Artisans have a wide range of opinions on how to choose your tools. Some feel the cheapest tools are good enough, while others feel only the most expensive tools are worth your time. I believe it’s better to have the right tool for the job, rather than trying to improvise with the wrong tool. If that means you have to buy the cheapest one because your budget is small, so be it. Better to pound in a nail with a cheap hammer than the end of your cordless drill.
When you are building your tool collection, you will most likely feel tempted to buy all sorts of tools you see in the store or read about. If you wish to “audition” a tool to figure out whether it deserves a place in your toolbox, buy the cheapest version that will get the job down. If you use it to the point where it wears down and falls apart, you know it will be worth it to invest in a more expensive and higher quality version. You will also learn why it is a cheap version and which features and specifications to look for in your next purchase. If, however, that cheap tool sits around in your tool box for a year, unused, than you can feel good that you did not spend a lot of money on a tool which you don’t actually need.
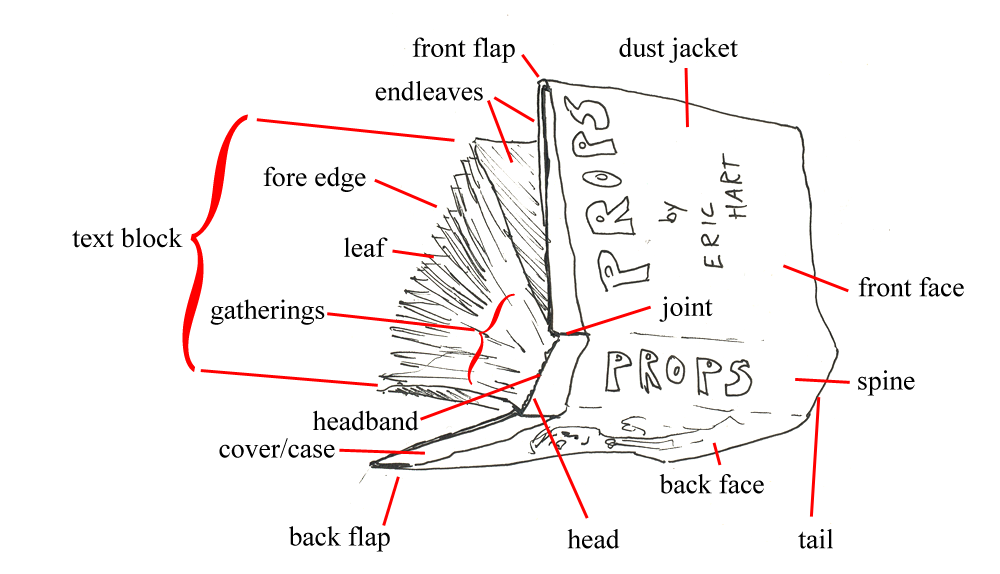
For long-term fans of my blog, you may have picked up that I am working on a book about props. It will be an expanded treatment of the paper I presented at the SETC Symposium in 2009, essentially setting forth a “scientific method” to approach the construction of any type of prop. It’s going to be a lot more fun than that sounds. To get in the spirit of things, here is a diagram and definitions of the various parts of a book.
Diagram of the parts of a book
text block – Everything between the covers.
front flap – The section of the dust jacket on the front of the book which is folded so it sits inside the cover.
endleaves – Two or more leaves at the front and back between the cover and the text block.
fore edge – The side of the book opposite the spine.
leaf – A single sheet of paper is a leaf, and each side is a page. The front page is known as the Obverse or Recto, while the back page is the Reverse or Verso.
gatherings – A group of leaves formed by folding a single sheet of paper. The text block is made of a series of gatherings.
headband – The narrow cloth band on the top and bottom of the spine. In hand-sewn books, it is functional and adds strength, in machine-bound books it is decorative.
cover/case – Whatever covers the text block. It consists of the cover panels and cover spine.
back flap – Like the front flap, but in the back.
dust jacket – Books used to have these to protect the covers. Of course that was before they had dust repellent paper.
front face – The front section of the dust jacket. The portion of the cover underneath is the front cover panel.
joint – Where the cover panels meet the cover spine.
spine – The back part of the cover where the text block is attached. It’s what you see when books are on a bookcase.
back face – The back section of the dust jacket. The portion of the cover underneath is the back cover panel.
Some may question whether masks are actually props. Often they are considered costumes, and in some cases, they can be considered a completely separate department. However, I feel that because they are physical objects of the theatre, they are worth investigating for historical purposes. In Ancient Greek theatre, the mask-makers were the same craftsmen who would make other theatrical props called for in the show (read my article on Ancient Greek Theatre props for more information), and it is not implausible to believe that such was the case in other theatrical traditions.
I would like to add one further caveat as well before continuing. Masks were used in many early societies as parts of rituals. Ancient Greek theatre rose out of such rituals, and many other early rituals evolved into forms of theatre as well. While rituals are not theatre per say, they can be considered part of the theatrical tradition. In any event, masks and mask-makers may be viewed as the earliest predecessors of props and prop artisans.
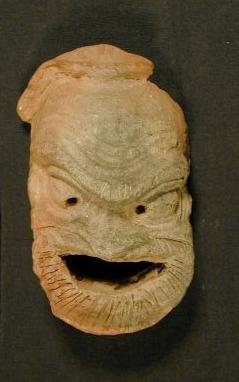
Though no Greek theatre masks have survived to the modern day, we have some examples of Roman New Comedy masks which have evolved out of the Greek tradition.
Terracotta mask from 395BCE-332BCE
Many early theatre traditions made masks out of leather or hide, and included feathers and fur as decorations. While clay and stone masks may been less prevalent, they are the only kinds which have survived, as anything organic has long since decomposed.
Preceding the Greeks were the Ancient Egyptians. Here we see a ceramic Anubis mask, one of the only surviving helmet masks from Egypt.
Ceramic Anubis mask
Currently held in the Hildesheim Pelizaeus-Museum, the mask weighs about 17 pounds and is believed to date from about 600BCE. Notice the two holes below the head; these are eye-holes for the priest who wore it. Unlike the Roman mask above, this mask was used in a more ceremonial rather than theatrical purpose.
One of the oldest masks believed to be in existence is this stone mask from the neolithic period.
One way to begin with a carpentry project is to make a cut list. You break apart the drawing into all the parts, figure out the measurements for each of those parts, and draw up a list of how big each piece should be. Perhaps the most common error in developing a cut list is neglecting the thickness of the pieces. Let’s say you want to build a cube which is one foot on each side. A perfect cube. A solid cube will be built with six pieces of wood. For this exercise, let us say you will build it with scraps of ¾†plywood you have laying around the shop. If you make a drawing of a cube, you may assume you need to cut six pieces one foot long and one foot wide.
A one-foot cube
Wrong!
Let’s look at the drawing again.
The top and the bottom can be one foot by one foot. However, if you make the front and the back one foot by one foot, the cube will end up being one foot by one foot, one and a half inches. See? You need to subtract the thickness of both the top and bottom from the length of the front and the back. In this case, ¾†and ¾†is an inch and a half, so the length of the front and the back would be 10 ½ inches. The width remains one foot.
Revised drawing showing thicknesses
The sides need the thicknesses of the materials taken away from both the length and the width. In other words, it will be 10 ½†by 10 ½â€. So our final cut list looks like this:
2 pieces at 1′-0†x 1′-0â€
2 pieces at 10 ½†x 1′-0â€
2 pieces at 10 ½†x 10 ½â€
At this point I wish to add a caveat. Plywood does not come in exact measurements. While it is sold as ¾†thickness (or ½†or what have you), the actual measurements vary. Three quarter inch construction plywood is actually 23/32â€. In some cases, you may not care about a thirty-second of an inch difference, though in others you may. One sure-proof method for accounting for the actual thicknesses of materials is to hold two pieces on the piece you are measuring and make your mark using them as a guide.
An easy way to account for thicknesses
Now, in props, there is no reason to try and create a cut list for all the parts at the beginning before you begin working. Sometimes, it is nearly impossible to do all the math to discern the measurements of every single piece. Other times, you need to build a section and look at it so you can visualize the next portion of what you are building. It is not always necessary to have a project completely mapped out in your head at the outset, because better solutions may become apparent as the prop comes into being.
I’ve posted before about the importance of precision in cut lists. You will also find a link to a wonderful series at Popular Woodworking which has a more in-depth look at cut lists.
I’m still catching up with a lot of things; you may have noticed Monday’s post did not appear until Tuesday. First up, I want to mention that Puppet Kitchen will be giving a live chat interview today at Theatre Face, starting at 2pm (E.S.T.). We’ve worked with them together and individually on a number of projects here at the Public, like The Bacchae and Hamlet, and will be joining them again on our upcoming production of Compulsion. Check it out!
Here are a few links to help you make it through the week:
The Replica Prop Forum is posting a three-part interview with John Dykstra, perhaps best known for creating the visual effects on a little film called Star Wars.
The LA Times’ Hero Complex has an interview with Barry Wilkinson, prop master for all the Harry Potter films. He’s constructed over 500 magic wands just for the final film alone.