This was originally published in the February 1907 issue of Popular Mechanics. As such, it does not include over a hundred years of chair evolution. Still, it’s a good starting point for narrowing down what kind of chair your production needs.
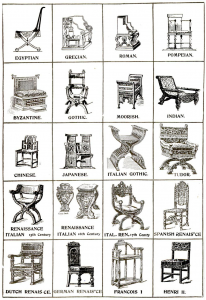
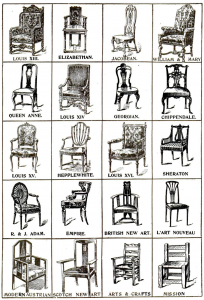
There are 40 distinct styles of chairs embracing the period from 3000 B.C. to 1900 A.D. — nearly 7,000 years. Of all the millions of chairs made during the centuries, each one can be classified under one or more of the 40 general styles shown in the chart. This chart was compiled by the editor of Decorative Furniture. The Colonial does not appear on the chart because it classifies under the Jacobean and other styles. A condensed key to the chart follows:

Egyptian — 3000 B.C. to 500 B.C. Seems to have been derived largely from the Early Asian. It influenced Assyrian and Greek decorations, and was used as a motif in some French Empire decoration. Not used in its entirety except for lodge rooms, etc.
Grecian — 700 B.C. to 200 B.C. Influenced by Egyptian and Assyrian styles. It had a progressive growth through the Doric, Ionic and Corinthian periods. It influenced the Roman style and the Pompeian, and all the Renaissance styles, and all styles following the Renaissance, and is still the most important factor in decorations today.
Roman — 750 B.C. to 450 A.D. Rome took her art entirely from Greece, and the Roman is purely a Greek development. The Roman style “revived” in the Renaissance, and in this way is still a prominent factor in modern decoration.
Pompeian — 100 B.C. to 79 A.D. Sometimes called the Grecian-Roman style, which well describes its components. The style we know as Greek was the Greek as used in public structures. The Pompeian is our best idea of Greek domestic decoration. Pompeii was long buried, but when rediscovered it promptly influenced all European styles, including Louis XVI, and the various Georgian styles.
Byzantine — 300 A.D. to 1450 A.D. The “Eastern Roman” style, originating in the removal of the capital of the Roman Empire to Constantinople (then called Byzantium). It is a combination of Persian and Roman. It influenced the various Moorish, Sacracenic and other Mohammedan styles.
Gothic — 1100 to 1550. It had nothing to do with the Goths, but was a local European outgrowth of the Romanesque. It spread all over Europe, and reached its climax of development about 1550. It was on the Gothic construction that the Northern European and English Renaissance styles were grafted to form such styles as the Elizabethan, etc.
Moorish — 700 to 1600. The various Mohammedan styles can all be traced to the ancient Persian through the Byzantine. The Moorish or Moresque was the form taken by the Mohammedans in Spain.
Indian — 2000 B.C. to 1906 A.D. The East Indian style is almost composite, as expected of one with a growth of nearly 4,000 years. It has been influenced repeatedly by outside forces and various religious invasions, and has, in turn, influenced other far Eastern styles.
Chinese — 3500 B.C. to 1906 A.D. Another of the ancient styles. It had a continuous growth up to 230 B.C., since when it has not changed much. It has influenced Western styles, as in the Chippendale, Queen Anne, etc.
Japanese — 1200 B.C. to 1906 A.D. A style probably springing originally from China, but now absolutely distinct. It has influenced recent art in Europe and America, especially the “New Art” styles.
Italian Gothic — 1100 to 1500. The Italian Gothic differs from the European and English Gothic in clinging more closely to the Romanesque-Byzantine originals.
Tudor — 1485 to 1558. The earliest entry of the Renaissance into England. An application of Renaissance to the Gothic foundations. Its growth was into the Elizabethan.
Italian Renaissance, Fifteenth Century — 1400 to 1500. The birth century of the Renaissance. A seeking for revival of the old Roman and Greek decorative and constructive forms.
Italian Renaissance, Sixteenth Century — 1500 to 1600. A period of greater elaboration of detail and more freedom from actual Greek and Roman models.
Italian Renaissance, Seventeenth Century — 1600 to 1700. The period of great elaboration and beginning of reckless ornamentation.
Spanish Renaissance — 1500 to 1700. A variation of the Renaissance spirit caused by the combination of three distinct styles—the Renaissance as known in Italy, the Gothic and the Moorish. In furniture the Spanish Renaissance is almost identical with the Flemish, which it influenced.
Dutch Renaissance — 1500 to 1700. A style influenced alternately by the French and the Spanish. This style and the Flemish had a strong influence on the English William and Mary and Queen Anne styles, and especially on the Jacobean.
German Renaissance — 1550 to 1700. A style introduced by Germans who had gone to Italy to study. It was a heavy treatment of the Renaissance spirit, and merged into the German Baroque about 1700.
Francis I — 1515 to 1549. The introductory period when the Italian Renaissance found foothold in France. It is almost purely Italian, and was the forerunner of the Henri II.
Henri II — 1549 to 1610. In this the French Renaissance became differentiated from the Italian, assuming traits that were specifically French and that were emphasized in the next period.

Louis XIII — 1616 to 1643. A typically French style, in which but few traces of its derivation from the Italian remained. It was followed by the Louis XIV.
Elizabethan — 1558 to 1603. A compound style containing traces of the Gothic, much of the Tudor, some Dutch, Flemish and a little Italian. Especially noted for its fine wood carving.
Jacobean — 1603 to 1689. The English period immediately following the Elizabethan, and in most respects quite similar. The Dutch influence was, however, more prominent. The Cromwellian, which is included in this period, was identical with it.
William and Mary — 1689 to 1702. More Dutch influences. All furniture lighter and better suited to domestic purposes.
Queen Anne — 1702 to 1714. Increasing Dutch influences. Jacobean influence finally discarded. Chinese influence largely present.
Louis XIV — 1643 to 1715. The greatest French style. An entirely French creation, marked by elegance and dignity. Toward the end of the period it softened into the early Rococo.
Georgian — 1714 to 1820. A direct outgrowth of the Queen Anne, tempered by the prevailing French styles. It includes Chippendale, Hepplewhite and Sheraton, but these three great cabinetmakers were sufficiently distinct from the average Georgian to be worthy separate classification.
Chippendale — 1754 to 1800. The greatest English cabinet style. Based on the Queen Anne, but drawing largely from the Rococo, Chinese and Gothic, he produced three distinct types, viz.: French Chippendale, Chinese Chippendale and Gothic Chippendale. The last is a negligible quantity.
Louis XV — 1715 to 1774. The Rococo period. The result of the efforts of French designers to enliven the Louis XIV, and to evolve a new style out of one that had reached its logical climax.
Hepplewhite — 1775 to 1800. Succeeded Chippendale as the popular English cabinetmaker. By many he is considered his superior. His work is notable for a charming delicacy of line and design.
Louis XVI — 1774 to 1793. The French style based on a revival of Greek forms, and influenced by the discovery of the ruins of Pompeii.
Sheraton — 1775 to 1800. A fellow cabinetmaker, working at same time as Hepplewhite. One of the Colonial styles (Georgian).
R. & J. Adam — 1762 to 1800. Fathers of an English classic revival. Much like the French Louis XVI and Empire styles in many respects.
Empire — 1804 to 1814. The style created during the Empire of Napoleon I. Derived from classic Roman suggestions, with some Greek and Egyptian influences.
New Arts — 1900 to date. These are various worthy attempts by the designers of various nations to create a new style. Some of the results are good, and they are apt to be like the “little girl who had a little curl that hung in the middle of her forehead,” in that “when they are good they are very, very good, but when they are bad they are horrid.”


