This past summer, our production of The Grand Duchess of Gerolstein at the Santa Fe Opera had a lot of tricks. Like… a lot of them. One trick I worked on was a set of magically-appearing flags. The set had seven flag poles along one wall, and during one big moment of pomp and circumstance, the design team wanted flags to suddenly appear on them. The idea is kind of like those “bang” flags that pop out of guns in the cartoons.
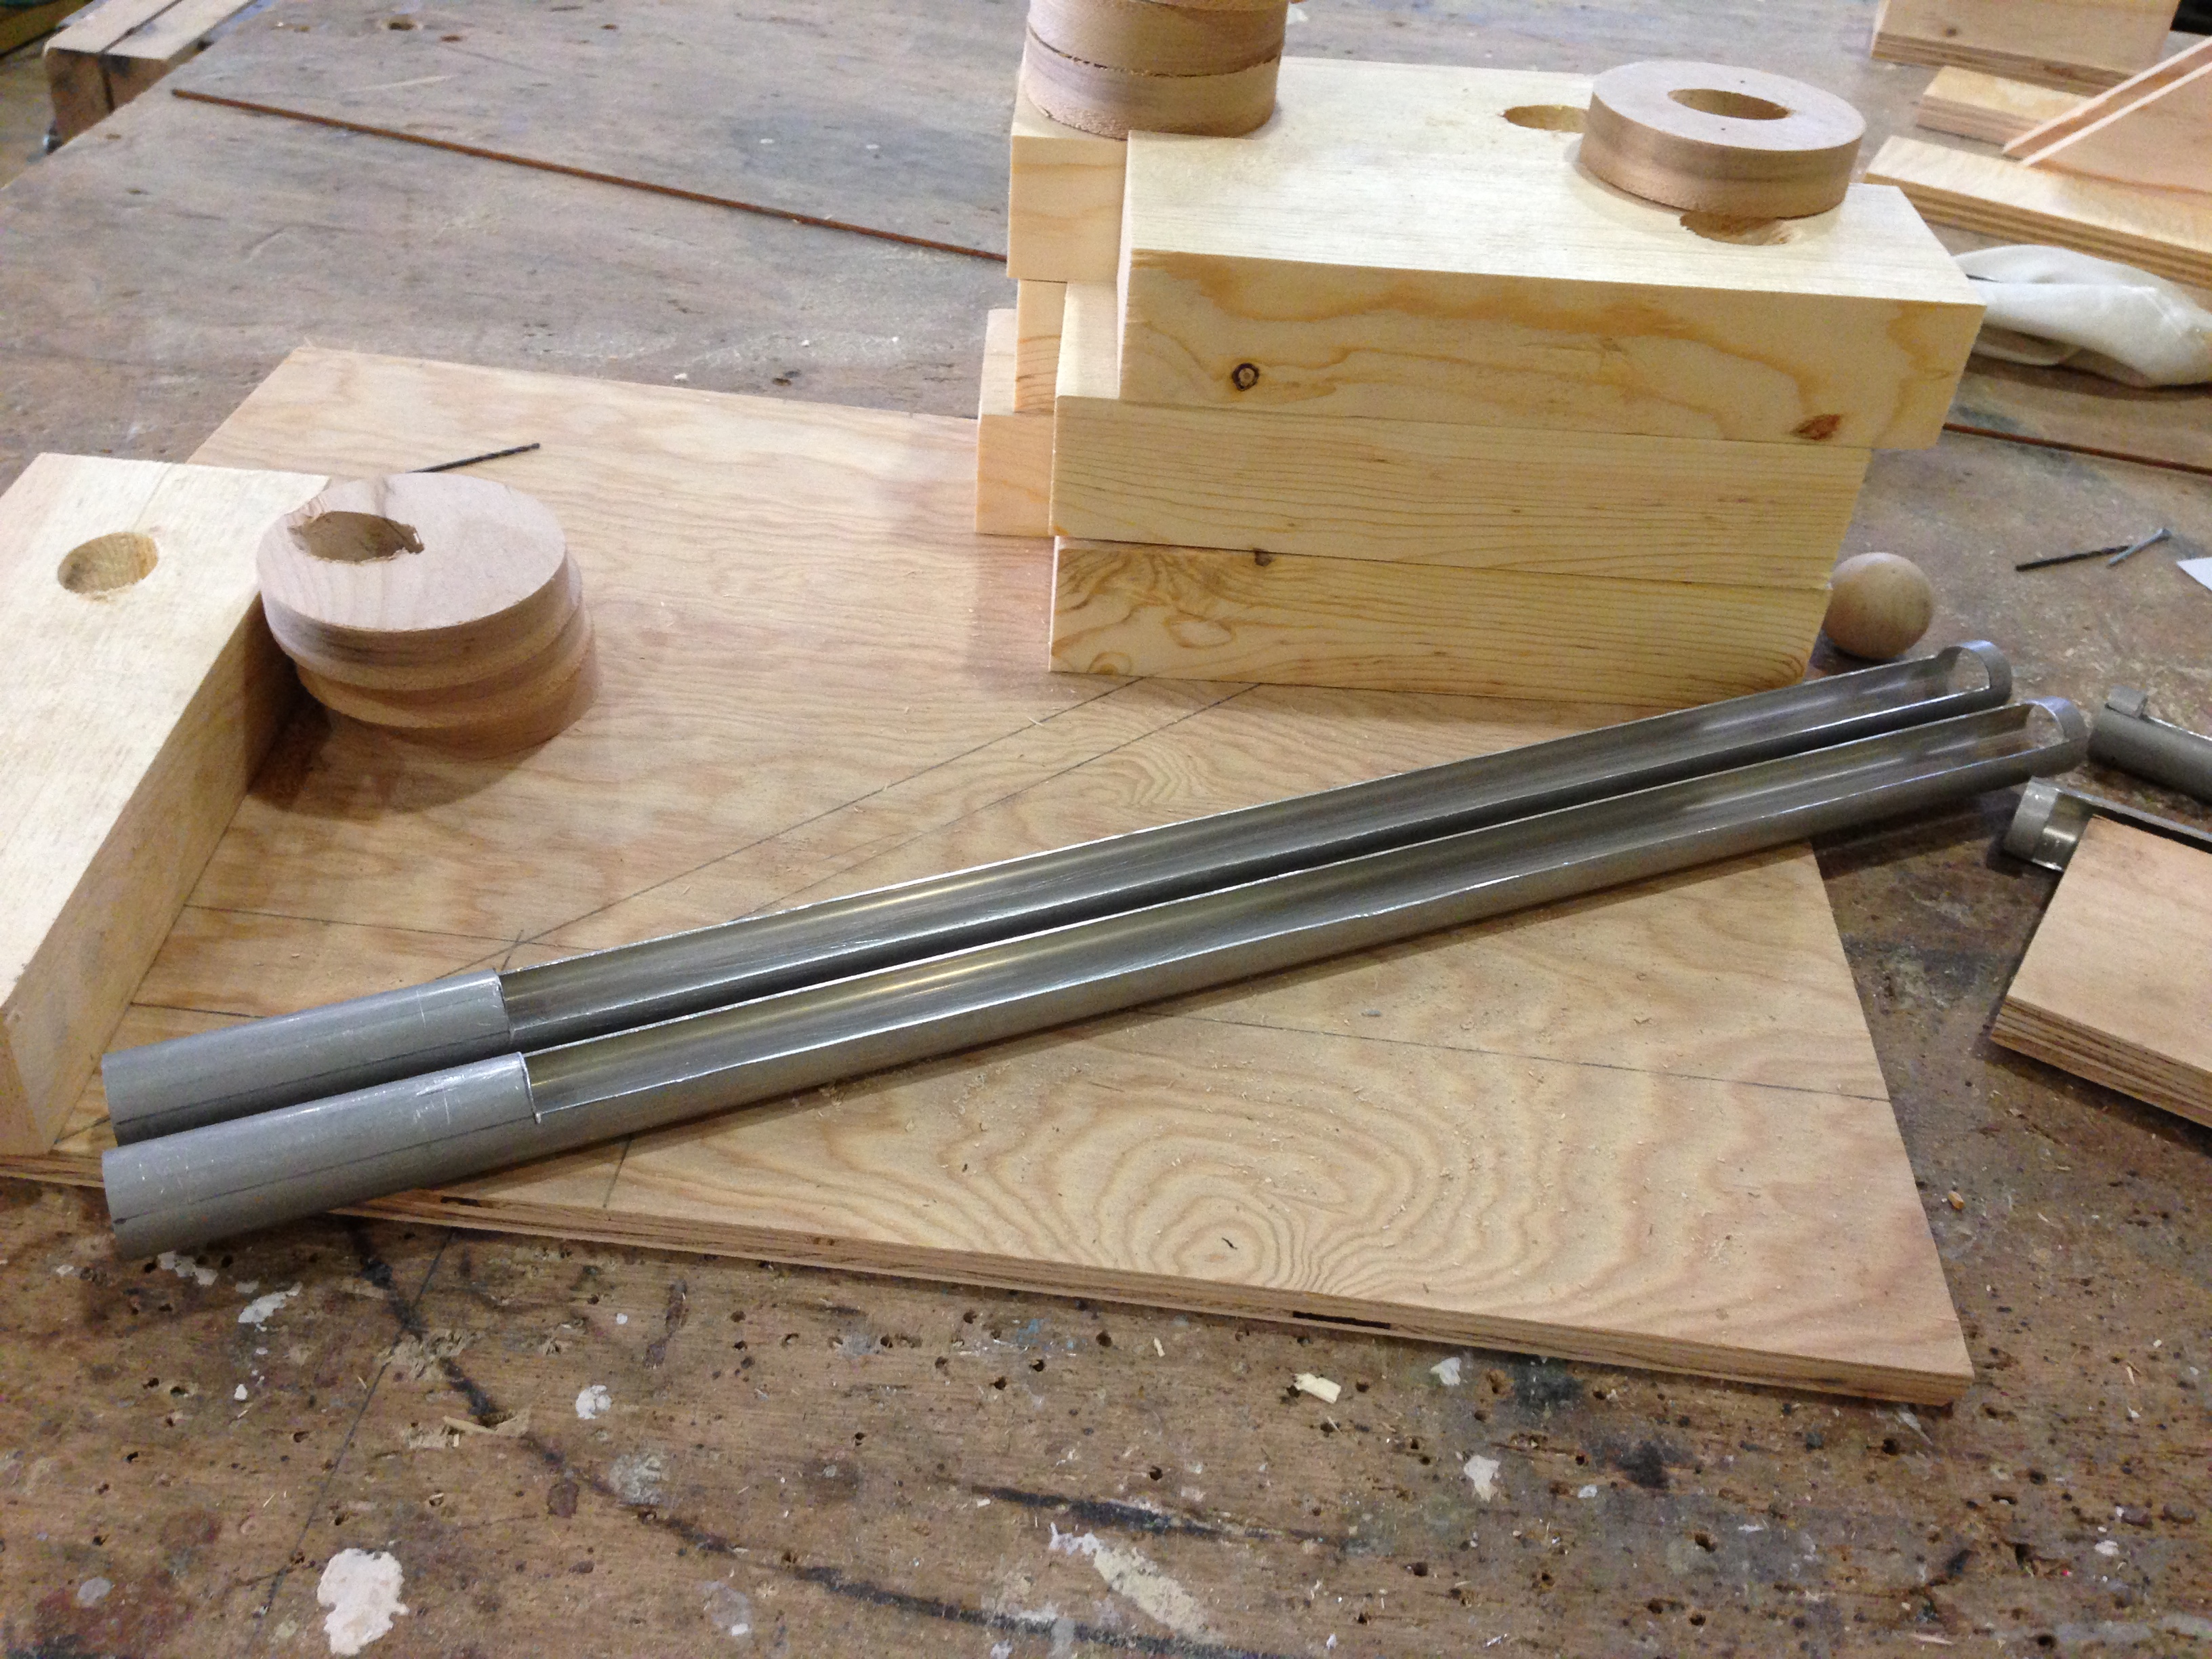
Flag tubes
The basic mechanism behind the trick is that each flagpole has a second pole which sleeves inside. The two poles have slightly less than half of their surface notched out, as you can see in the photo above. The outer pole is fixed in place on the set, while the inner pole can spin around inside. So you can spin the inner pole to a position where the whole flag pole looks like a solid rod, and the flag is trapped inside. Then when you spin the inner pole around so the notches line up, the flag is free to drop down.
You can watch it all in action in the video below. The video also shows how I rigged the tubes so they could be activated by pulling a string off-stage, since there was no room on set to activate them directly.
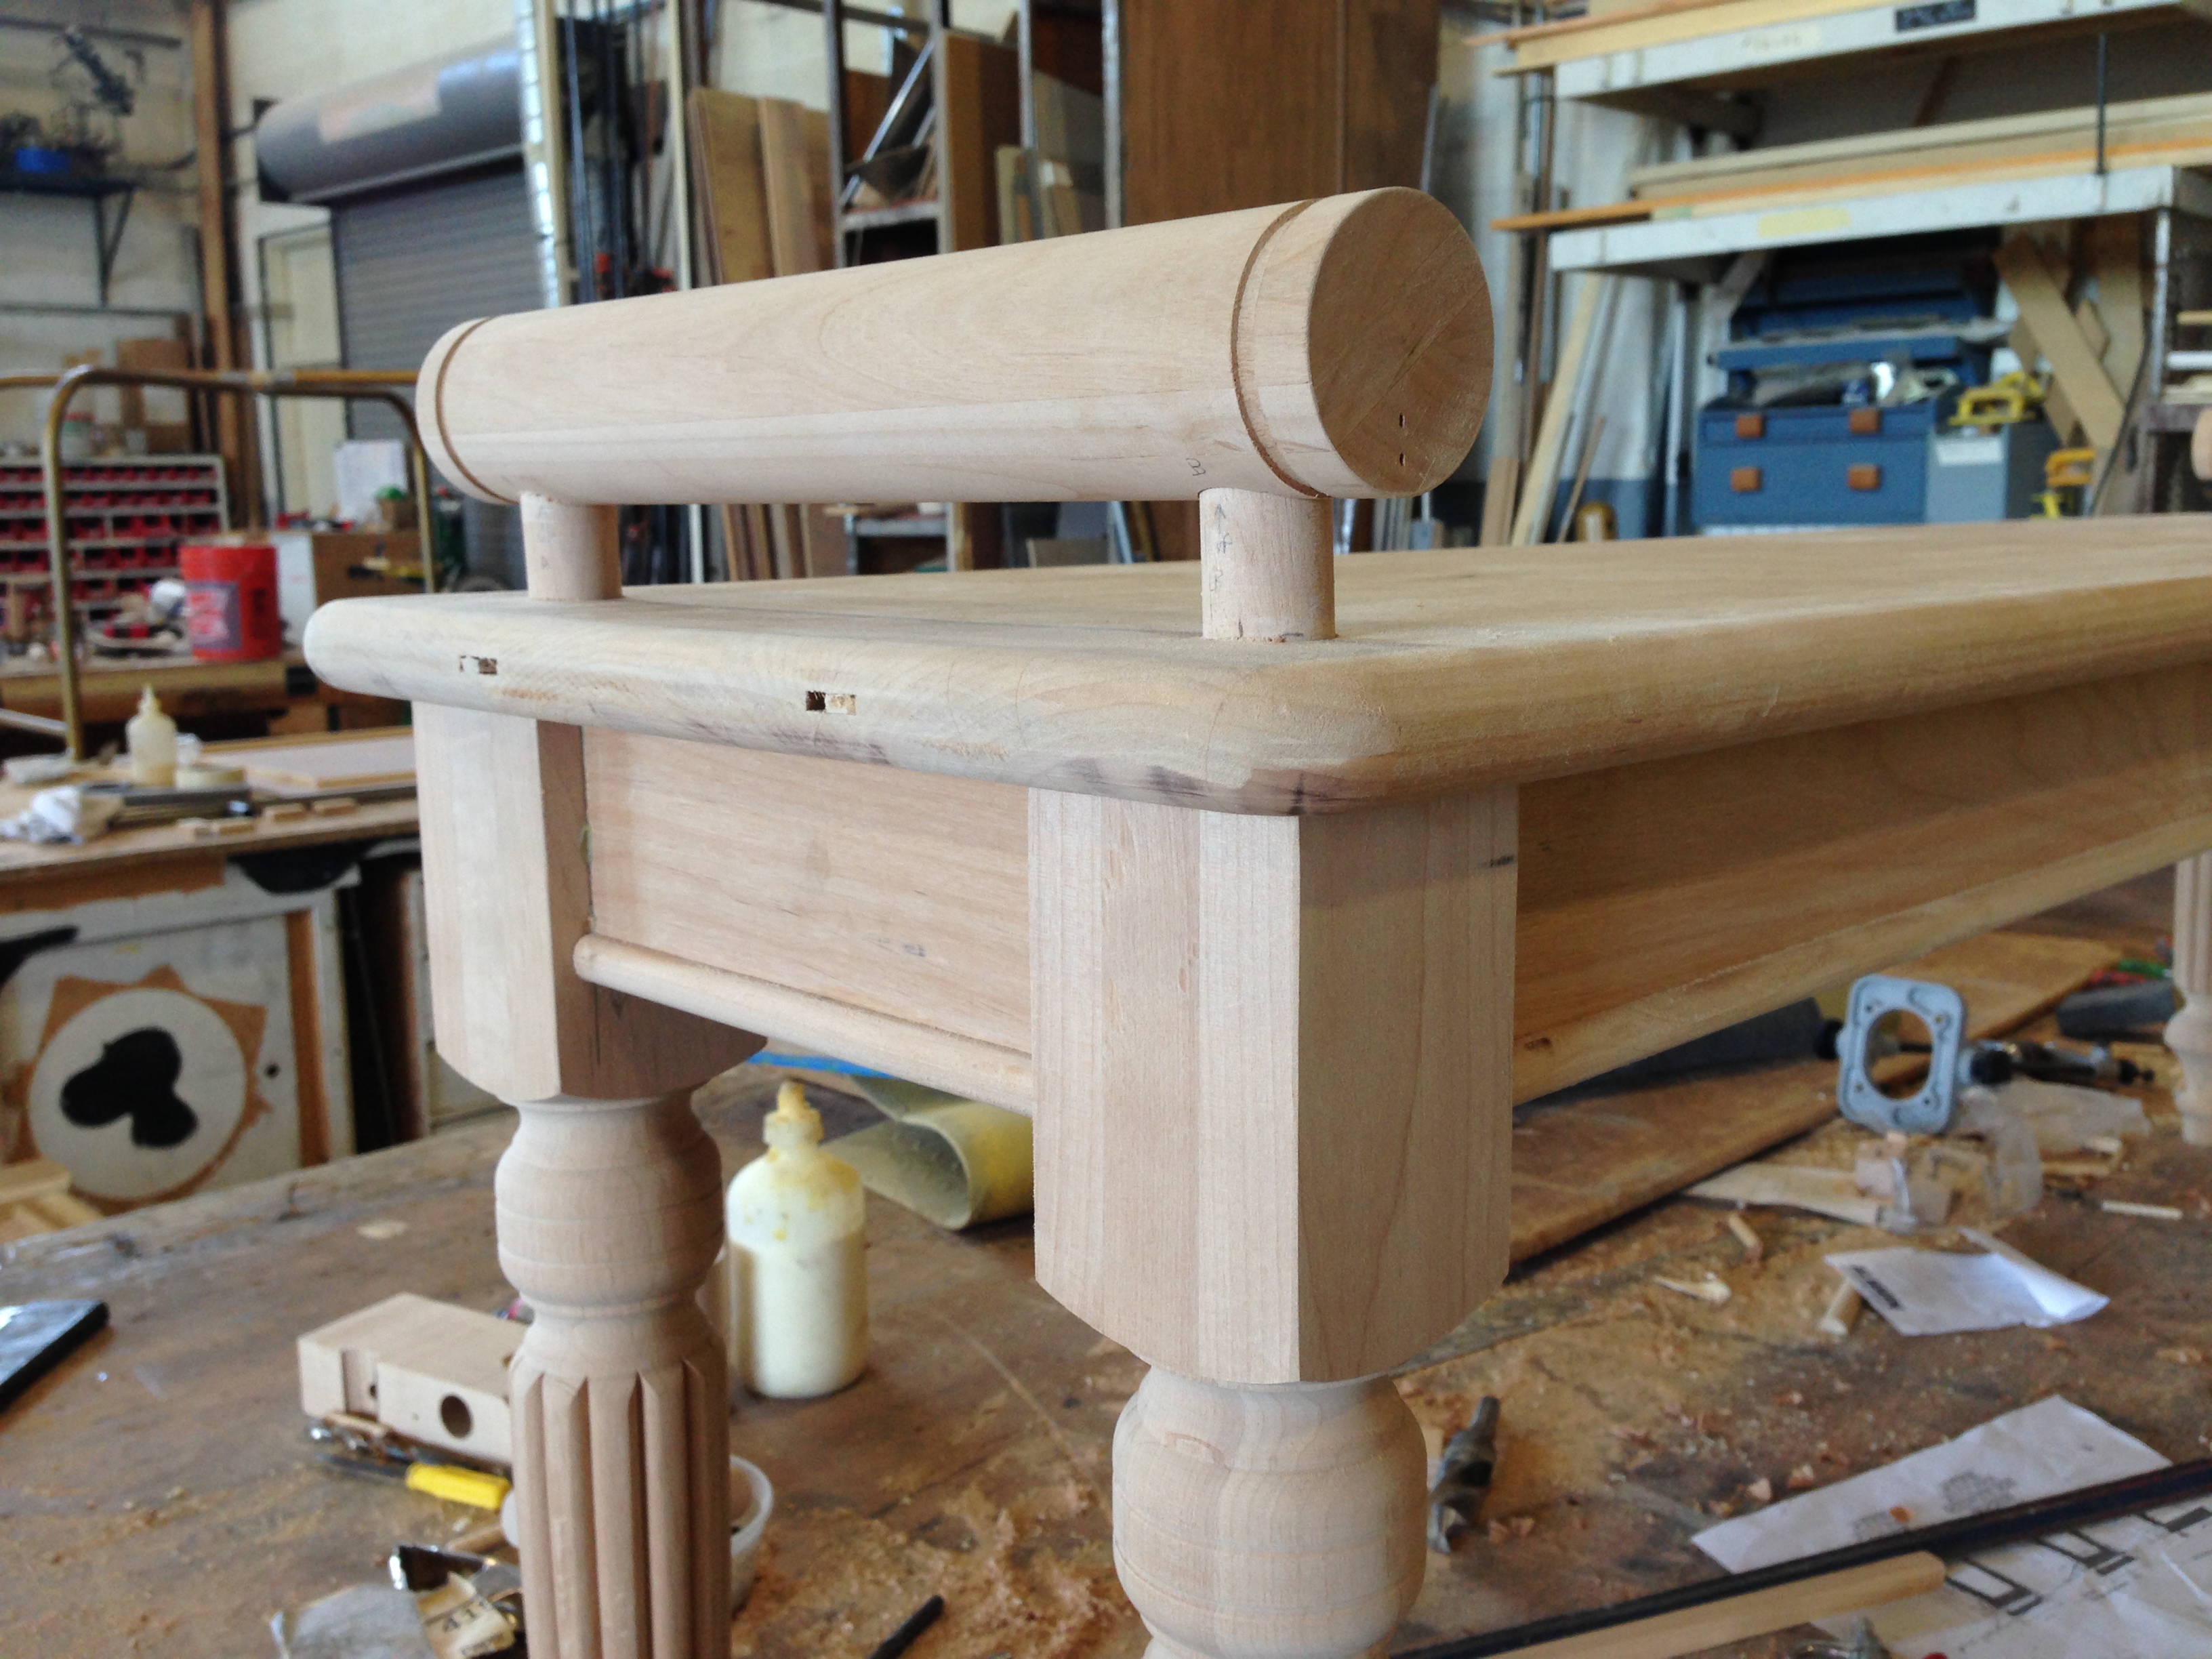
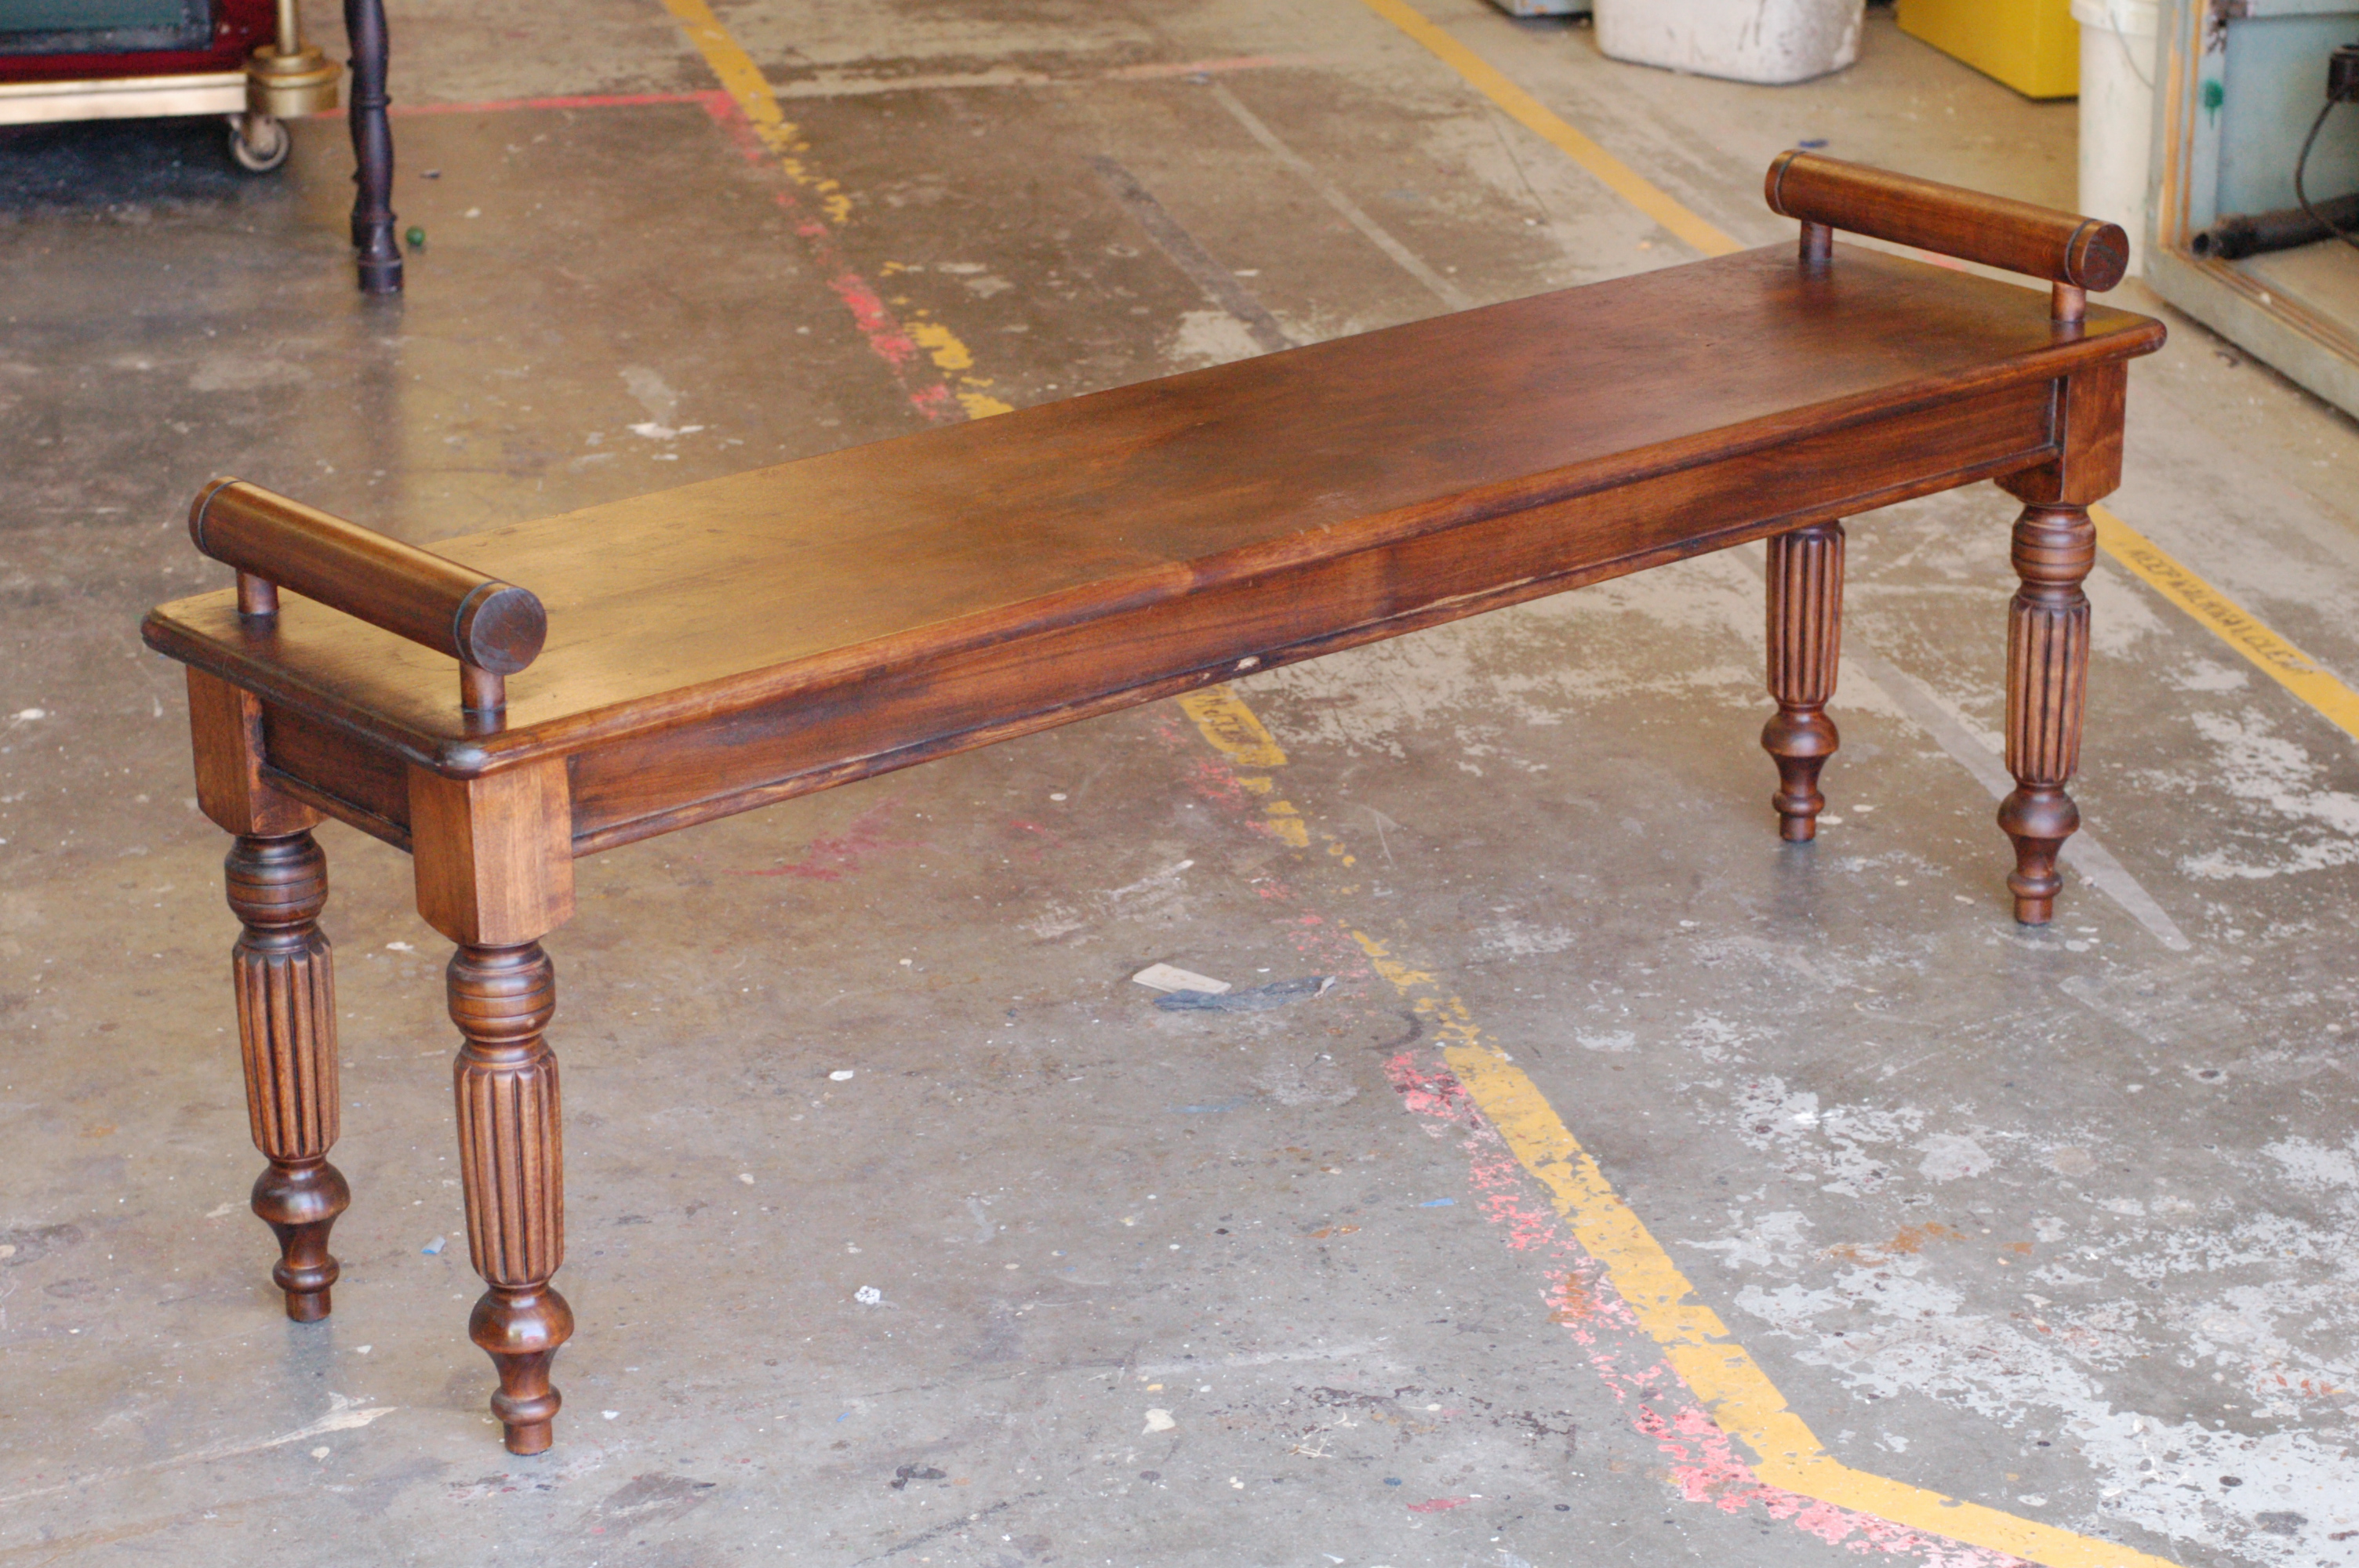
Our final opera at this past season of the Santa Fe Opera was “Oscar”, a world premiere based on Oscar Wilde. I made a bench for it. It was a simple bench, and the legs were purchased rather than made by us, but it was all solid alder wood, and the end result was quite attractive.
Gluing up the seat
I picked up a truckload of alder from the local lumber store, and planed and jointed some boards for the seat. The seat was a full inch thick, so it was quite hefty. After gluing them together, I rounded off the corners and routed a round-over along the whole circumference.
Hole-drilling jig
The trickiest part were the bars on either side which stood on top of the seat. I turned them out of the same alder I had bought. I then constructed a jig for drilling the holes. The jig allowed me to drill the hole exactly perpendicular to the bar, as well as to place the hole directly in the center (width-wise) of the bar. I also marked the bars so I could drill both holes along the same line.
Attaching the side bar
Next, I had to line up the holes on the bars with the holes on the seat. The dowels connecting the bars to the bench were also turned by me out of alder. They ran through the top into the legs, so you could pick the bench up by the bars very securely.
For an extra touch, I fabricated the half-round molding along the bottom of the apron from the same alder I used on the rest of the bench. Since the legs we bought were also alder, this meant the entire bench was solid alder, and it would have a consistent appearance when stained.
Bench from “Oscar”
The final bench was stained by our paint department; I had actually constructed two (the one above and a much longer one), but the second one was cut. Again, it was fairly simple, and the legs were not turned by me, but working in solid wood is always fun and interesting.
In previous posts, I showed off some foam cannon barrels I built and some giant champagne bottles I helped work on for the Santa Fe Opera. I also built the four carriages they rode around on.
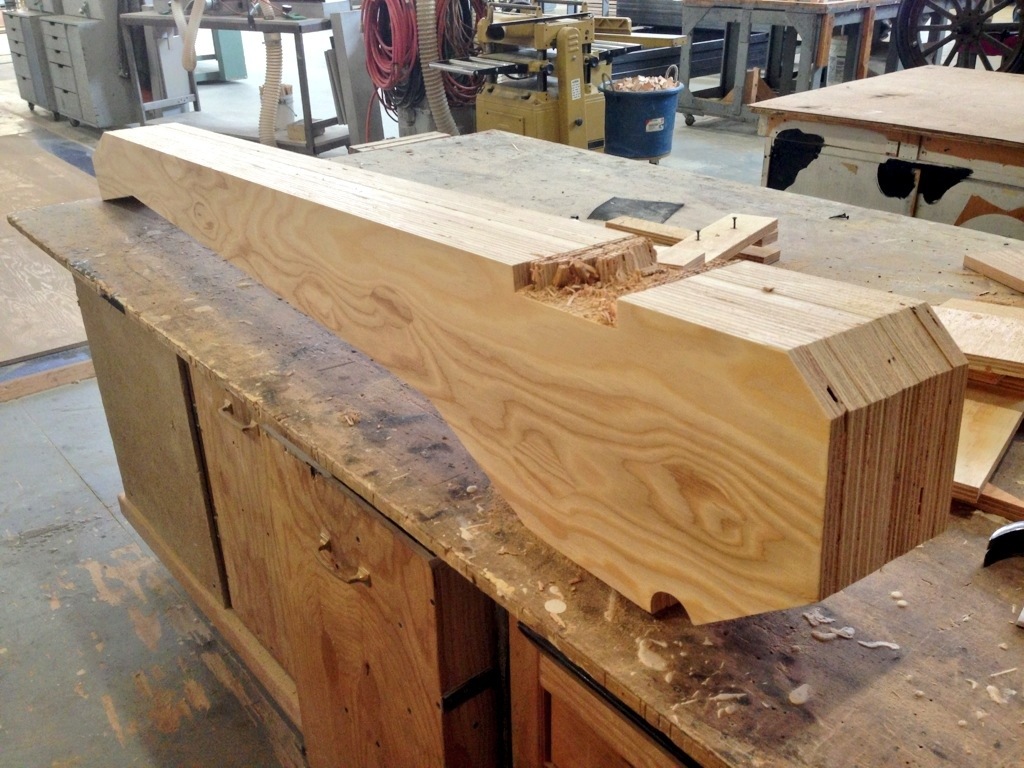
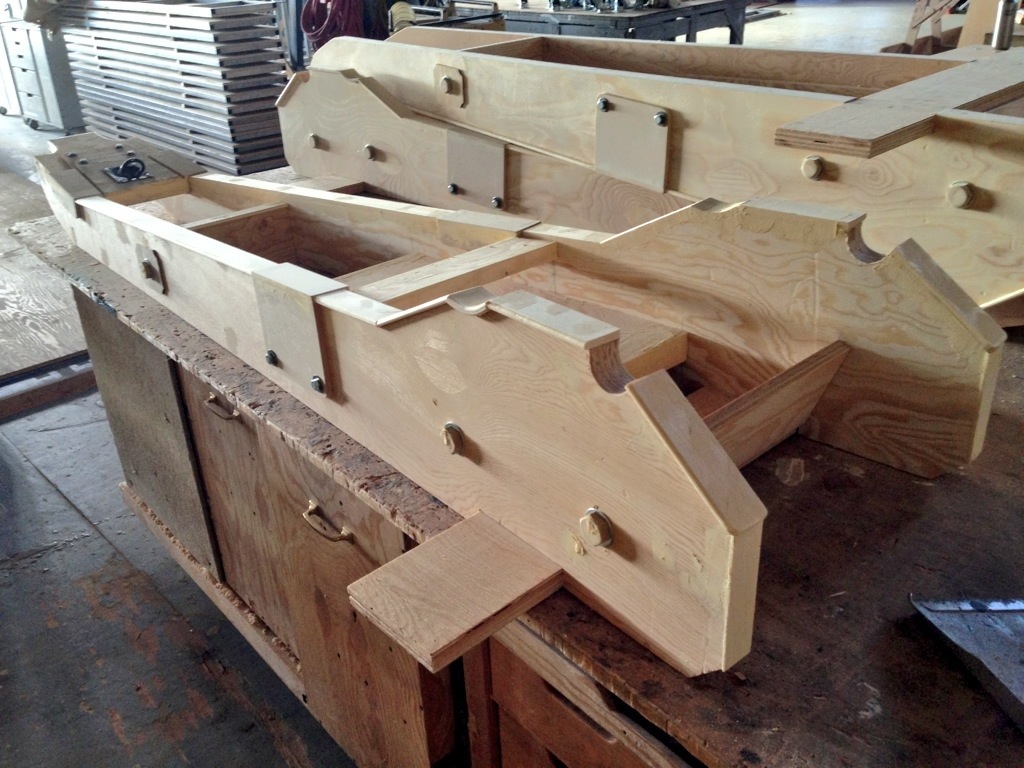
Cutting the shape
The main beams of the bases were cut out of plywood. I drew out a full-scale pattern for one of them and cut it out, then transferred it to all the pieces of plywood and cut those out to match. The bottom needed a square notch to hold the axle assembly, and it needed to be in the exact same location on all the pieces so the wheels would sit straight, so I attached all the pieces together and cut the notch out on all of them at once.
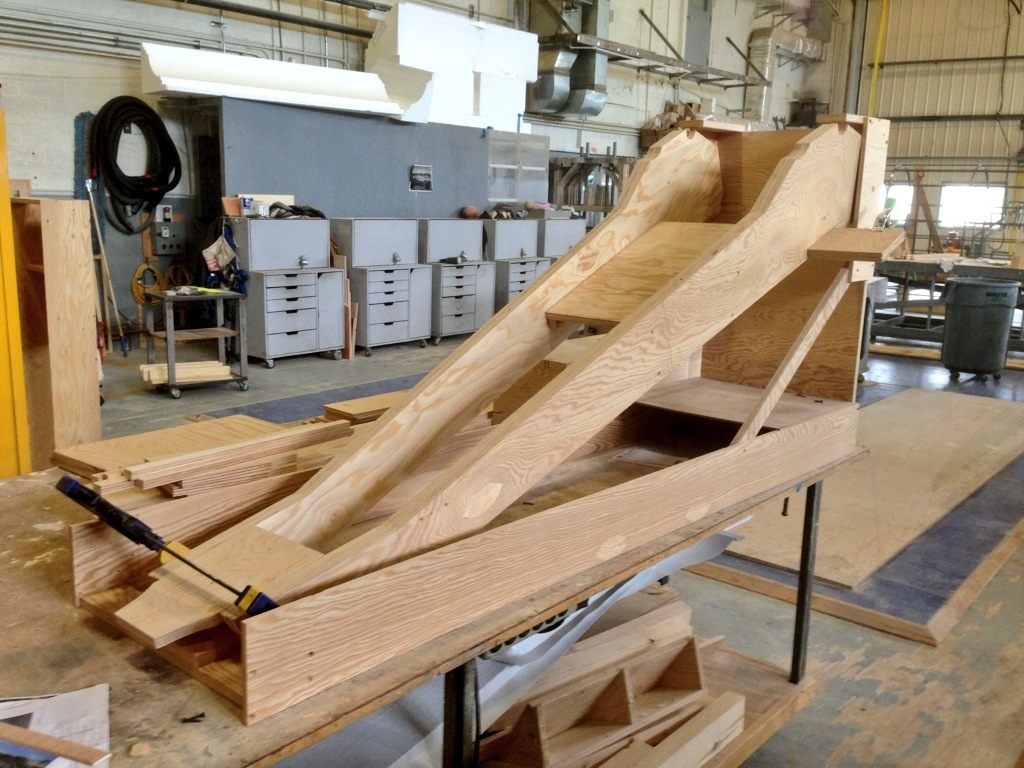
Assembling in the jig
Next I built a jig to hold the beams. They sat at an angle and tapered out at the top. While in place, I measured and cut the cross pieces to fit exactly. This part took awhile to get perfectly correct, but once I had the pieces for one of them, I could just duplicate them for the other three carriages.
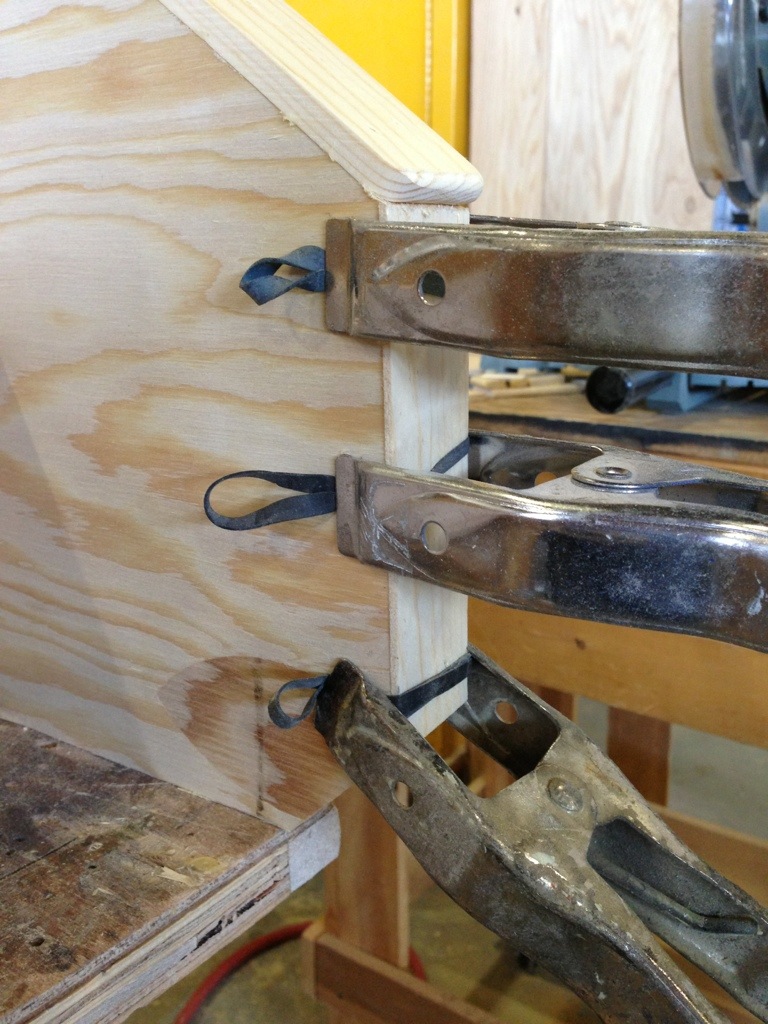
Attaching the facing
The carriages wanted to look like cast iron, so I faced all the edges with some strips of wood that were a little wider than the bases and rounded over on the ends. This gave it that look you might find on I-beams or similar pieces of metal. The photograph above shows a trick I read about that I wanted to try out: clamping a long strip of wood using rubber bands and spring clamps. It was not as effortless as I thought it would be, but it was a better clamping method than anything else I’ve used in the past.
Adding details
With the major structure in place, I began adding details, like bolt heads and plates. These were all applied pieces; I cut and shaped the larger bolt heads out of MDF, while the smaller bolt heads were just short lag bolts that I screwed in.
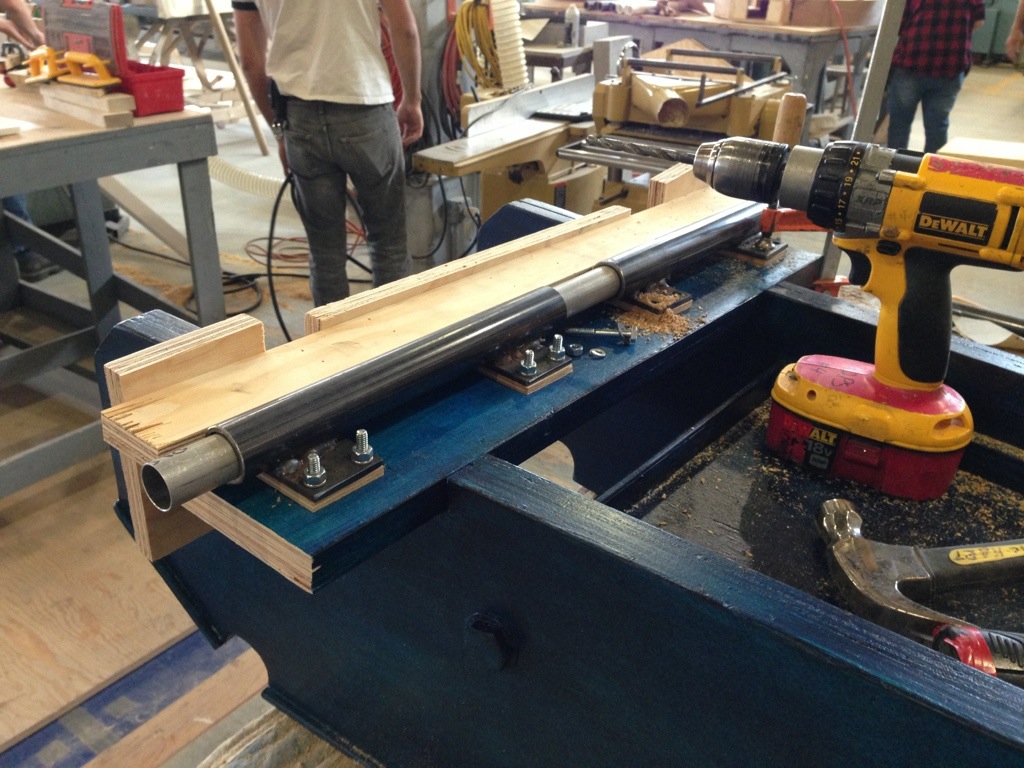
Positioning the axles
The wheels we used were bought from a place that makes wooden carriage wheels; I’ve made wheels in the past, but it’s very time-consuming, and hard to make them as strong as a legit wooden wheel. I attached a pipe to each of the wheels as an axle, and found a slightly larger pipe that could sleeve over them. I welded this larger pipe to some plates so I could bolt it to the carriage. In the photo above, you can see the axle pipe is in two sections. When building a carriage like this, you need the wheels to be able to spin independently of each other, because when you make turns, they spin at different speeds. The long aluminum pipe going through both larger pipes in the photograph was used to line them up with each other while attaching them.
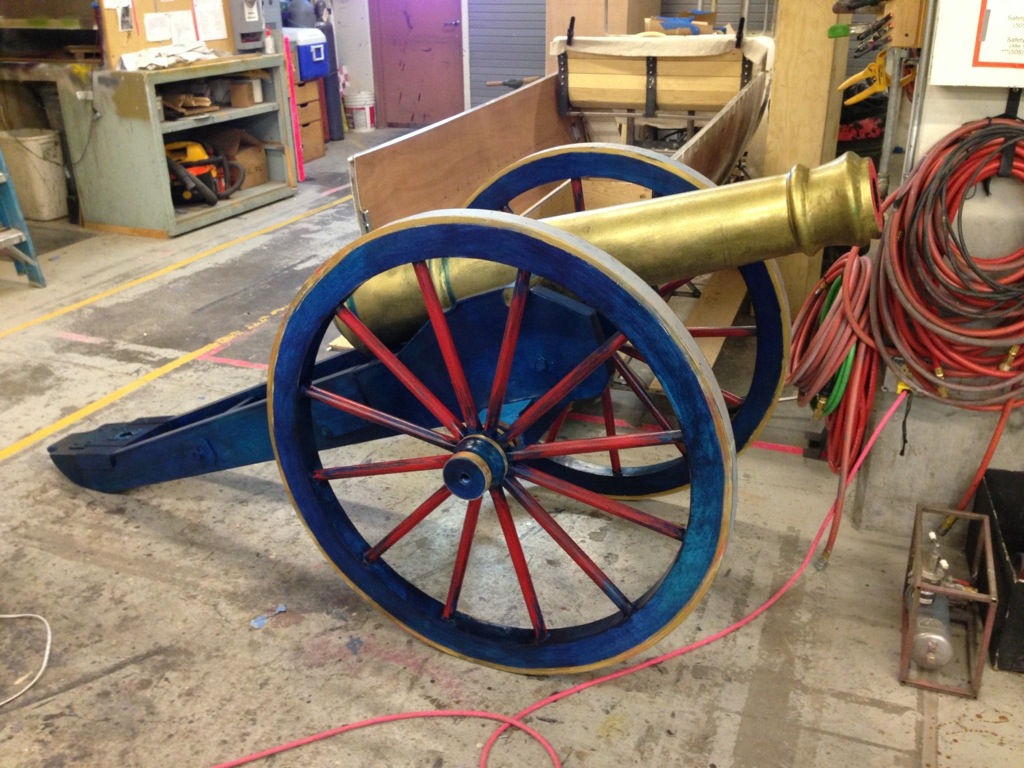
The whole thing got a pretty interesting paint treatment by the paint crew. Overall, it was a very fun project that saw a lot of stage time during the performance. It was also interesting to compare it to the previous cannon I have built, which could not be more different than this one both in appearance and in methods of construction.
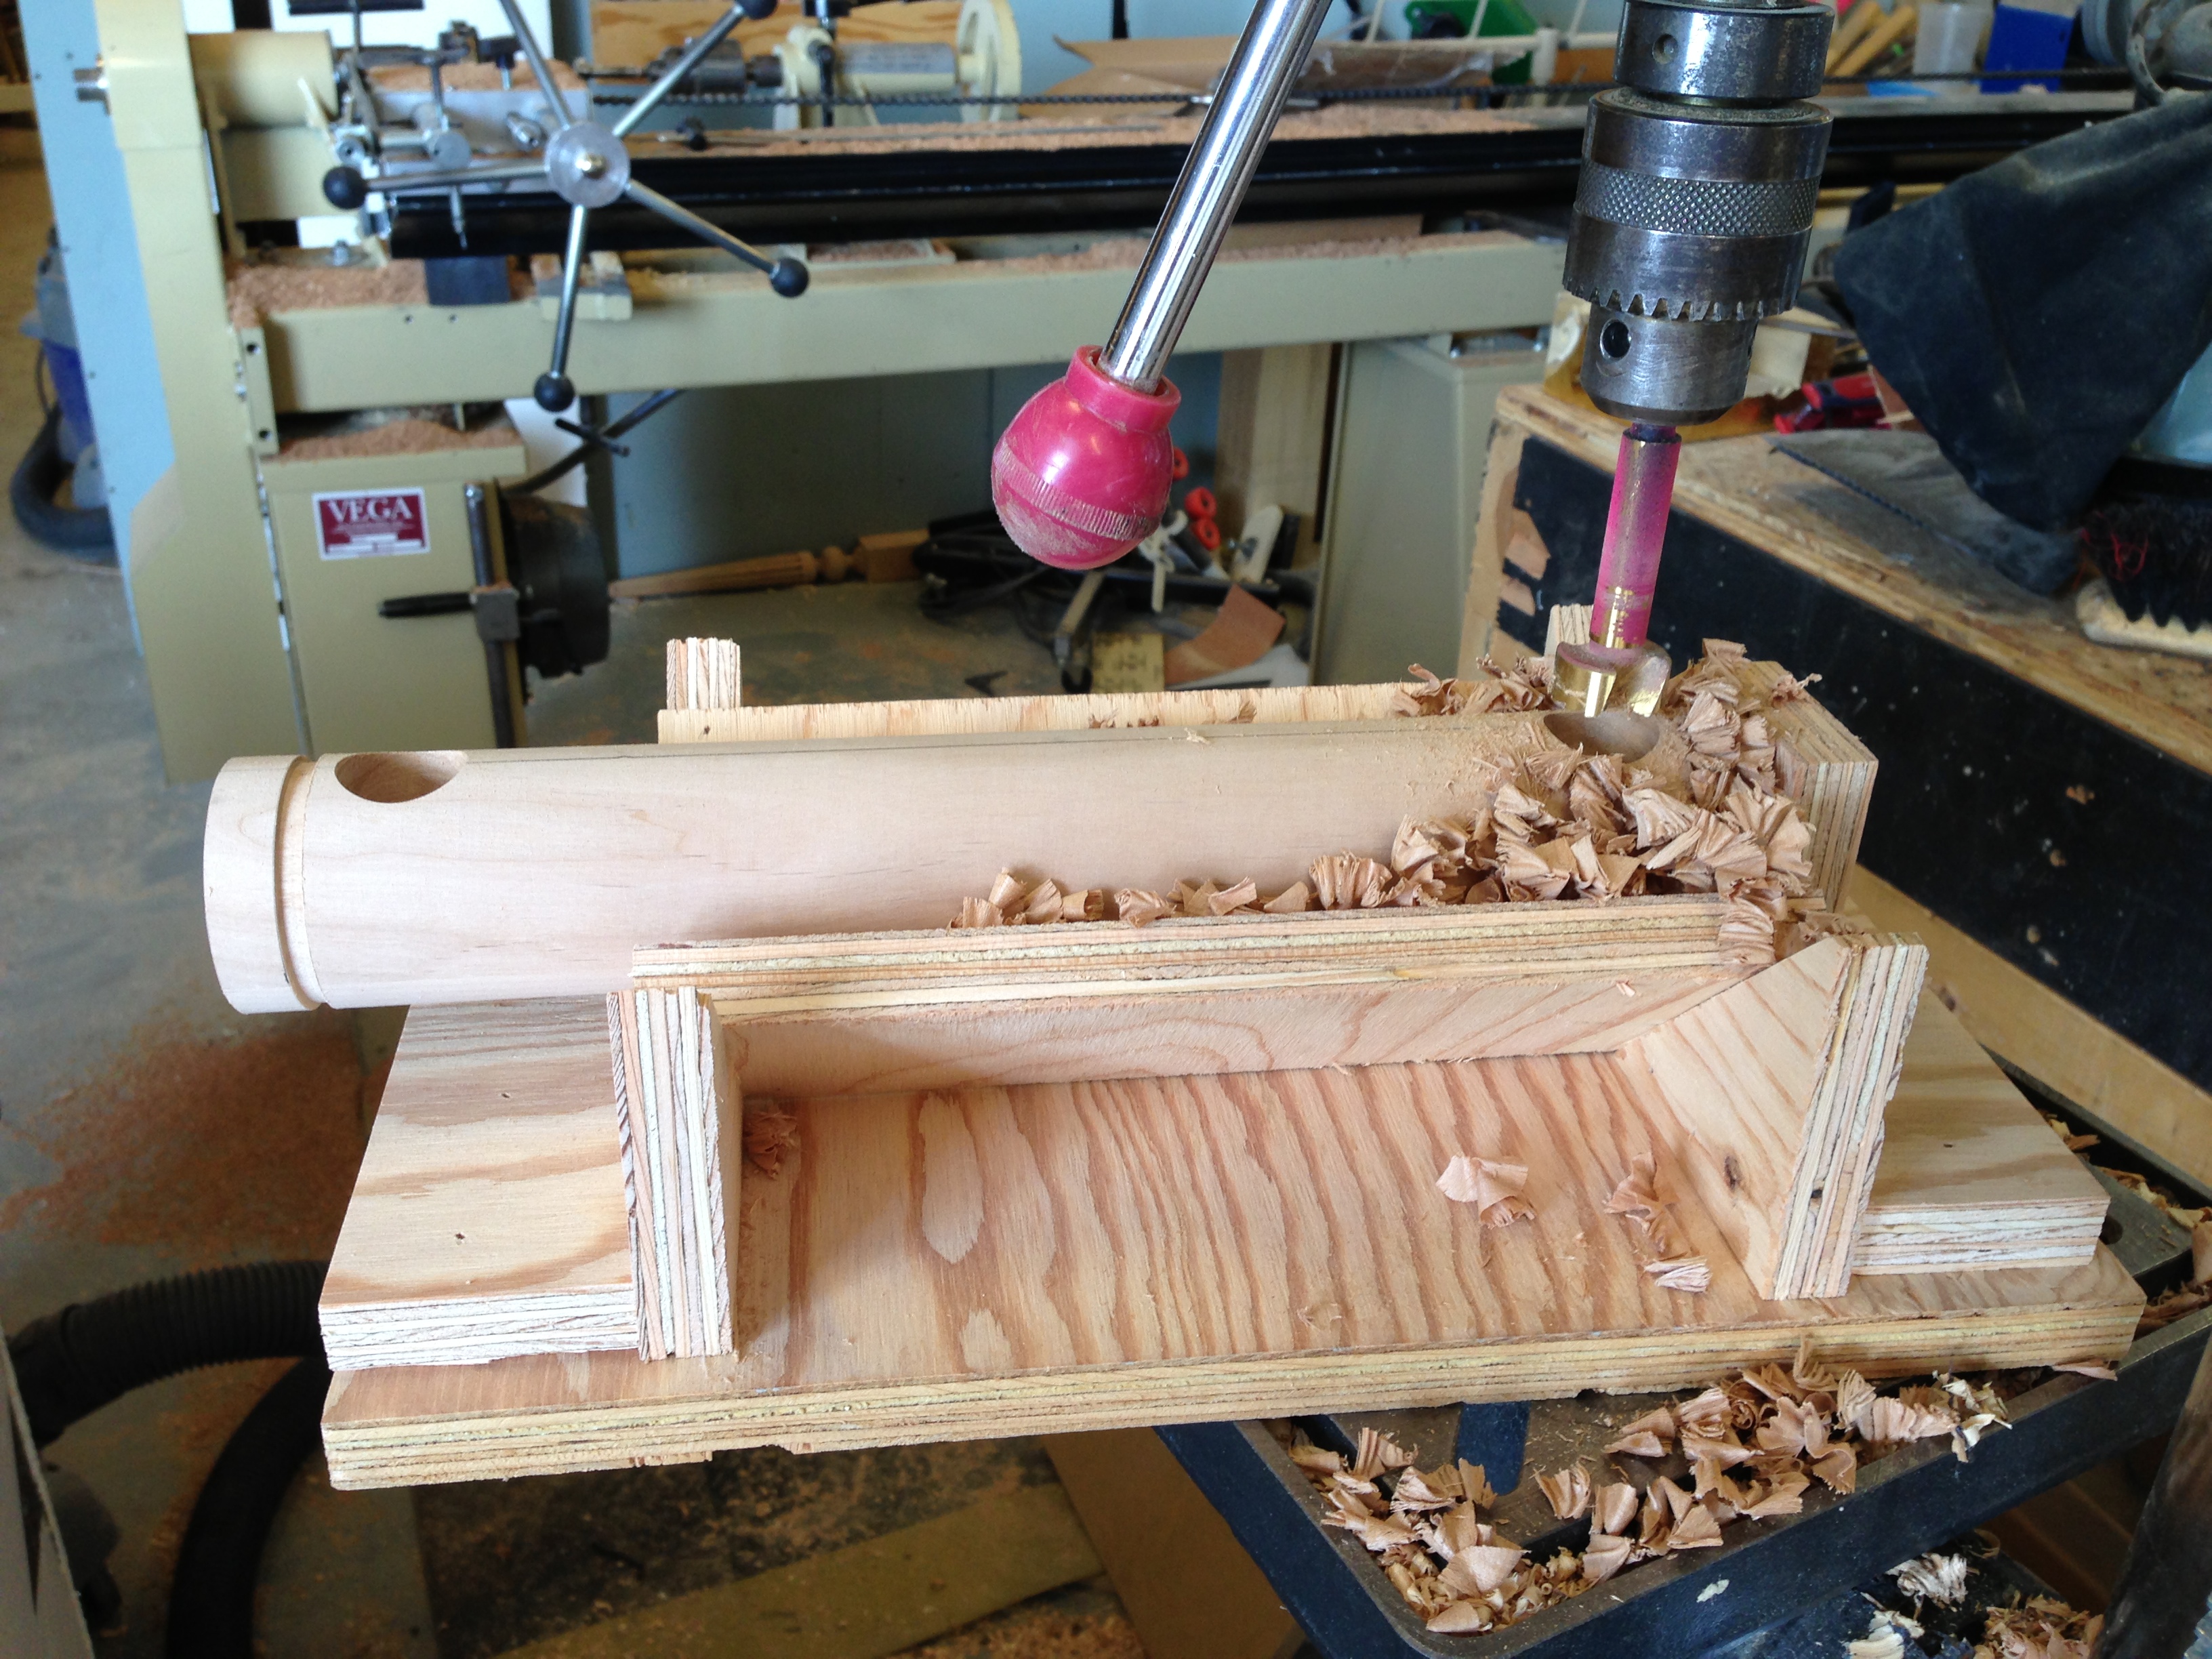
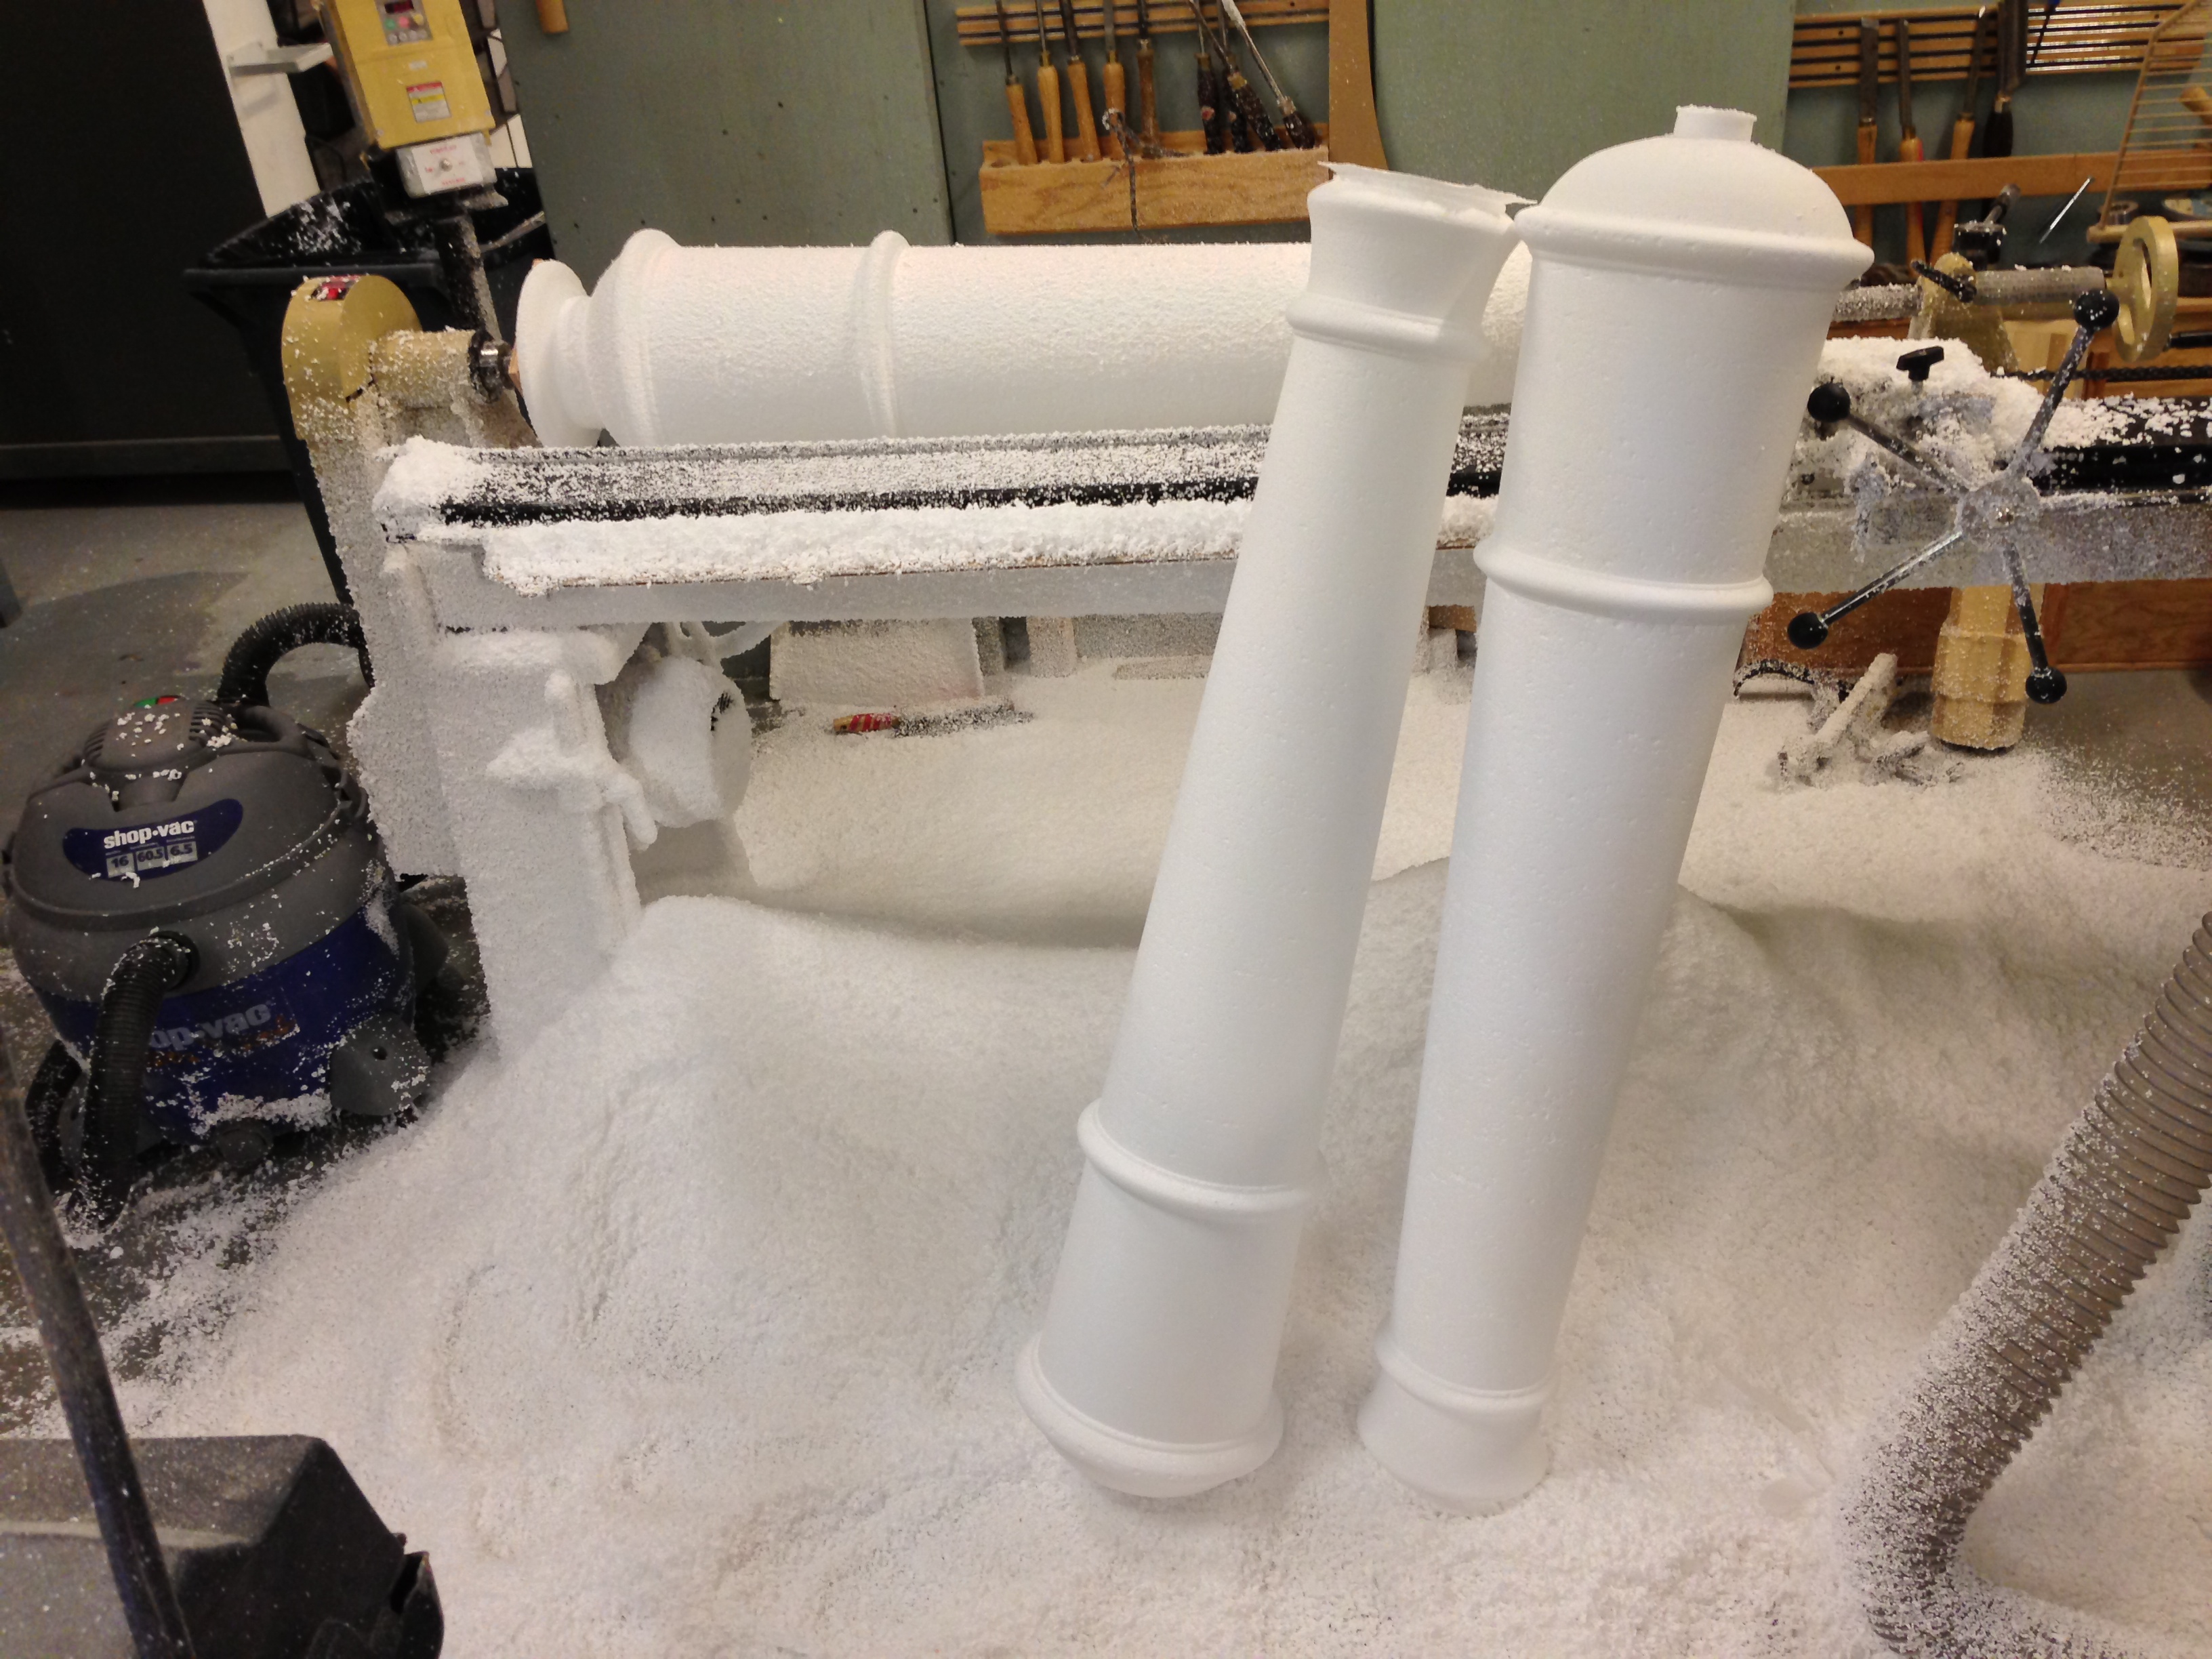
Last week, I showed off some giant champagne bottles I made, and mentioned that they would act as the barrels of some cannons I was also building at the Santa Fe Opera. Today, I will show you the actual cannon barrels I made. We needed four cannons, so that meant four barrels.
Bandsaw Cutting Jig
I made the barrels out of foam to keep them lightweight; the Santa Fe Opera runs their shows in repertory, so any savings in weight is much appreciated by the running crew, who have to move all the props from the basement to the stage on a daily basis. I whipped up a quick jig for the bandsaw to cut the corners from the blocks of foam I got. This meant less time turning, less dust, and it allowed the foam to actually fit on the lathe.
Turned barrels
I designed a full-size template of the shape of the barrels based on the designer’s sketches and my own research. I could also use this template as a pattern on the lathe to make all four barrels exactly the same as each other. Turning foam on the lathe is fun and easy, but it makes a gigantic mess.
Coating and sanding
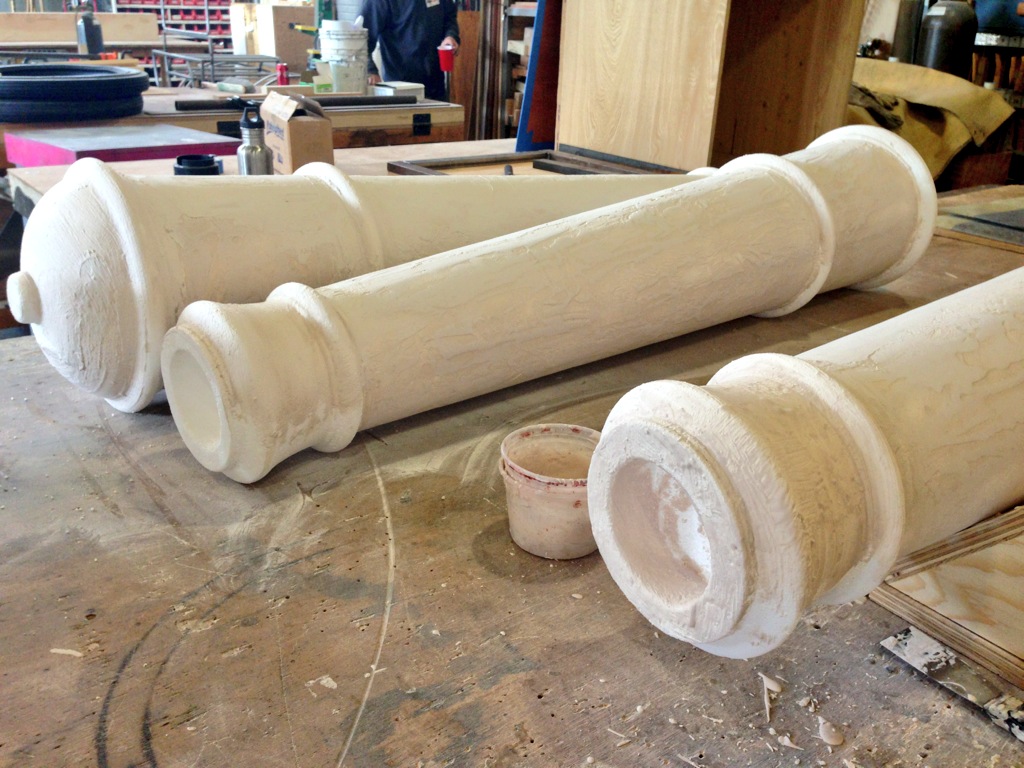
After the barrels were taken off the lathe, I began the long and laborious process of coating and sanding them. The designer wanted them to look like smooth brass without any distressing, so they needed to be absolutely flawless. I used Aqua Resin, which provided a sandable hard coat with far less toxicity than Bondo. I spent nearly a week just coating and sanding all these guys.
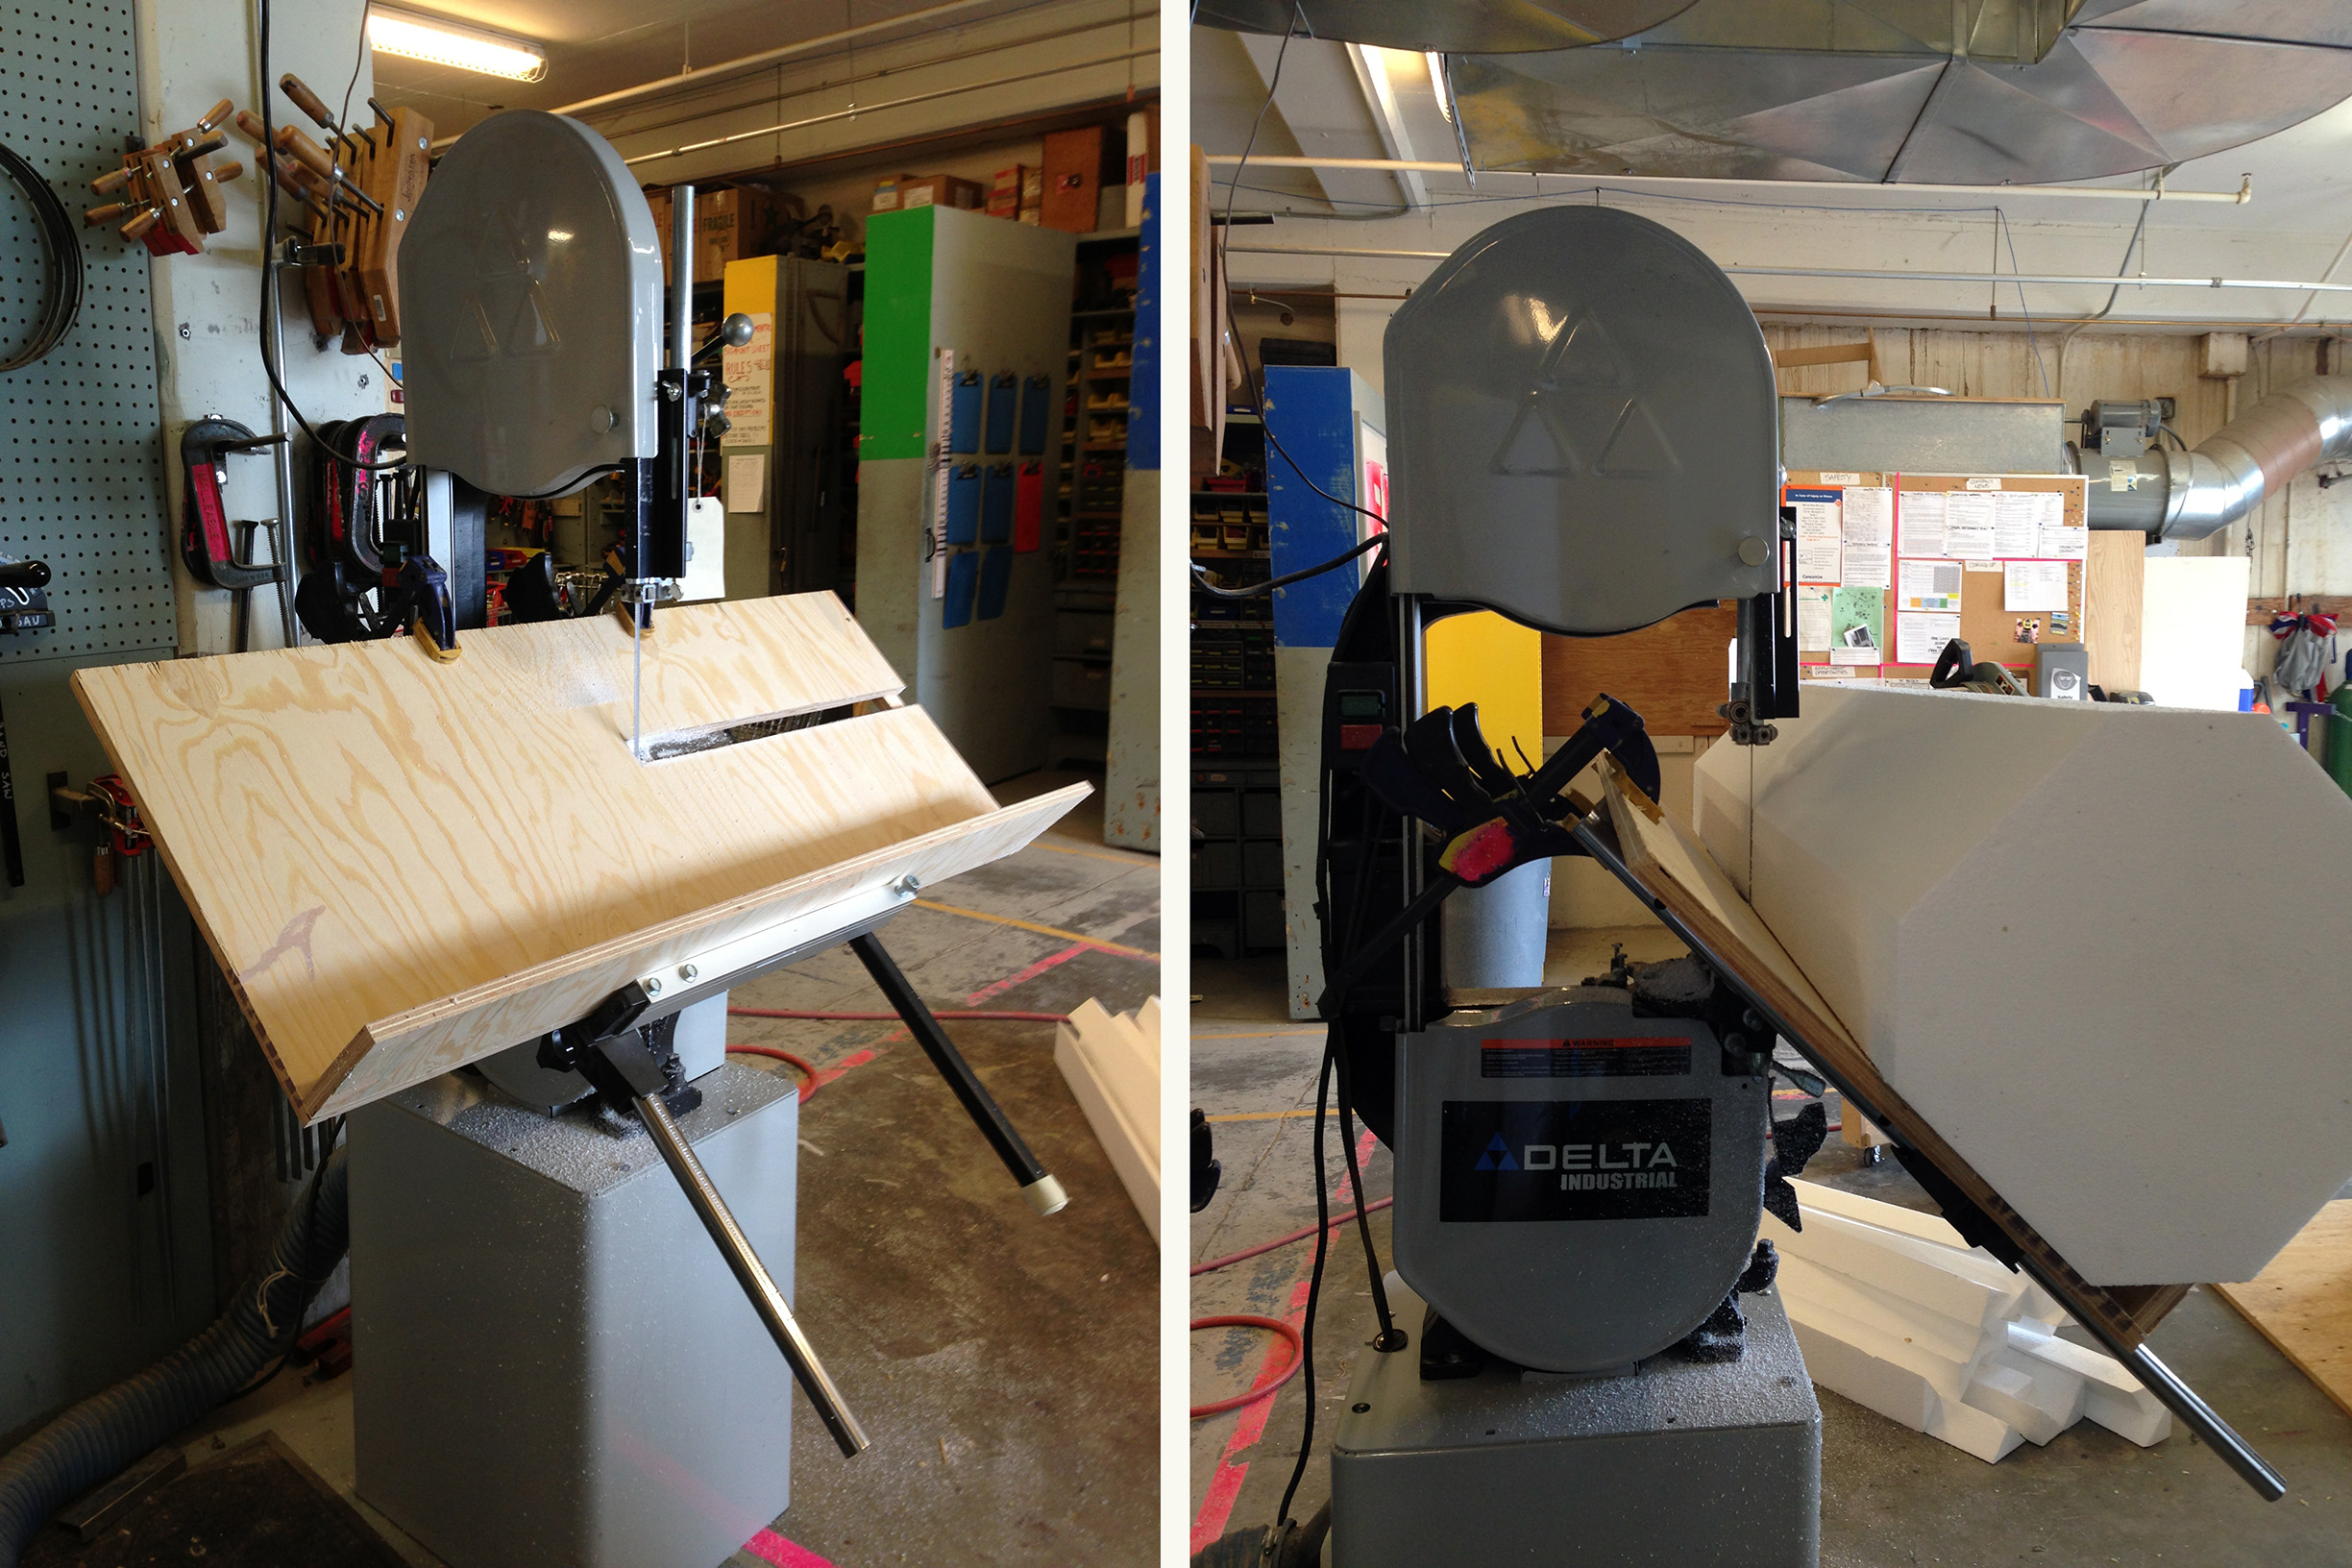
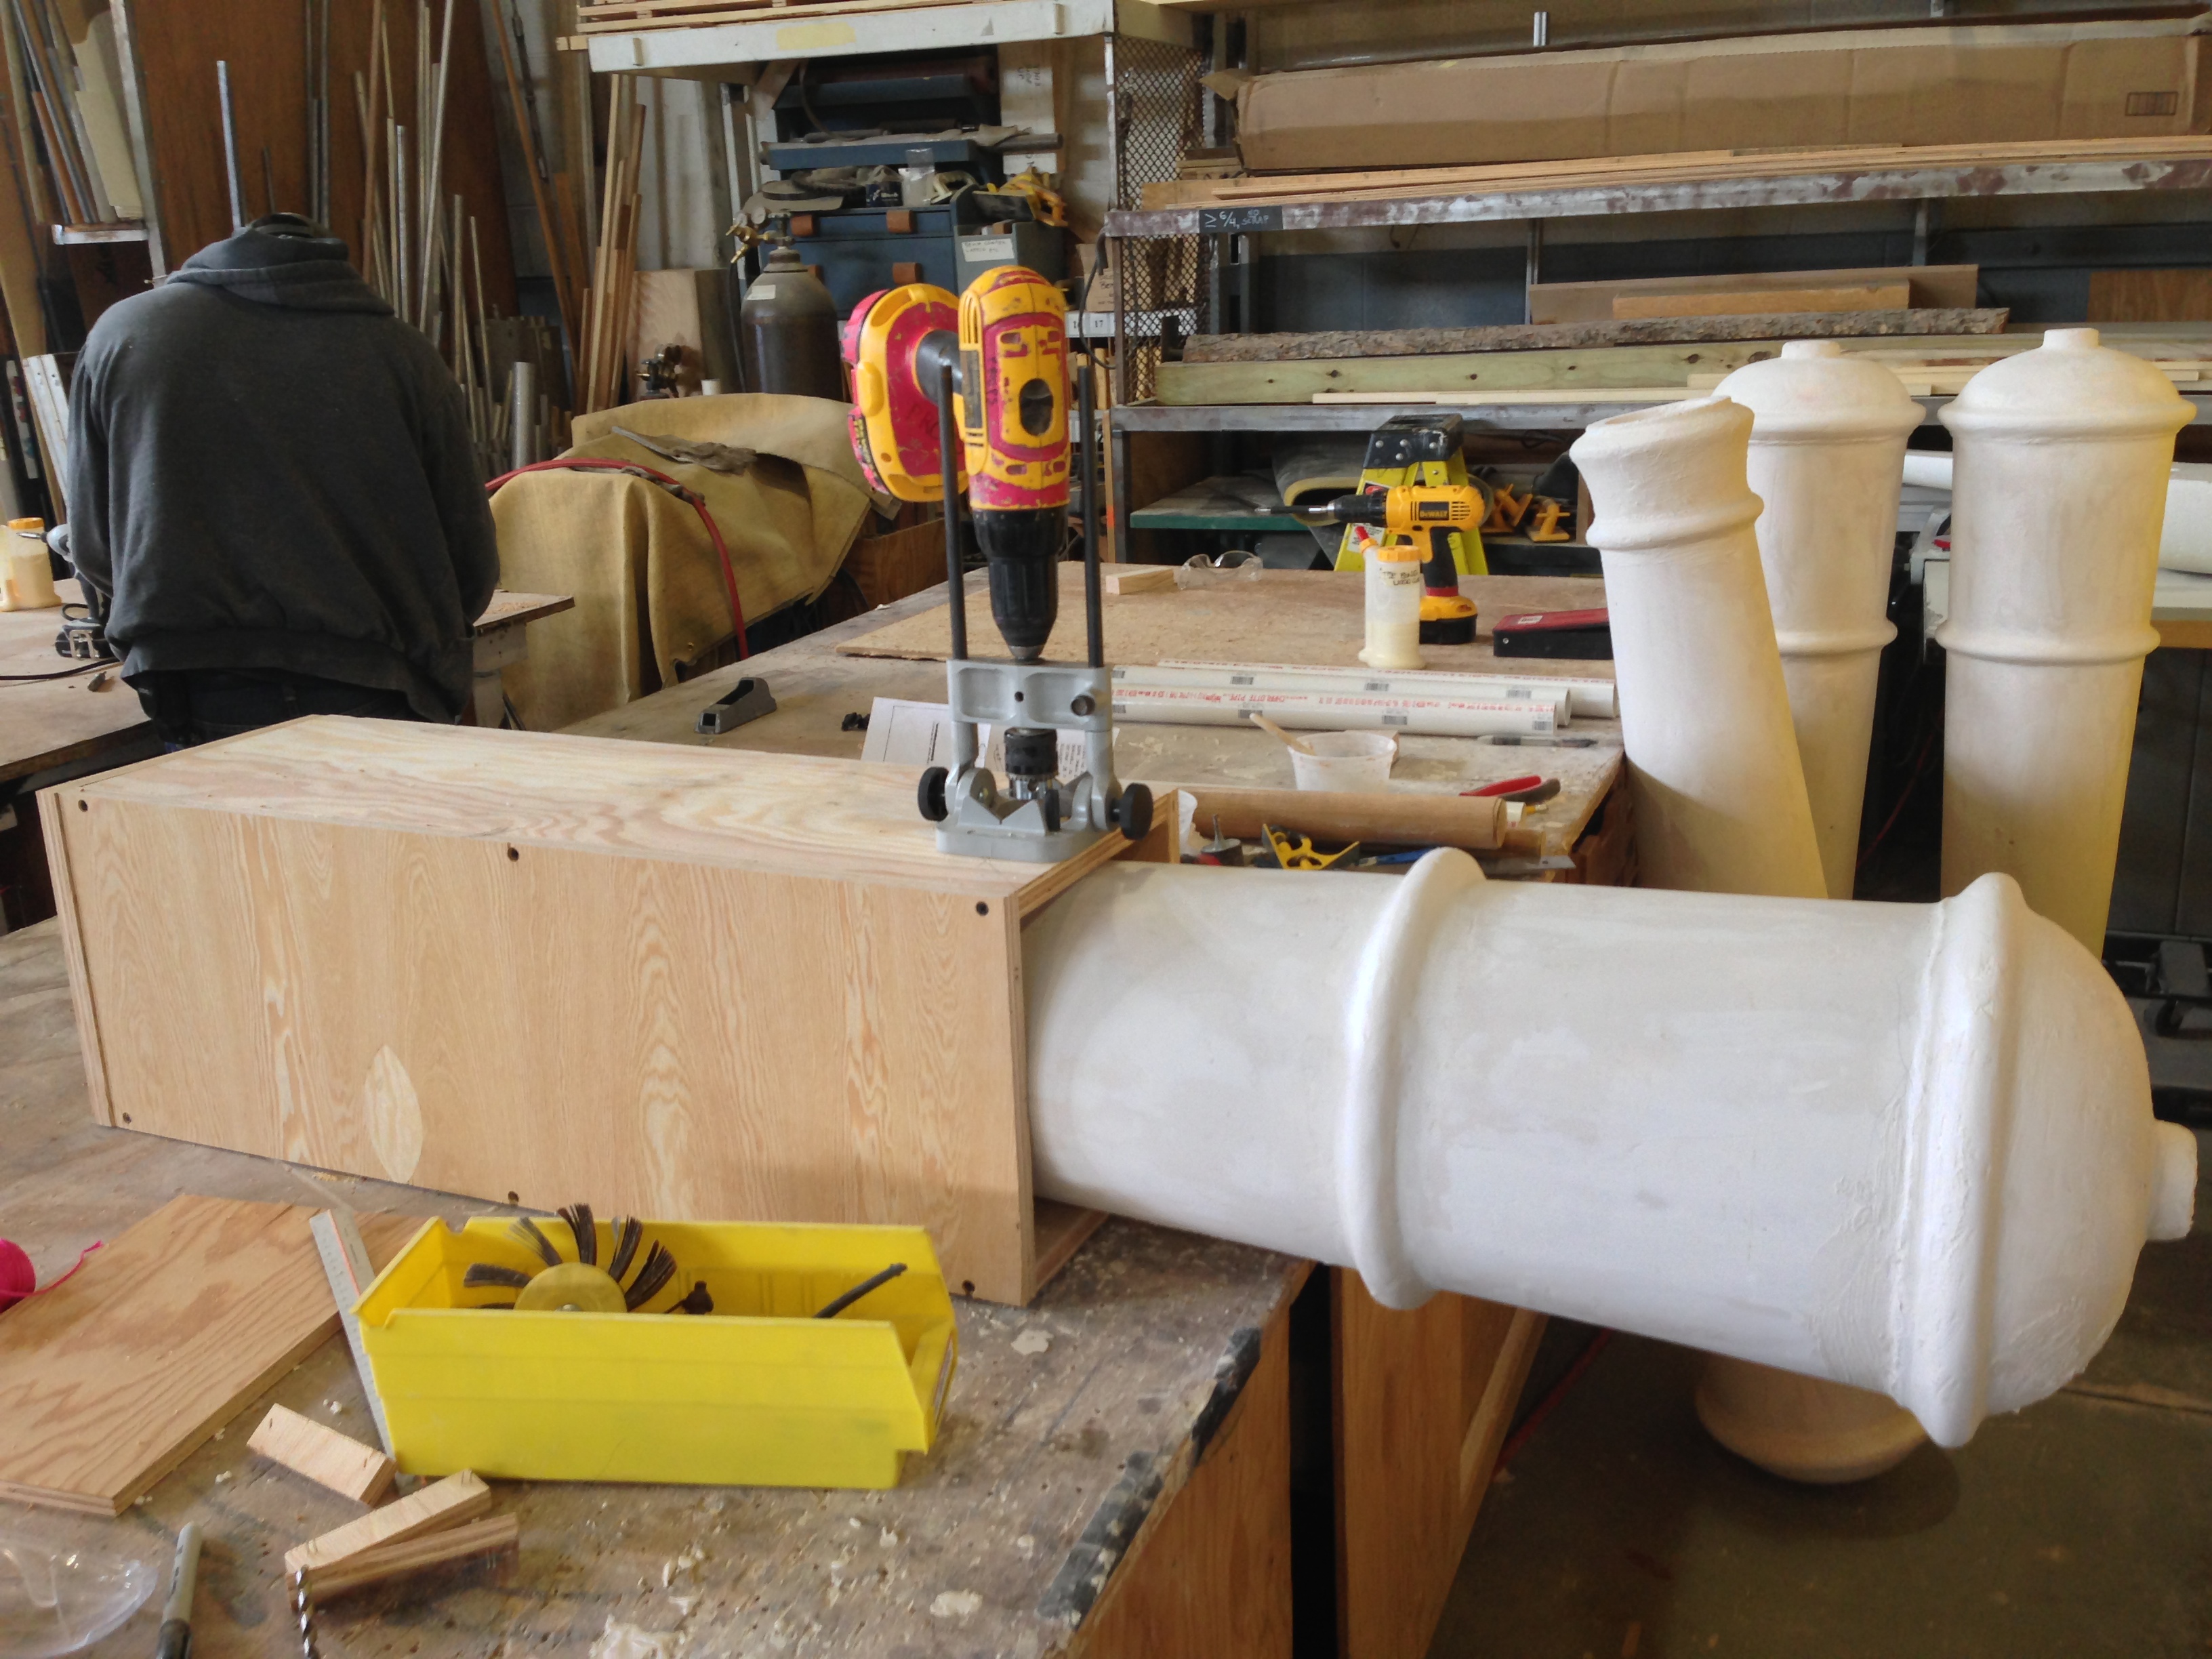
Drilling straight through
I built a jig so I could hold the barrel and a cordless drill perpendicular to each other. This provided a pilot hole for the trunnion I would add; the trunnion would be a piece of PVC pipe which would hold the cannon on the carriage and allow it to pivot up and down.
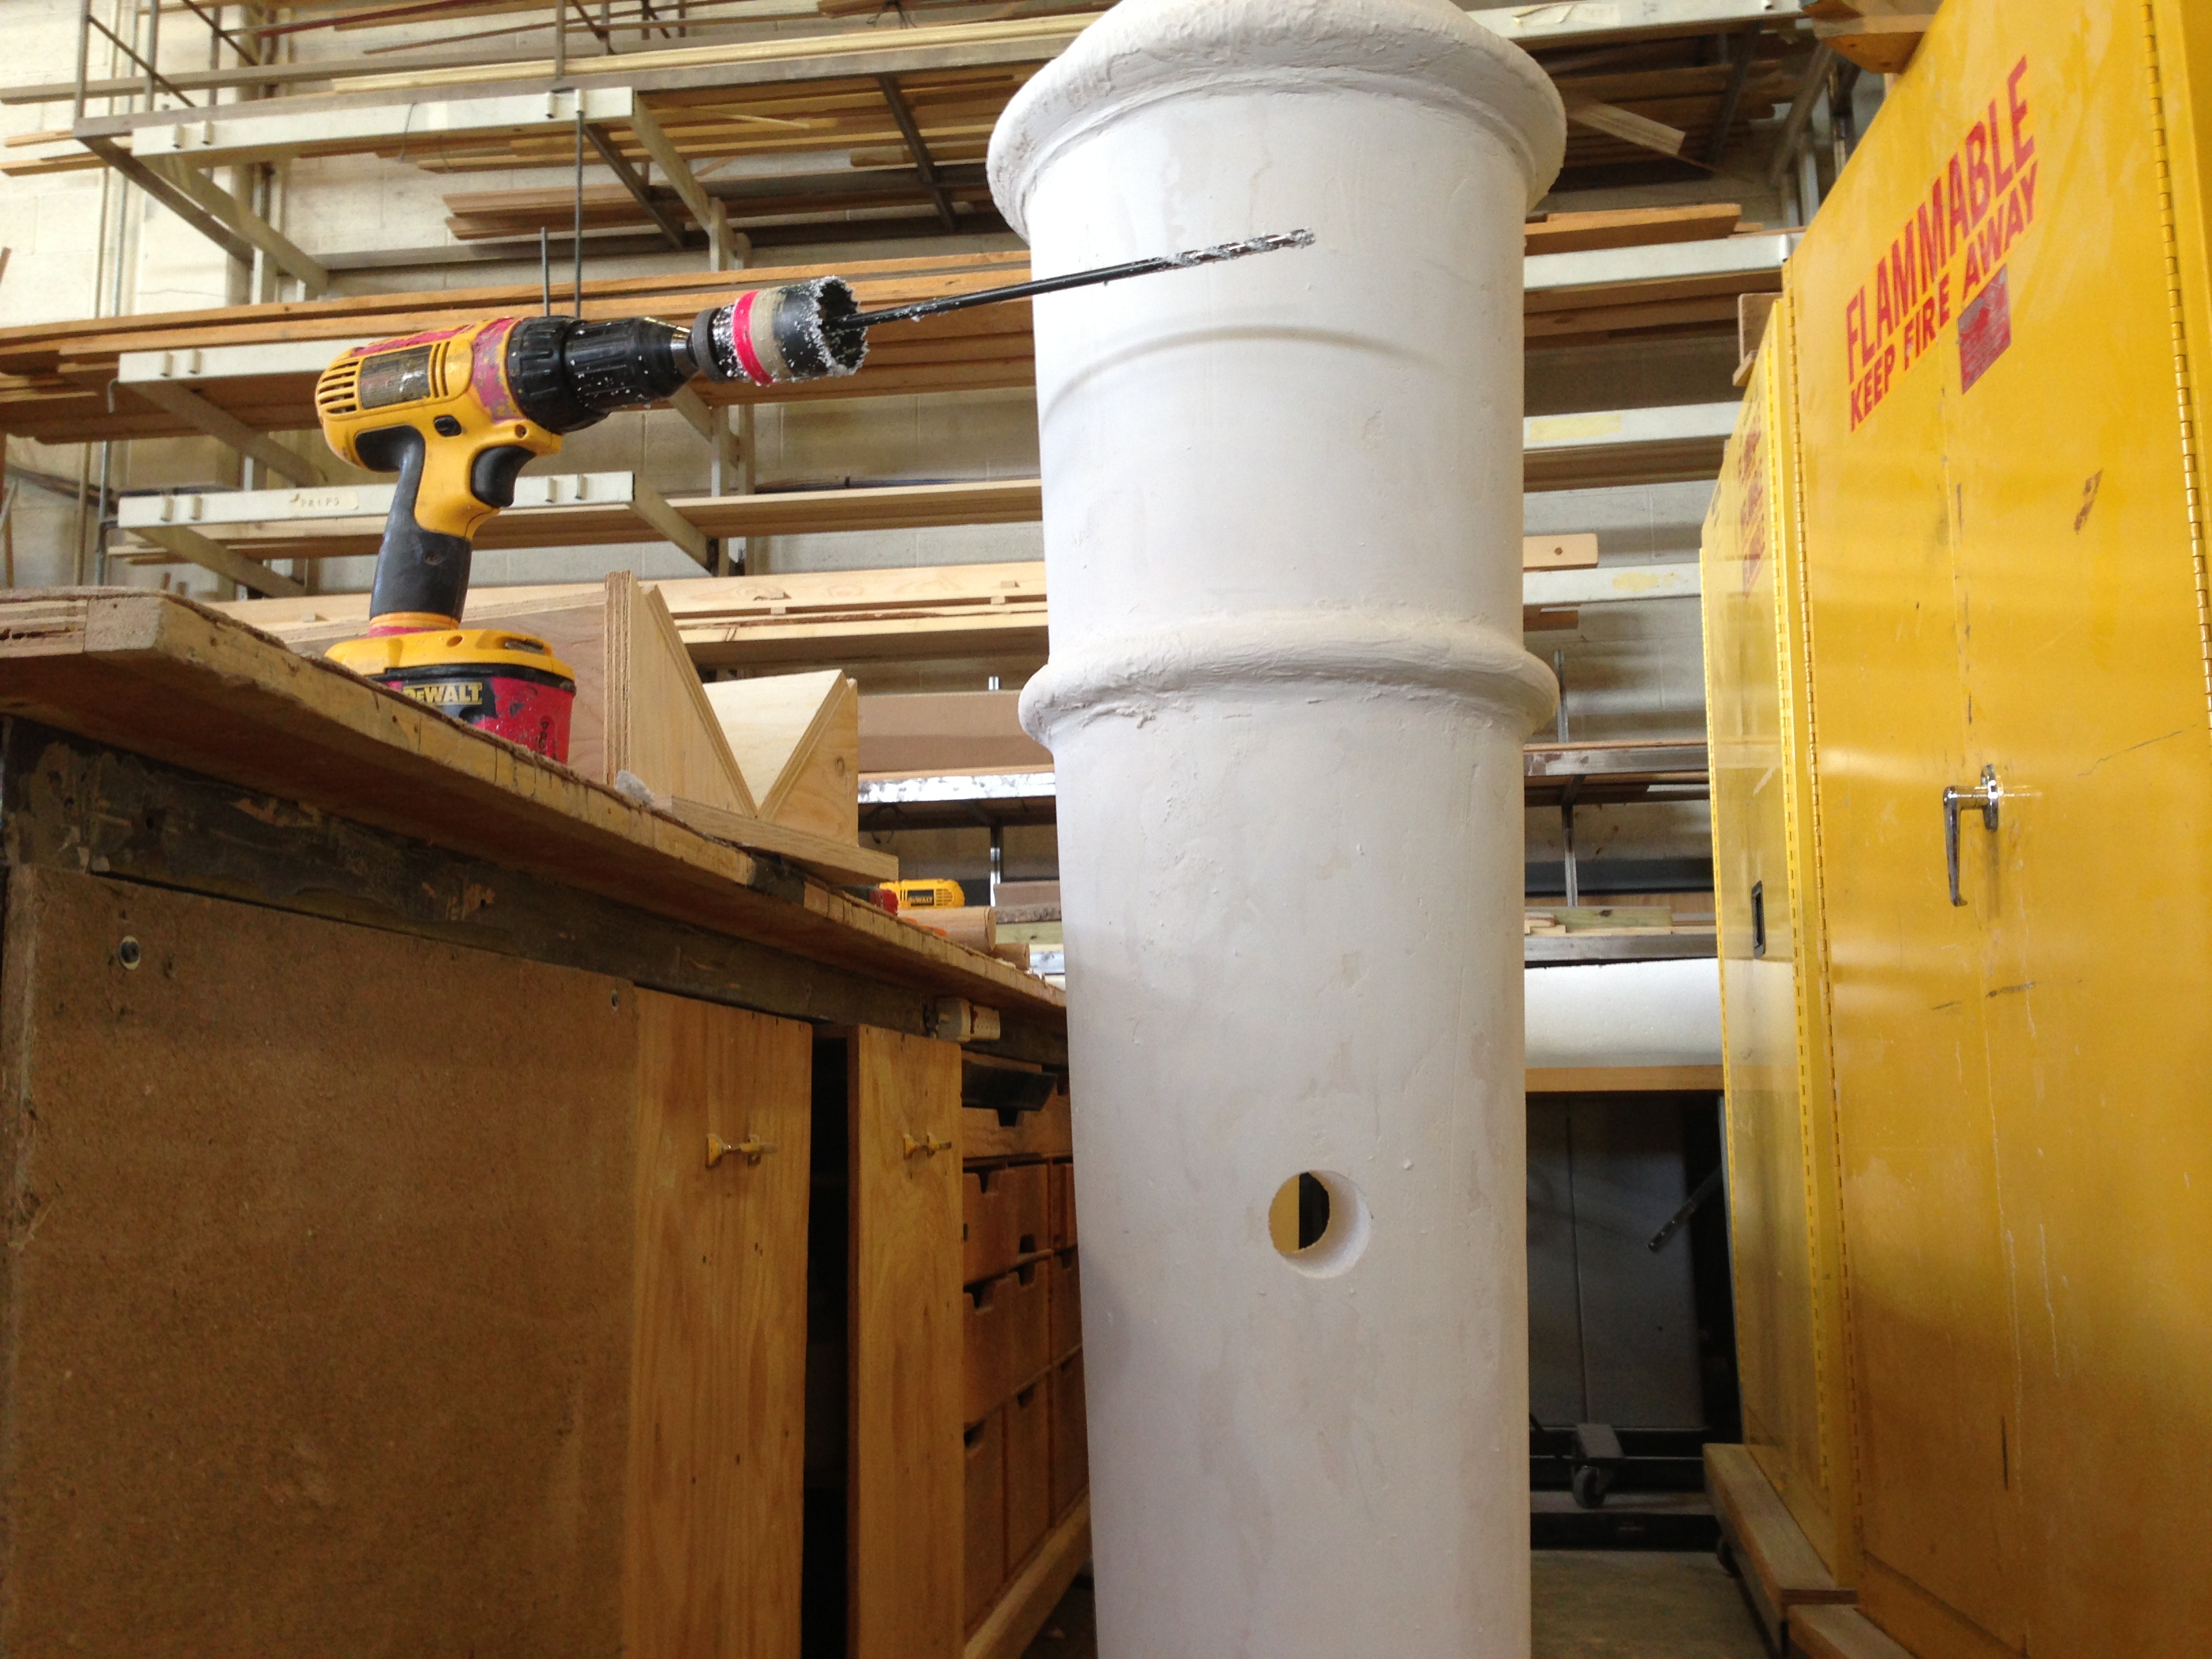
Hole
With the pilot hole drilled, I switched to a hole saw that was closer to the size of the PVC pipe. You can see in the photo above that I have an extra long pilot bit on the hole saw. This bit was long enough to pop out the other side of the barrel so I could be sure that the hole saw would exit in exactly the right place.
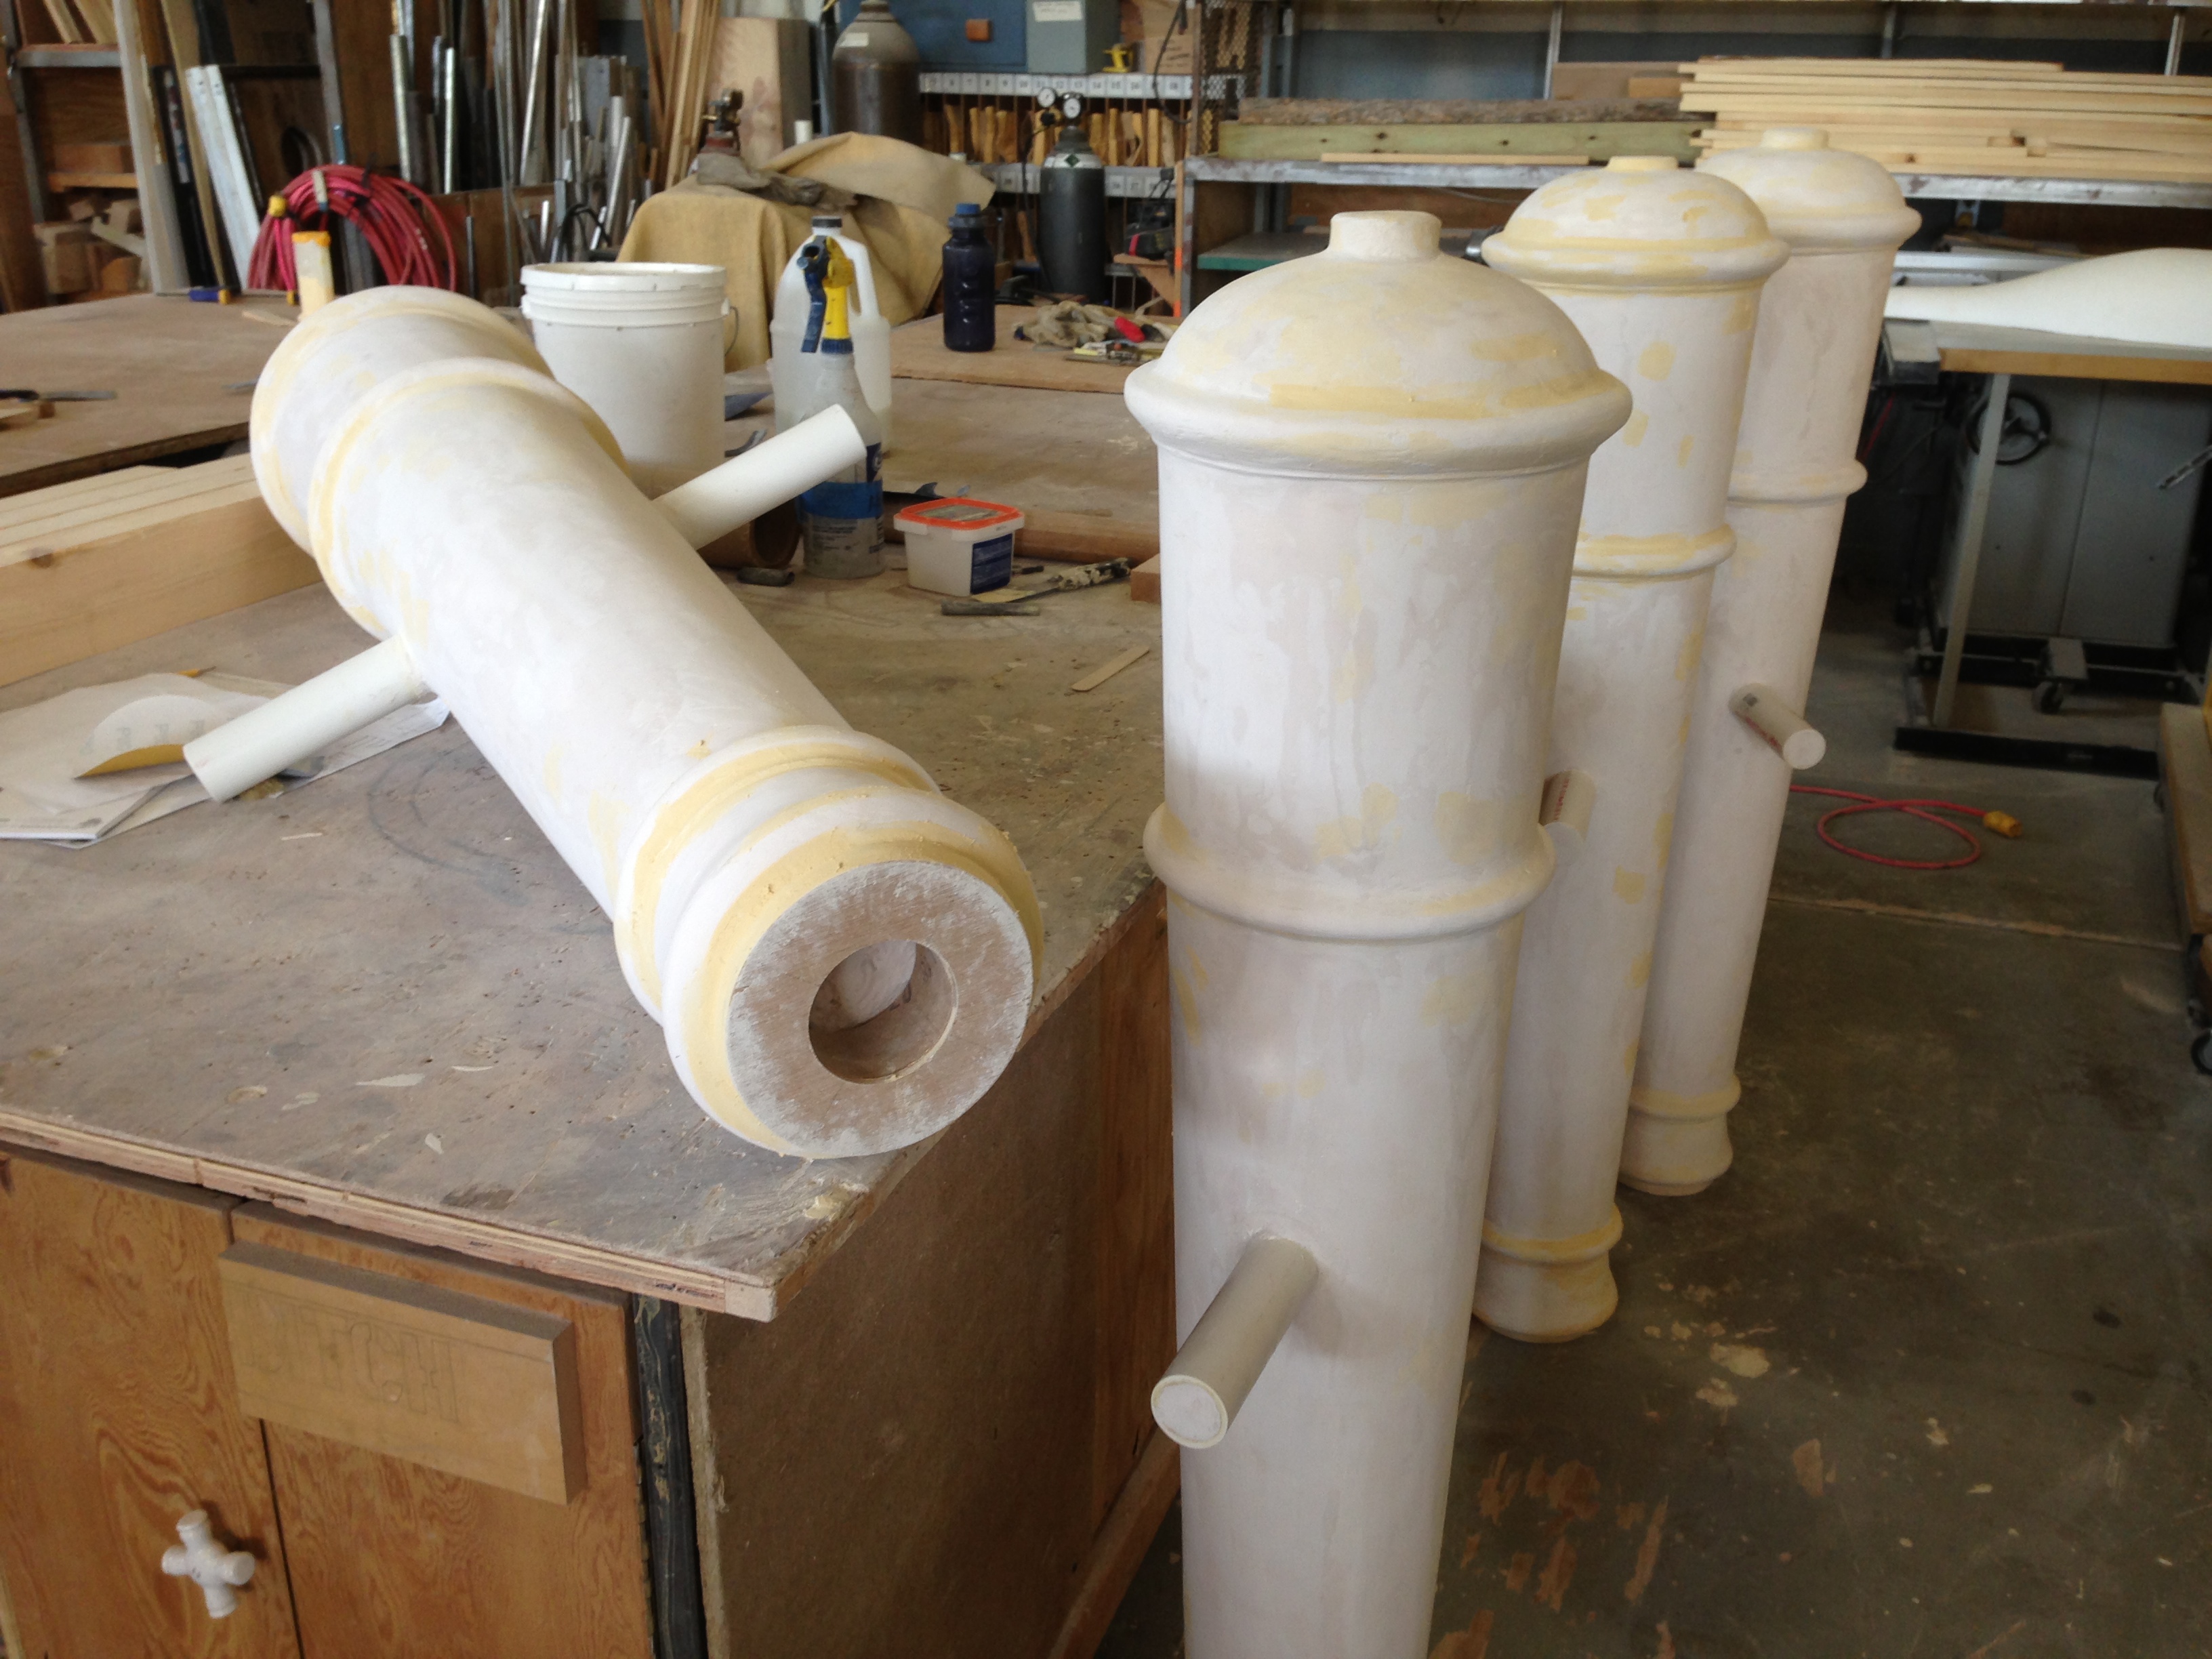
Finished Barrels
I pushed the sections of PVC pipe through the hole and capped off the ends to make them look like a solid bar. I also added some lauan rings to the ends of the barrels to help reinforce them when they were standing up.
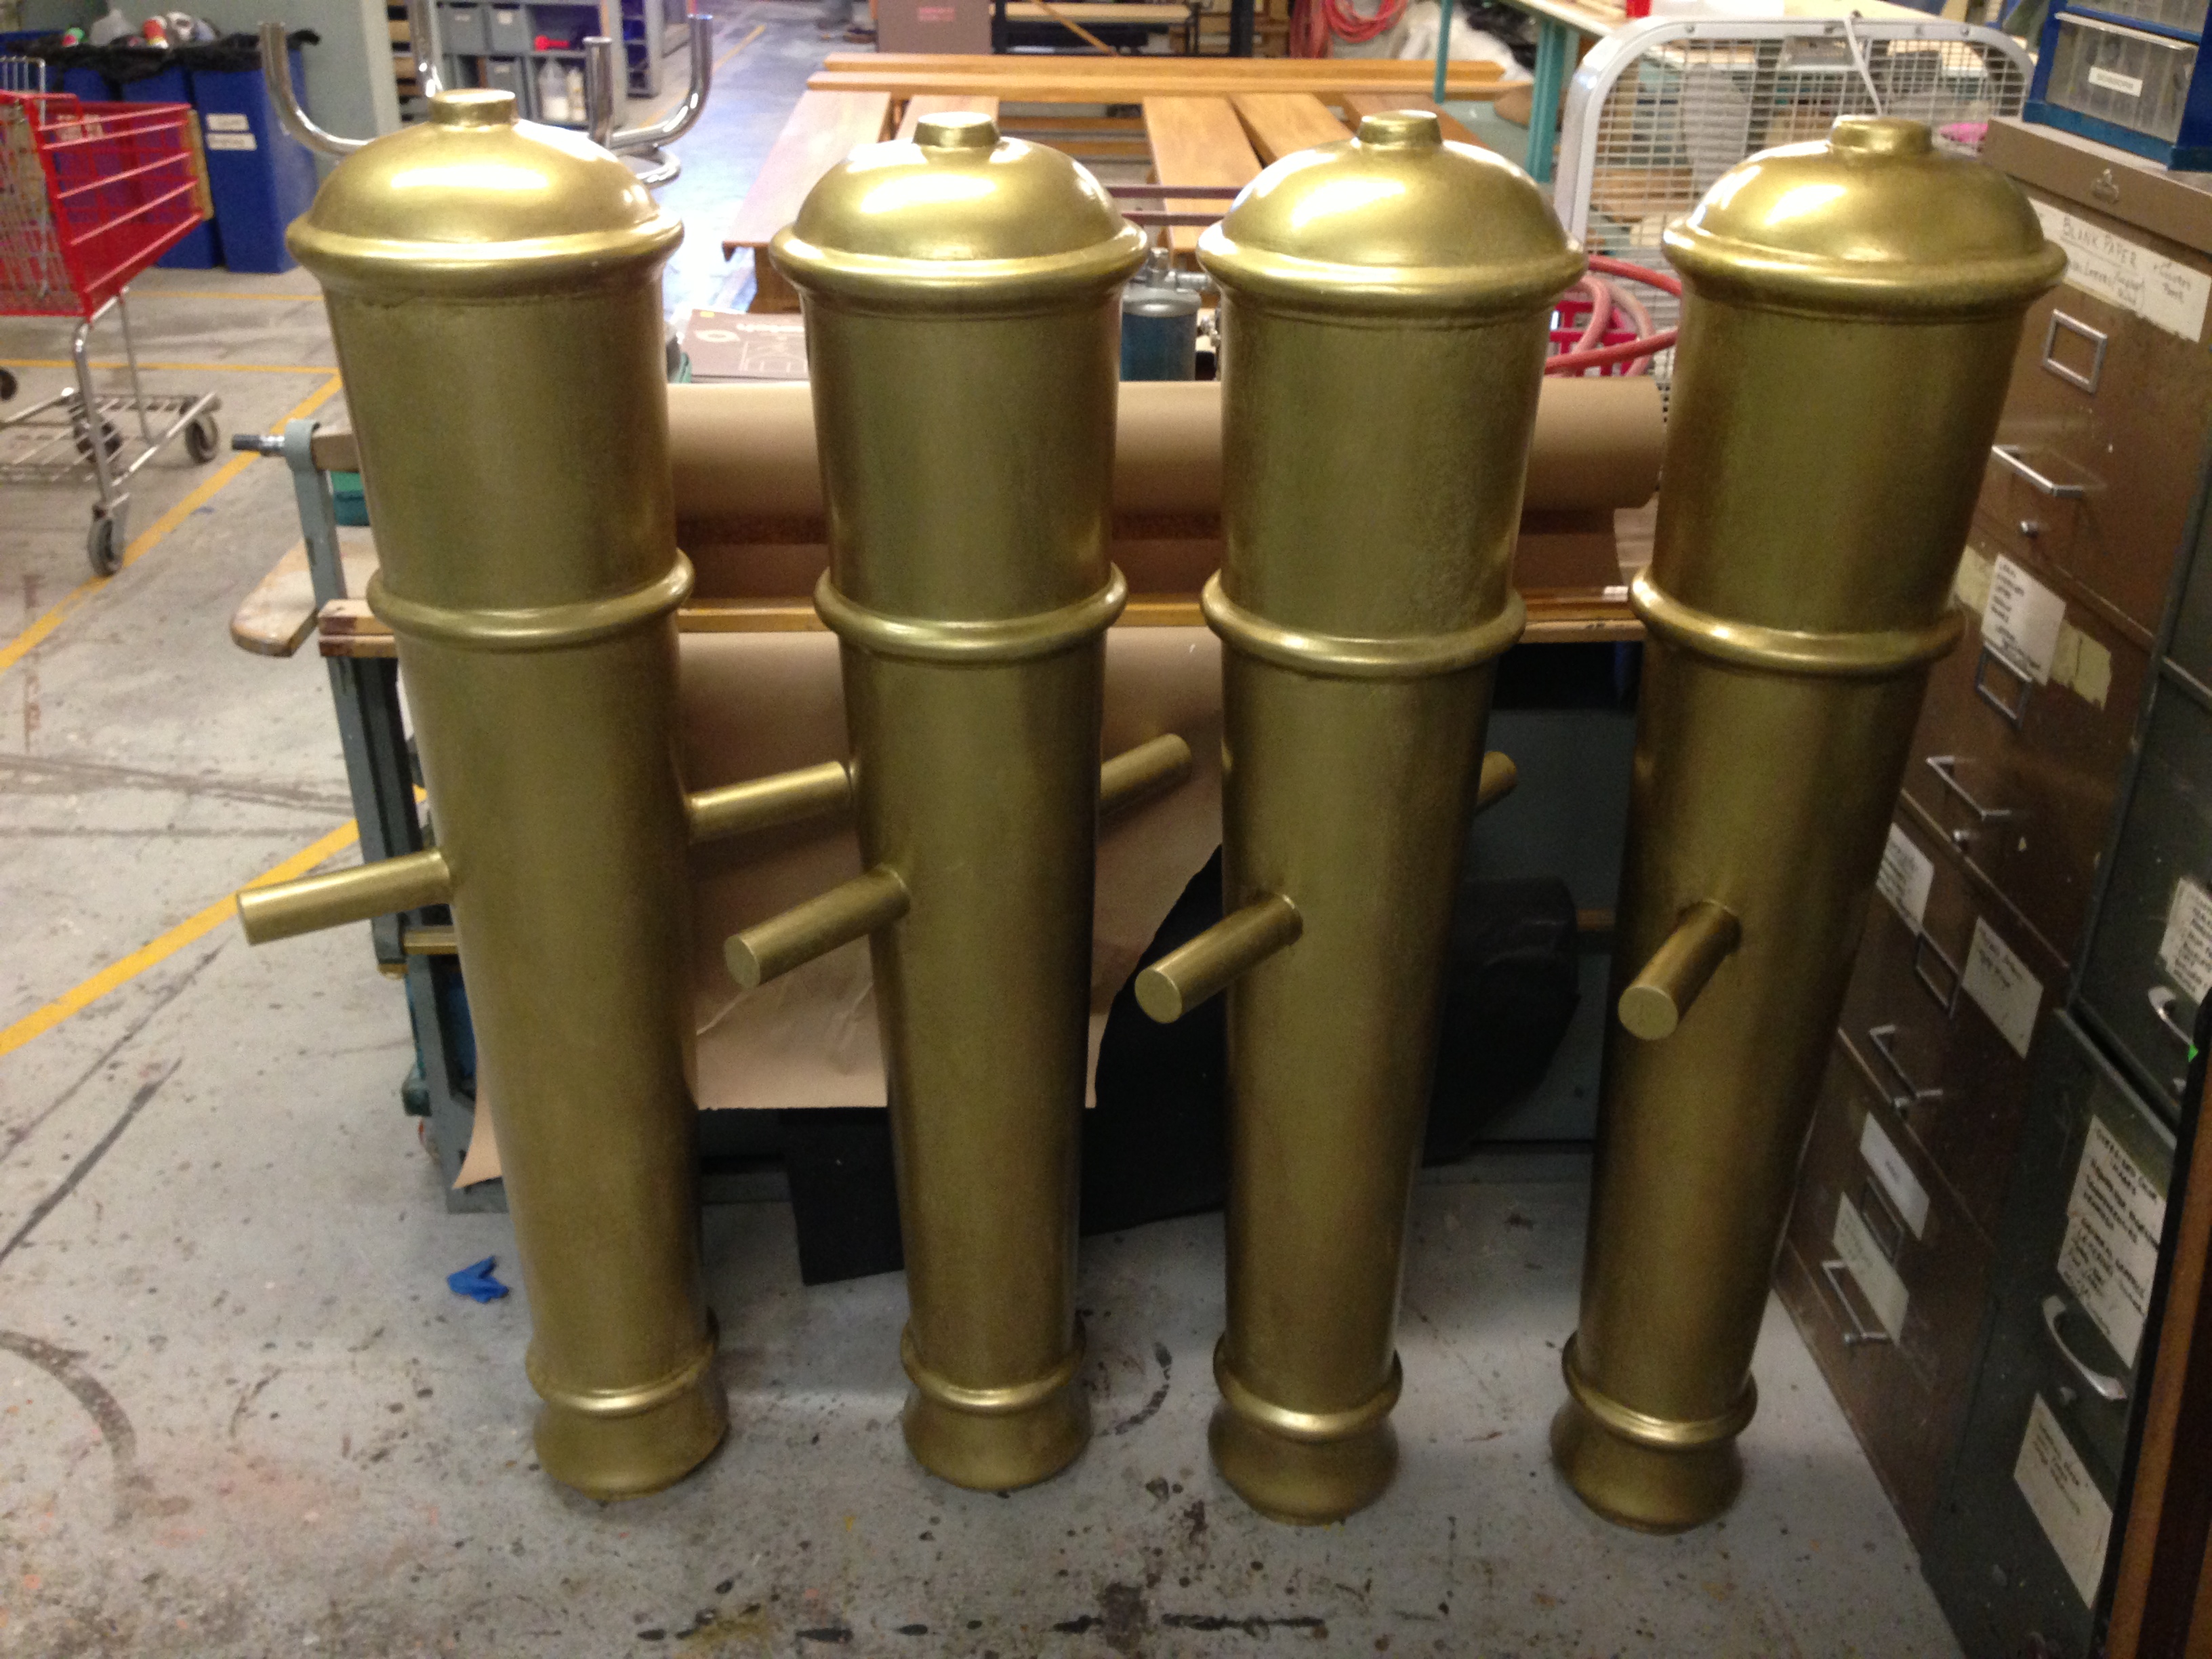
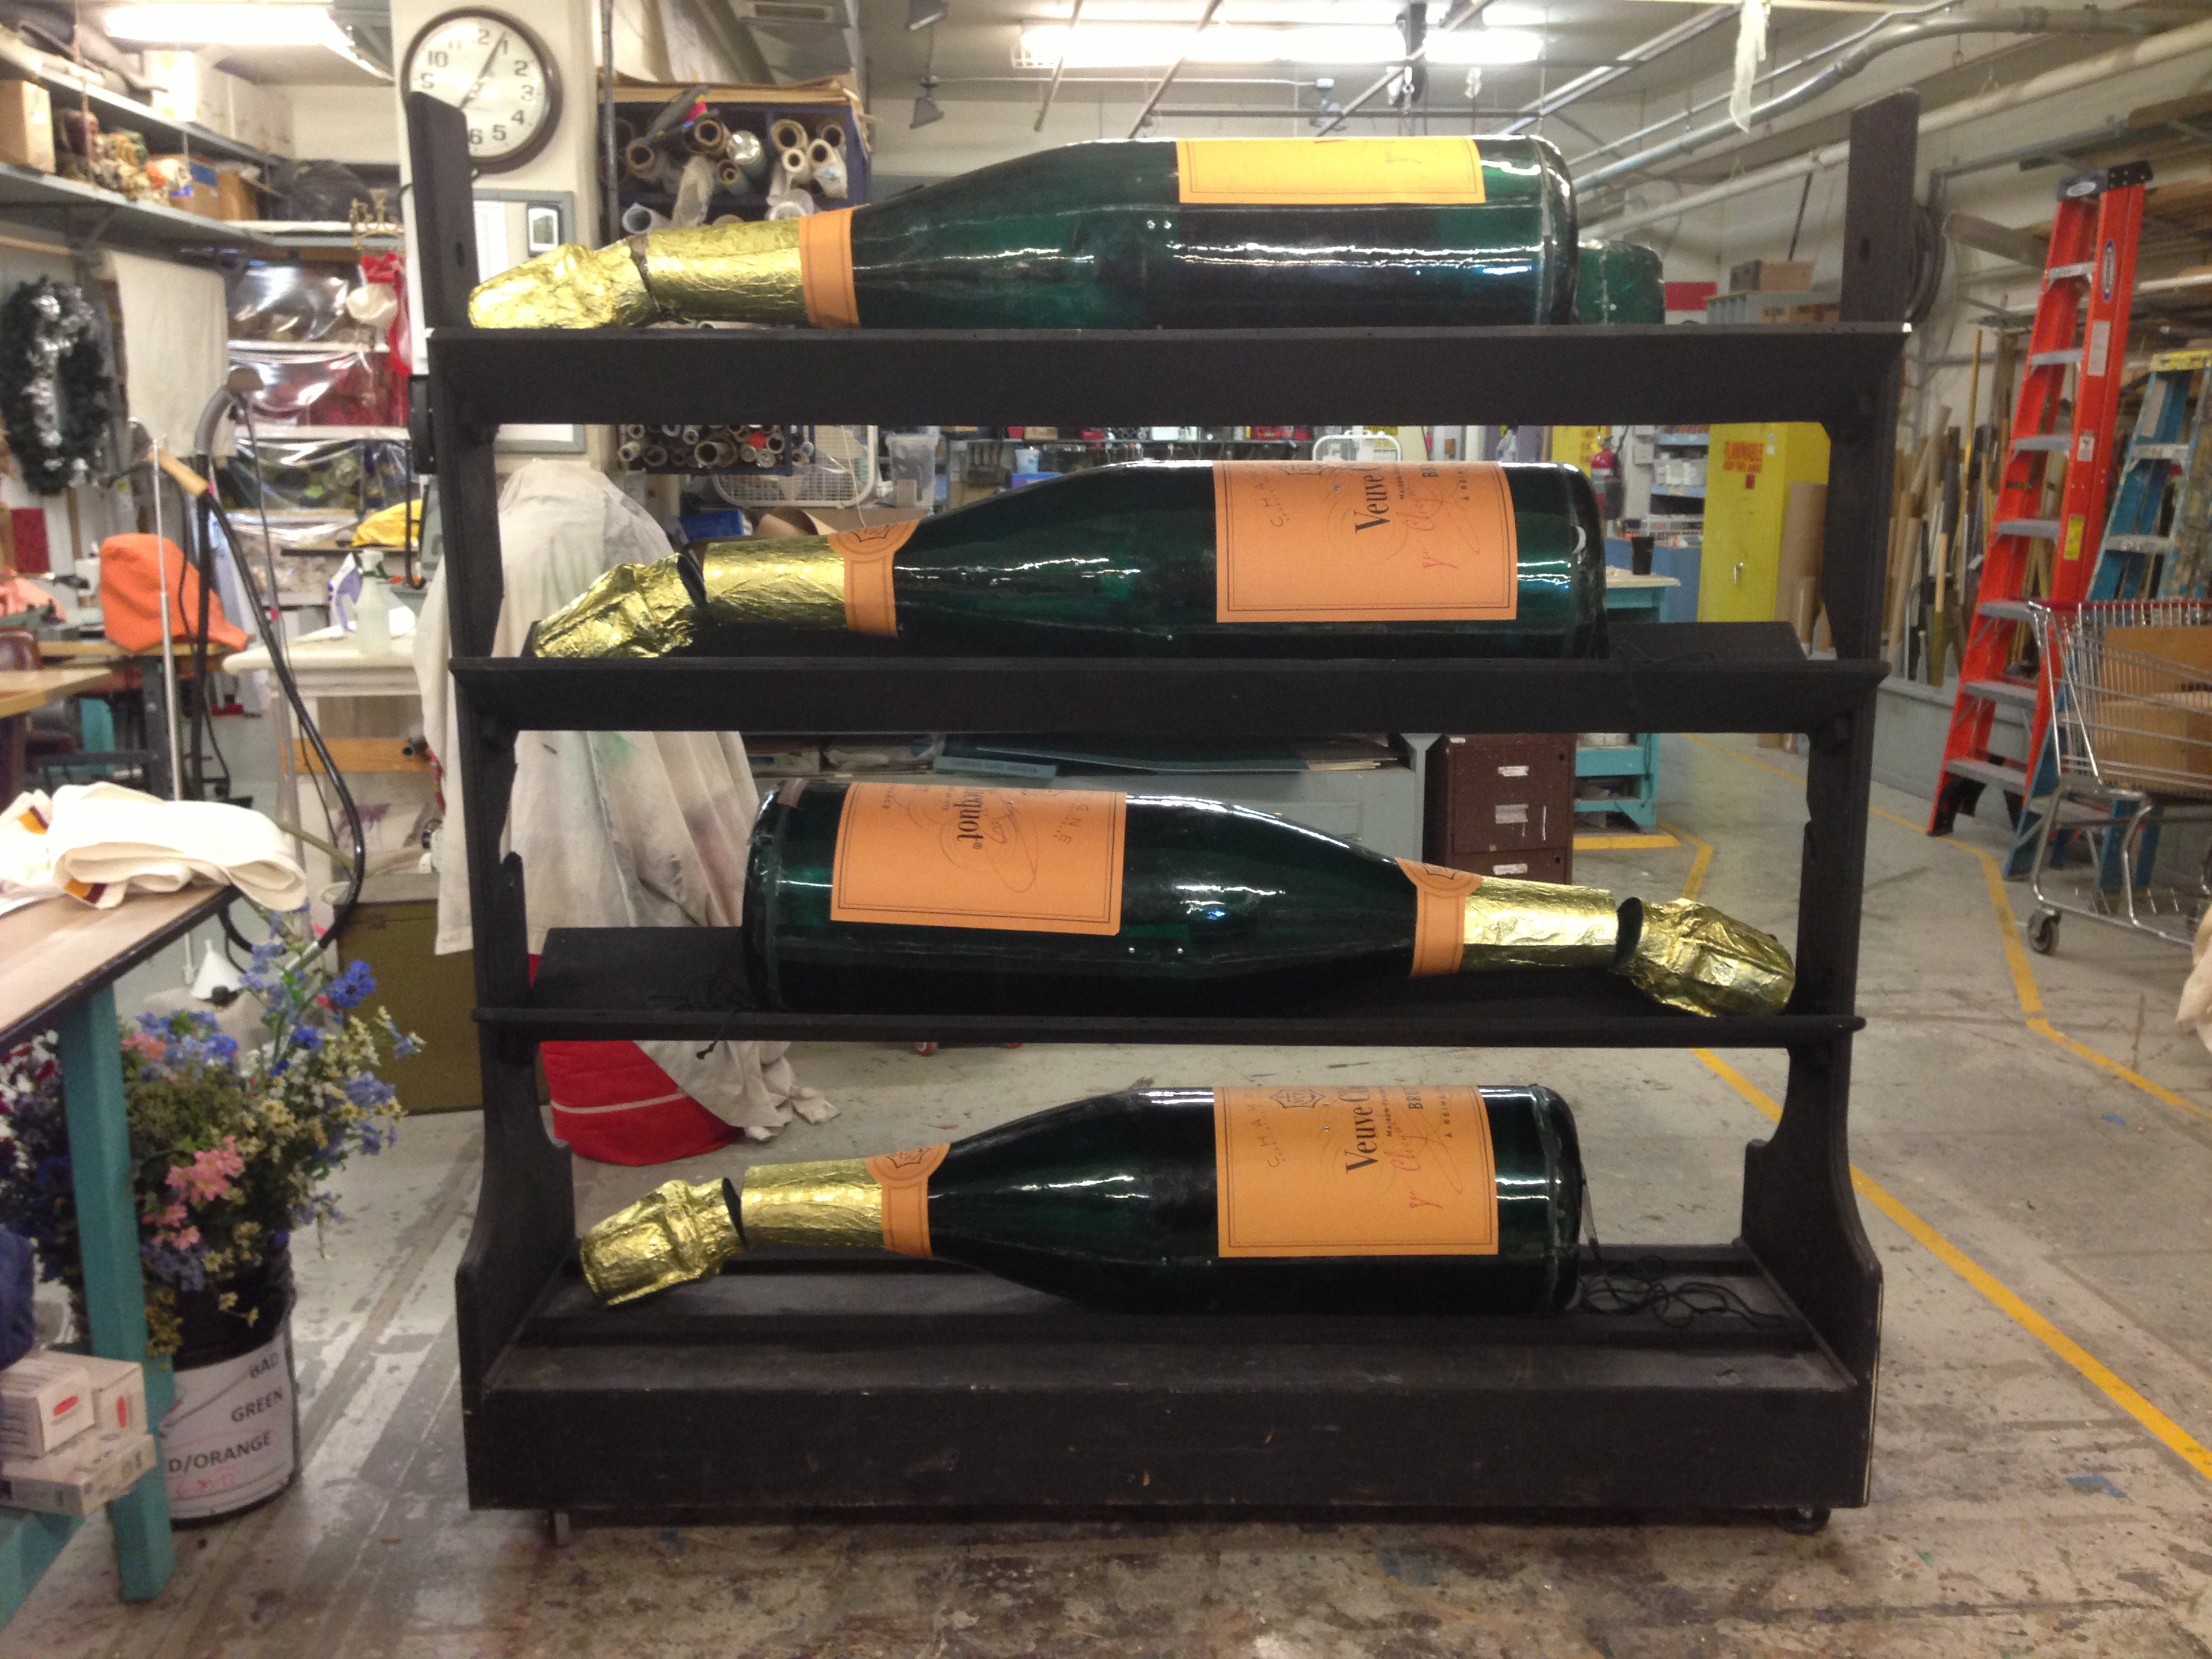
Painted Barrels
With the barrels finished, I handed them off to the painters, who gave them the great brass paint treatment that you see above. In a few days, I’ll post about how I built the carriages to these cannons, and you can see pictures of the final piece.
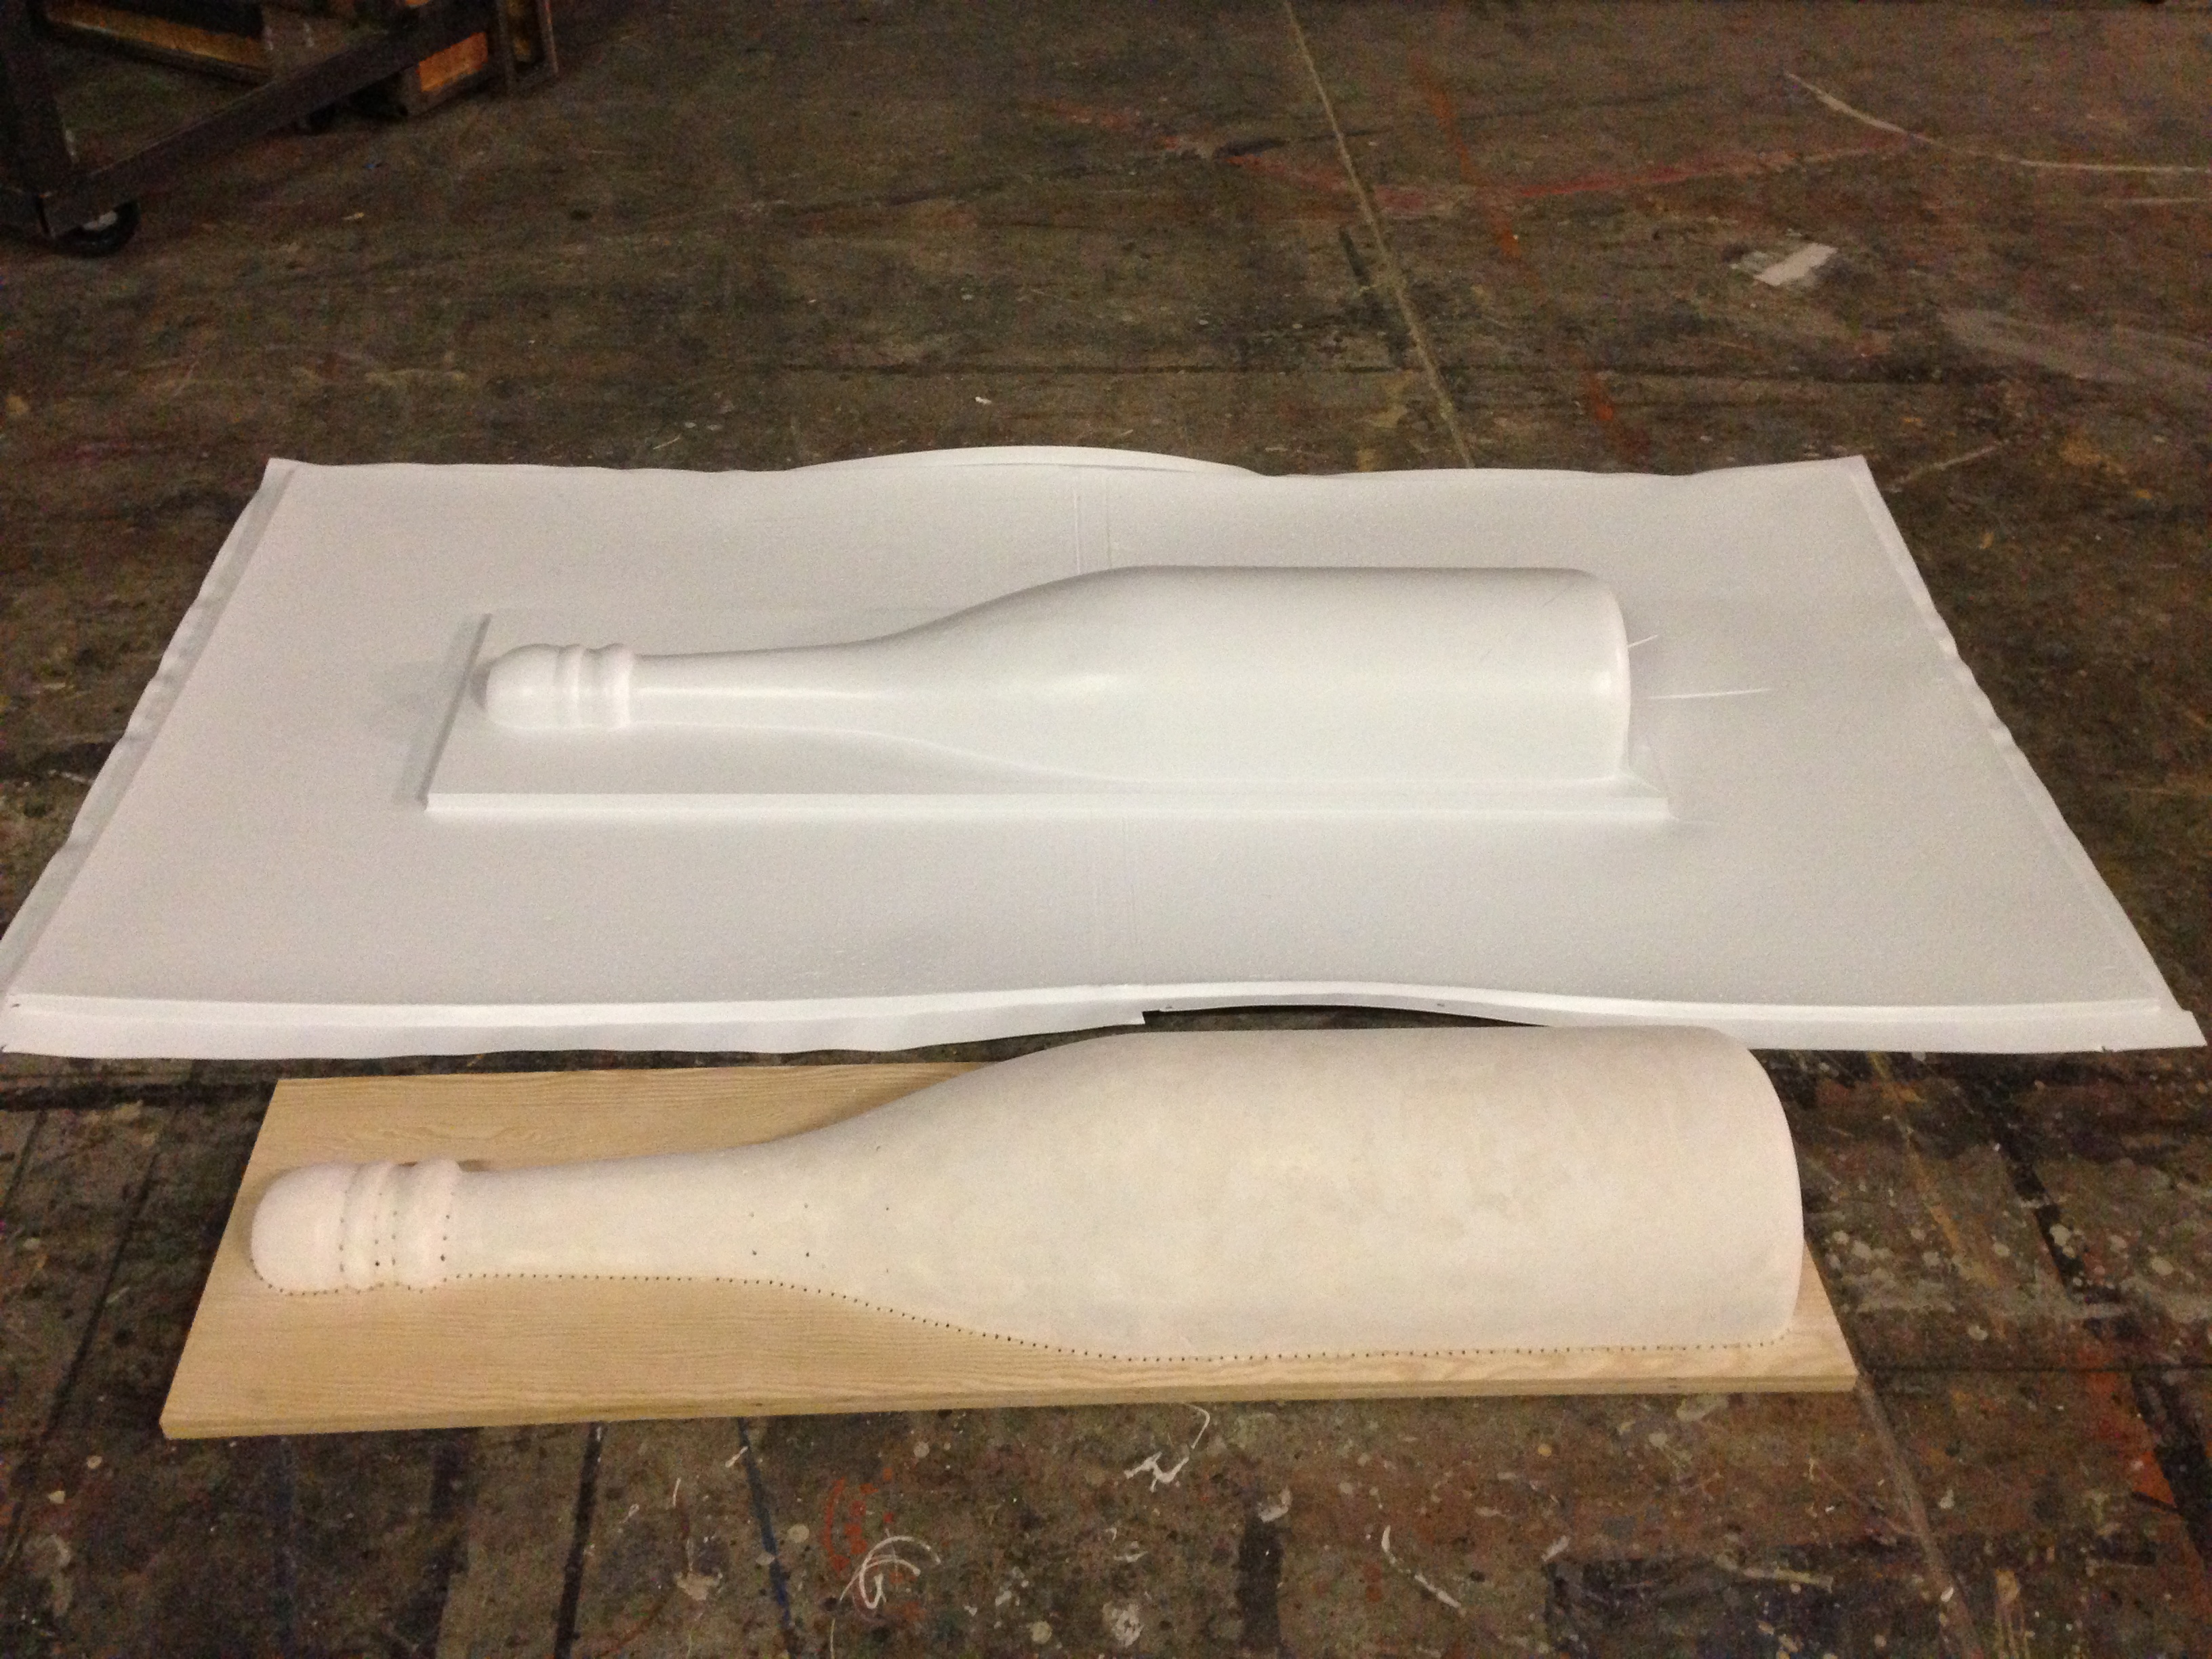
With this summer’s season at the Santa Fe Opera at an end, I can begin to show off some of the props I’ve built there. First up is a giant champagne bottle.
We needed four champagne bottles of a very specific size; they were going to be the barrels of cannons that I would also build. Nobody manufactures champagne bottles that large, so we had to make them. Since we would vacuum-form them from plastic, I began by making a solid foam bottle.
Blank and pattern
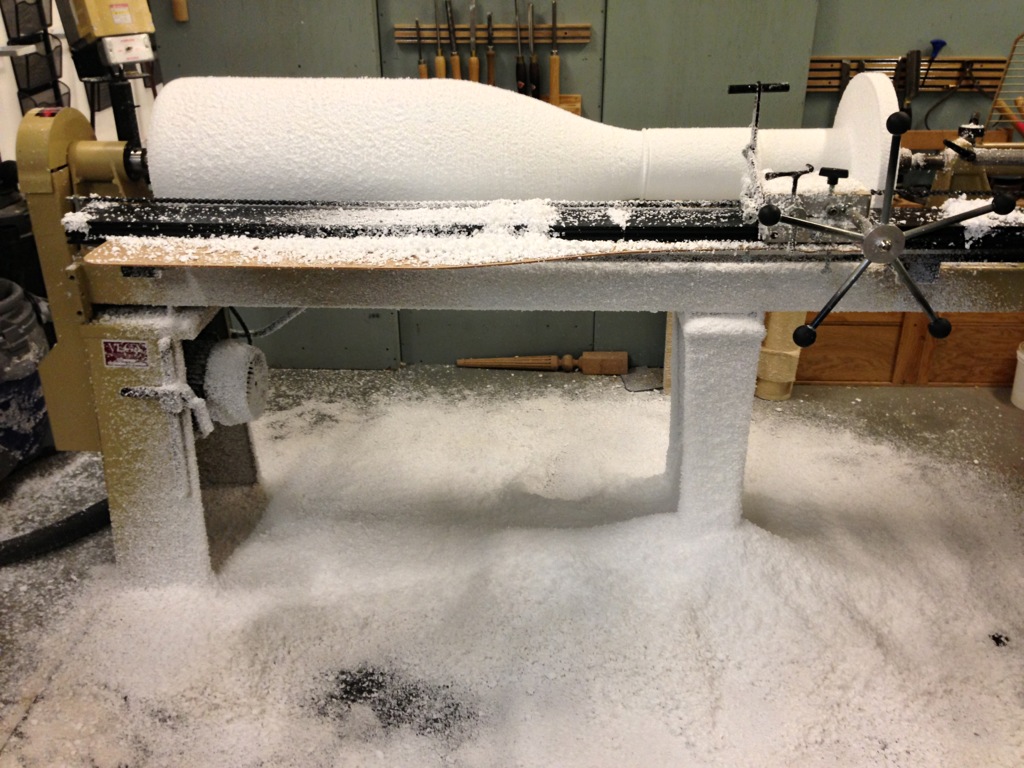
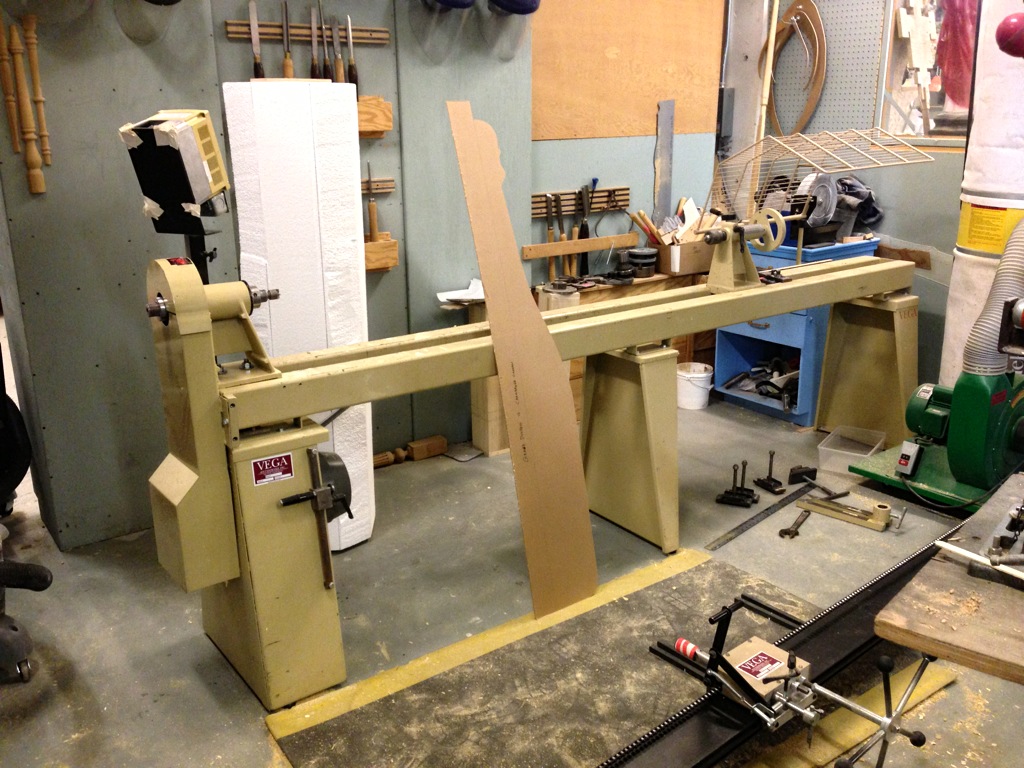
I drew out half the shape at full-scale on a piece of plexiglass. We have a duplicator on our lathe, which allows us to rough out the shape by directly following a pattern like this. I also got the block of foam ready. This piece was so wide, it barely fit on the lathe; I had to take most of the attachments off and round off the foam by hand before there was enough room to put the attachments back on.
Turning foam
As you can imagine, turning a block of foam this large creates quite a bit of debris. I am still finding bits of foam in my clothes to this day.
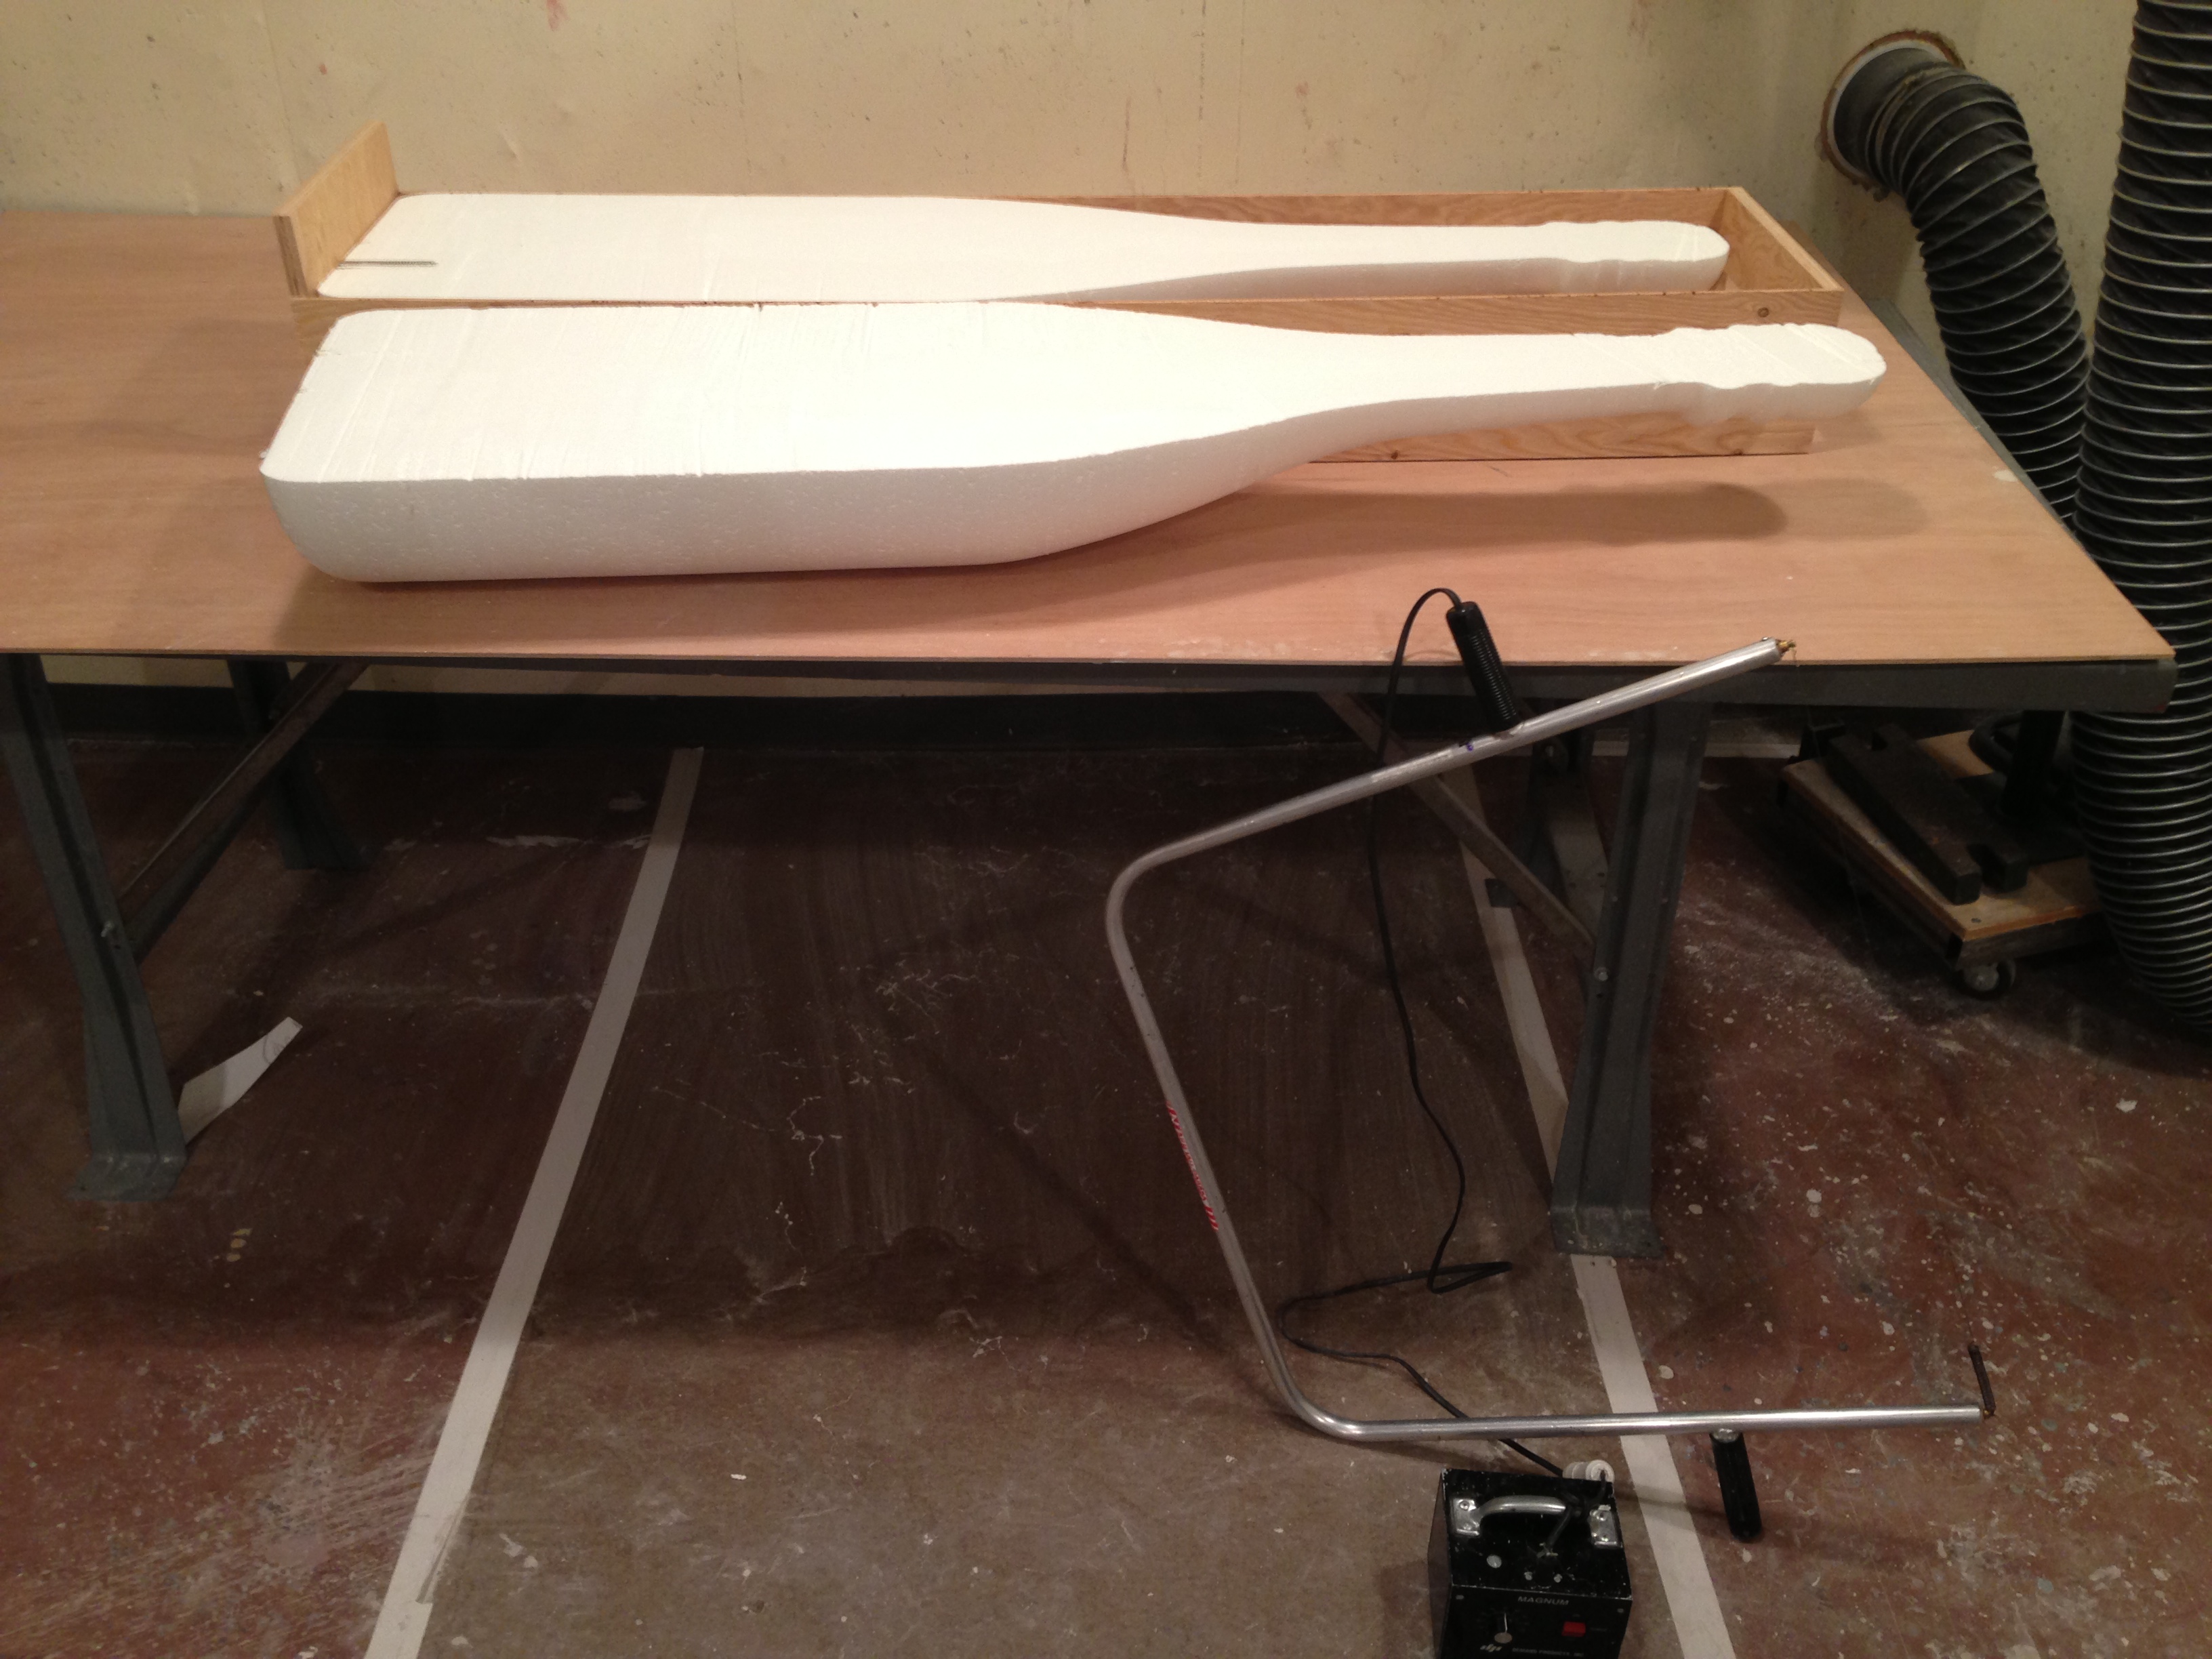
Splitting the foam in half
To vacuum form this piece, I only needed half of the bottle. I built a box so I could hold the bottle straight. The top of the box reached the exact middle point of the bottle, so when I ran a hot wire along it, it sliced the foam bottle directly in half.
Vacuum formed half
I mounted the foam onto a board and drilled holes all around the circumference, as well as holes in the concave portions to ensure the plastic would be sucked all the way down. I also coated the foam with Aqua Resin and sanded it smooth. I posted a video a few weeks ago showing the vacuum forming machine in action; check it out if you want to see how I made the piece in the photo above.
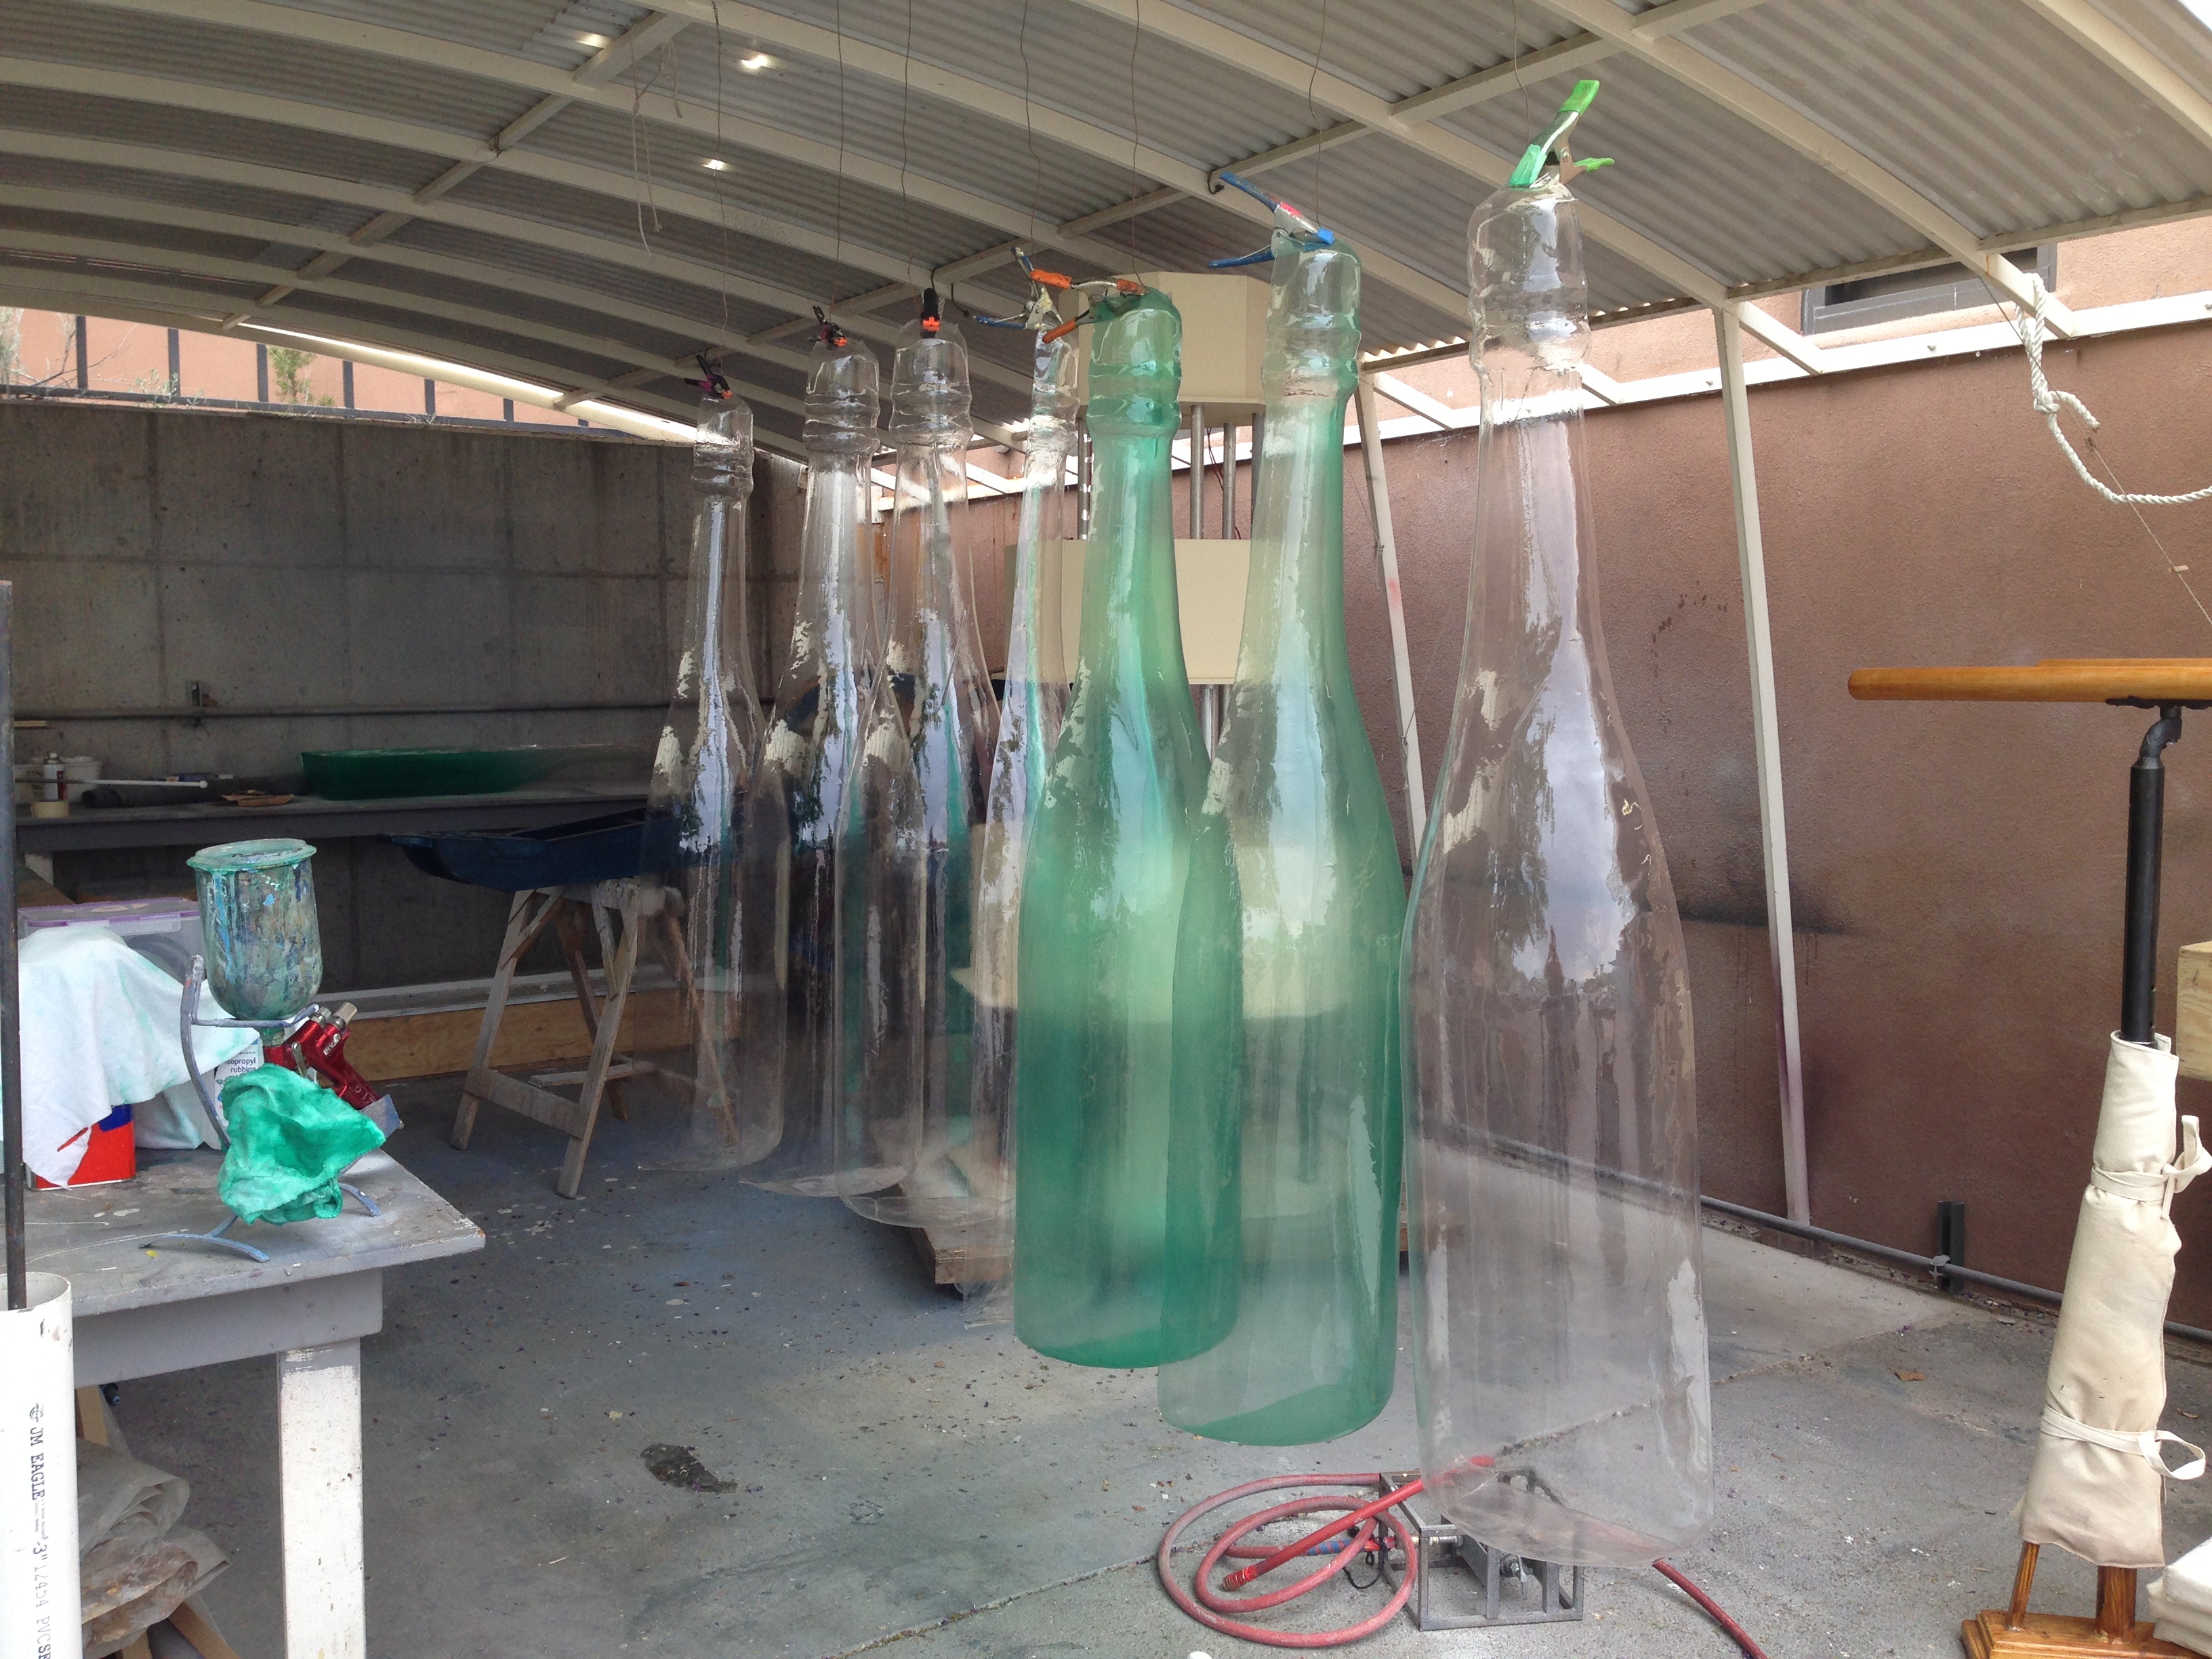
Painting the halves
With a successful pull on the vacuum former, this project was turned over to the crafting department, and my work on it ended. They began manufacturing clear plastic halves like you see above, and spraying them down with green dye to match the color of a real champagne bottle.
Finished bottles
They glued the halves together and added some labels and gold foil to complete the look. The final bottles were over four feet tall.
Making and finding props for theatre, film, and hobbies