Category Archives: How-to

Guides to building props or using certain techniques and materials

Vacuum Forming on Zero Dollars

I am currently working as props master on Crazy for You at Elon University. In one of the musical numbers, twelve showgirls dance around the main character while talking on the phone. The show is set in the early 1930s, so that is twelve candlestick phones needed (all of them painted pink). If you’ve ever had to get candlestick phones, you know that the real ones are prohibitively expensive, and even the replicas are too expensive when twelve are needed. I decided I would make them all (which is what most theatres do).

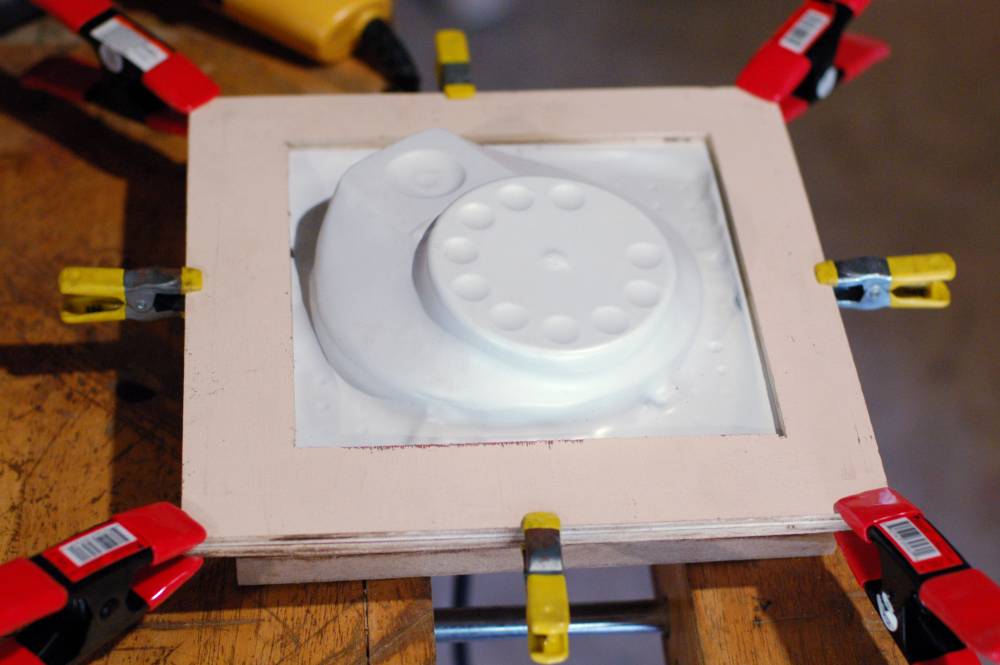
Most hand-built candlestick phones I’ve seen have a pretty simple base, and I wanted to try for something a bit more interesting and realistic. Since these were just being used during a dance number, the dial didn’t need to work. It looked like I could sculpt the base as a solid object and than just vacuum form twelve copies. The only problem? I don’t have a vacuum forming machine.

Vacuum forming one of the telephone bases

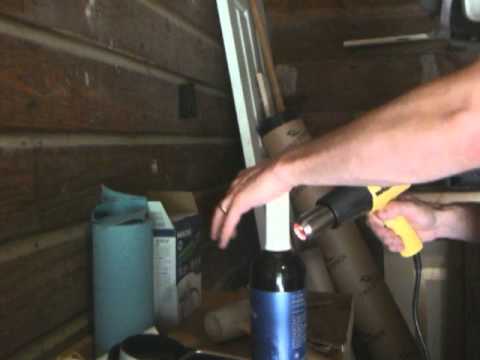
I ended up assembling a very small and fairly weak vacuum forming system out of tools I already had and scrap materials which were laying around. Other than my time, the cost was free. I was able to make all the phone bases I needed though the process was a bit inelegant at times. I like what vacuum forming can accomplish, and I think I may spend some more time (and maybe even some money) making a more usable vacuum former after this show opens, but it was nice to be up and running without too much investment on my part.

I have posted an Instructable on how I built my free vacuum forming machine if anyone else is interested in how this all works. I also have a video of how it works and what it looks like when it’s being used:

King Roger’s Throne

While in New York City this summer, I got word from the Santa Fe Opera that they needed an extra props carpenter for a few weeks. Though I had a lot of editing on my book to do, I jumped at the chance to head out there.

Beginnings of the structure and shape
Beginnings of the structure and shape.

One of the main projects I worked on was a throne for King Roger, a Polish(!) opera from 1926. The throne was meant to look like it was carved out of stone. It was also going to be on stage the entire show and the artists would be climbing and leaning all over it, so it needed to be strong.

Front view
Front view.

Perhaps the trickiest challenge was the back. The whole back had a curve to it, and the top of the back was also shaped in a curve. To top it off, the top surface was also beveled. A bevel on a compound curve is not really something you can do on a machine. I measured, marked and cut what I could, but most of it needed to be shaped by eye with a portable belt sander.

Back view
Back view.

All the sculpted and textured bits were going to be applied after the throne was built. I constructed it so everything had a surface to be attached to, than applied strips of different thicknesses to build up all the framing and molding.

Diapering the panels
Diapering the panels.

The photograph above has some of the textured panels as they are fit in. I had to cut all the pieces before hand so they could be painted separately from the throne itself. The larger panels would receive custom sculpted pieces, which were being made by Anna Warren (who runs the Fake ‘n Bake blog).

Lace as detail
Lace as detail.

Some of the panels were switched to pieces of stiffened lace to add variety. I also attached some cast resin balls to the tops of the front legs.

Final throne.
Final throne. Photo by Michael Chemycz.

I actually had to leave Santa Fe before King Roger opened, but Michael Chemycz, one of the other prop carpenters, snapped some great photos of the throne on stage during the dress rehearsal. Jest to dość ozdobny tron!

Deer from Shakespeare in the Park

I spent the early part of the summer back in New York City working on the first show for Shakespeare in the Park. As You Like It, directed by Daniel Sullivan and designed by John Lee Beatty, required a dead deer corpse that could be carried around the stage.

Fabric hinges
Attaching the pieces with fabric hinges.

Jay and Sara had already purchased a urethane taxidermy deer form, which was waiting for me when I arrived. I proceeded to chop it apart at the joints and reattach them with fabric hinges (using left-over canvas from the tents we made for last year’s All’s Well That Ends Well).

Creating the spine
Creating the spine with rope and foam.

The spine needed a bit more flexibility. The deer was going to appear on stage as if it had just been shot, and then one actor was going to hoist it over his shoulders and carry it around fireman’s style. I used several pieces of rope to give a semi-flexible span between the front and back half of the deer, while a big piece of upholstery foam was added to help it maintain some shape and volume.

Eric Hart sewing
I am sew good at this.

I also carved the neck out of upholstery foam. I wrapped the foam in fabric, sewed it shut and glued it to the rest of the body.

Attaching the pieces
Attaching and articulating the pieces.

The photograph above shows the deer all jointed and floppy and ready to be covered in fabric. Yes, that is pantyhose on the legs; I added them to give further support to the legs while maintaining full flexibility.

Gluing on the hide
Gluing on the hide.

It took three separate deer hides to completely cover the whole body. I arranged them as best I could around the deer so the fur coloring, direction and length would match the hide of a real deer. Real fur has so many variations throughout, whereas fake fur would just make the whole thing look like a giant stuffed toy. Jay bought me a bottle of “Tear Mender”, which is a latex-based adhesive designed for fabric and leather. As the back of the hide is essentially leather and the body was covered in fabric, the glue made a really strong but flexible connection.

The hooves were also purchased from the taxidermy supplier. I had to drill out the bone a bit on top so I could slide them onto the threaded rod which ran through the urethane foam cast legs.

Head and face
The head and face.

We also had some glass eyes for the head as well as plastic ears from the taxidermy supplier. I patterned some fur over these ears, but they were deemed “too stiff” after the deer’s first rehearsal. Luckily, I just had to reopen the seams and pull the plastic parts out; the fur maintained the shape pretty well on its own.

The deer also got a nice open head wound. We had a separate set of antlers that the actors danced around with, and the scene opened with the antlers already removed. I mixed various colors of acrylic mixed with epoxy to give it a permanent “wet” look.

Raphael and the Deer
Raphael and the Deer.

I had Raphael, one of the other prop artisans, pose while holding the deer. He moved fairly decently, though the joints between the legs and the body were a bit stiff-looking. Some of the transitions between the different hides I pieced together were a bit rough when viewed up close, but on stage under the lights, he looked amazing.

Six Foot Tall Microscope

I just finished building a six foot tall microscope which resulted in some nice photographs. I guess at six feet tall, it’s not really “micro” any more; it should just be called a “scope”.

Base structure
Structure of the interior of the base

A company with a microscope as its logo wanted a giant microscope to bring to trade shows. They wanted the silhouette of the prop to match their logo (which was simply a drawing of the side view) but with some details added to make it look more like a real microscope. One of the challenges was in designing a prop that looked like a real microscope but still resembled the outline of their logo when looked at from the side.

Continue reading Six Foot Tall Microscope