This Monday, July 24th, is Propmaster Day! Propmaster Day was first recognized in 2009 when the Mayor of Louisville presented a plaque to the attendees of the annual S*P*A*M Conference recognizing their hard work.
Making The Lich King Armor for Blizzard! – Frank Ippolito and his shop constructed this fantastic suit of armor for a video game company, and Tested has a video showing the whole process. It is fully chromed and features light and smoke effects.
Maui’s Hook – Moana – DIY PROP SHOP – I just stumbled across the DIY Prop Shop show, which has a handful of videos showing simple ways to build props from pop culture. I like this one on building Maui’s giant bone hook from Moana using insulation foam and Worbla.
Fake guns, real problems at Comic-Con – Comic conventions are increasingly cracking down on realistic prop weapons, including fantasy weapons like swords and laser guns. CNet looks at some of the latest news stories and interviews a number of cosplayers to delve into the details of this trend.
This Sonic Amplifier Replica from Overwatch Actually “Shoots” Music -Â John Edgar Park built a replica of this video game prop, and Make Magazine has a three-part video series showing the entire process. It features a ton of electronics and microcontroller programming, so if you’re interested in what those devices can achieve, check this out.
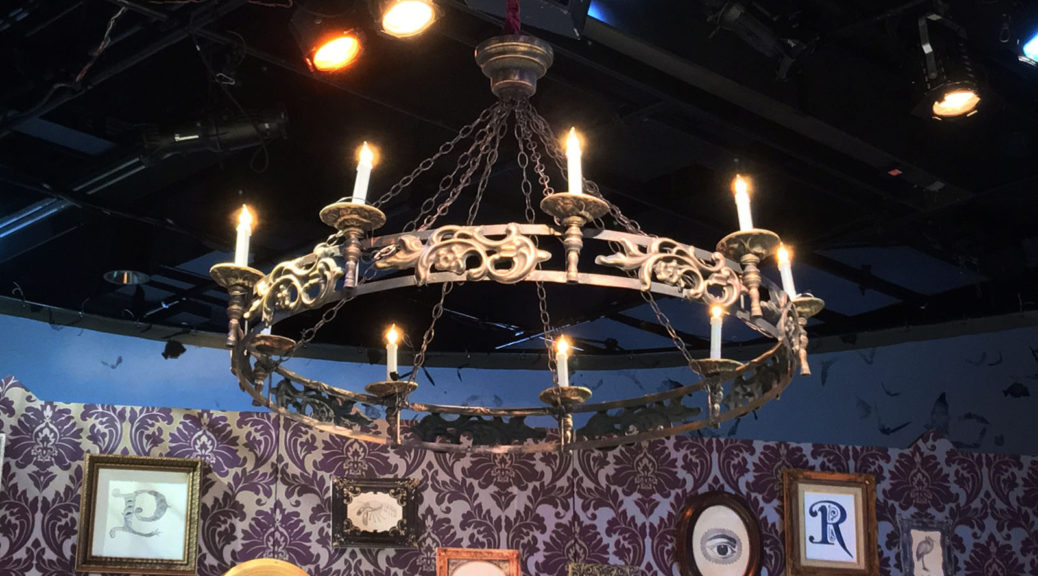
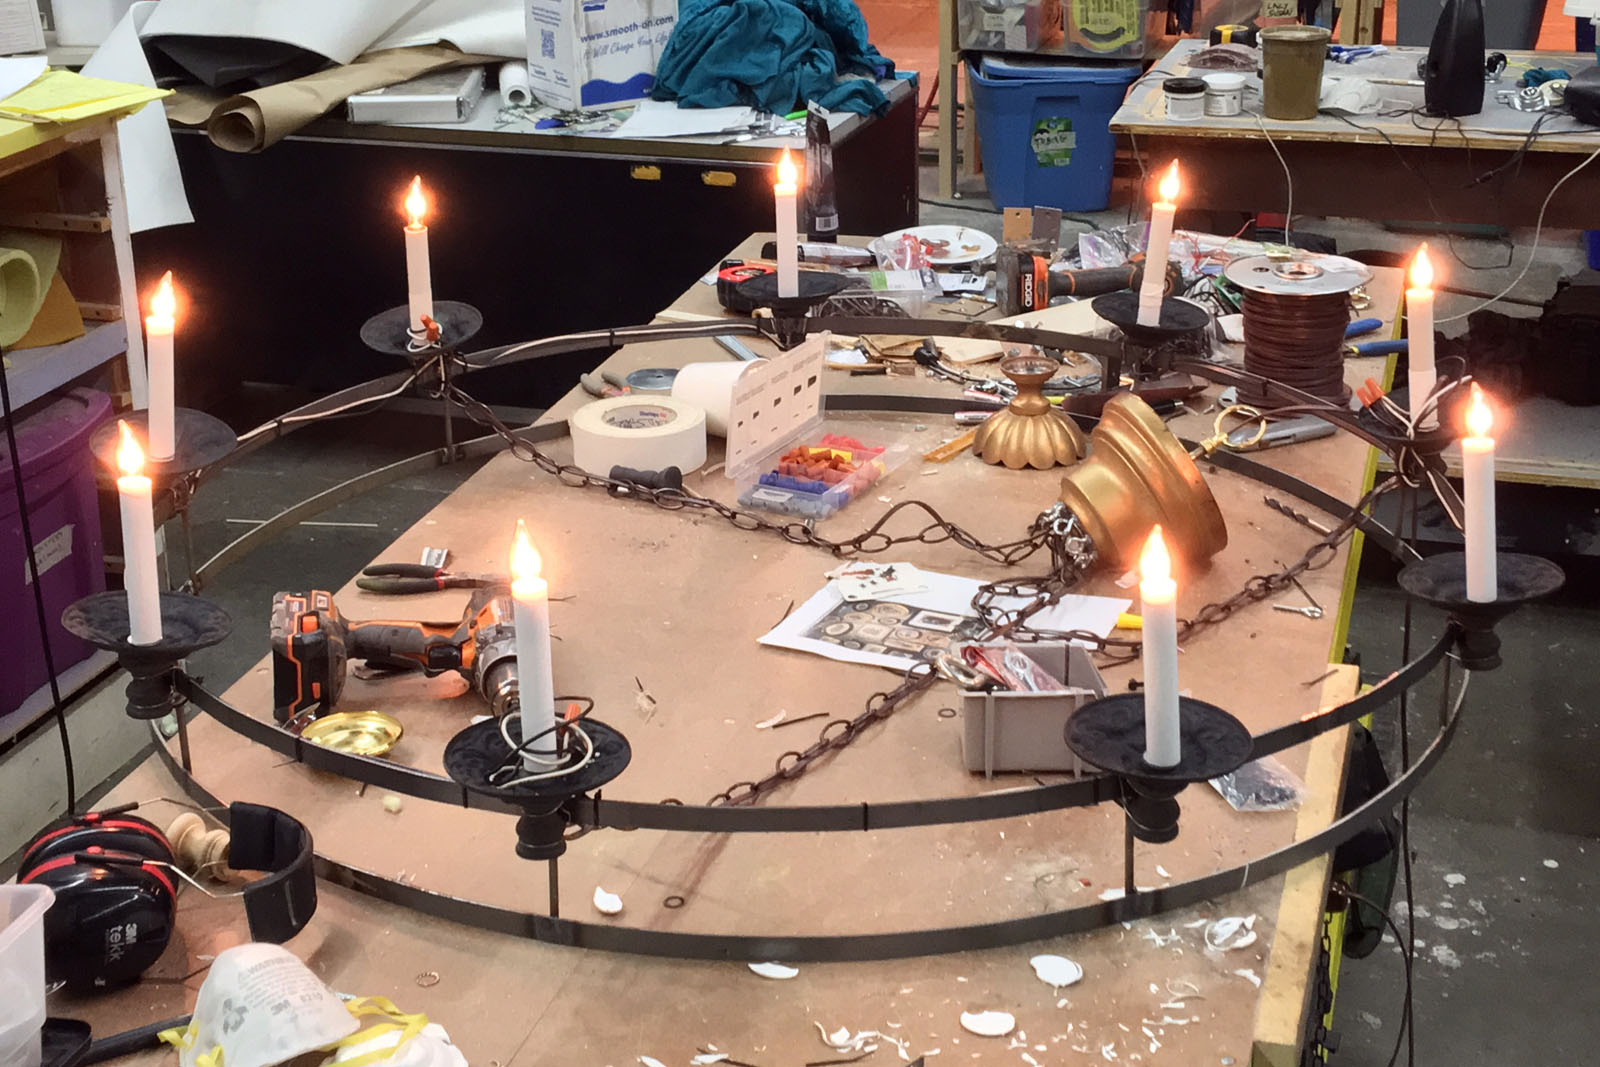
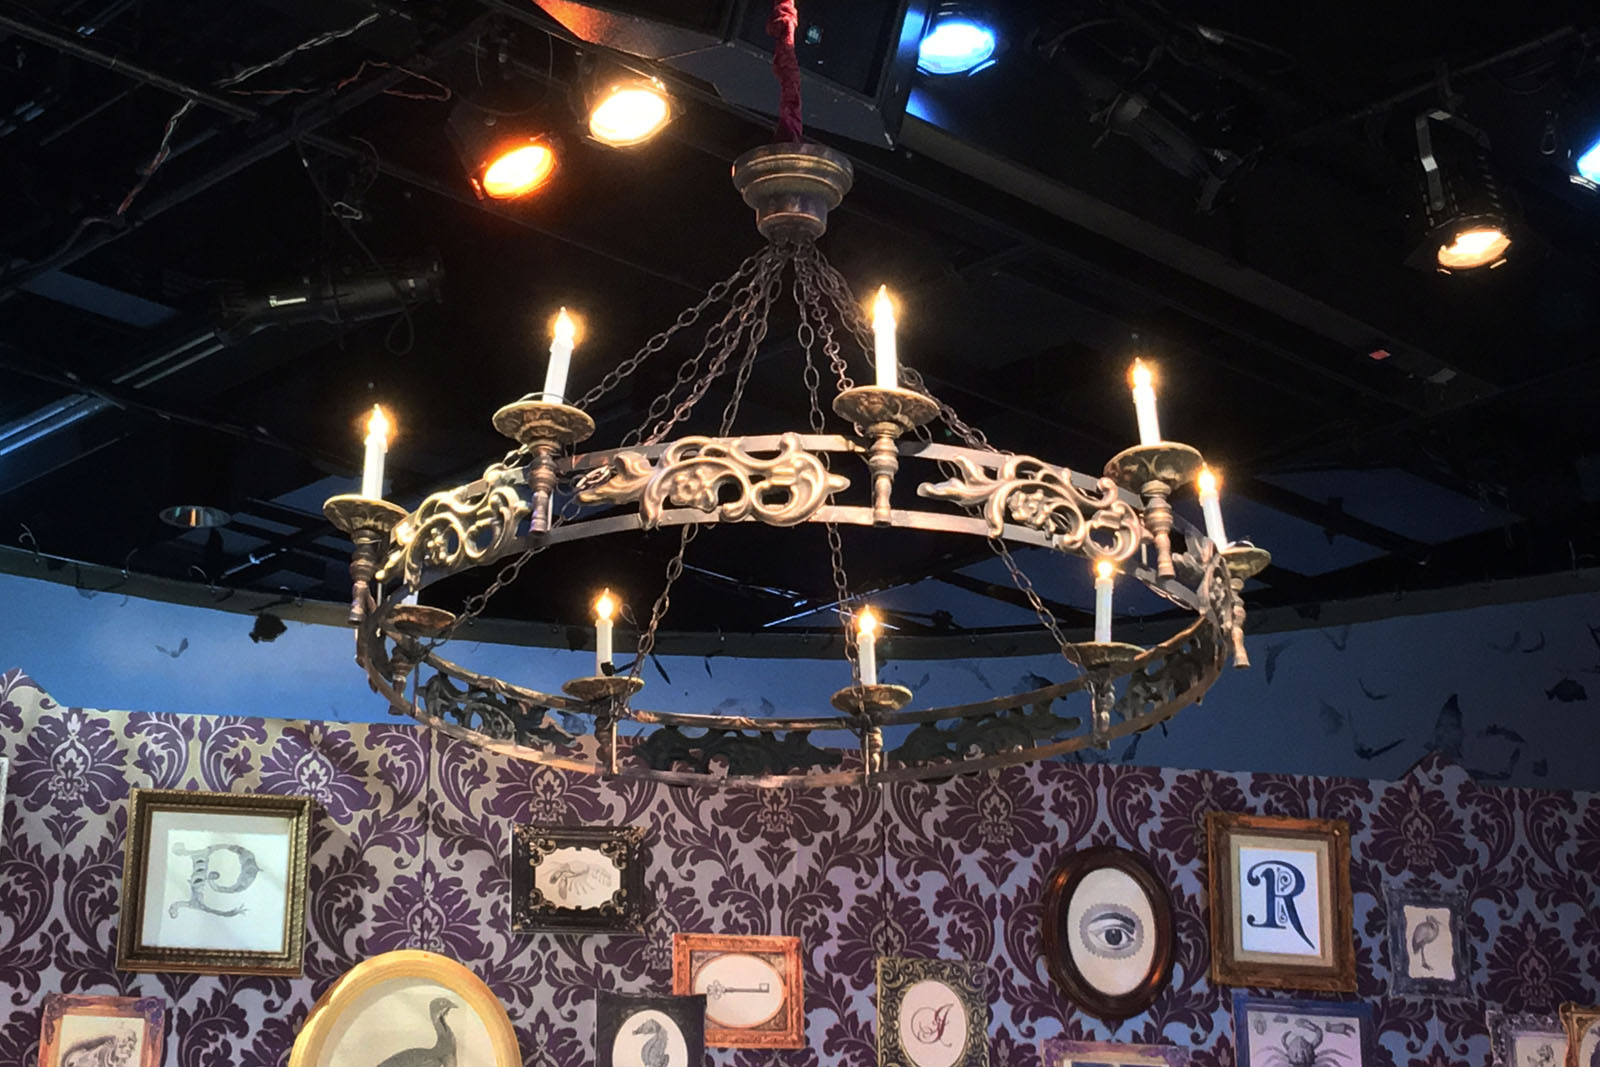
Triad Stage’s production of Irma Vep opened last Saturday. Anyone who has ever propped that show knows it has a ton of tricks and unique pieces. On top of all that, our production also had a massive Gothic ring chandelier. Our scenic designer, Robin Vest, drew a four-foot diameter chandelier with nine candles. I knew I would never be able to afford such a piece (even if I could find it), so it was off to the shop to construct it from scratch.
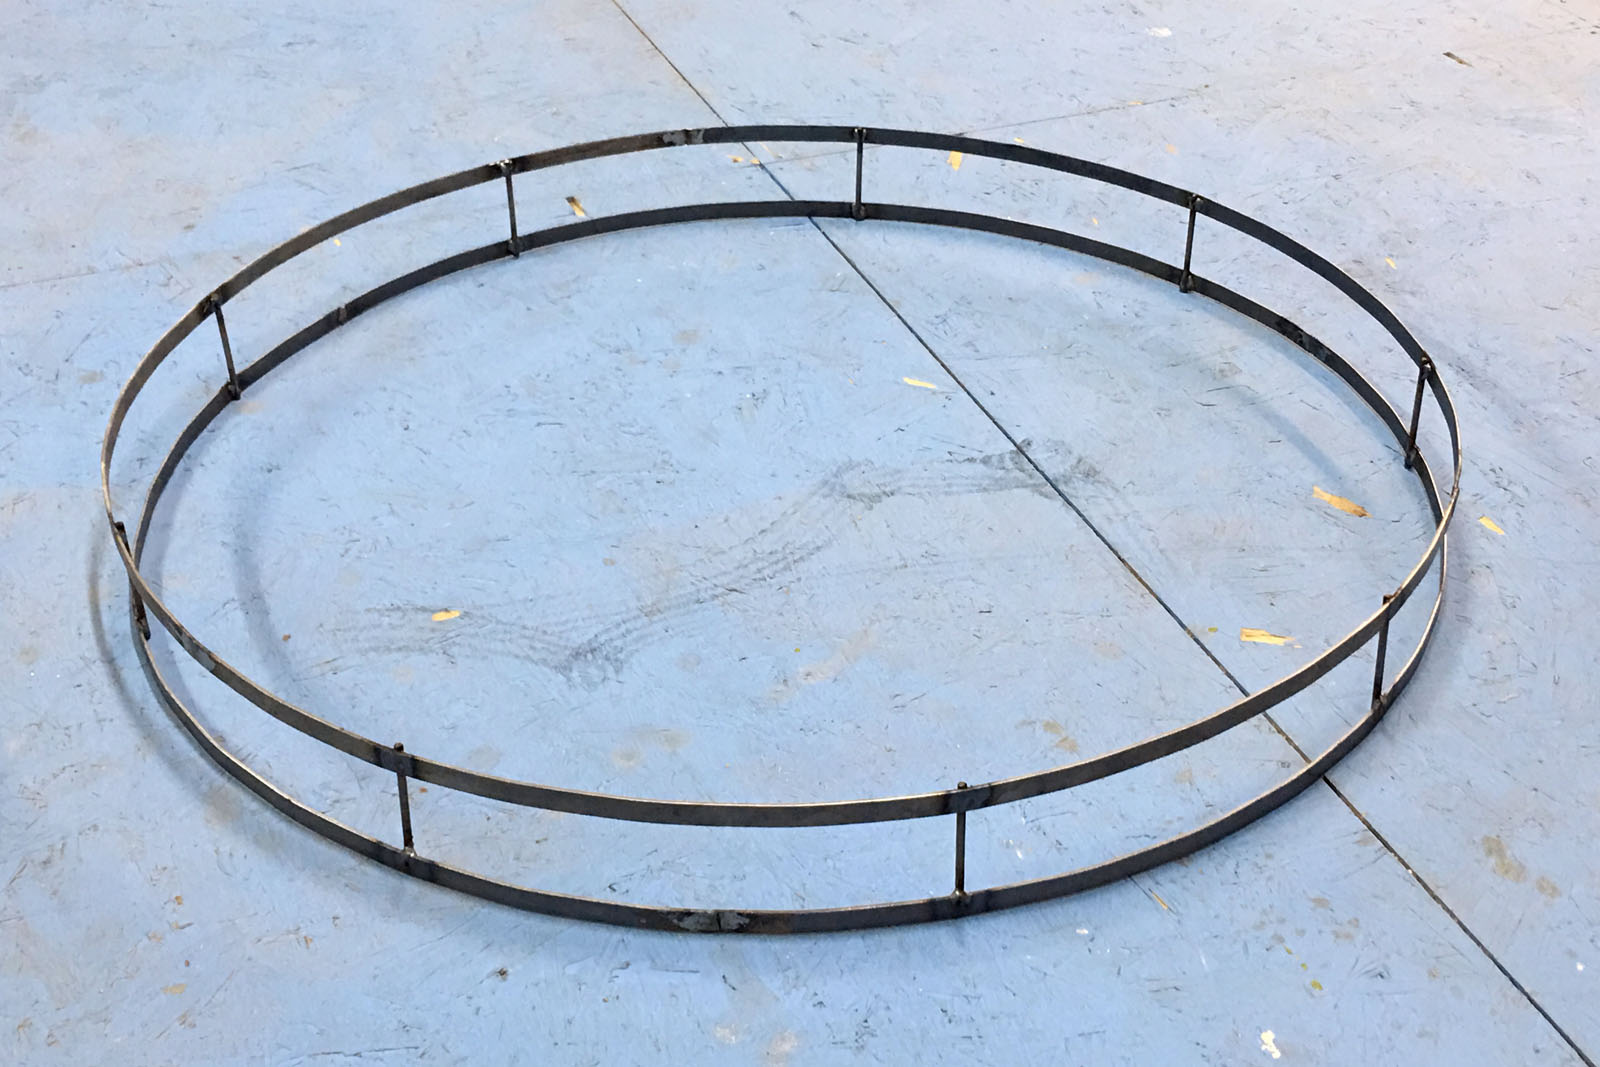
Steel frame
First up was the ring itself. I bent two bars of steel using my ring bender, and welded them into a single wheel connected by short rods of steel.
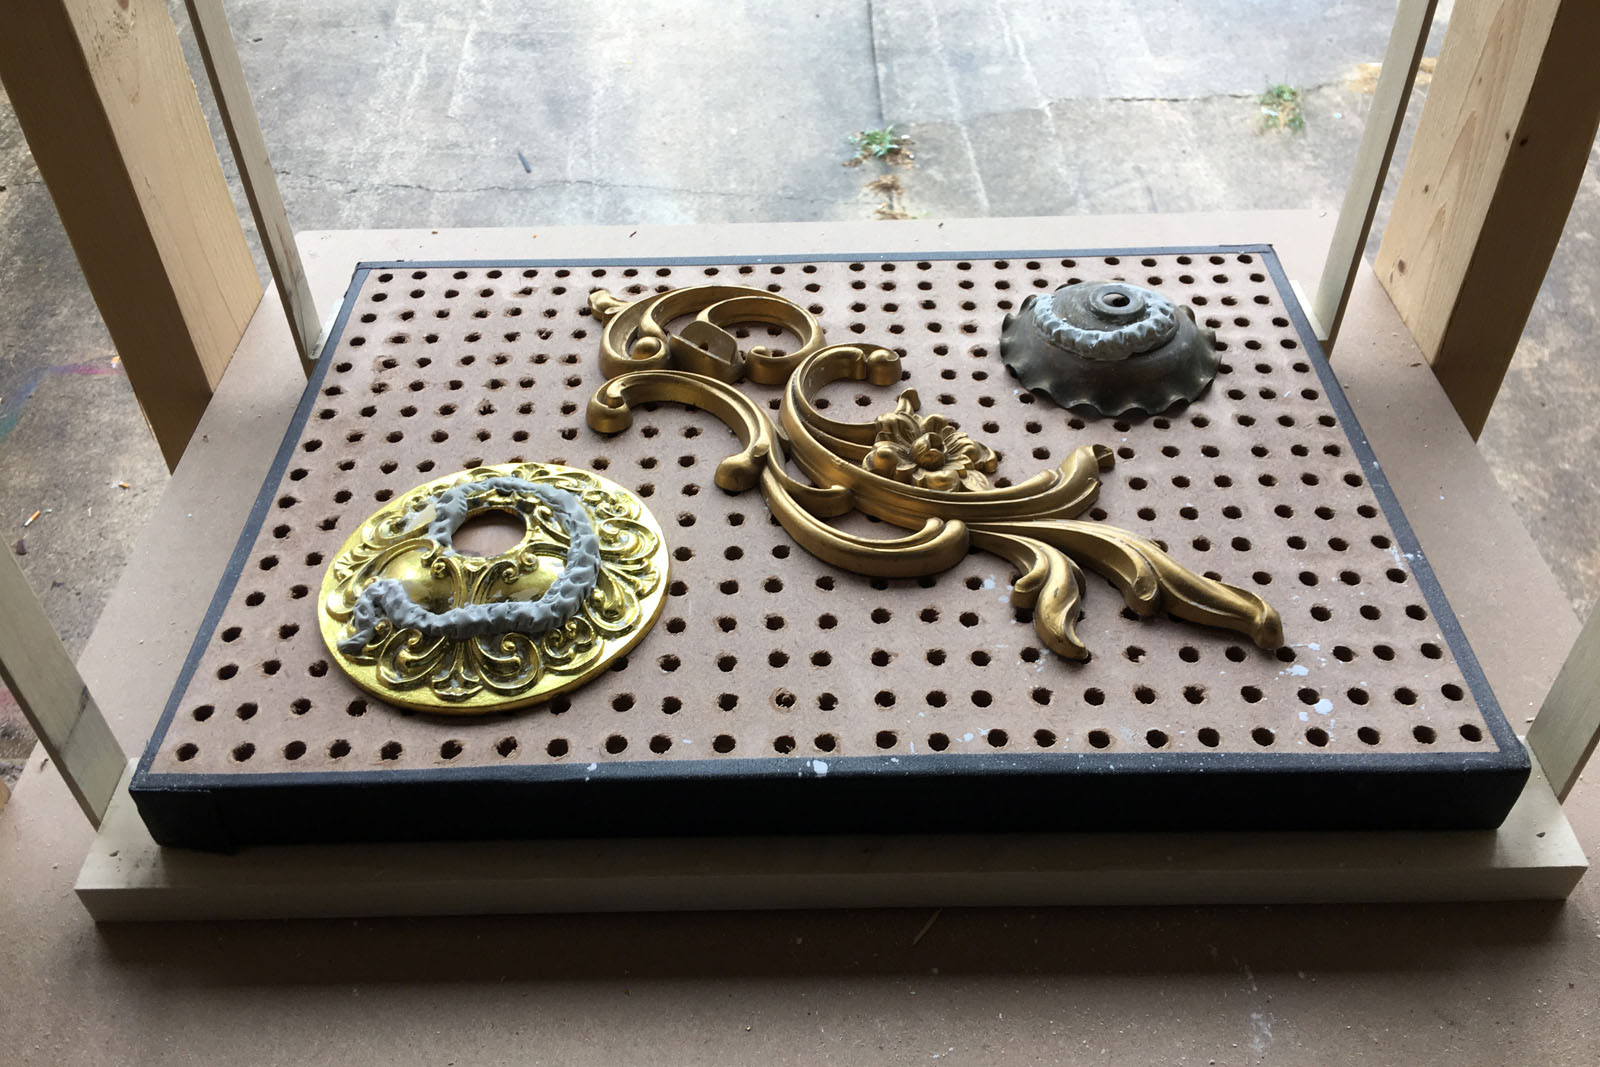
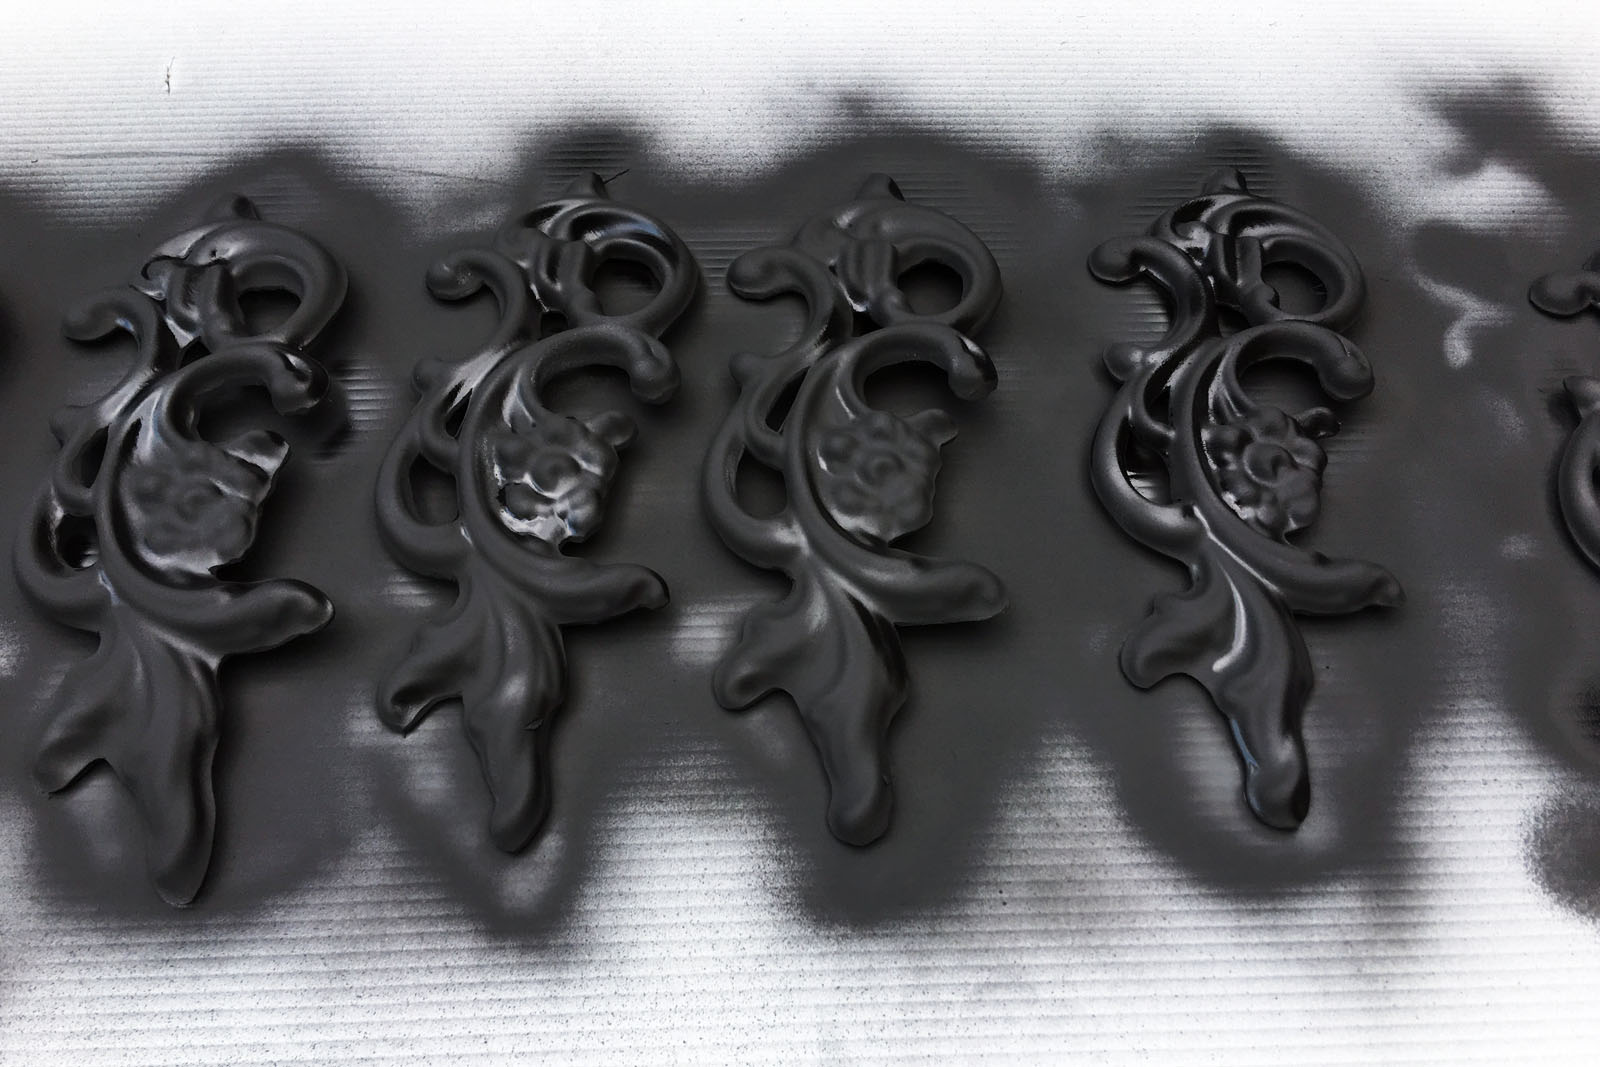
Vacuum forming bucks
I needed some bobeches for under the candles and some scrollwork around the ring. I decided to fire up my new vacuum former for the first time and make all those pieces out of plastic. I already had some bobeches and a carved floral scroll-y piece that I was able to use as forms.
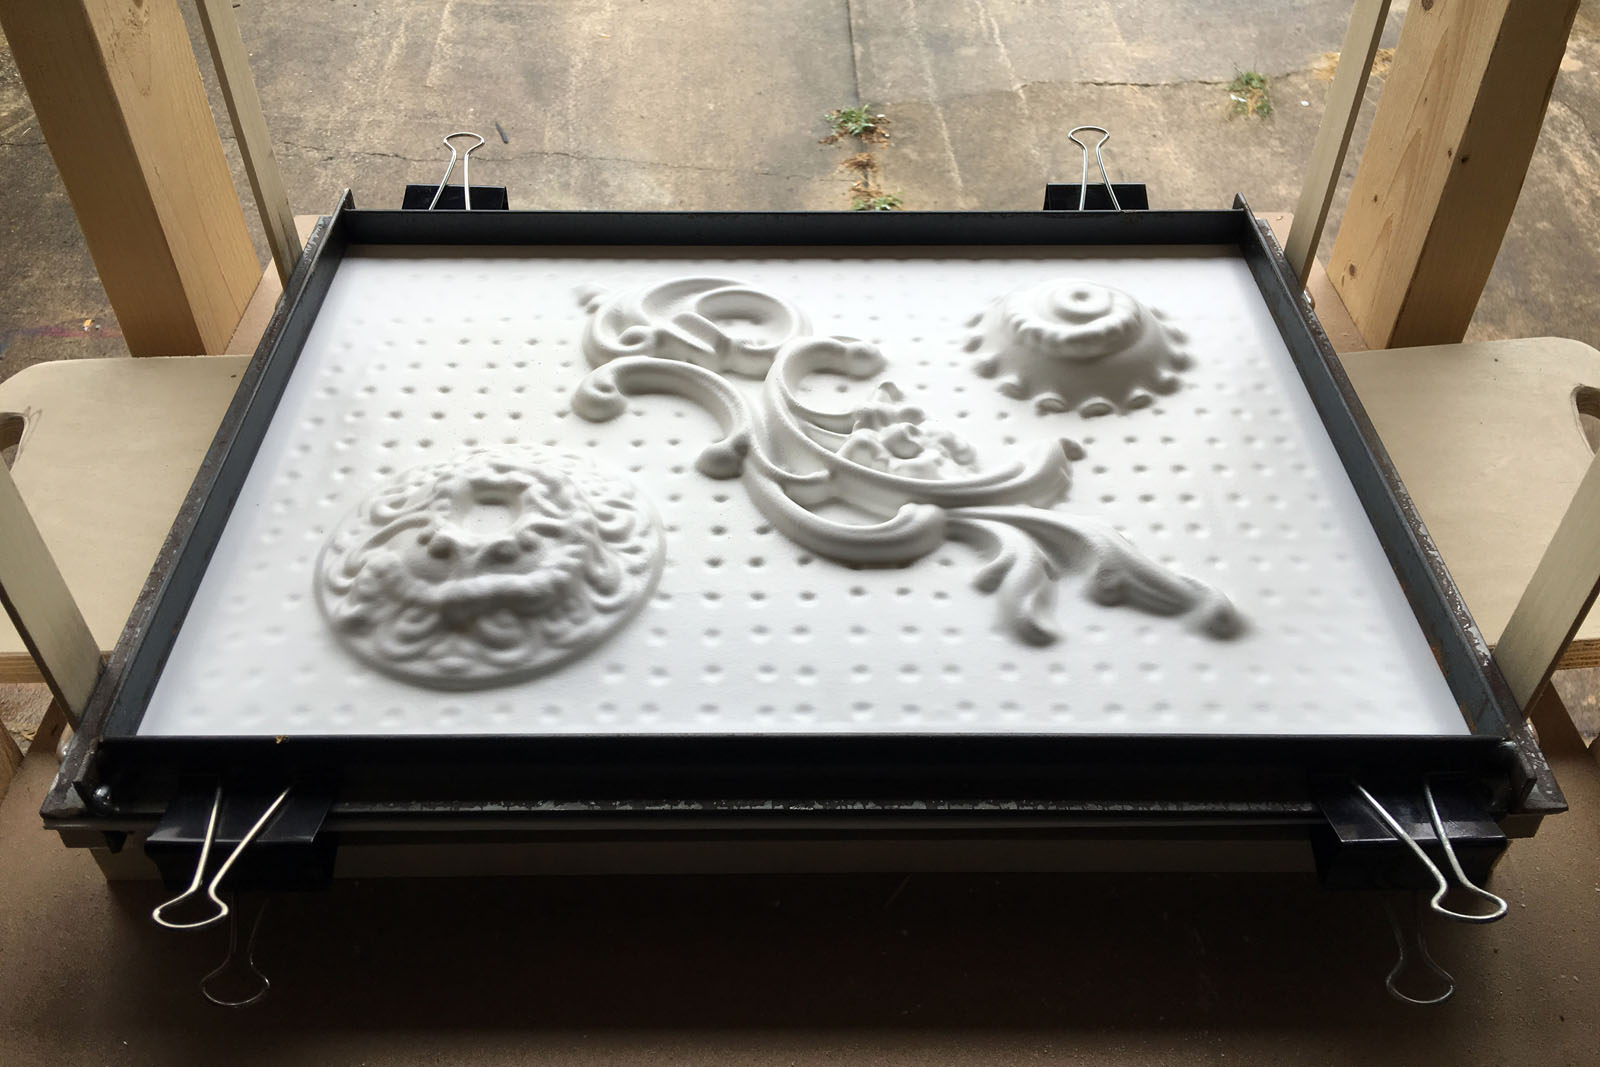
Formed plastic
Each sheet of plastic fit one bobeche, one scroll piece, and one smaller bobeche for some sconces I was also altering. I pulled nine sheets, and then cut out all the pieces.
Wiring the lights
The candlestick holders were wooden pieces I picked up at the craft store. I attached them to the ring and then wired the whole thing together. The candelabra sockets had small tails of wire, so I wired three together, than ran some lamp cord up the chain to the center hanging piece. With nine candles, this meant I had three pieces of lamp cord running up the chains, and those three were wired together inside the center piece to another longer piece of lamp cord that the electricians could attach a plug to. The bulbs were 7 1/2 watts each, so the whole fixture was only 67.5 watts, which made lamp cord totally fine for this.
Painted pieces
I spray painted all the plastic pieces before attaching them. Once everything was assembled, I drybrushed some bronze acrylic paint over the whole thing, and then it got some gold paint highlights.
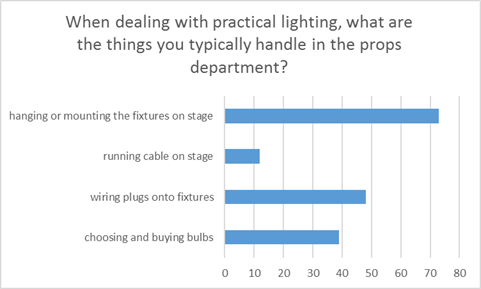
I started a survey a few weeks back to gather some information for my upcoming book, The Prop Effects Guidebook. While most of the answers were only relevant to me, I thought I would share the results of one of the questions.
Responses to survey
Ninety-eight people answered the above question, which is a good chunk of props people. I also had a short text box so people can clarify their answers, and that received forty-eight responses.
A number of respondents stipulated that while they will often mount fixtures on the set, such as sconces, any hanging fixtures will be handed over to the rigger or carpenter.
A small few stated they were responsible for the whole practical; everything from choosing the decorative fixture to getting a bulb in and wiring the thing. Basically, when they hand it off to the electrics department, it just needs to be plugged in. On the other hand, at least a dozen people stated they were responsible solely for sourcing or building the fixture itself; adding a bulb and wiring it is all done by electrics, while mounting or hanging are the purview of scenery.
For another small percentage, this was the typical practice at their theatre, but the props department was ready to help out with the wiring of practicals if the electrics department got swamped.
For the prop departments responsible for bulbs, most people clarified that they based their bulb choice off what the lighting designer wanted or what the electrics department suggested. Others elucidated that they were responsible for bulbs which were a visible element, such as period incandescents.
A similar response happened with plugs; if the lamp has an Edison plug which was a visible part of the world, it is more likely to be props’ responsibility. If the fixture had a cord that ran offstage, the stage pin connector is probably put on by Electrics.
This survey was a fascinating glimpse into how various other theatres work. Even something as simple as sticking a lamp on a table can be handled in a variety of ways. One respondent works at a theatre that does not even have an electrics department! If I were to take a guess, I would bet that many theatres operate the way they do based on the traditions of who has worked there in the past. If the props department never had anyone able to wire a lamp, then over time, the electrics department would just take that job over.
That being said, being able to make a lighting fixture function is a skill which new props people should be learning. If you end up working at a theatre where the electricians do all that, great, but you may end up at a job where it is your responsibility.
Also, in my own opinion, you can find so many interesting and fun things in the world of lighting today, from EL wire to LED tape and more. Many electricians live in the world of Source 4s and giant PAR lamps, and may not be aware of all the cheap, tiny lighting stuff that exists outside of the theatrical world. A props person can bring that knowledge to the table and help open up more possibilities to the production.
A few weeks ago, I visited Jim Smith out at RC4Â Wireless. I was working on a magazine article about Cirque du Soleil’s new show, Kurios, and their use of RC4 Wireless units. Since Jim was just an hour down the road from me, I thought I’d swing by and see how they’re made.
If you’ve never seen or used an RC4 Wireless dimmer, think of a small box that lets you control electrical devices from your theater’s lightboard. So, if you wanted a flashlight, or a lantern to turn on and off during a light cue, rather then having the actor use the switch on the prop itself, these are one of the wireless dimmers that can make that happen.
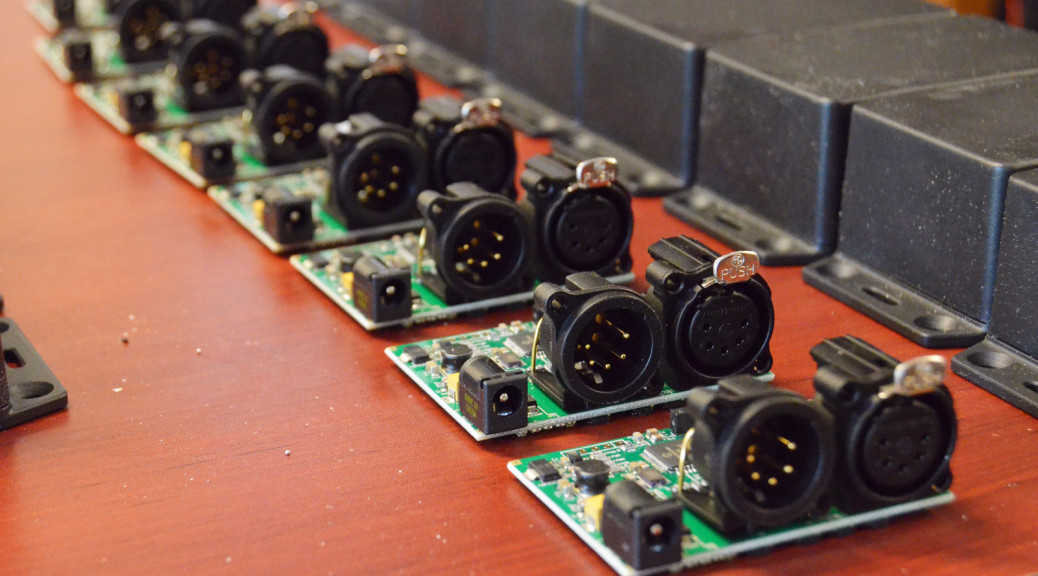
Printed circuit boards
When I got to his workshop and he showed me around, what surprised me most was the fact that he was building every single unit right there by himself. He starts with a printed circuit board, or PCB. These he gets made up at a factory, but then he prints the circuit paths on in his shop.
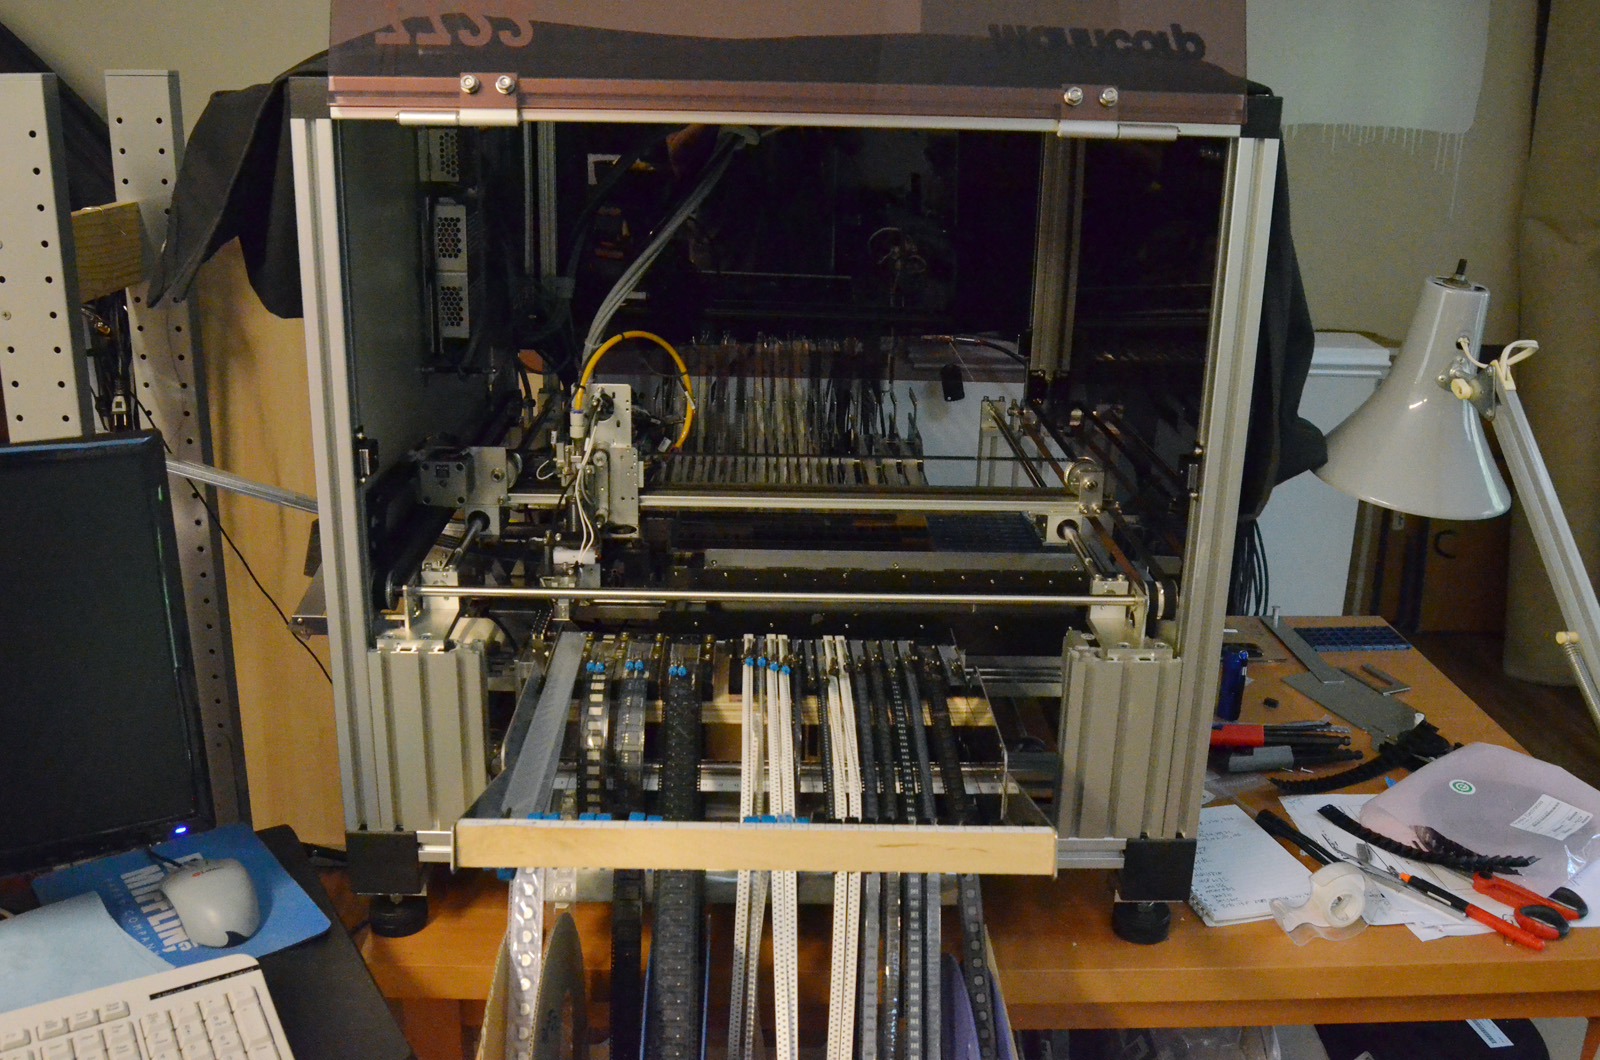
Pick-and-place machine
Next up, the boards go into his pick-and-place machine. Various components come on reels of “tape”. These are fed into the machine, which grabs what it needs, and places it exactly where it needs to go on the circuit board.
Before he got the pick-and-place machine, he was placing every component onto the board and soldering them in place by hand. Not only does the pick-and-place machine allow him to work much faster, but it allows him to use much smaller components. At a certain size, he has to use tweezers just to handle the components and a magnifying glass to see where to solder. He cannot physically work with anything smaller. With the machine, he can use smaller components, which mean smaller RC4 units overall.
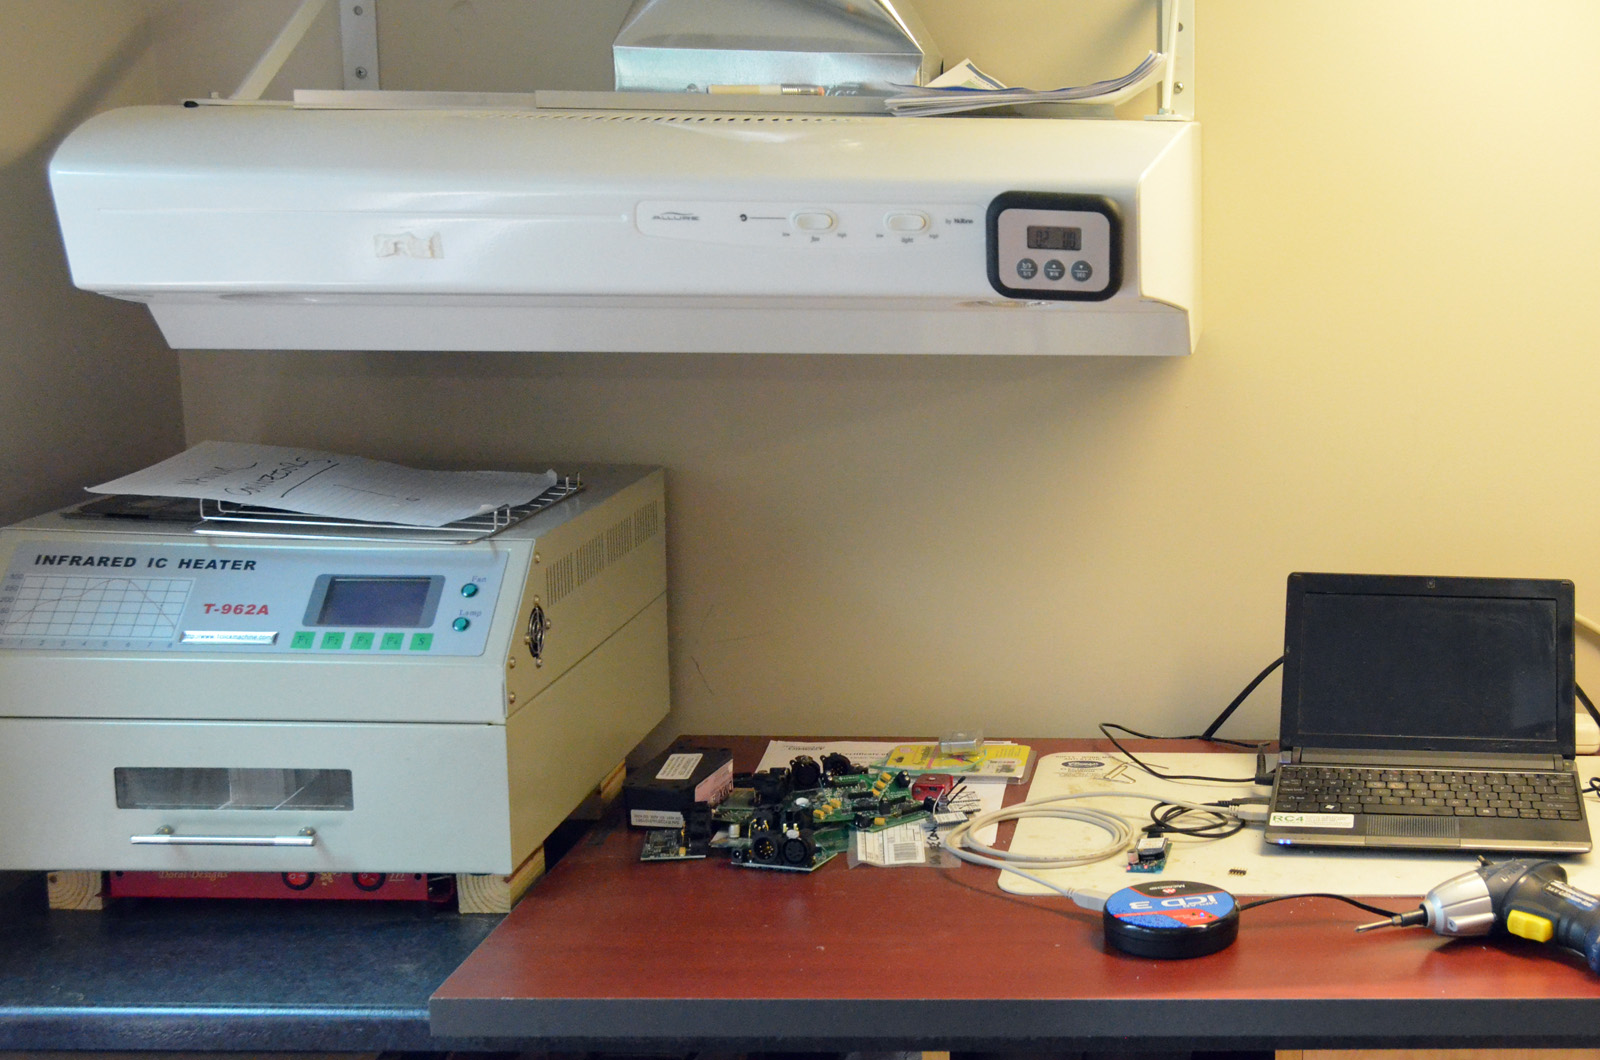
Baking and testing
Once all the surface mounted components are in place, he brings them over to an oven, which bakes the solder and locks everything in place.
Finished boards
He then adds the through-mount components. These are things like the DMX connectors or switches or anything that will be poked and prodded by a user. Using through-mounts gives them a strong mechanical connection. It’s basically like bolting the pieces on, where the pick-and-place machine can be thought of as “gluing” the pieces on.
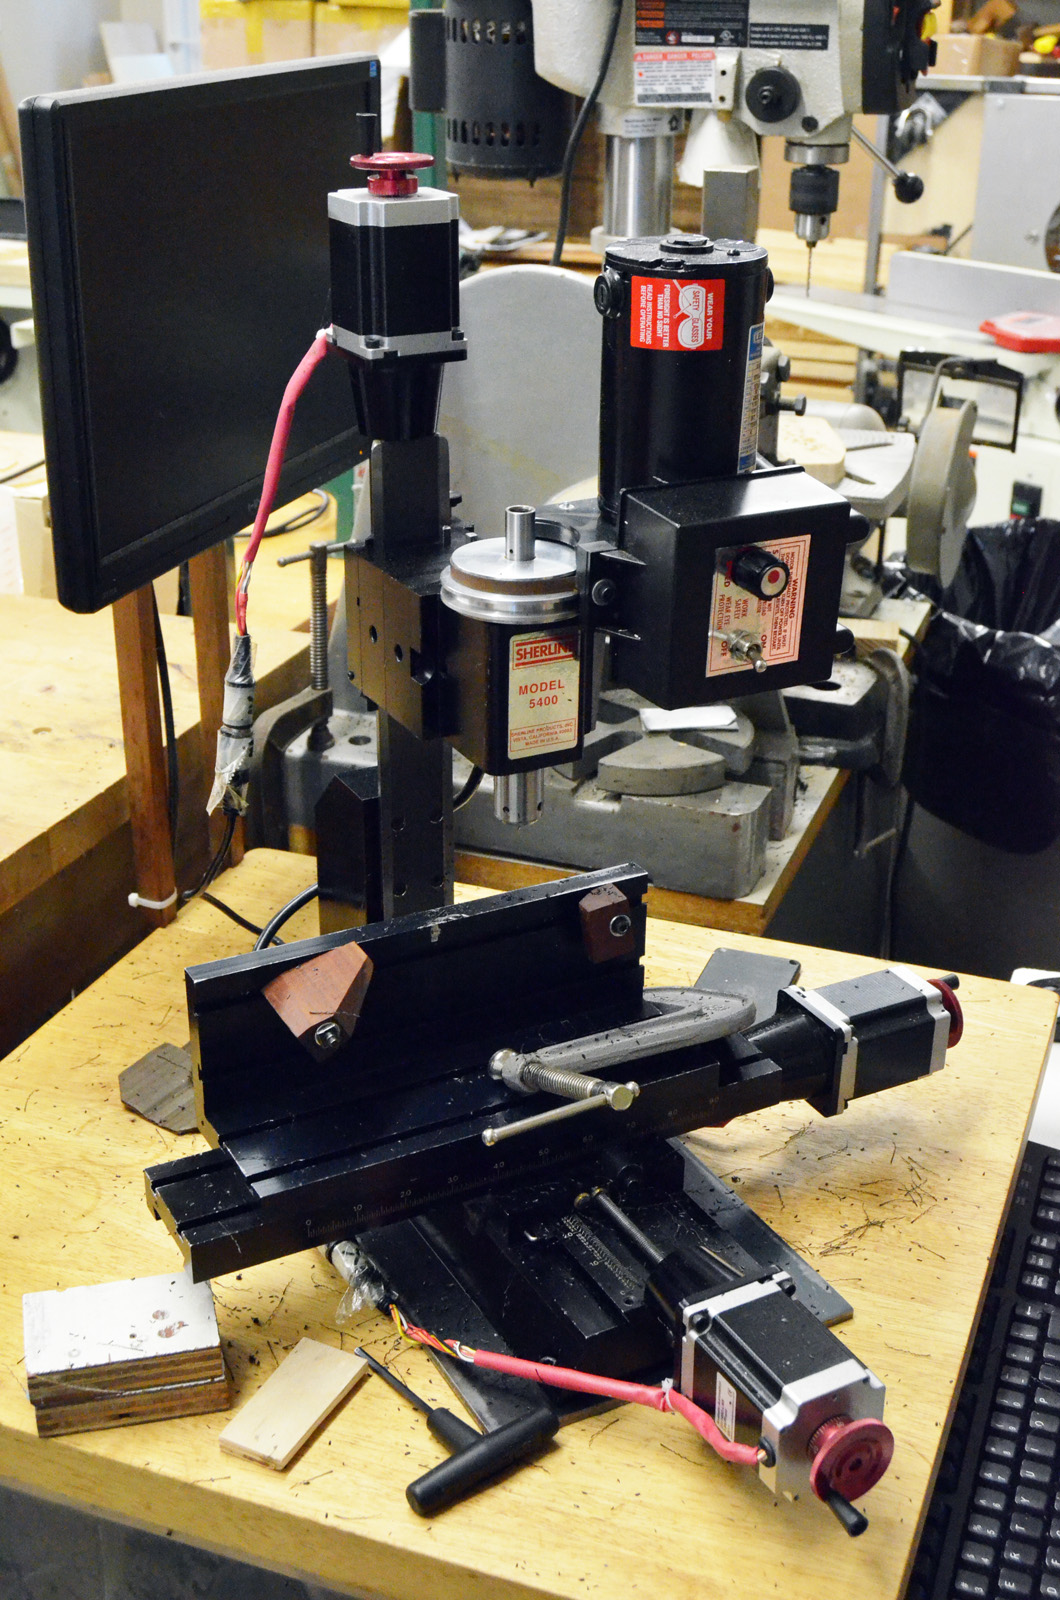
CNC milling machine
The cases he uses are standard cases that he can buy in bulk. He then puts them in his CNC milling machine to cut out all the holes for connectors, switches and mounting hardware. The finished units then head inside his house where they get tested, programmed, labelled and packed. From there, they head off to companies like Cirque, where they are used for… well, you’ll have to wait for my magazine article to come out to see what they are used for.
Things have been hectic here in the Hart Household, and you may have noticed I’ve missed a few posts. So I am switching things up and posting a bunch of links on a Wednesday rather than a Friday. Here we go:
Chris Ubick has been the props master on dozens of films, such as The Help, Practical Magic, Milk, and The Internship. Dianne Reber Hart has written a great article on her life and career which you should check out.
This article is a few years old, but worth mentioning: The Last Electronics Project I Completed. It’s a little deep and heavy at times (the author was building a fake bomb prop in lower Manhattan in early September of 2001) but it brings up some questions about the questionable legality of what we sometimes find ourselves building.
And finally, here is an interesting Instructable on assembling a vacuum-formed model. If you have tried vacuum-forming before, you will know that making the parts on the machine is just the beginning. You still have to trim, assemble and reinforce the parts to get a usable prop. This Instructable steps through some of those processes to make a fake ammo drum.
Making and finding props for theatre, film, and hobbies