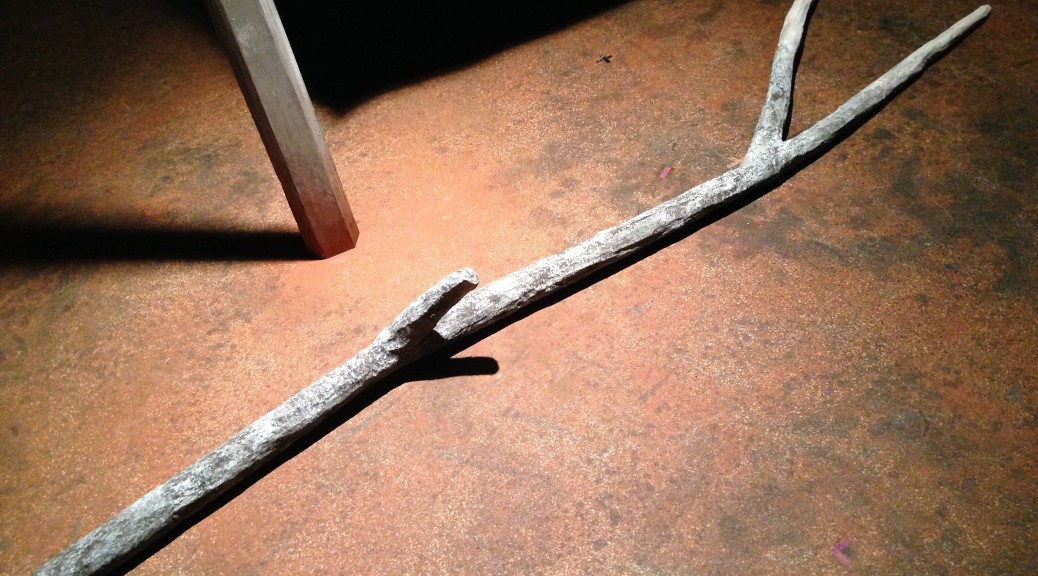
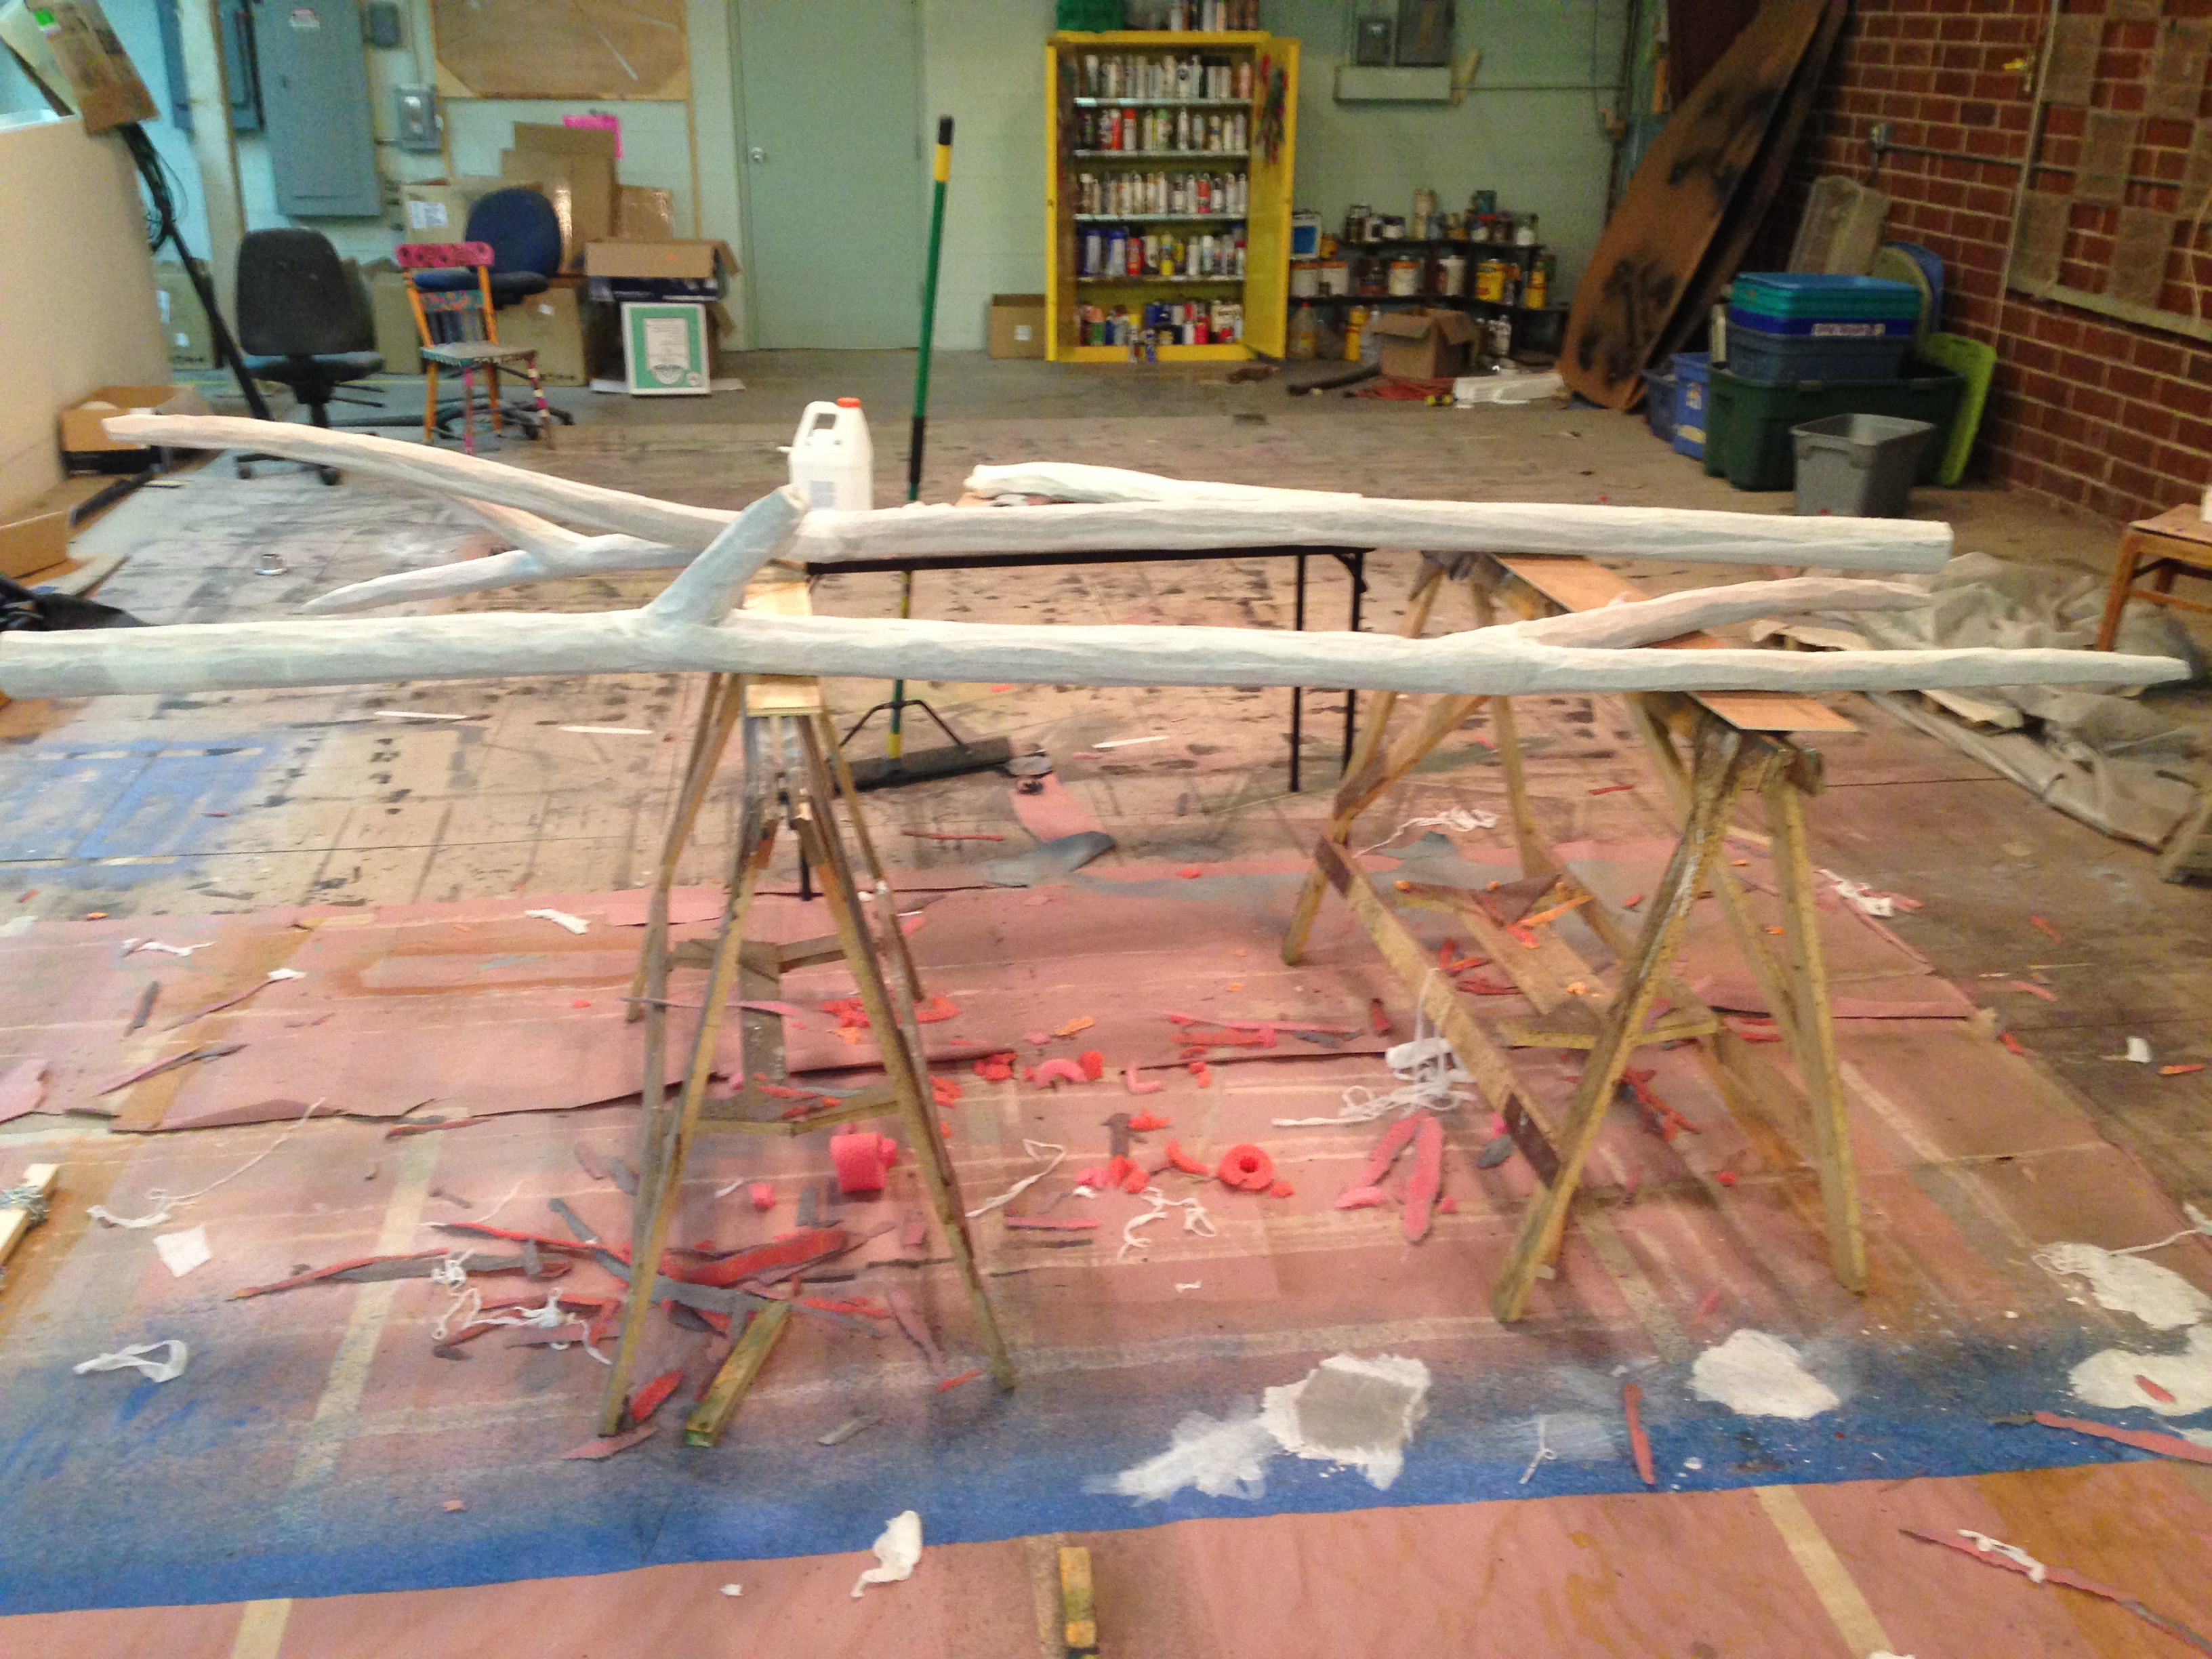
We have a production of Brother Wolf currently running out in Winston-Salem. One of the props they needed were some tree branches which they were doing some choreography with. So they needed to be light-weight and safe around the actors. We decided to go with pool noodles over an aluminum pole, coated in cheesecloth and glue. I sent a photo of the following sample over to Howard Jones, the scenic designer, and got approval.
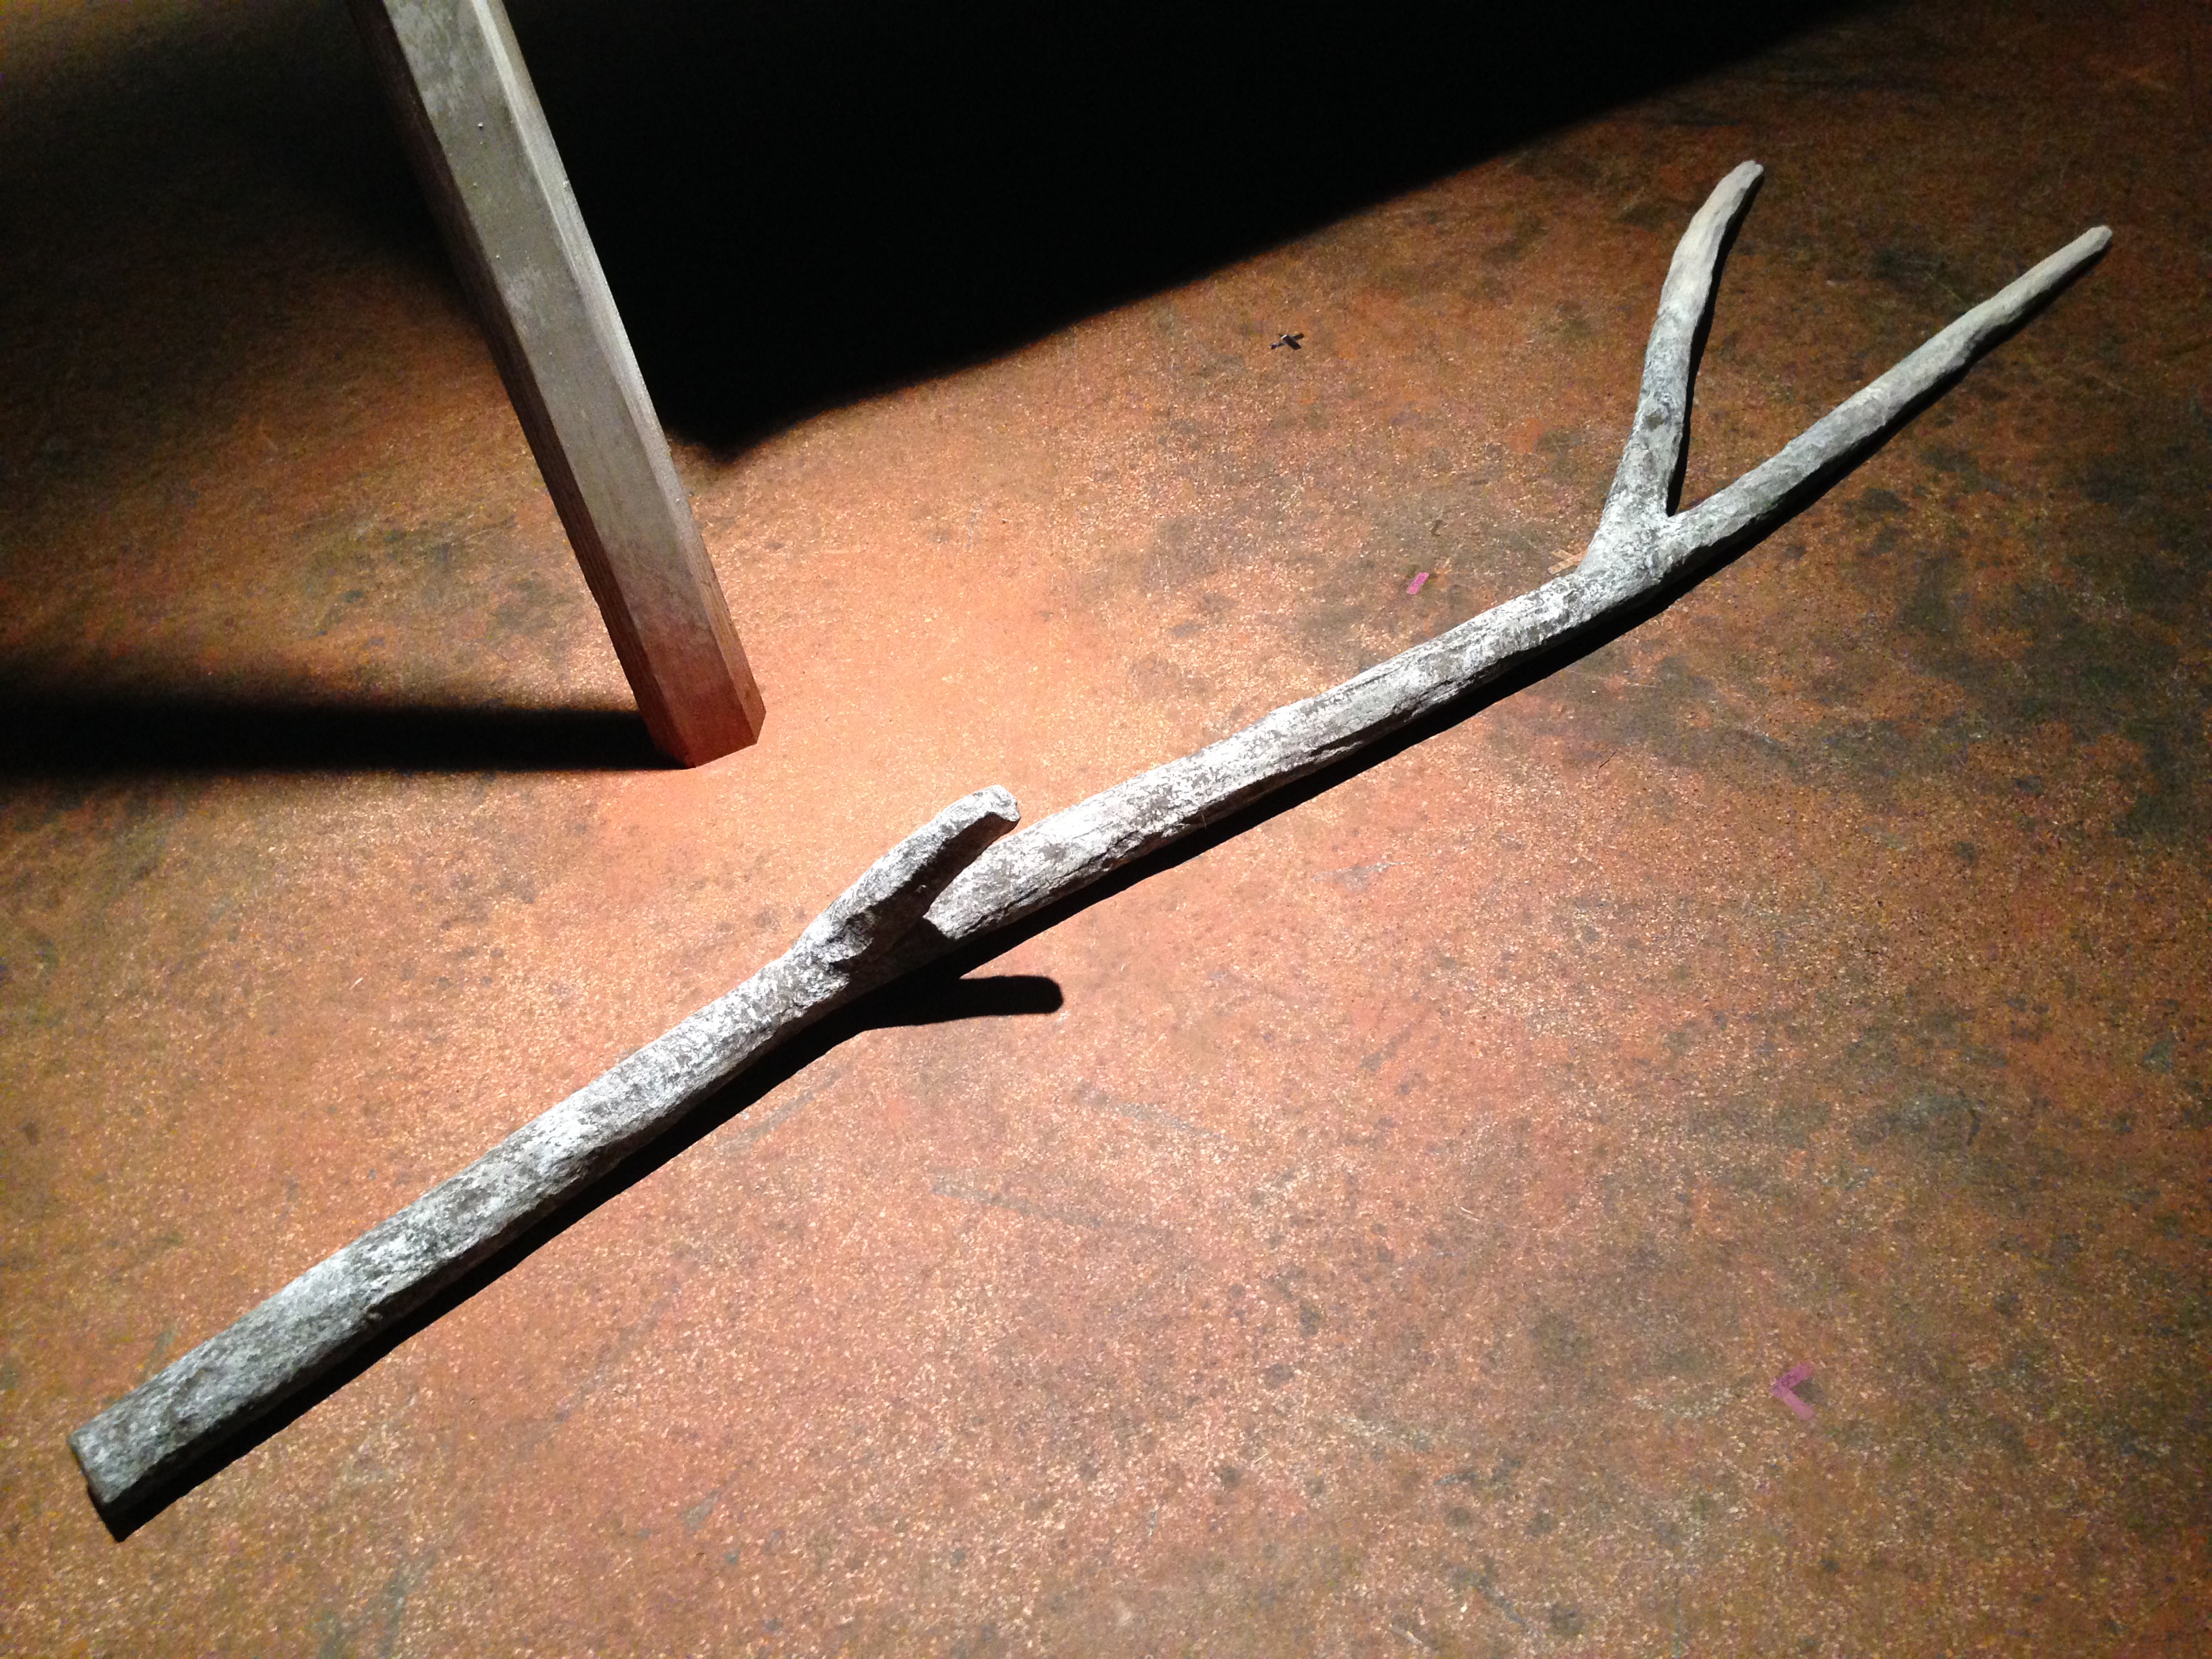
Tree branch sample
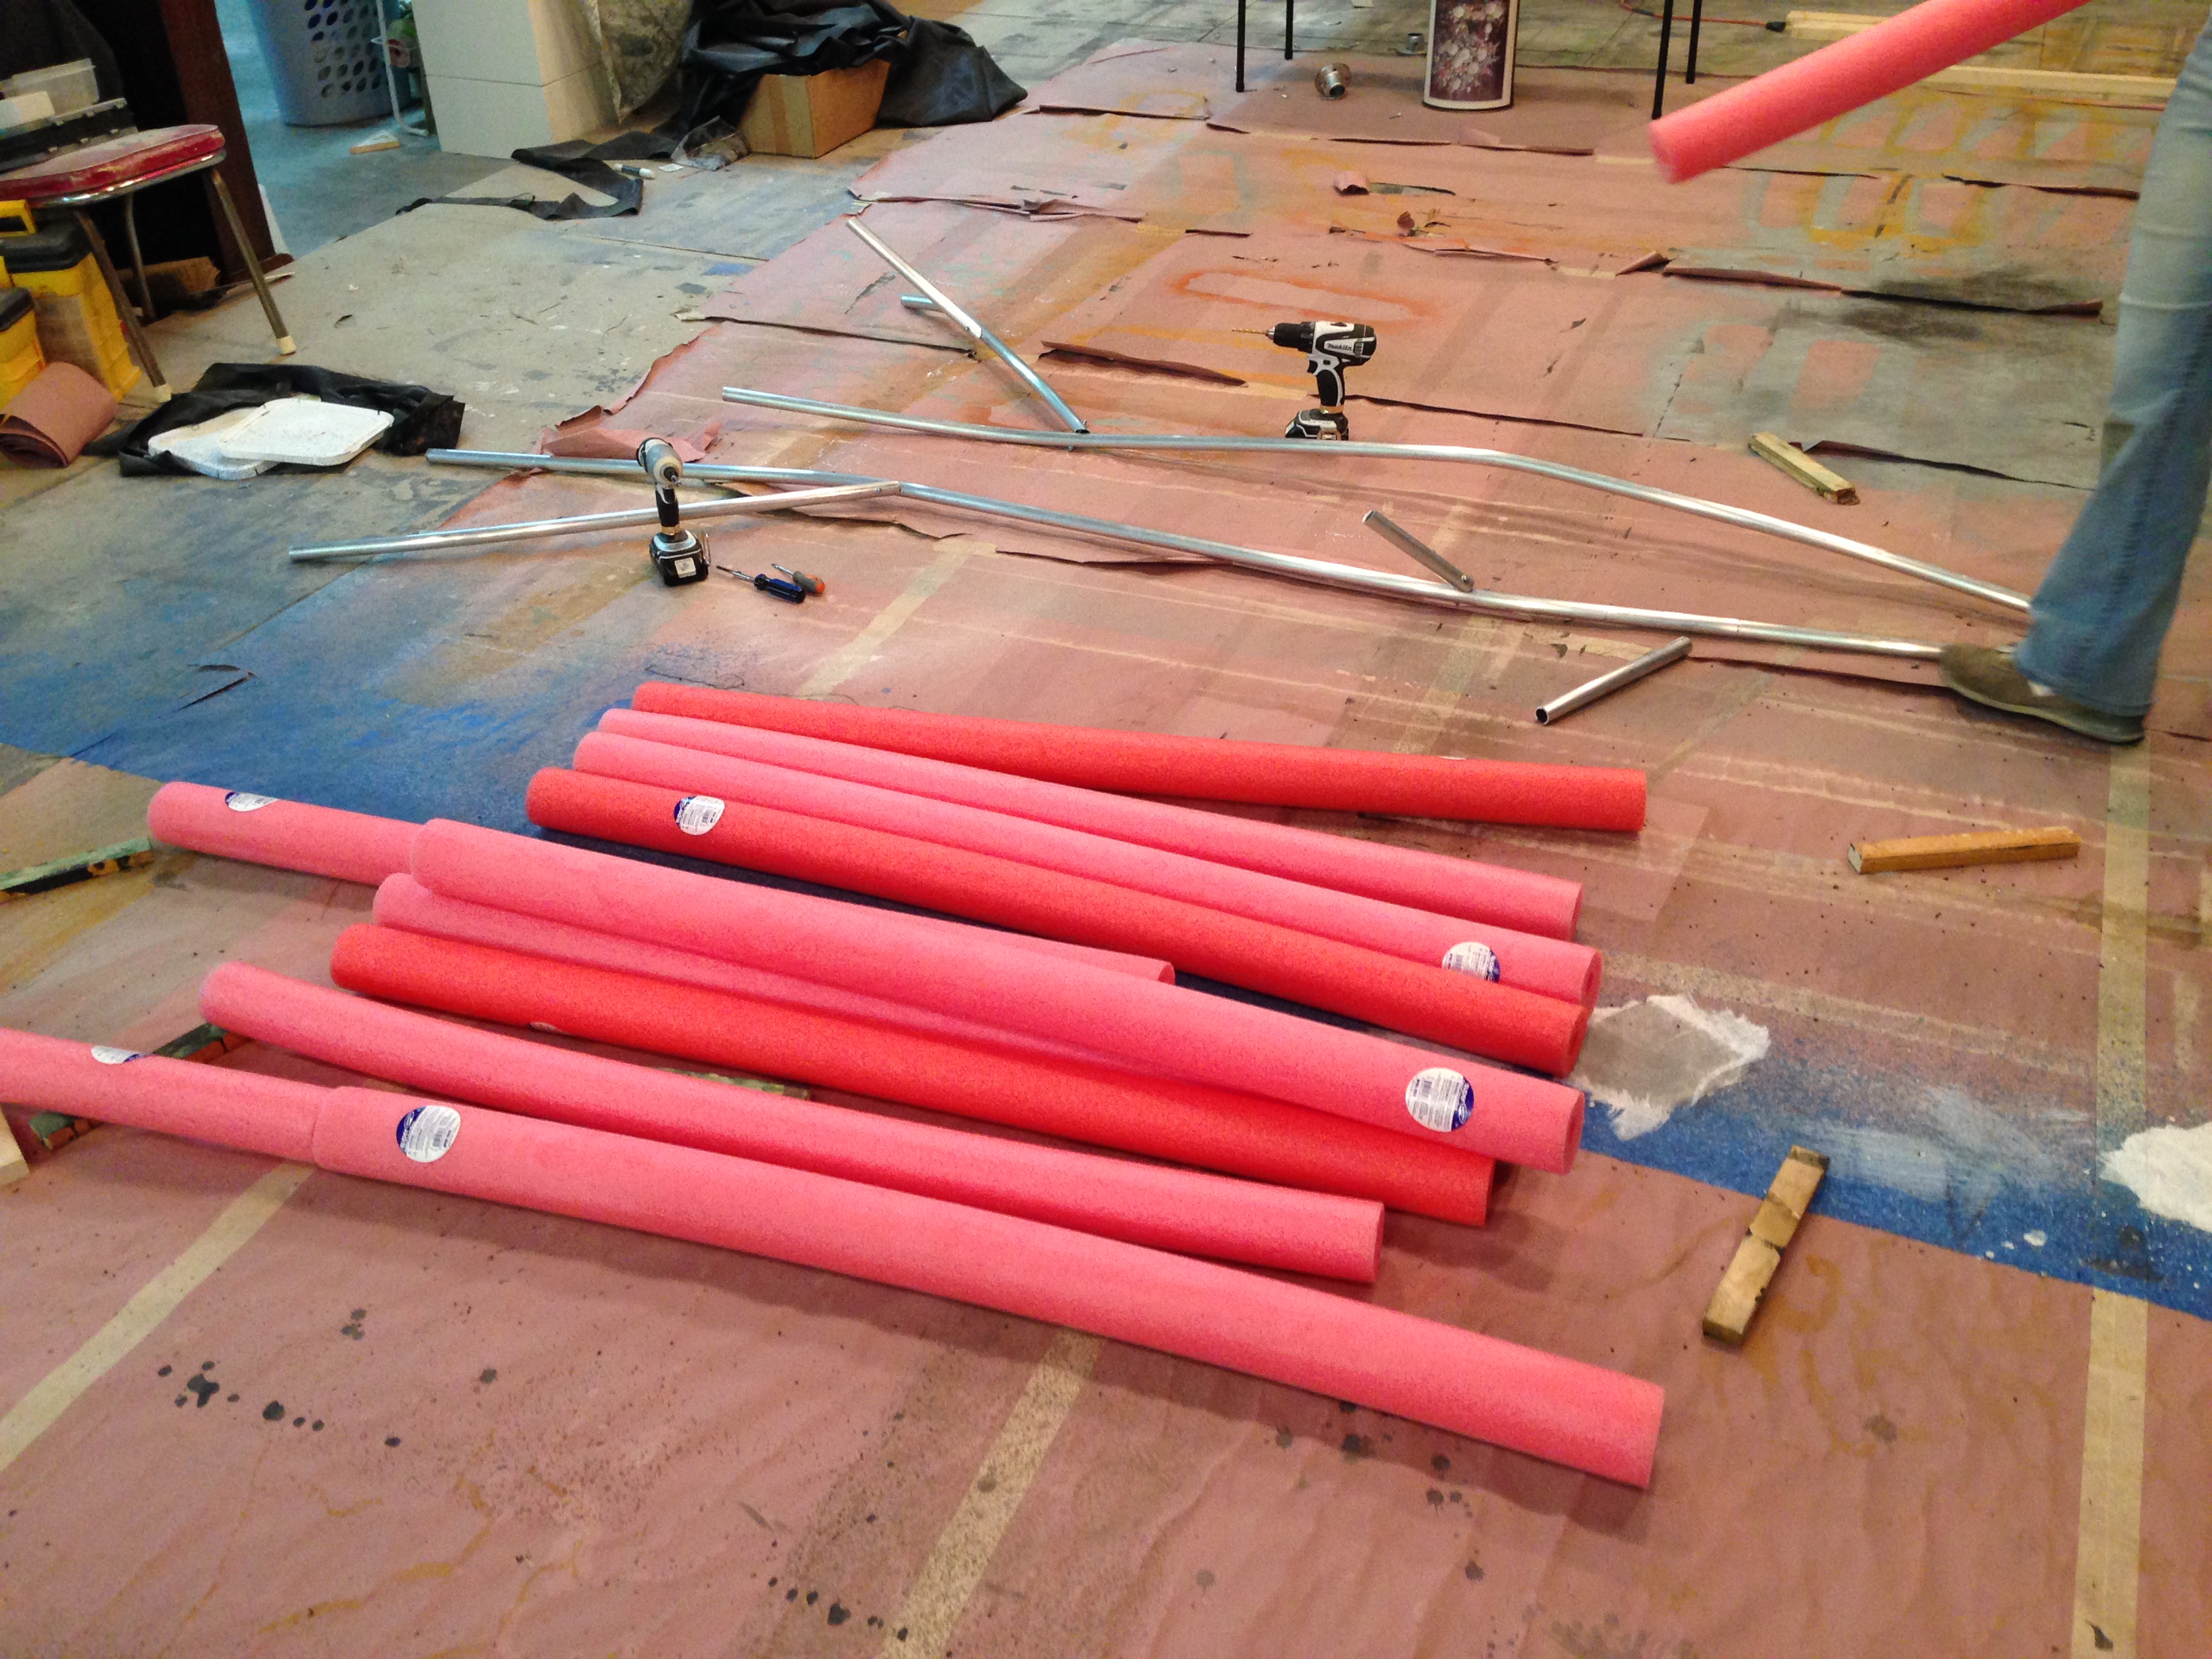
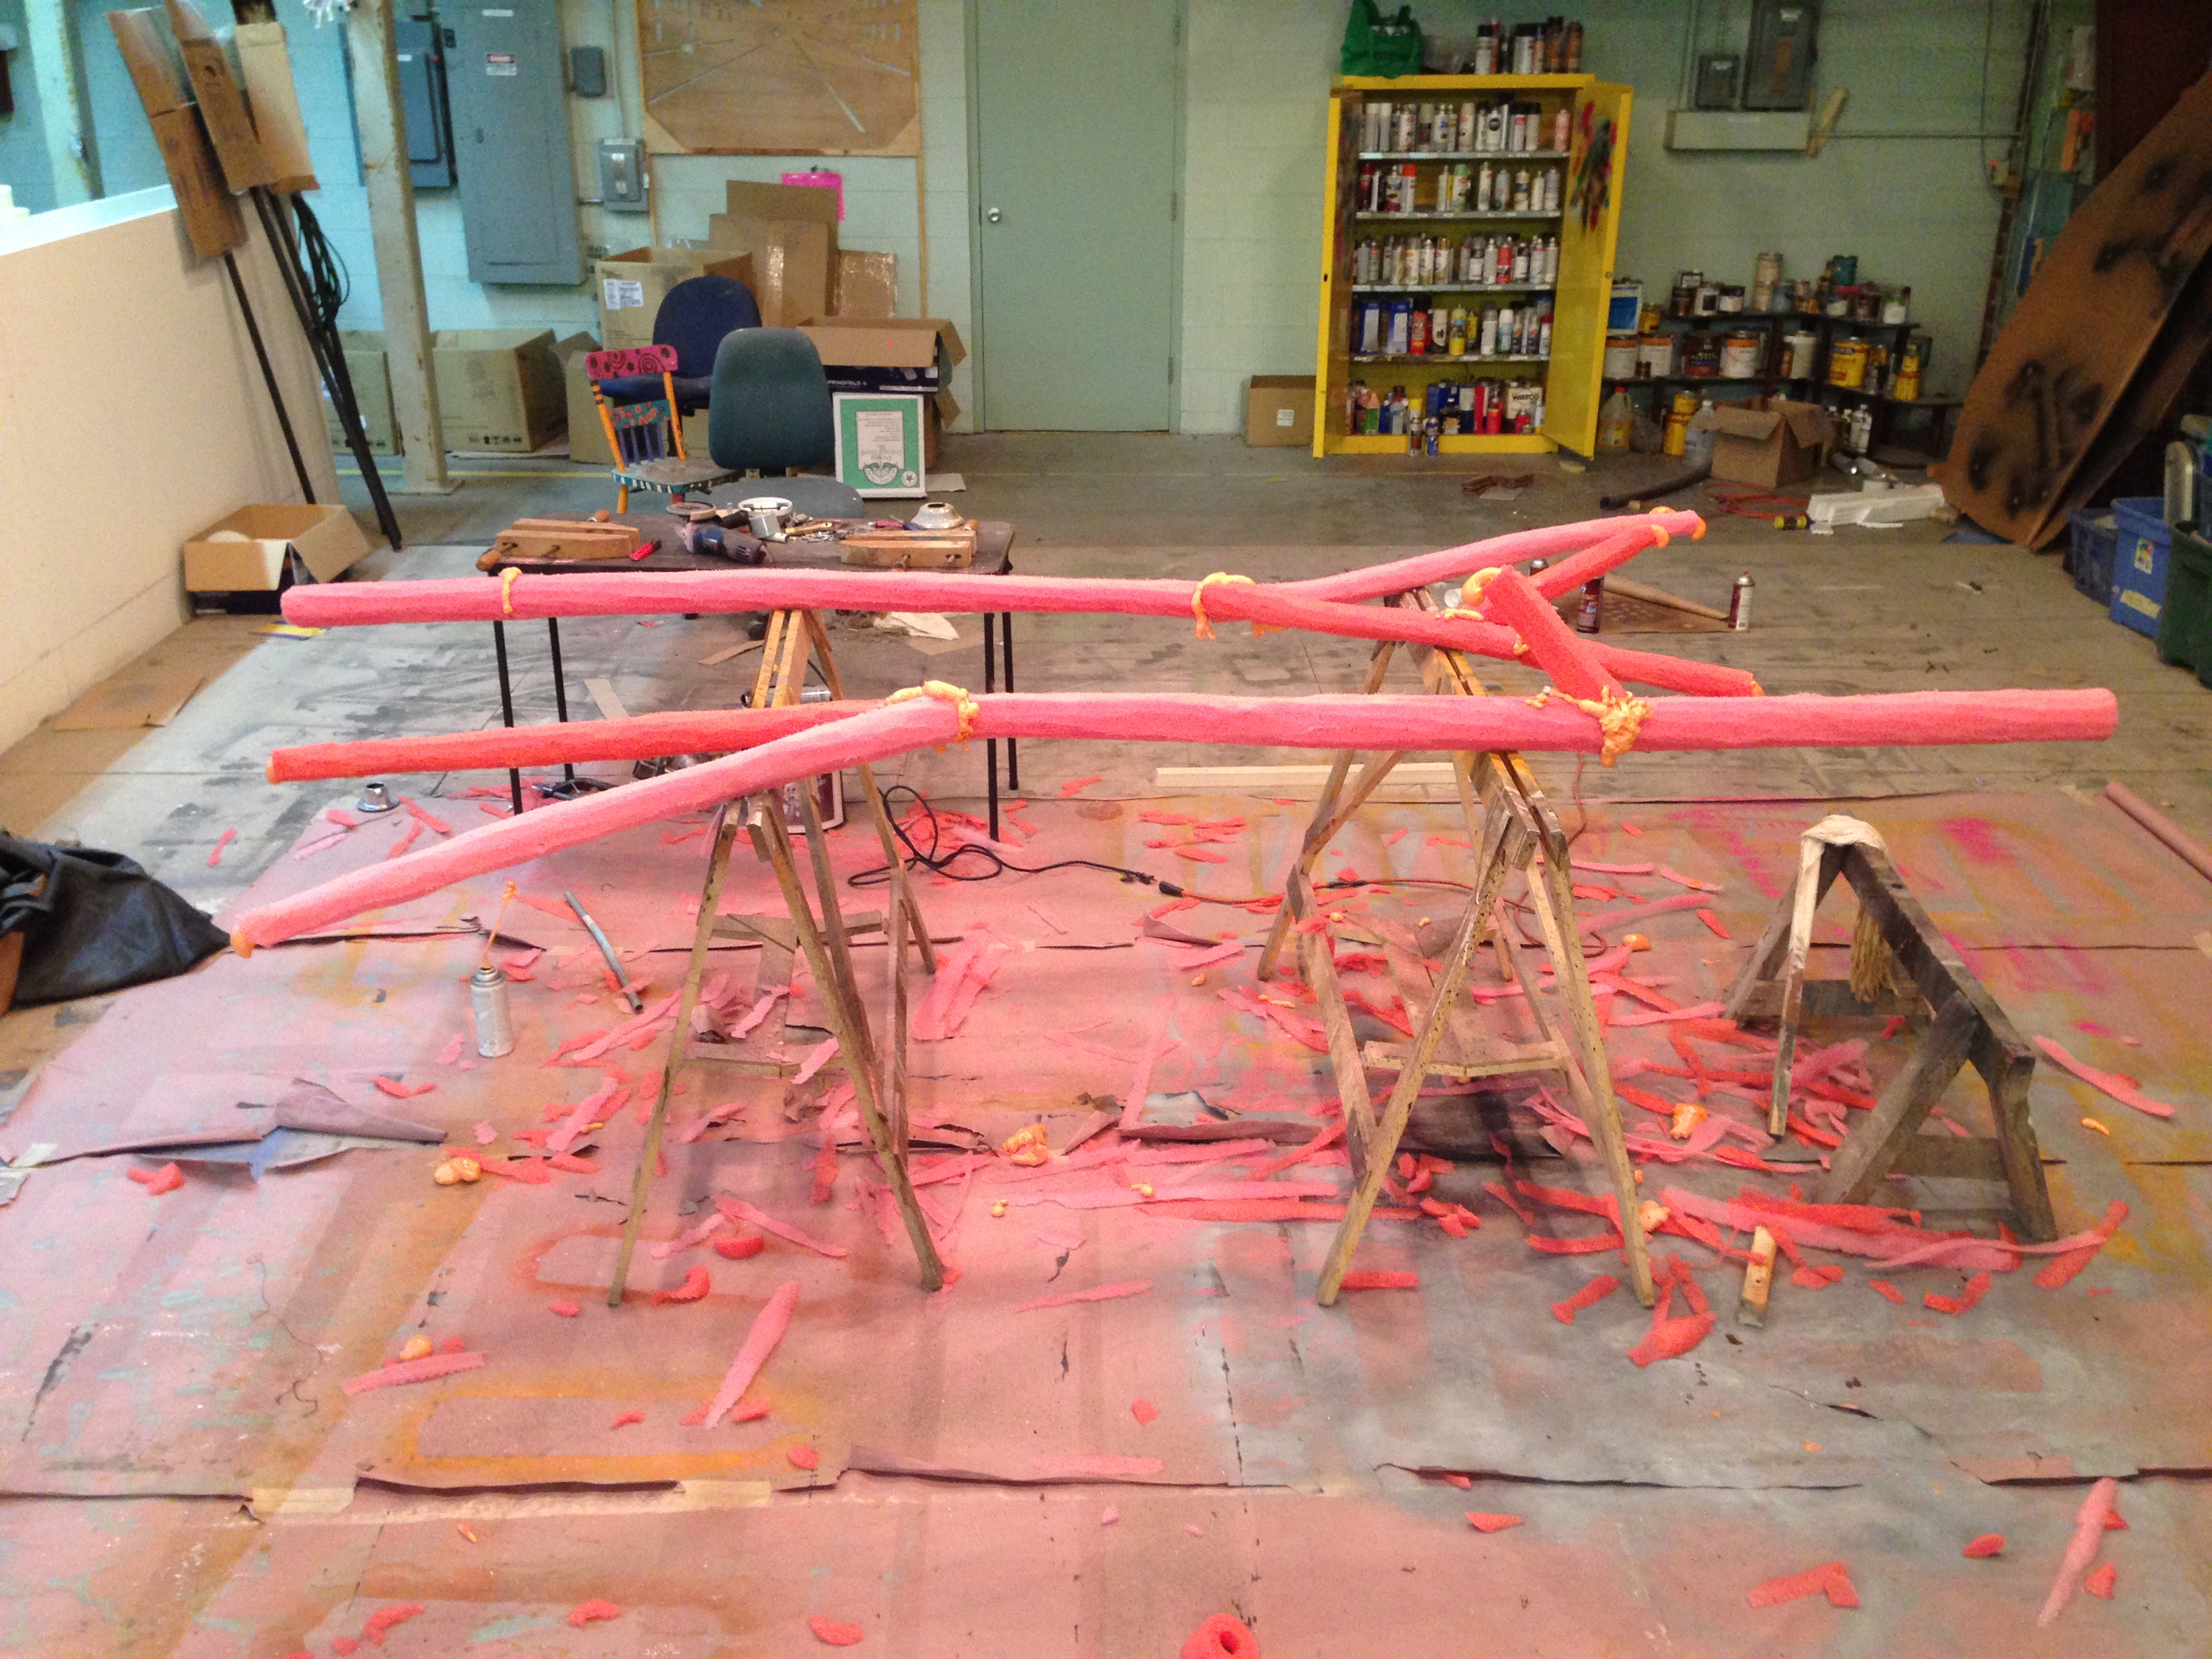
The two full-size branches were made by the assistant props master, Lisa Bledsoe (I merely took the pictures). She started by bending the poles to match what was drawn, and adding a few extra branches. They were bolted on since we do not have an aluminum welder at the shop.
Foam and structure
She adhered the separate pieces of pool noodle together with spray foam, which also filled the gaps. Once it had cured, she set to shaping the foam using a mix of knives and an angle grinder with an abrasive flap wheel.
Carving the shape
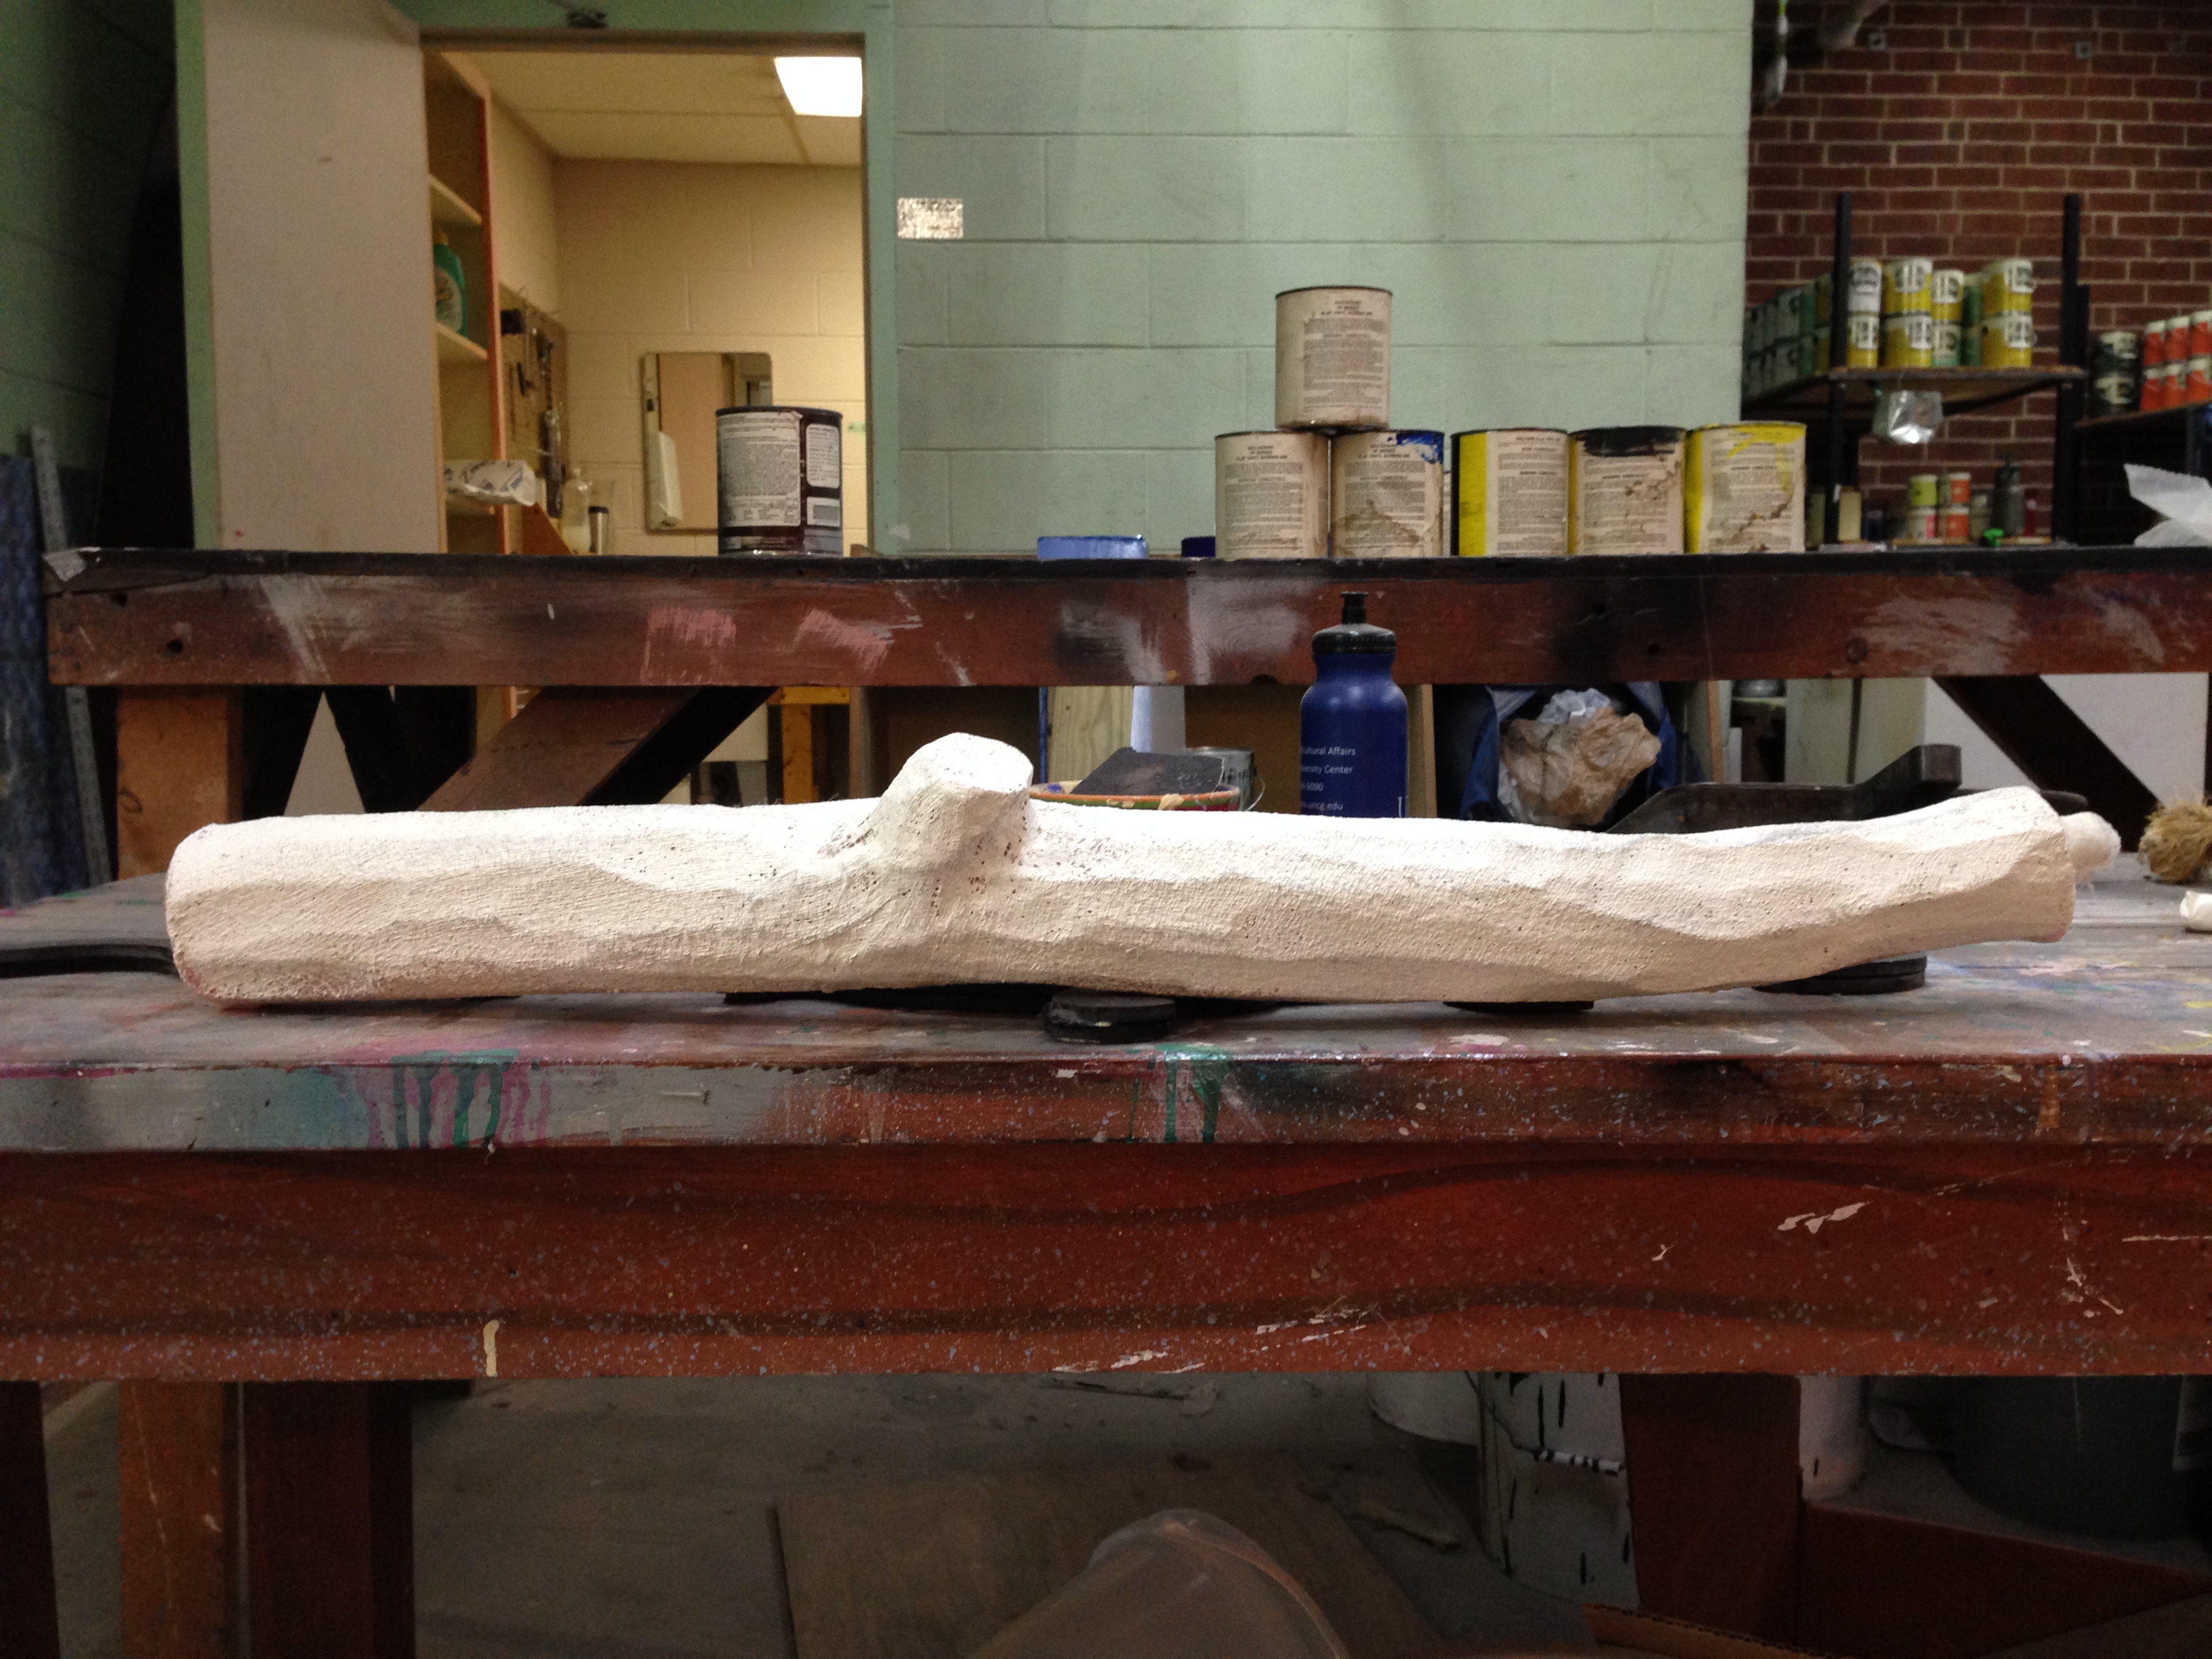
Once the branches were properly shaped, she painted on the cheesecloth with a 50/50 mix of Elmer’s Glue and water. I should mention that the branches got a quick coat of grey primer, since the cheesecloth is fairly translucent, and we did not want pink trees.
Coated
Once everything was dry, our scenic painter, Jessica Holcombe, gave the final paint treatment. It was a weathered grey wood, with a thin white wash over top. It matched all the wood elements in the scenery, so it was easier to just have her do the branches as well, rather than having us try to match it.
Fake tree branch
Overall, they worked pretty well. They are far lighter than a real tree branch, and they won’t hurt an actor if they accidentally make contact. There are a few spots at the tips where the pool noodle extends past the aluminum pole, and we found they were cracking at those points; a few times during the run, we had to glue on a “bandage” of cheesecloth to repair those cracks. Other than that, I thought they were a great solution.
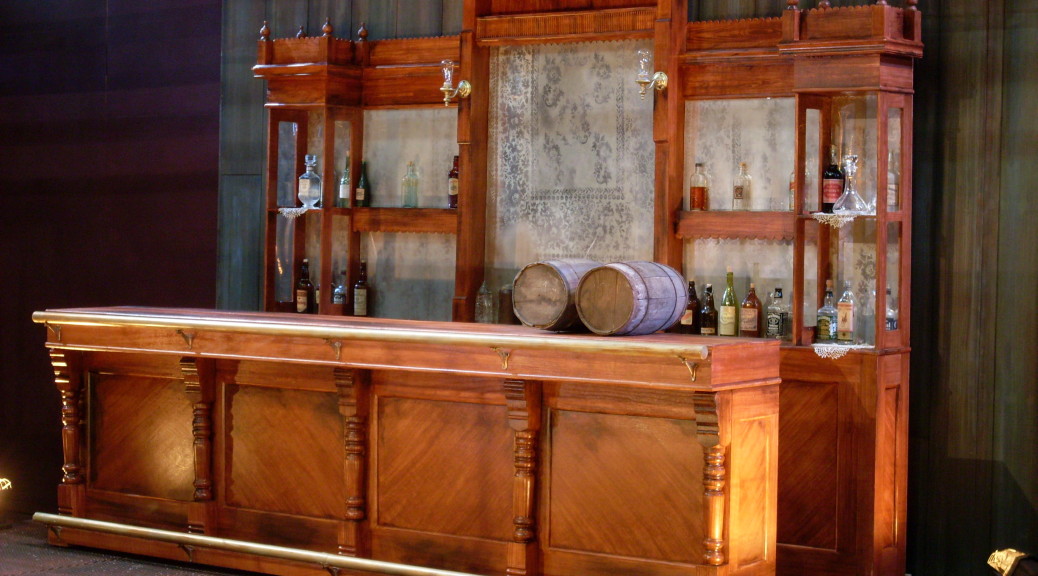
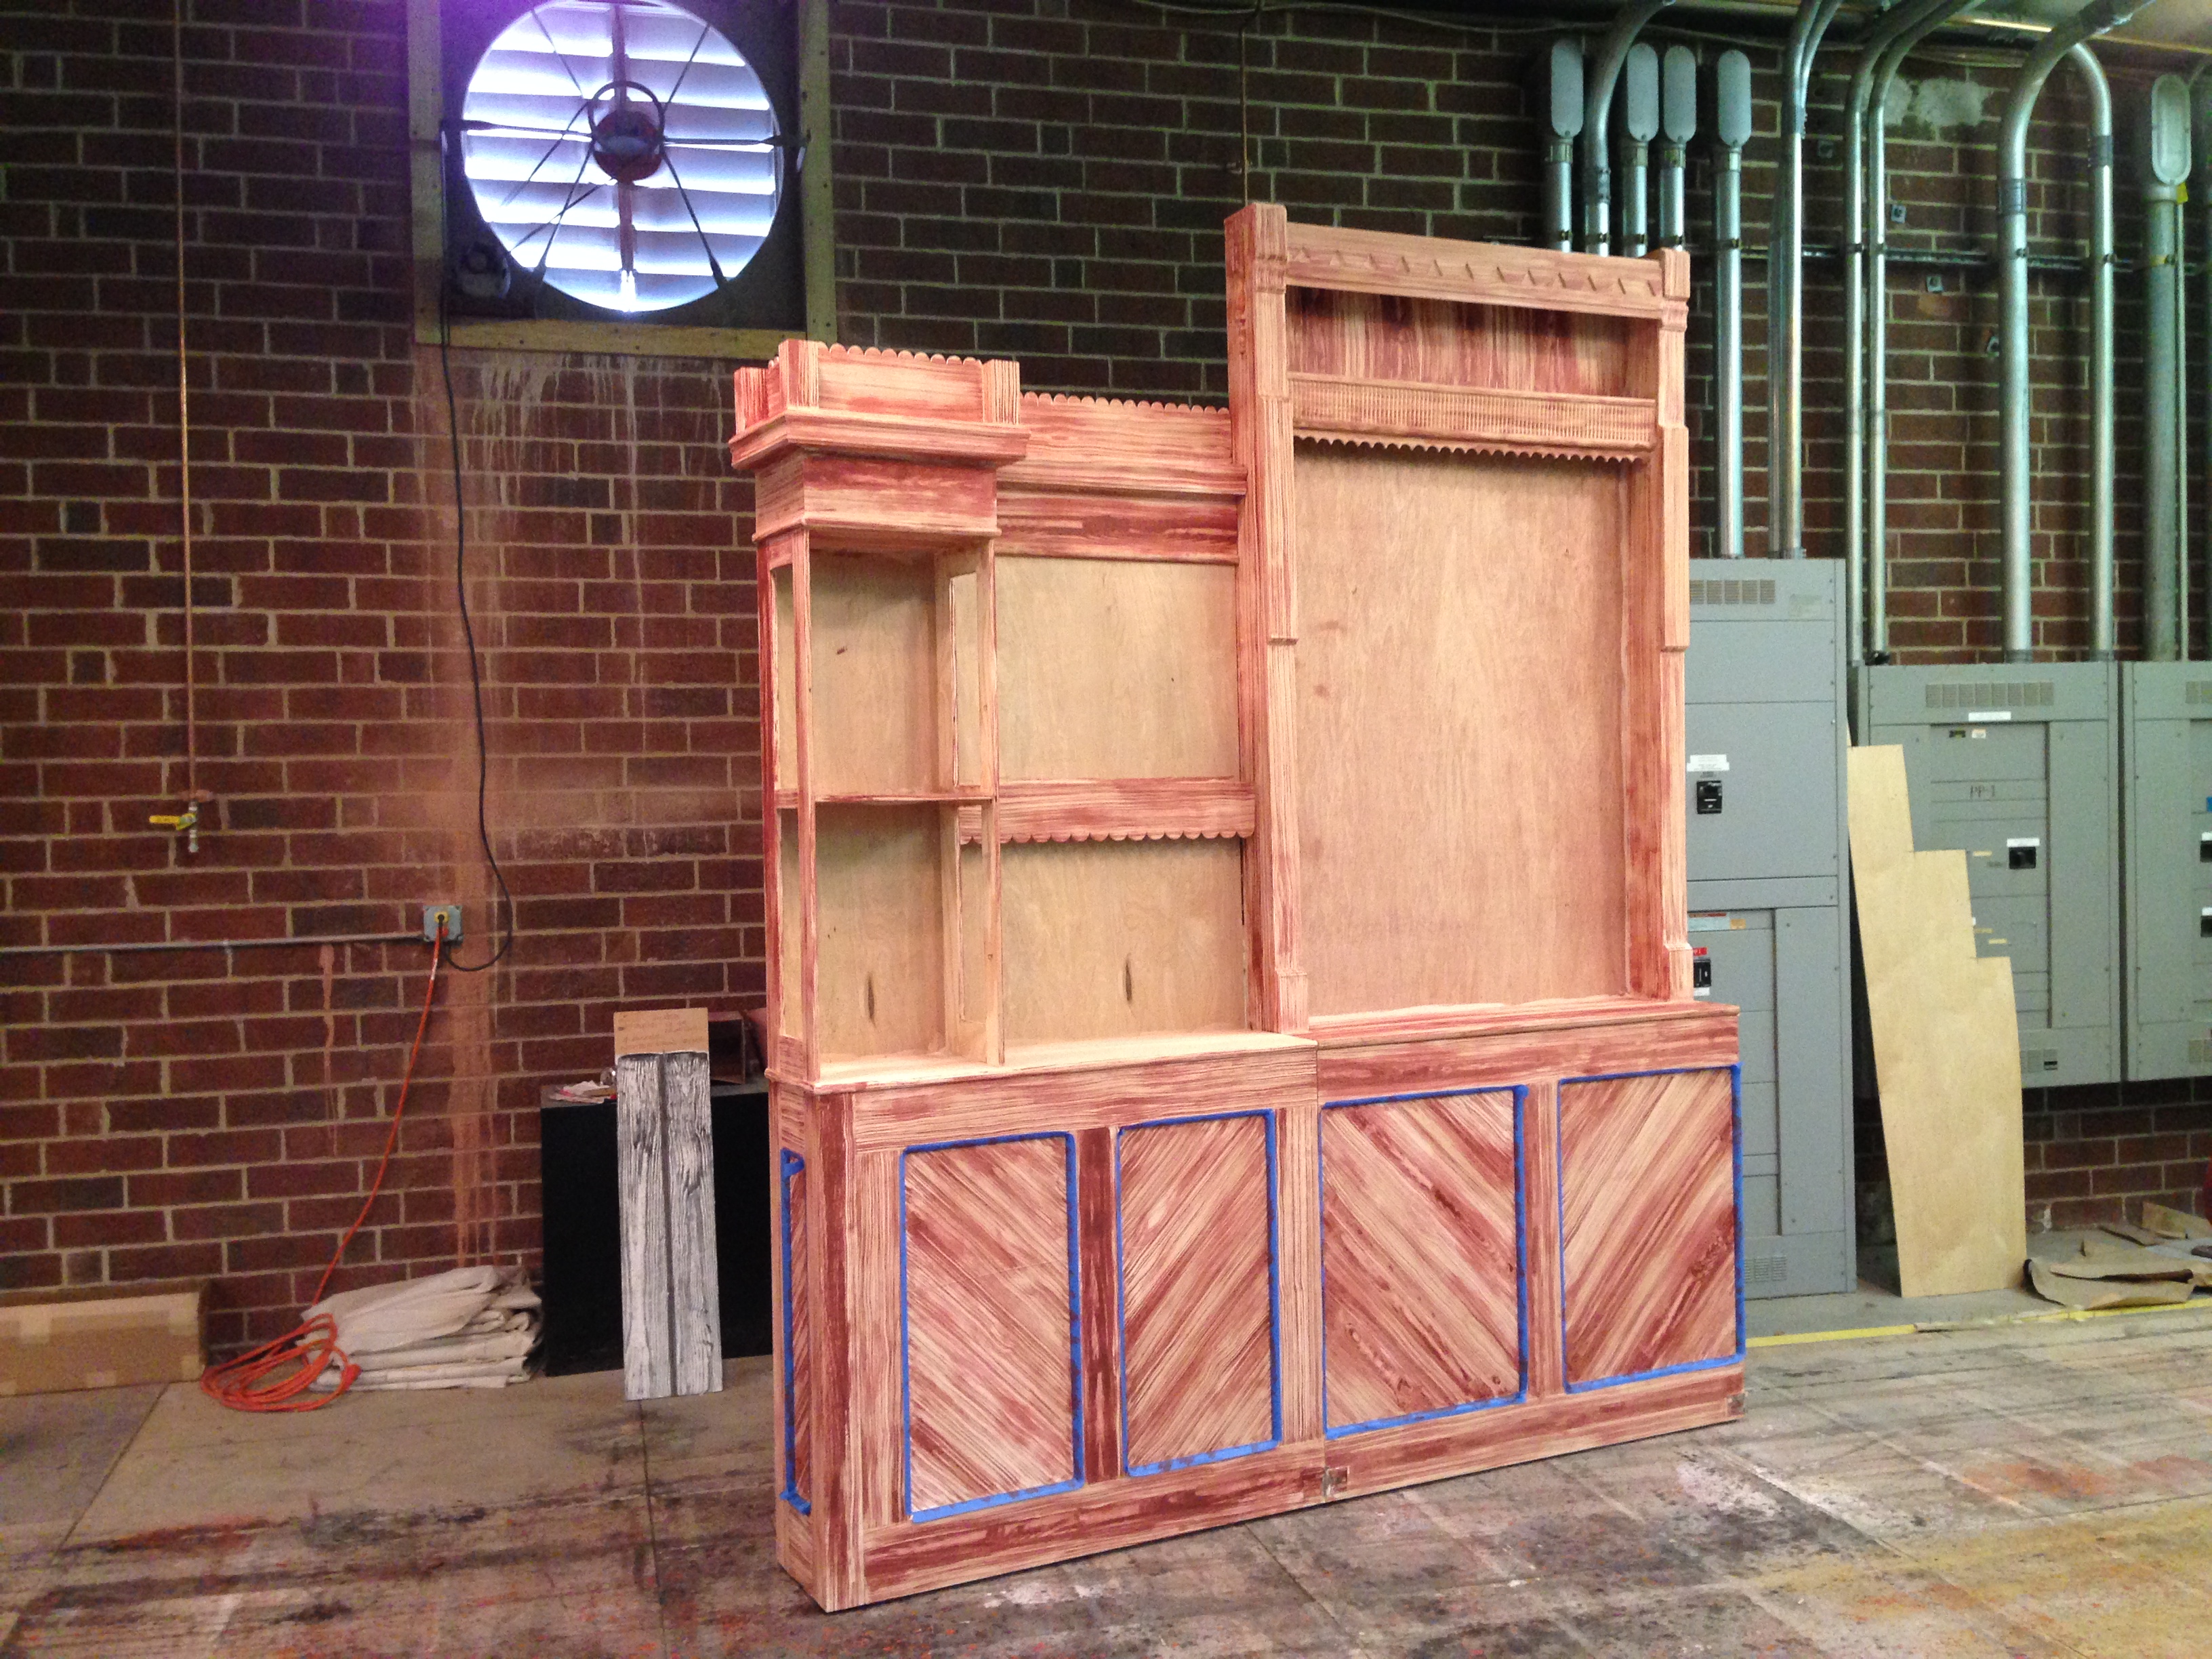
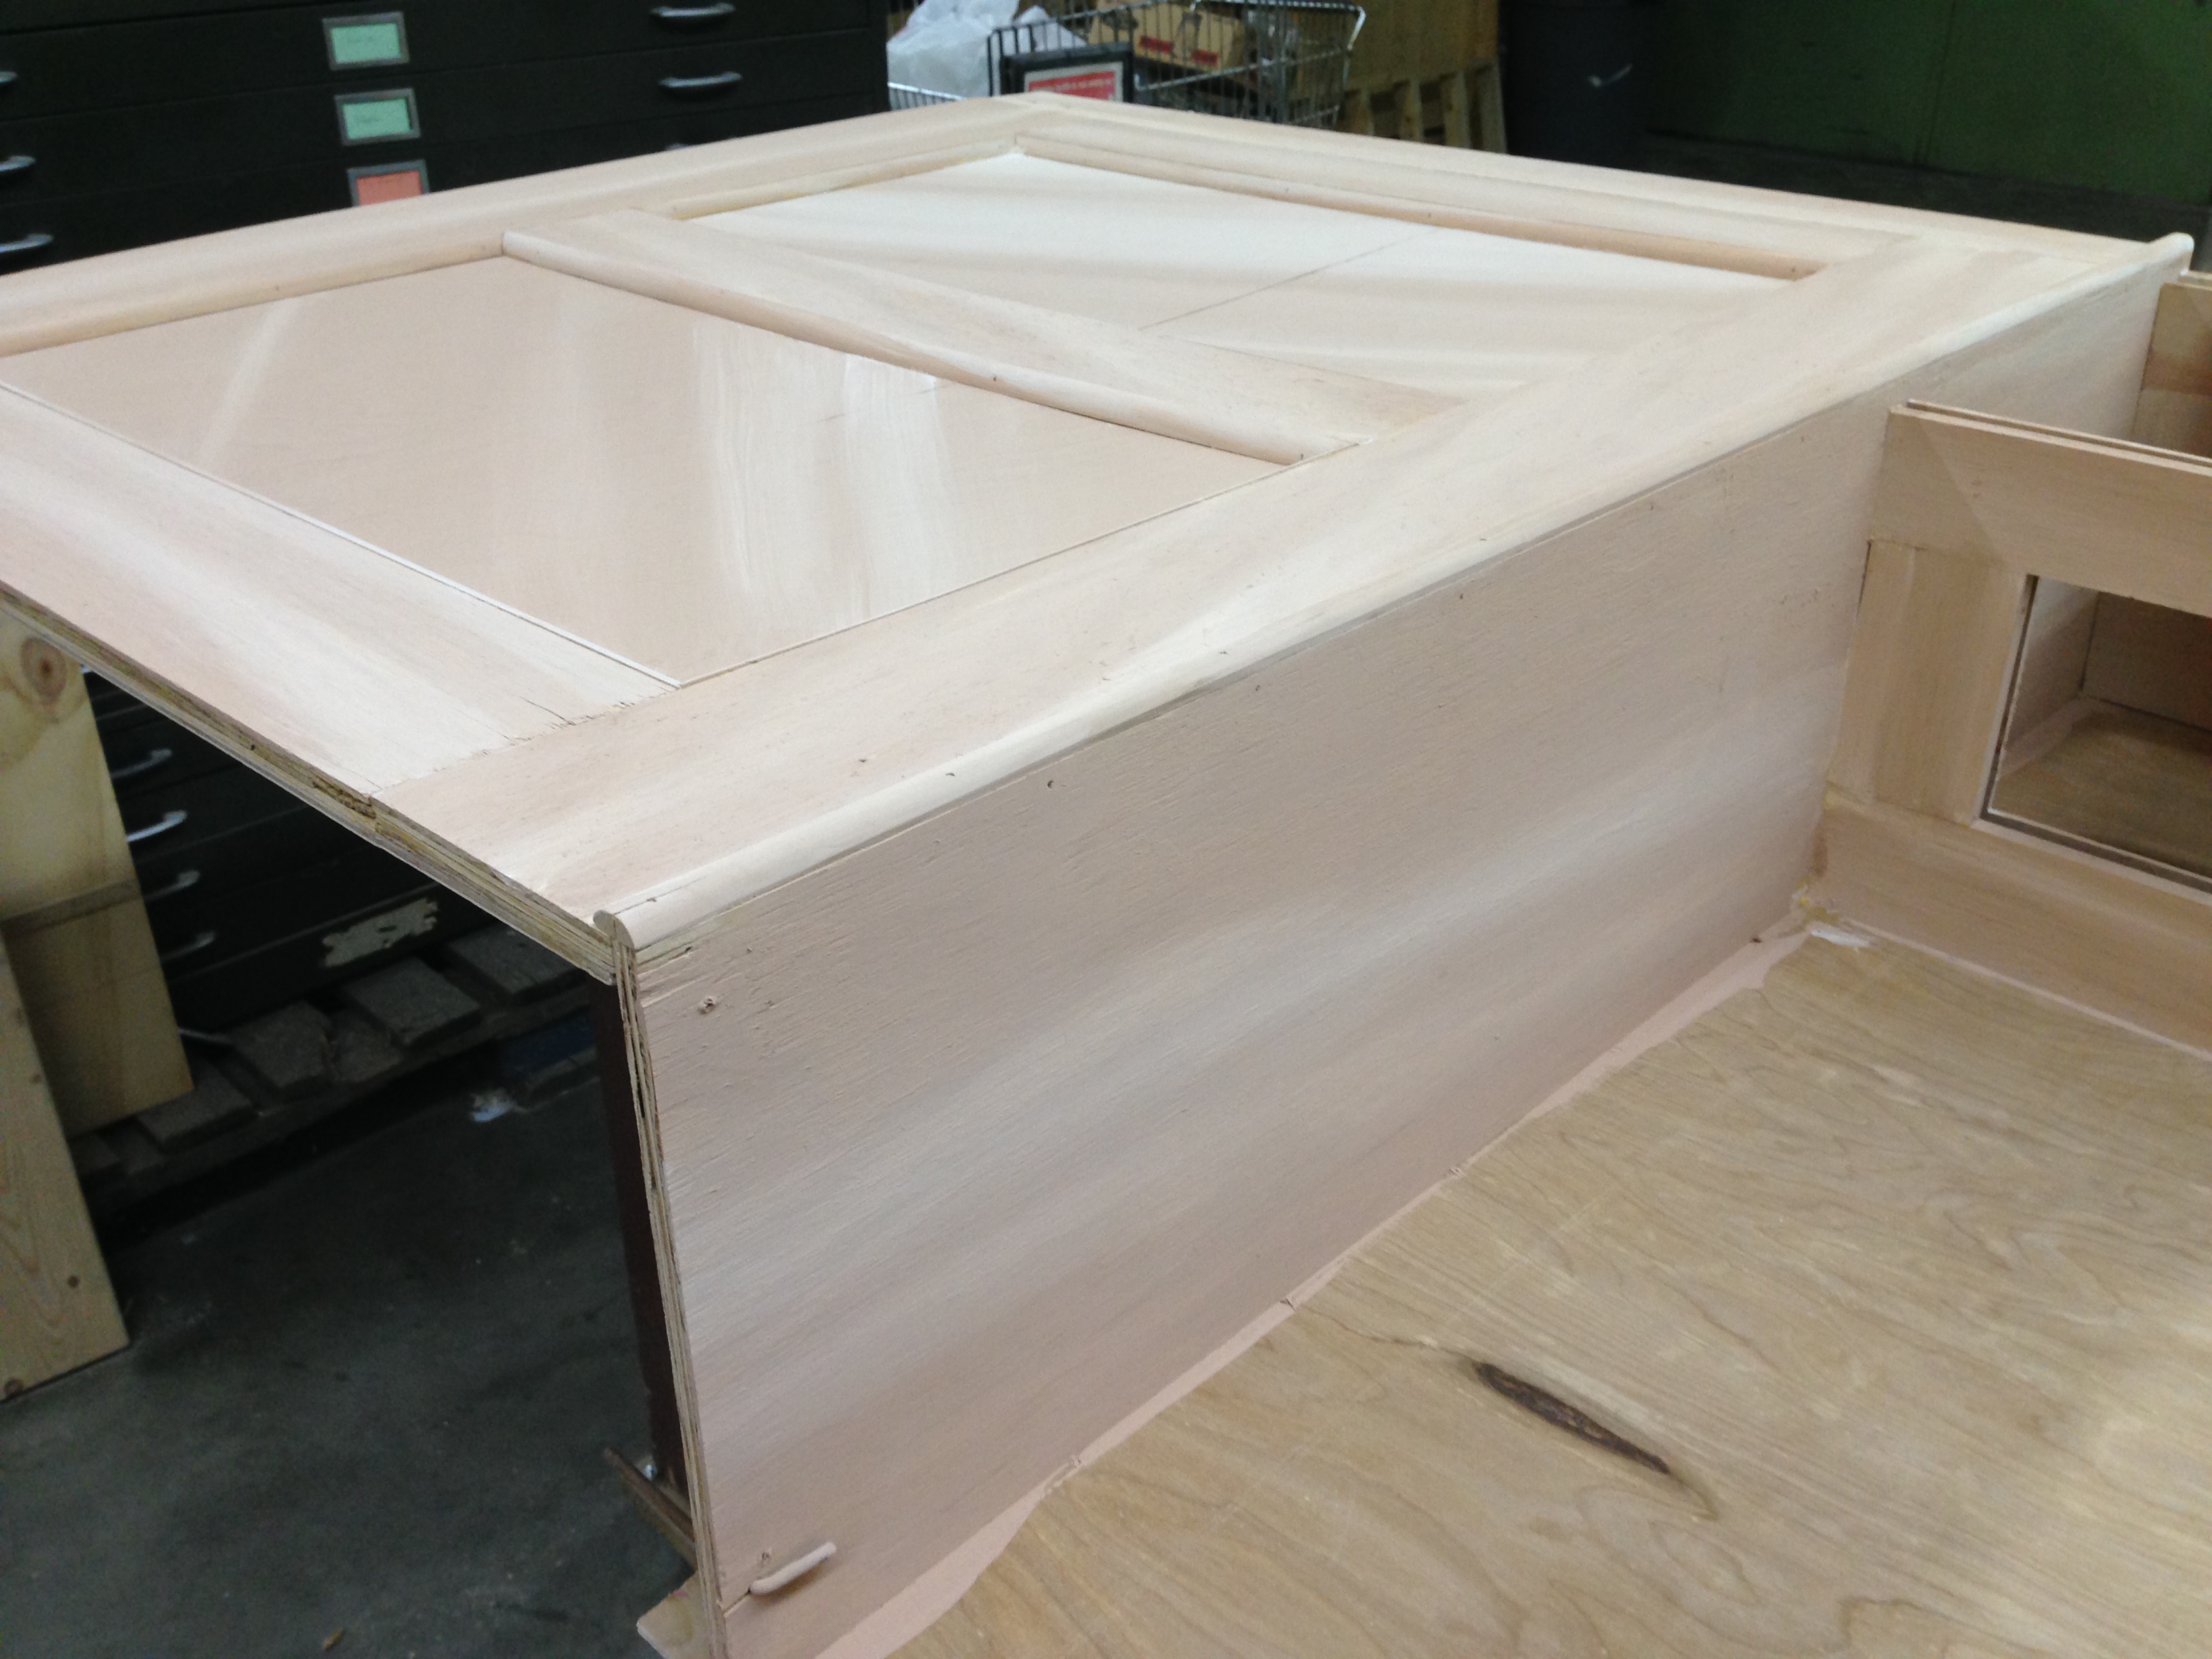
The first scene of Anna Christie takes place in a small waterfront bar in the New York City harbor around 1910. For our production at Triad Stage, the design had a large back bar and front bar which could appear for that scene and strike backstage when it ended. The scenic designer drafted the front bar and the back bar for the props shop to build, and away we went. Standing nine and a half feet tall, at almost twelve feet long, the back bar really pushed the limits of the definition of a “prop”.
The back bar was built mostly out of lauan with half-inch plywood framing pieces to make it as light as possible, since it would need to be pushed on and off stage a vista by three crew members.
Beginning construction
It was constructed in three sections to make transportation to the theatre possible. You can see two of the sections below, showing where the piece broke apart. You can also see the beginnings of the wood grain paint treatment which I wrote about last week.
Two sections
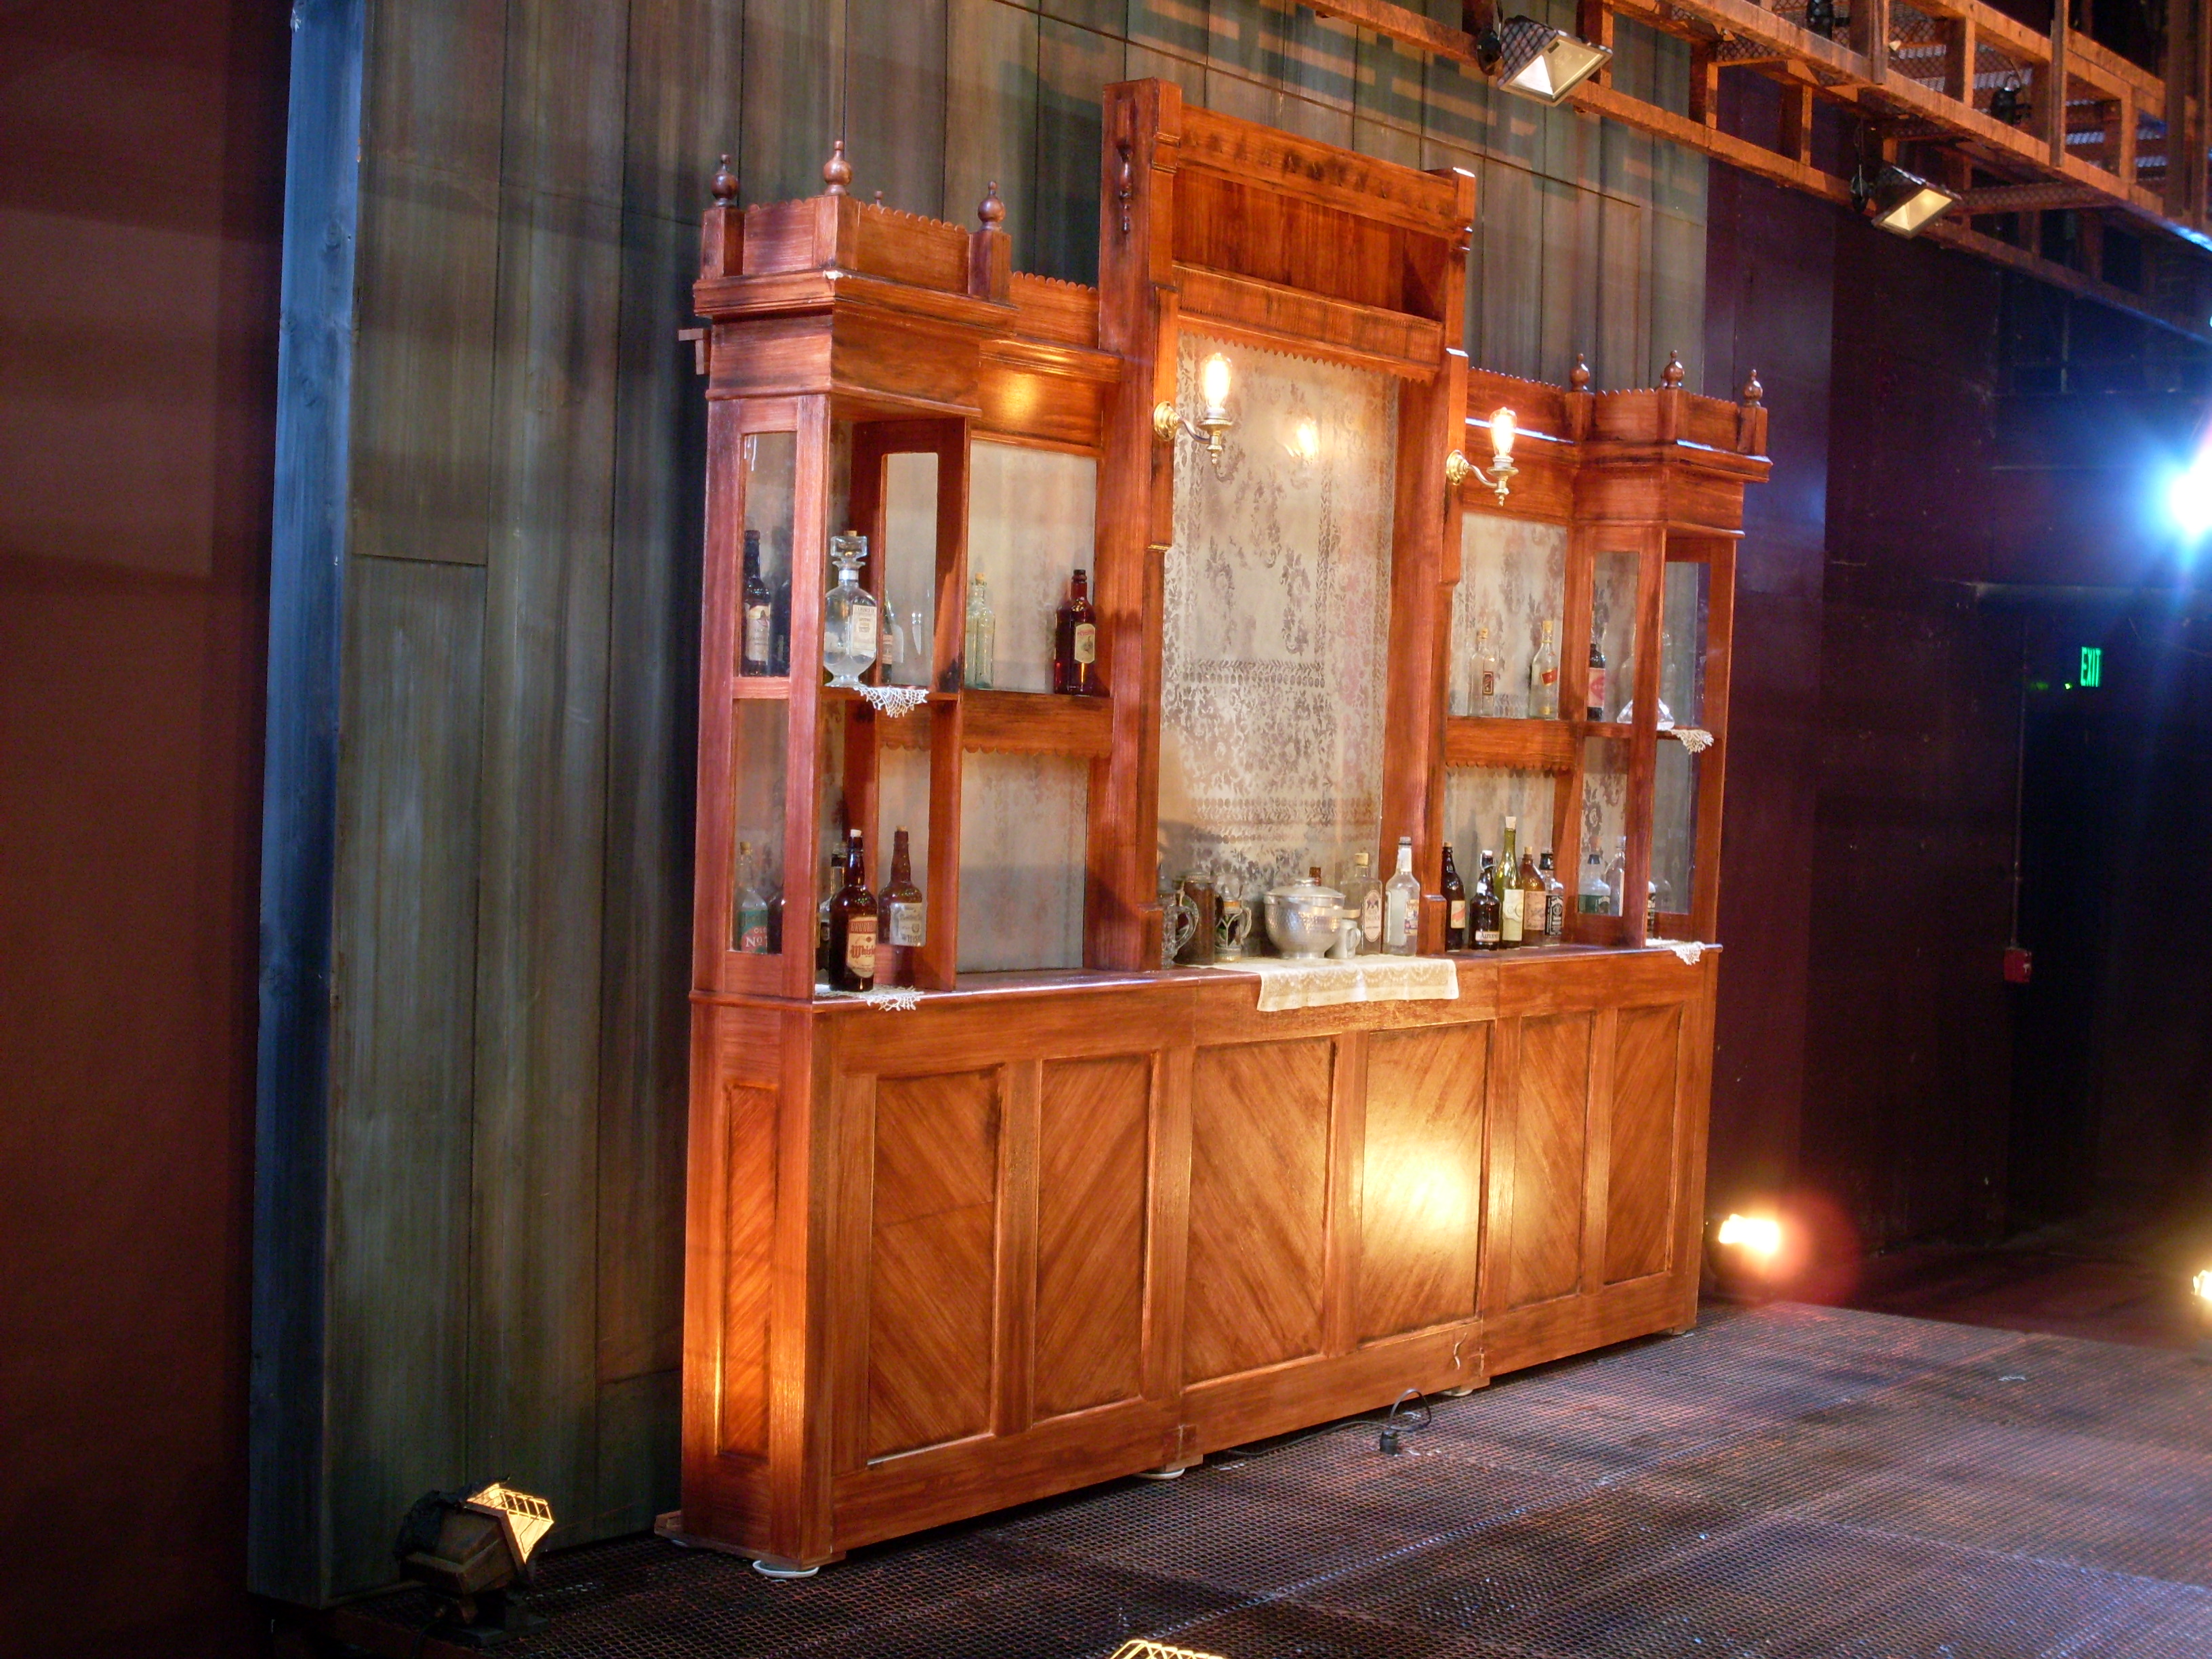
Most of the vertical surfaces on the top section of this piece were meant to be antique frosted mirrors. I used some silver Mylar as the mirror, laid a section of lace on top, and spray painted through it. This left a lace-like design on the Mylar, and after a few more coats of spray frosting over the whole thing, it looked just like a mirror.
Making the mirror
The unit was originally on wheels, but when it got to the theatre, the noise it made while moving was deafening. The stage floor consisted entirely of expanded steel panels. We discovered that plastic furniture gliders actually made moving the unit completely silent and fairly effortless. They also ensured the unit remained stationary when no one was touching it.
Back bar
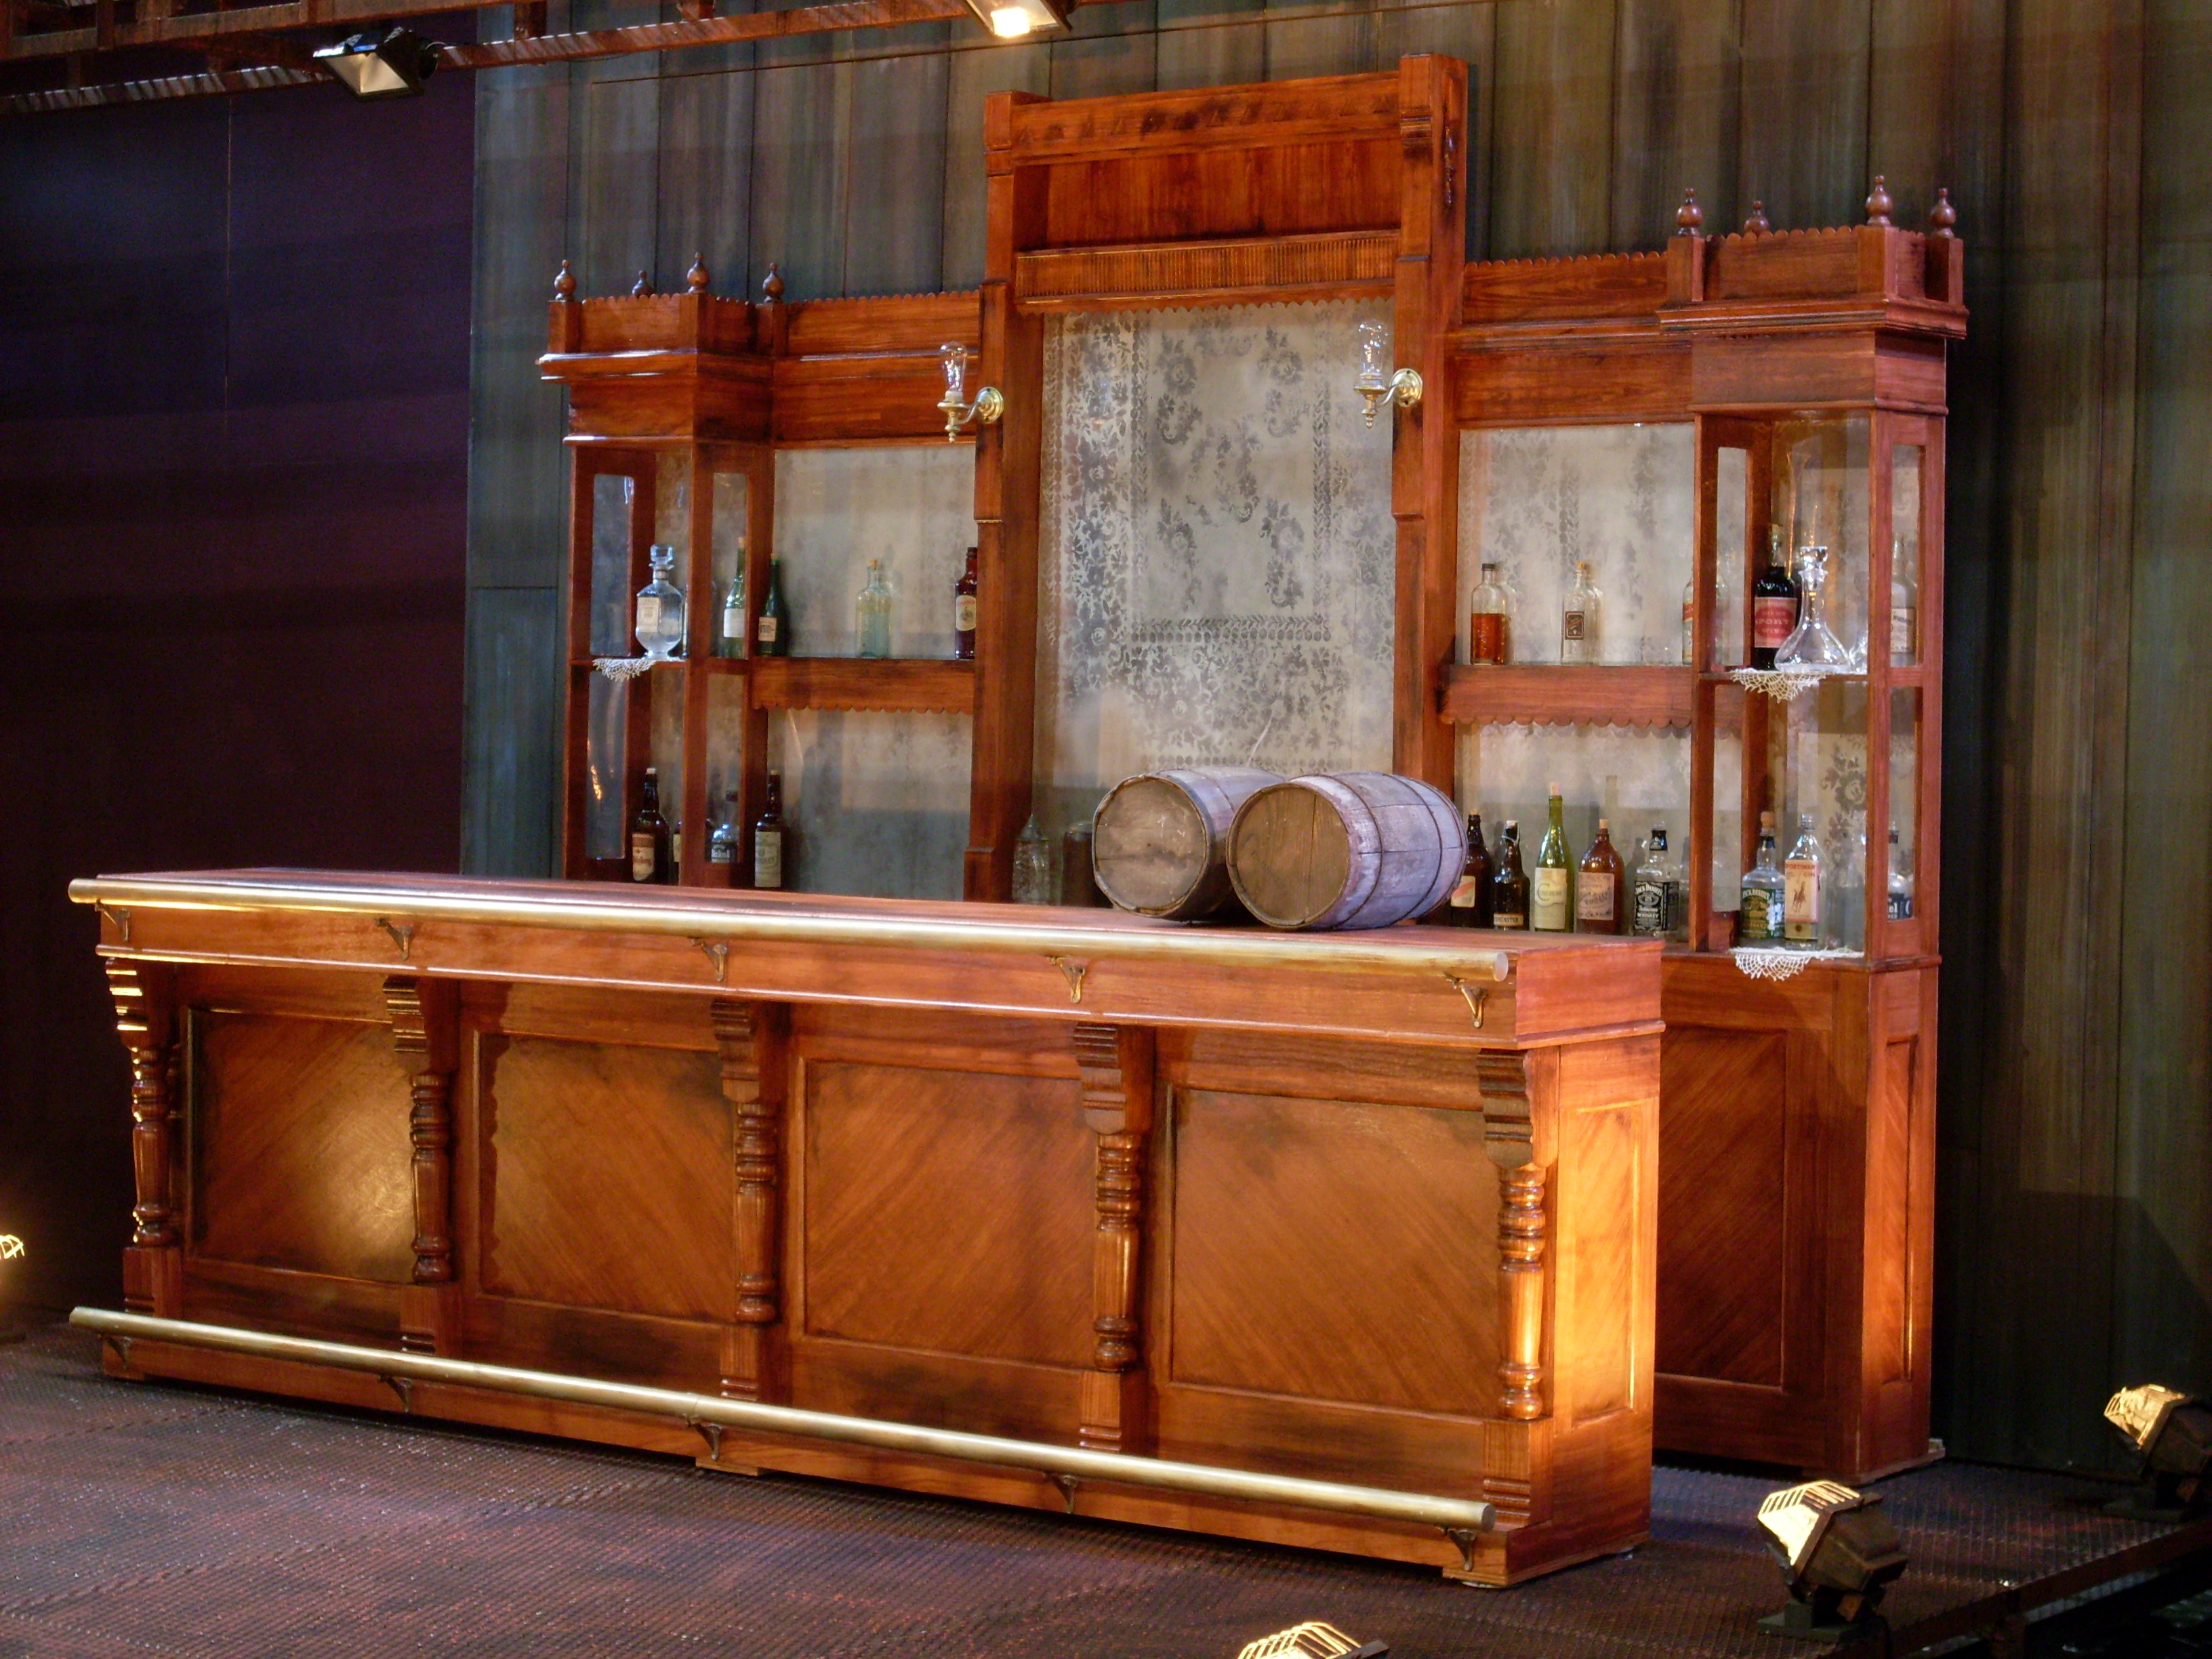
With some practical sconces, some lace runners and doilies, and a whole bunch of vintage liquor bottles, the piece was complete. Below is a photo of the whole setup, which includes the front bar that our prop shop also constructed.
Full bar
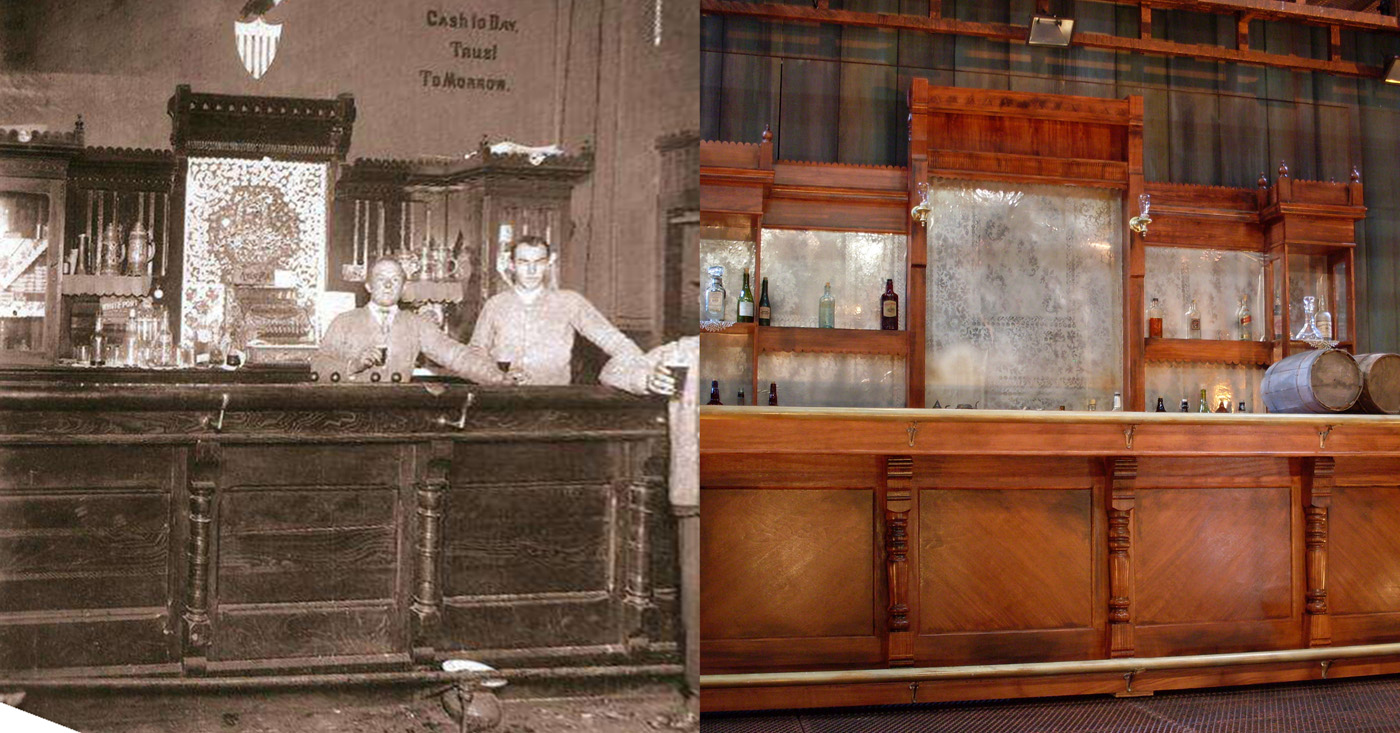
You can also see a side-by-side comparison of the final piece with a research image. Obviously the proportions and specifics were changed in the design, but the inspiration is fairly clear.
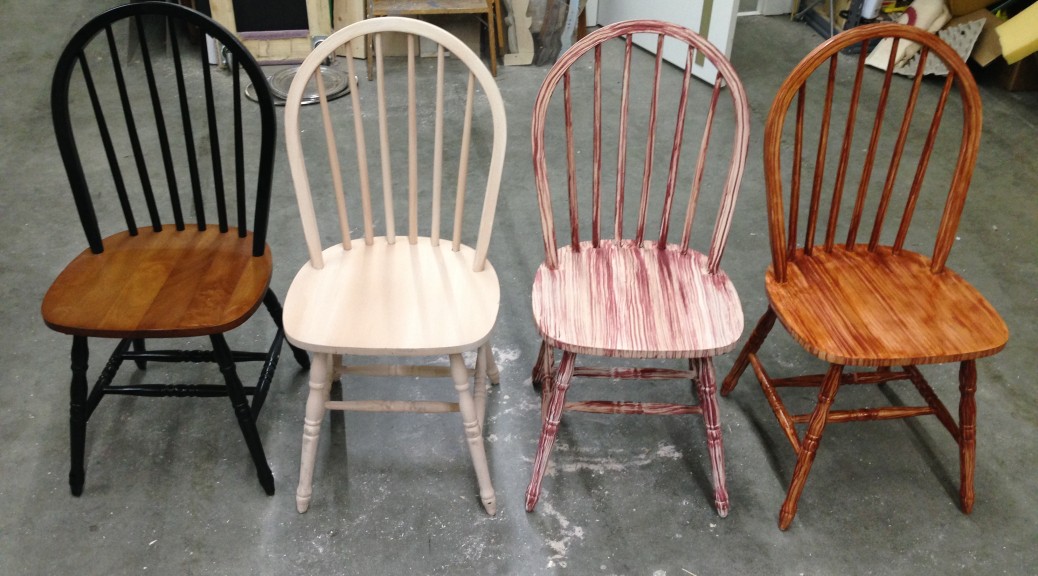
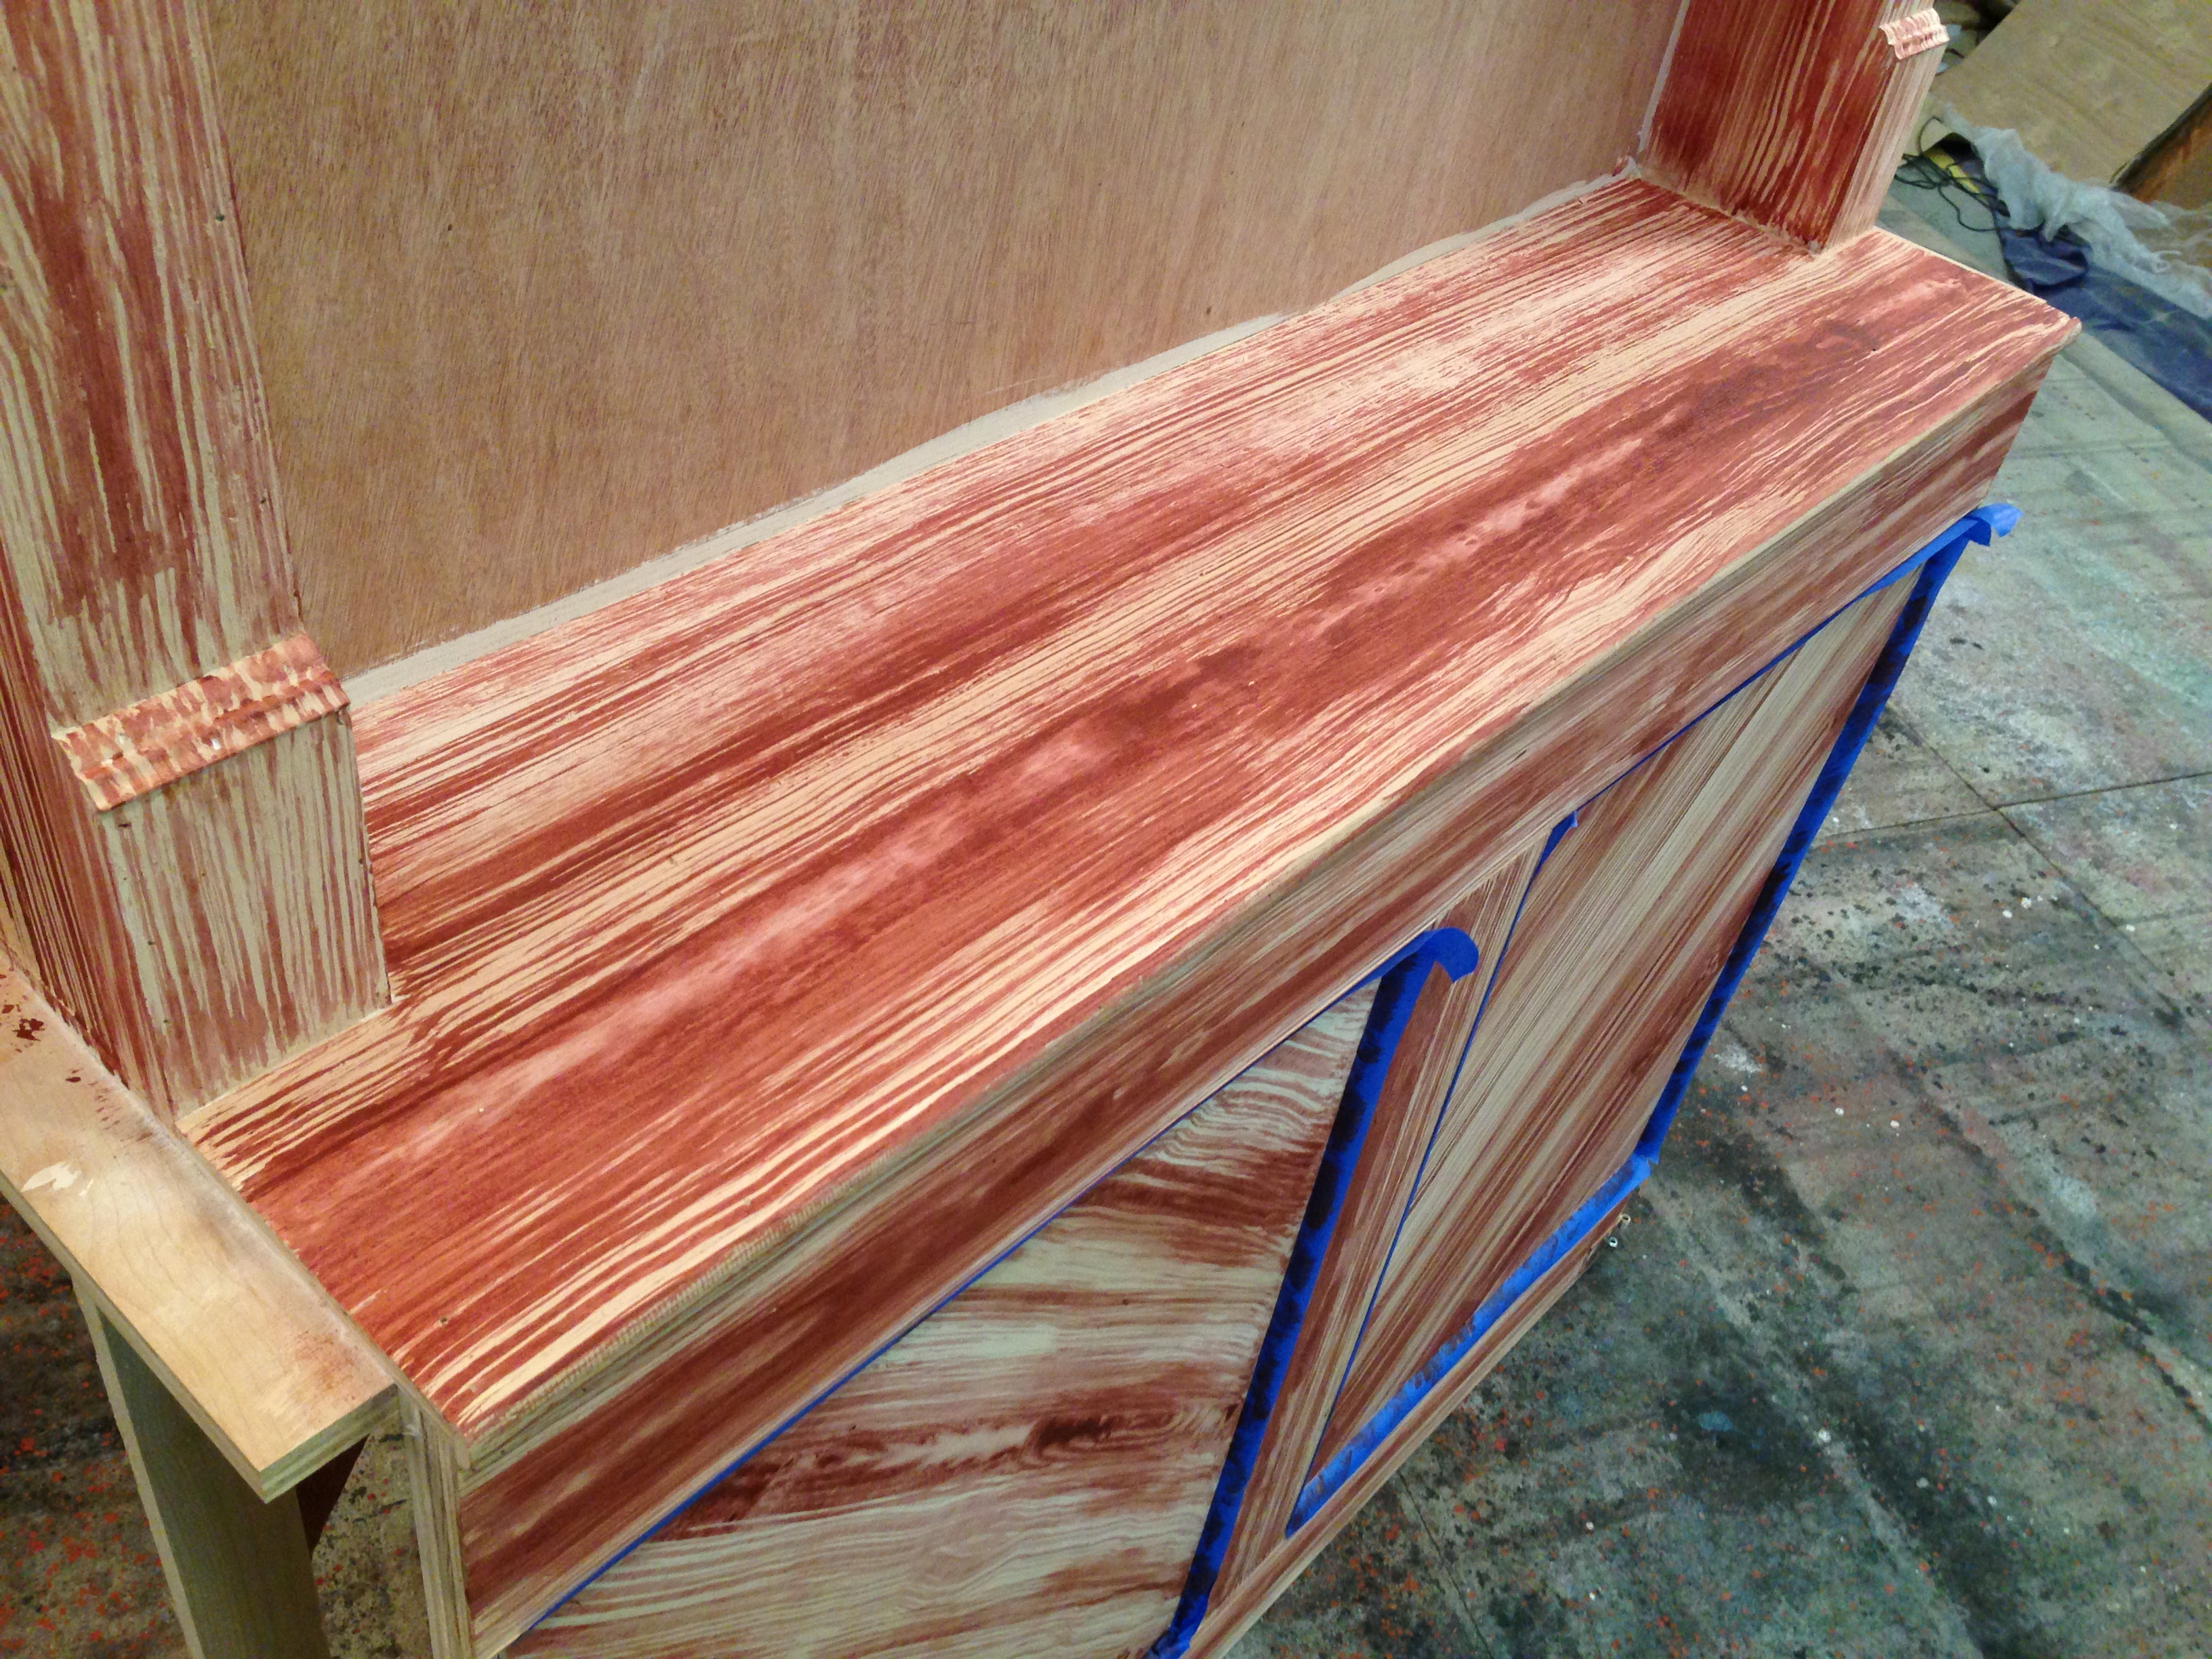
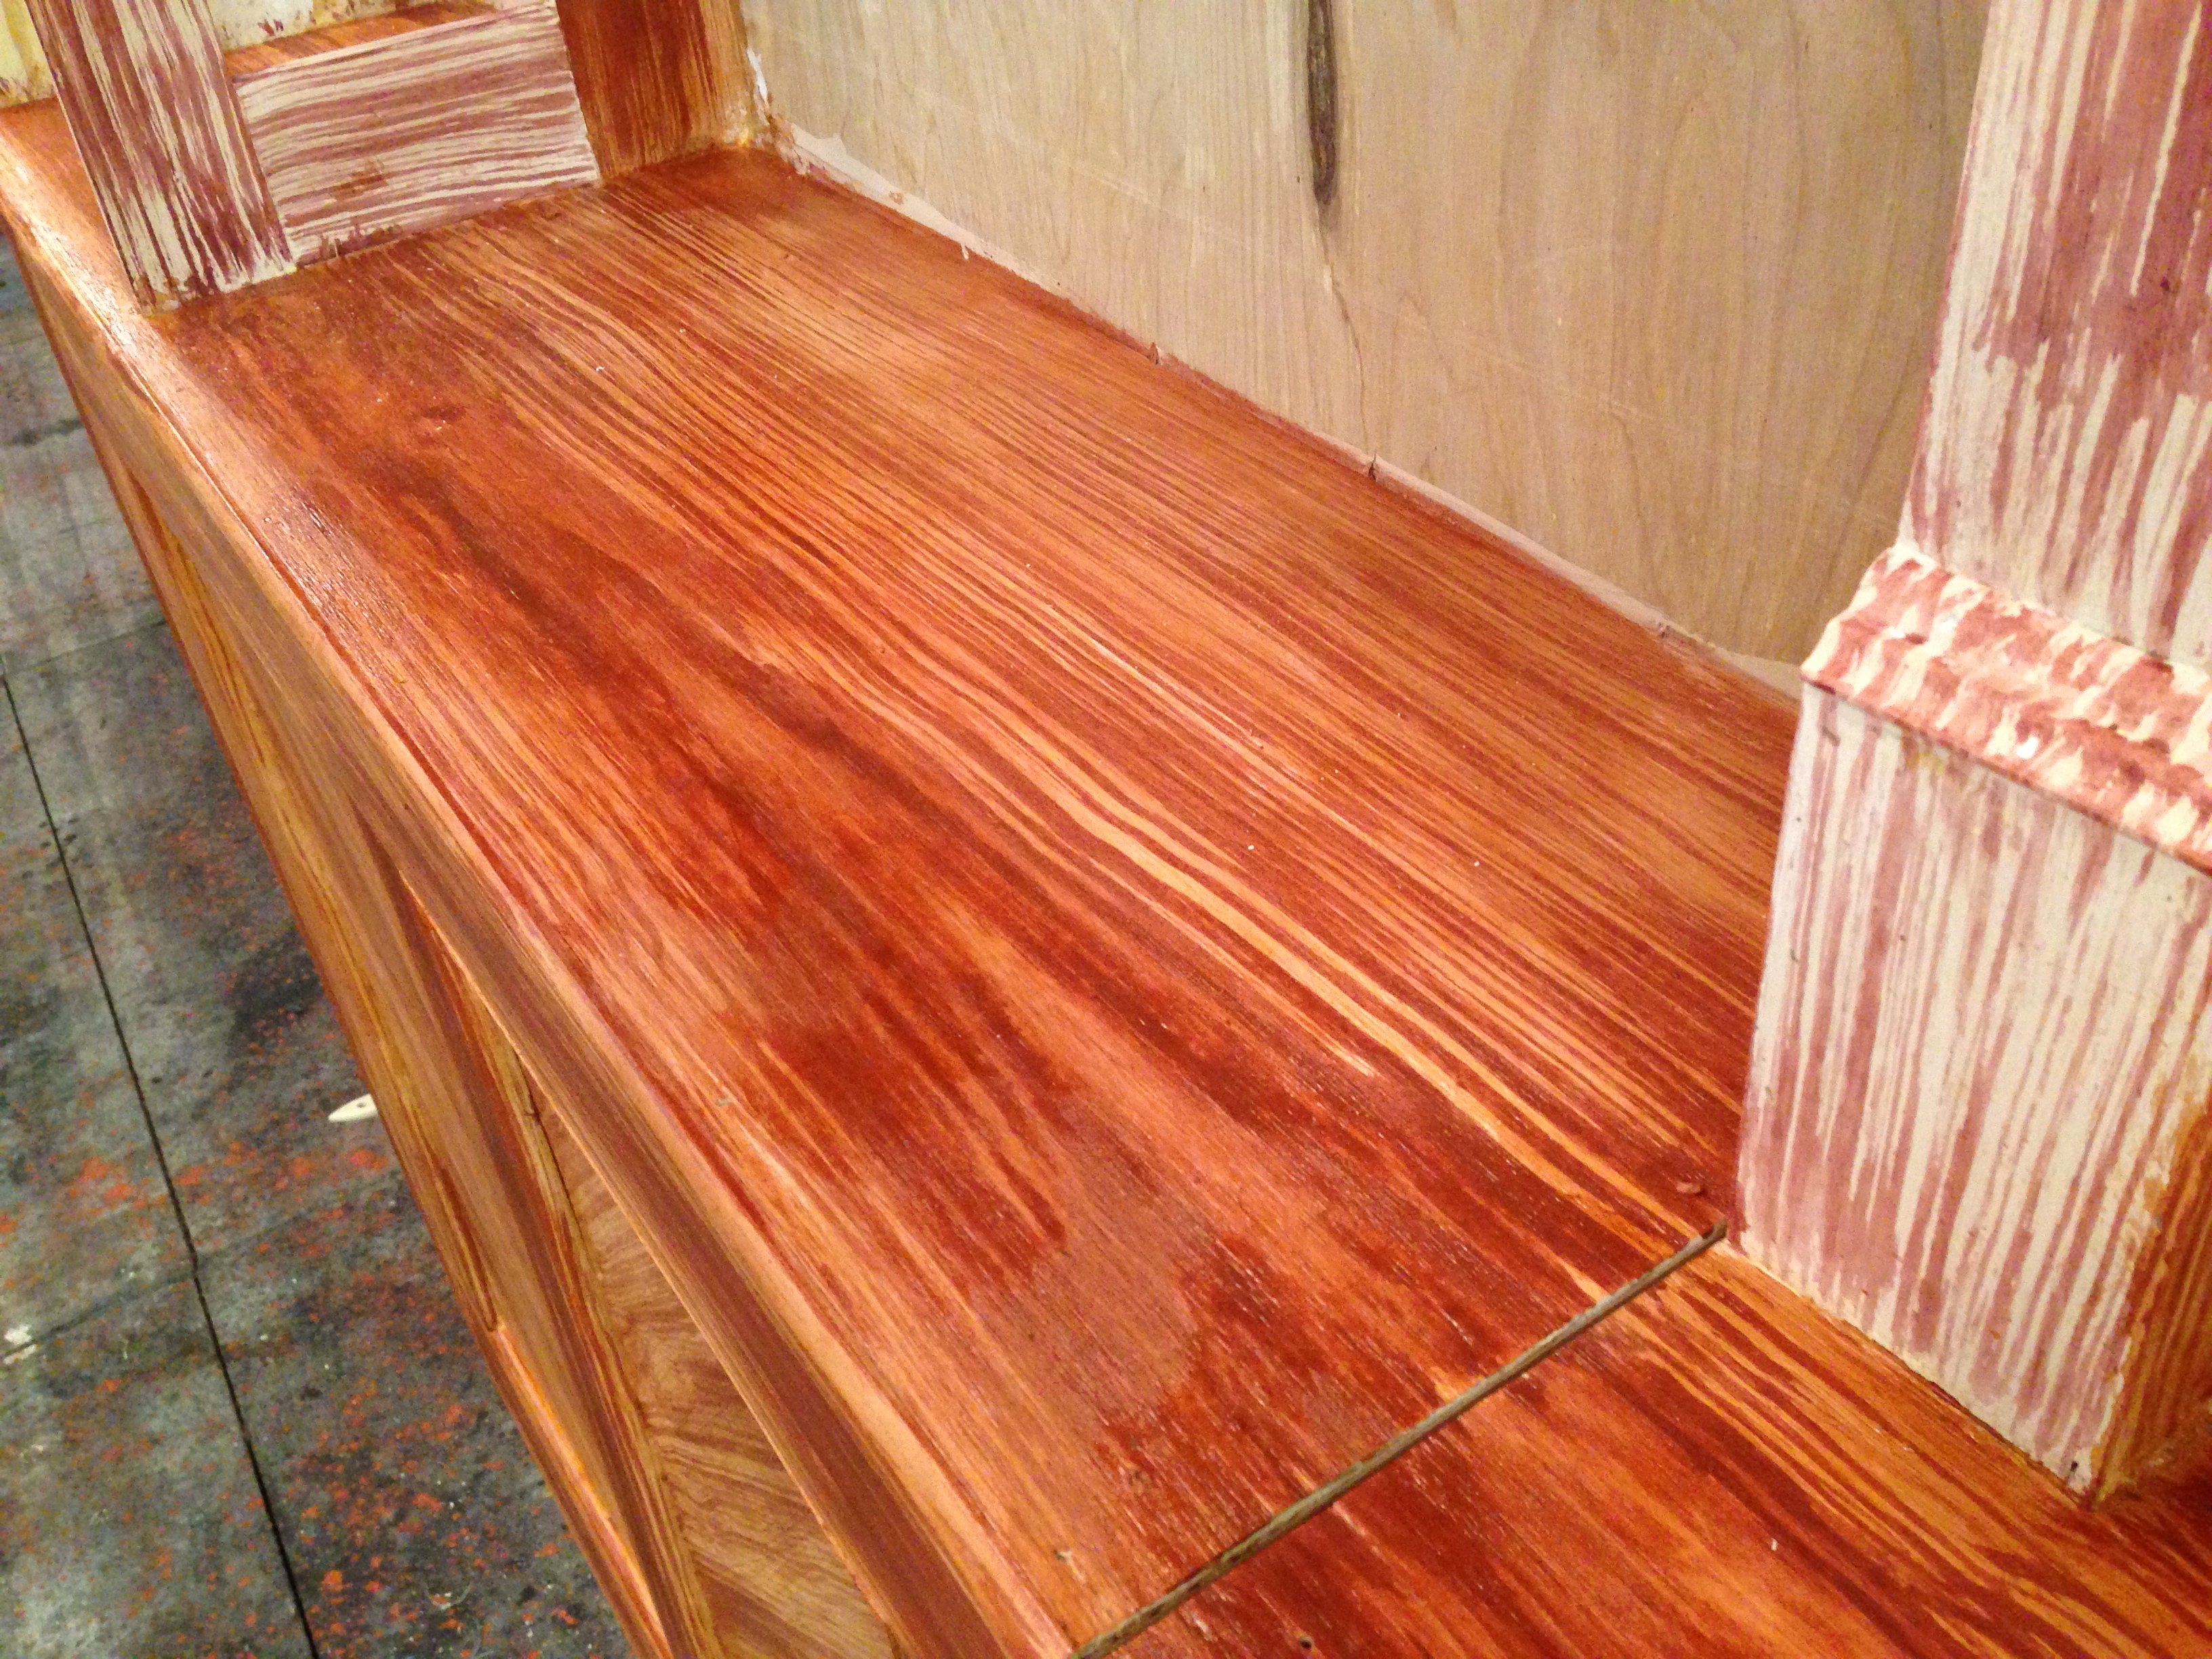
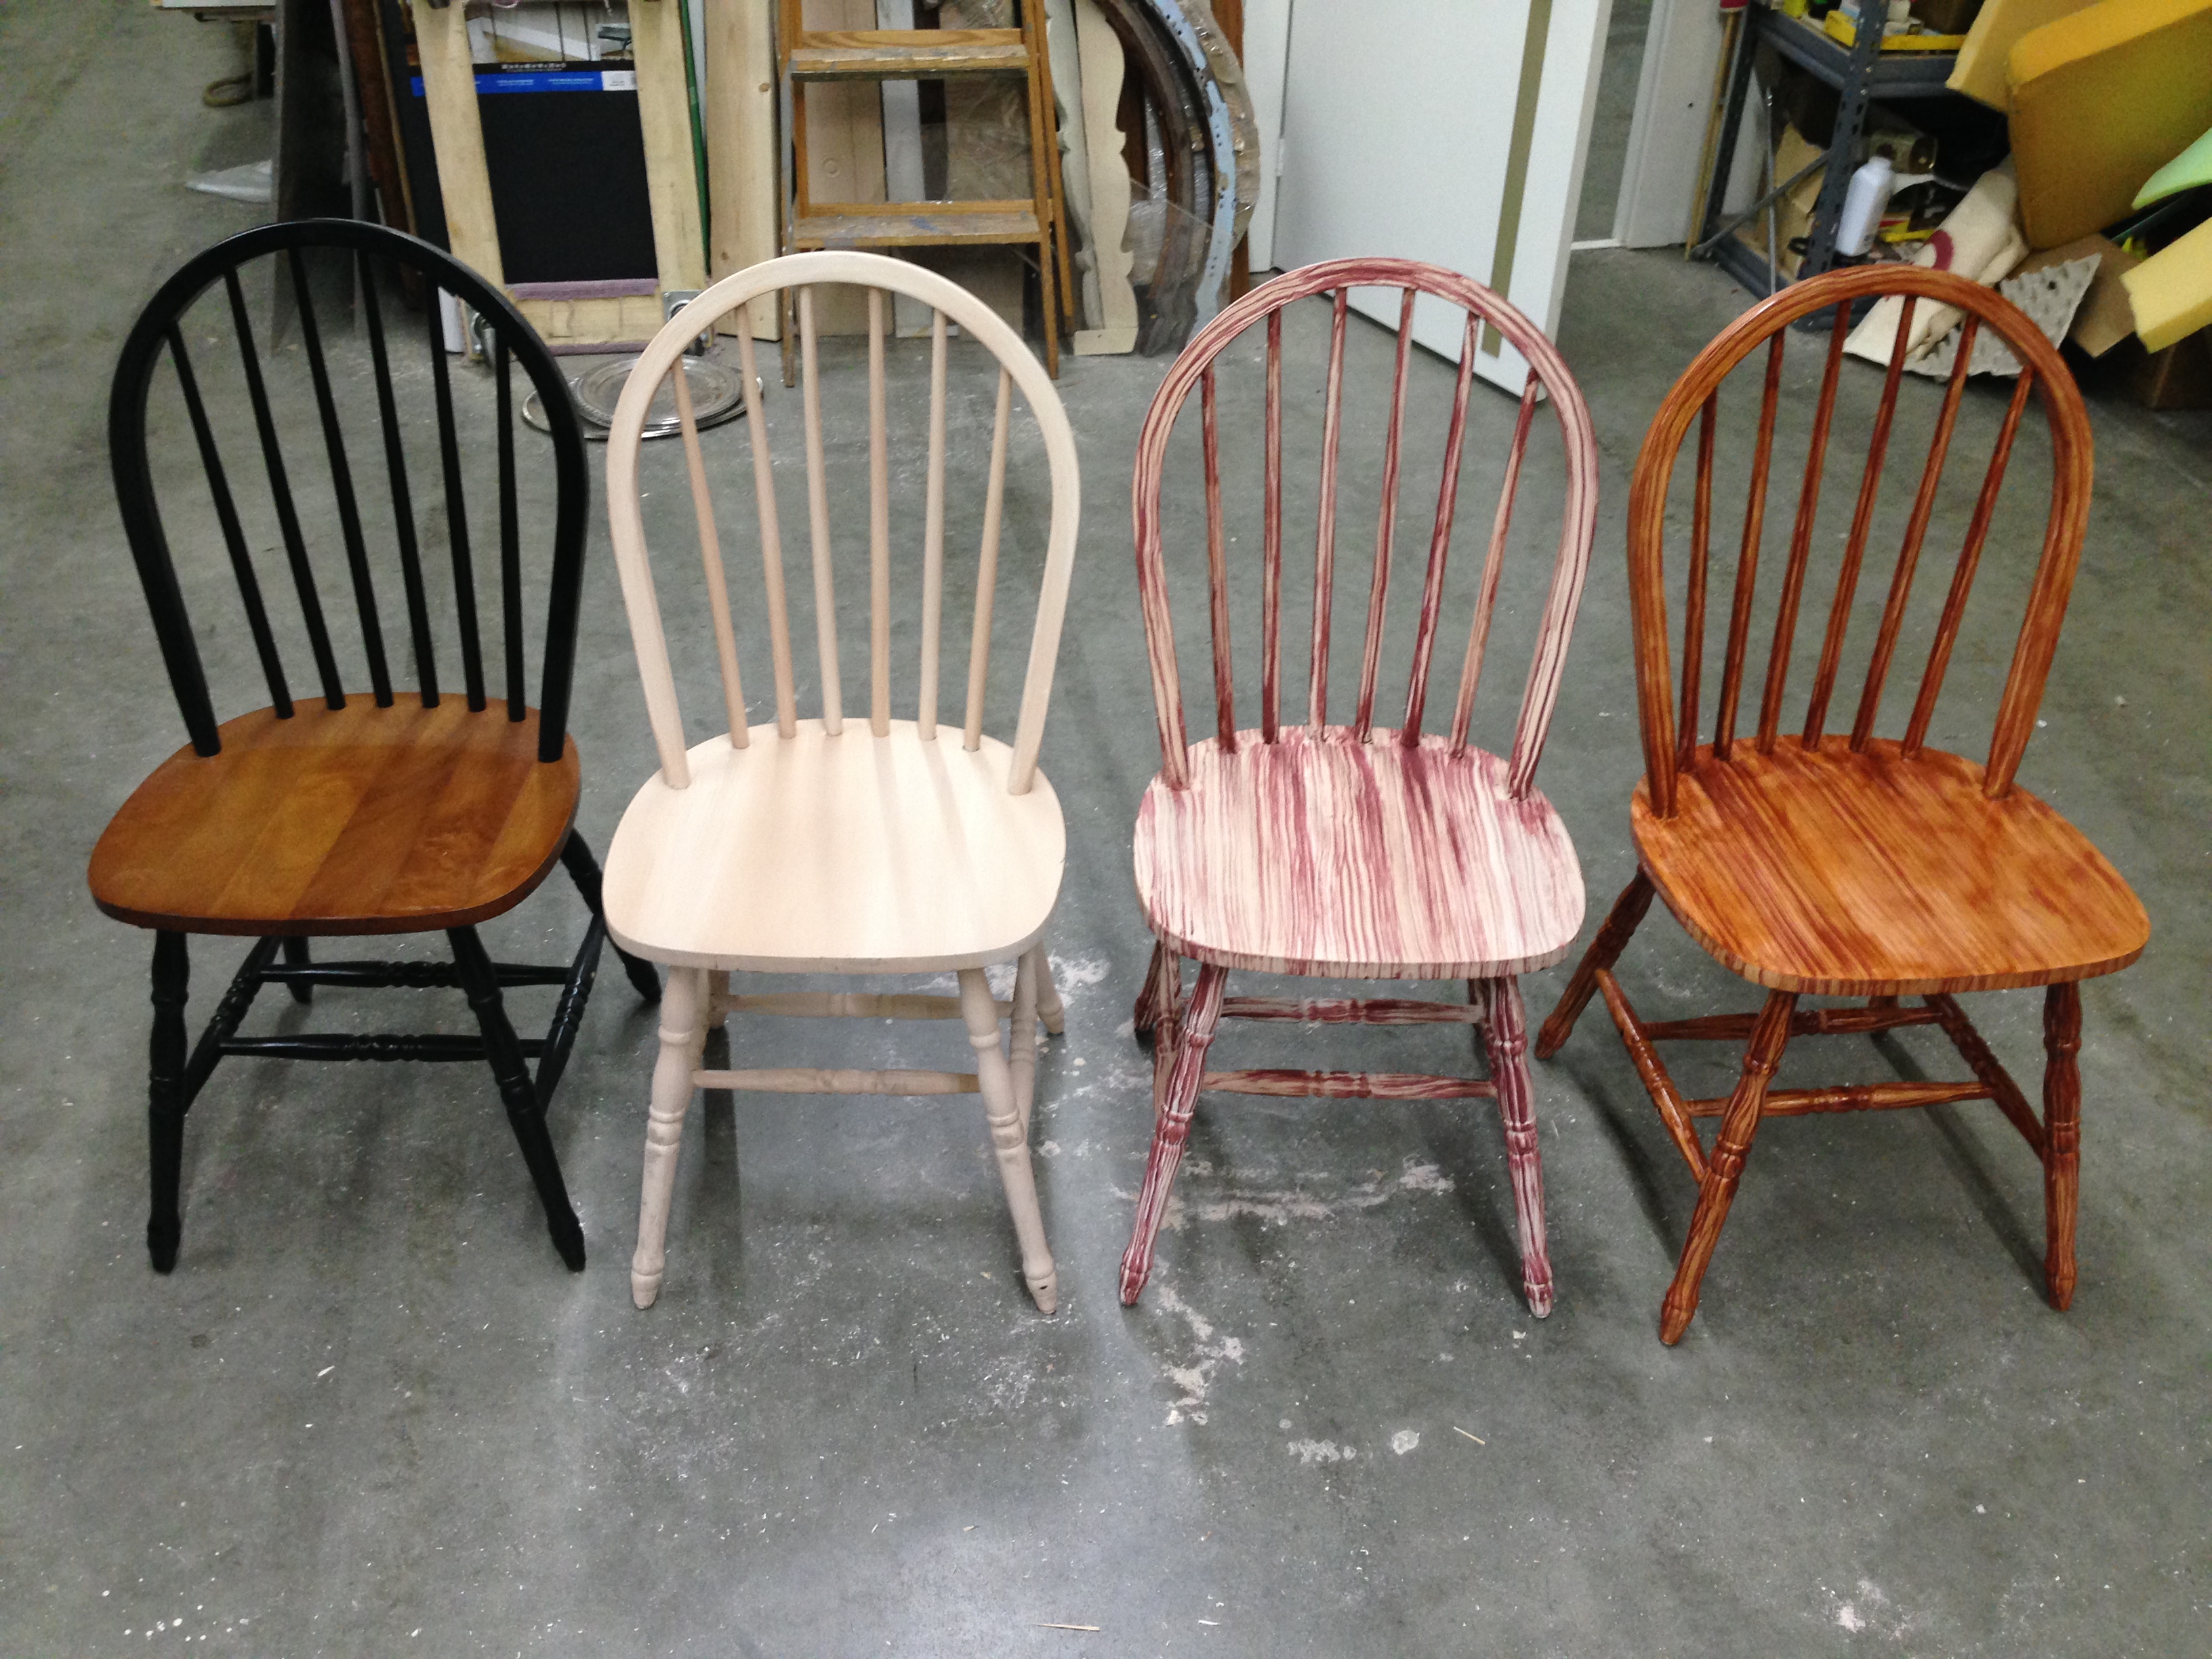
Our production of Anna Christie closed last night at Triad Stage. The first act takes place in a bar, filled with wooden furniture. The bar, tables and chairs all needed to match, and since they were constructed from a variety of wood and other materials, the best way to do that was by painting all of them.
Our scenic charge artist, Jessica Holcombe, helped us develop a process to match the wood sample that our designer picked out. The base coat was a wet blend of two colors: a light tan, and a slightly darker beige. We blended them in the direction that the fake grain would go.
Base coat
The next layer was a maroon/pink graining layer. A lot of the graining was done simply with a chip brush lightly dragged along the surface to make stripes. For some of the larger surfaces, we broke out the grain rocker to make some knots and other grain characteristics.
Graining
For the third layer, we made a glaze from some amber shellac and a bit of brown tint, and painted that over the whole thing.
Glaze coat
The picture below shows the progression of this graining process, starting with an unpainted chair I bought.
Step-by-step wood graining process
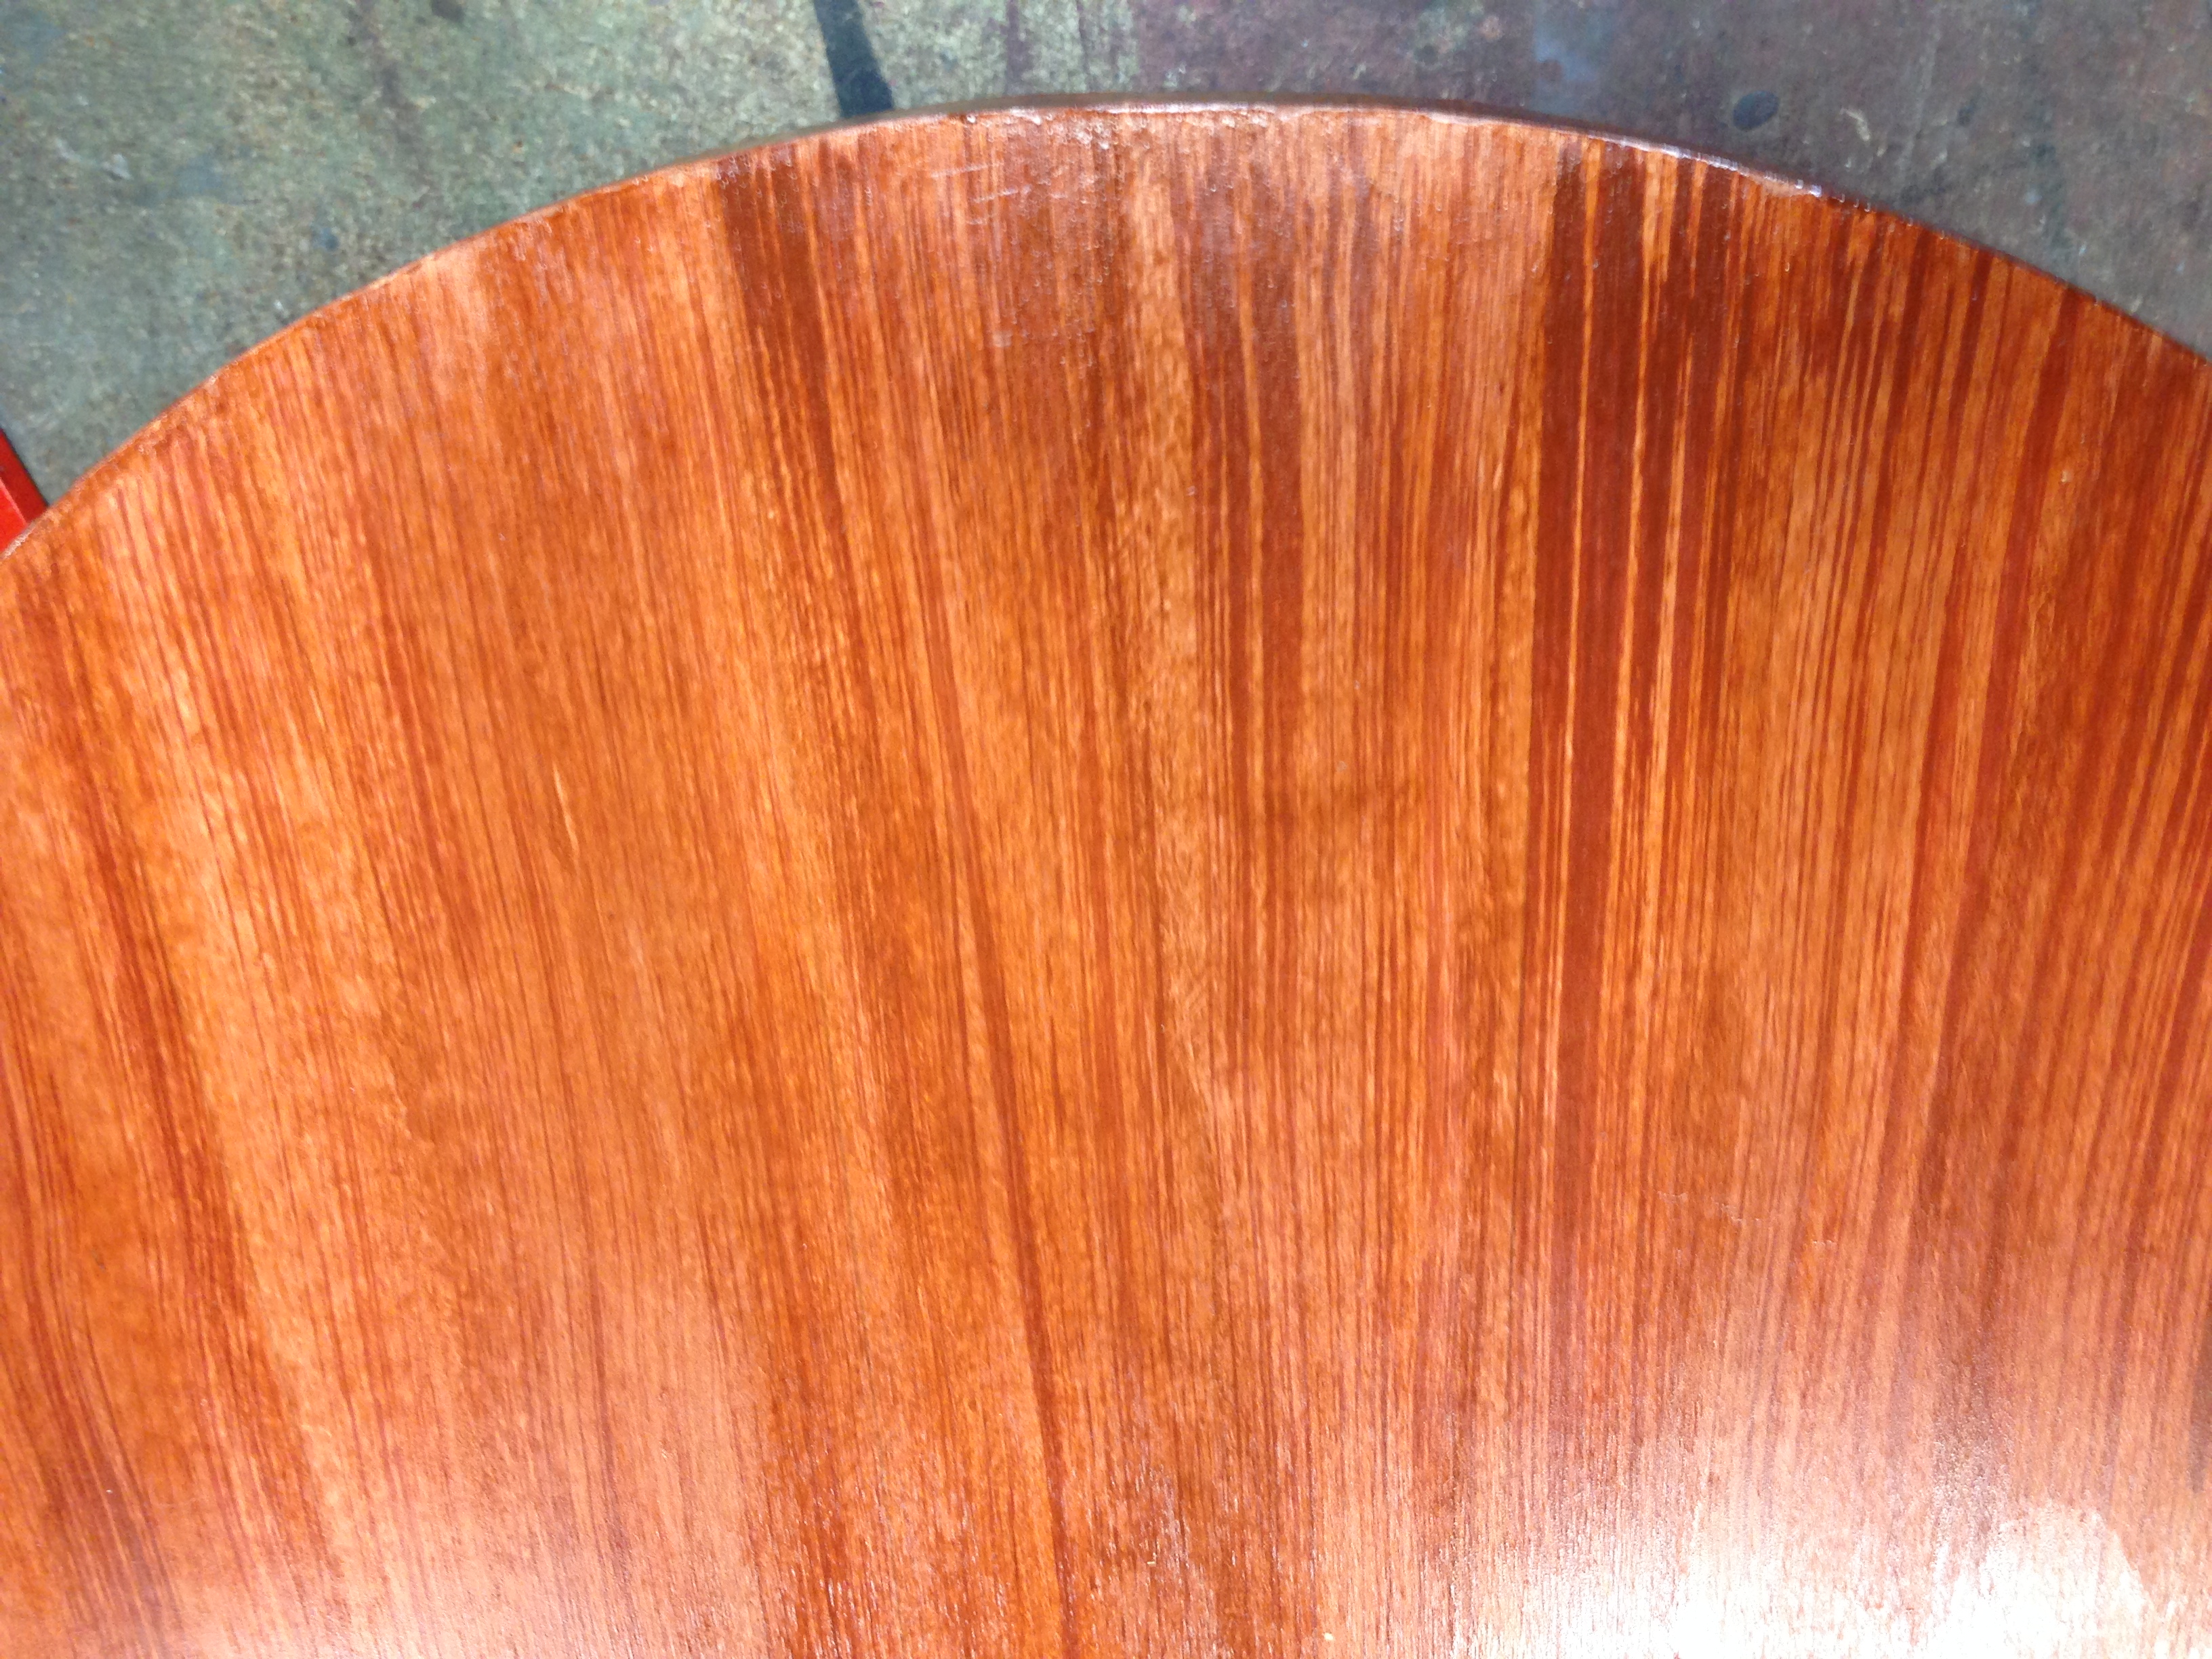
When the furniture got on stage under the lights, it was too bright and the grain had too much contrast. We added another glaze coat of tinted shellac, this time using a darker brown to tint it. Jessica also showed us how to flock (edit: I mean “flog”) this layer, giving it a bit of the subtle pores and perpendicular stripes you can see below.
Final glaze
When doing a wood grain, the more layers you can add, the richer and more realistic your final result will be. There are many other techniques and tricks you can utilize depending on the specific type of wood you are trying to replicate; it is important to have a clear reference photo or physical sample of what you want your wood to look like.
The following comes from a 1915 book called “Costumes and Scenery for Amateurs”. I published the first portion of the chapter on props way back in 2009. Here, without further delay, is the conclusion.
Stimulate initiative and invention wherever possible. A round collar box is only a collar box until you use it for an earthen bowl. A white cardboard shoe box is cut down a little, covered with black tissue paper, has a little yellow pane inserted in each side, and a curtain ring for a handle. Behold a lantern for a Yankee minute-man, or Paul Revere, or anyone else who wants to use it.
Remarkable stage furniture can be made from wooden boxes of all sizes. A packing case makes a dais. Several boxes nailed together and stained brown will make a peasant’s cupboard.
Three boxes nailed together like this |¯| will make a hearth. If it is to be a mediæval or fairy tale hearth, cover it with cheap gray cambric, bulked to look like stone, and marked with splotches of white and brown chalk. Be sure you turn the unglazed side of the cambric outward. Use chalk because paint will not show up well on cambric. A brick fireplace for a modern scene can be made in the same way, covering the boxes with brick chimney paper than can be bought at Dennison’s Tissue Paper Co., Boston, Chicago, or New York. One of their catalogues will prove invaluable to directors living in the country. A narrow box on rockers, stained brown, becomes a Puritan or eighteenth century cradle. Gilded and hooded it is the cradle of a royal Princess. Couch seats can be made from boxes, only be sure that they are secure.
Originally published in “Costumes and Scenery for Amateurs”, by Constance D’Arcy Mackay, 1915 (pp 95-96)
1. There are two main types of table saws: contractor and cabinet. Â Contractor saws are lighter and cheaper, and often built to be portable. They are also usually less exacting and have less power. Cabinet saws have an enclosed “cabinet” base, making them quieter and easier to use dust collection on. Compared to contractor saws, they typically have a larger table size and are more precise, but can be far more expensive, and are definitely not portable. They also typically require a 220v outlet. Most permanent props shops use cabinet saws, as contractor saws are not sturdy enough on their own to handle full-size sheet goods. Some manufacturers are now making hybrid saws, which capture features from both. You can also find hobby saws in specialty shops, which are small and fit on a table top. They can be useful for small projects and model work (though a full-size machine can also do this work with the proper setup). Hobby table saws range from cheap and inaccurate toys, to highly precise machines packed into small bodies.
2. Watch for kickback. While a SawStop can prevent your fingers being cut off (a very expensive accident), the most common injuries on a table saw come from kickback, which is when the spinning blade catches the material and flings it back at you. Never stand directly behind the piece you are cutting, but rather, just to the side. And never, ever let go of the wood while it is in contact with the blade; even if kickback is in progress, you have more control if you keep hold of the board than if you panic and let go. A splitter, or “riving knife”, is the single most effective method for preventing kickback. Never force the wood through; the blade may be too dull, or it may be binding, either of which can cause kickback. Pay attention to the sound of the blade; if it is whining or sounds like it is slowing down, you’re getting close to a kickback.
3. Double-check your measurements. Always measure from the fence to the blade, especially when using a particular saw for the first time. The ruler which is attached to the fence rail may not be accurate or precise. Only when you are certain the ruler on the machine is accurate and precise should you use it for setting your fence.
4. Keep the wood in place. Your wood (or other material) needs to be held snugly against the rail and down against table. Use featherboards or other attachments to hold your wood if your fingers will get too close during a cut. Featherboards are especially useful on miter cuts. Push sticks and push shoes are also vital accessories for holding your material snug and keeping your fingers away from the blade.
5. Never wear gloves when cutting. If a bit of the glove, or even just a single loose thread, gets caught by the spinning blade, it can be pulled into the blade, which will catch more of the fabric and pull more of the glove into the blade. This creates a vicious chain reaction where your entire hand can be pulled into a spinning blade within a fraction of a second. Without gloves, the blade cuts through the skin or bones before being able to grab on and pull more in. On this same note, avoid rings, ties, necklaces, loose hair, apron strings in the front, &c. If you are wearing long sleeves, roll them up tightly before using the table saw.
6. With the correct jigs, you can do almost anything on the table saw. You can cross-cut, cut slots and channels, cut patterns, cut tapers, cut circles, taper long boards, make cove molding, and much more, and you can do it all safely. For tricky cuts or complex operations, it will actually take longer to set up the tool than to carry out the actual operation.
7. Maintain the top of your table. Rust will slowly damage the top, making it hard to push material through. It will also discolor your wood. Clean the top with metal cleaners, or even steel wool for stubborn rust spots. When clean, you should wax and polish it to prevent further rusting. Paste wax works well, particularly carnauba-based wax; anything made for cars will work as well. A freshly-waxed surface will also make your materials slide through the saw much more effortlessly.
8. Watch where your wood goes. Never start a cut until you know that the wood can go all the way through without falling off the edge or hitting an obstacle, and that you can reach it and keep hands on it at all times. Use stands, outfeed tables, or a friend when necessary. You may wish to “walk-through” a cut first, to check all this before you cut. Do not forget that the balance of the wood will change after it is cut into two pieces; where a full-size piece may rest comfortably on your table, the off-cut may tip off the side.
9. Use the right blade. Some blades are made for ripping, some for cross cutting, while more specialty blades exist for cutting veneers, laminates and plastics. For most props shops, you will be ripping and cross-cutting plywoods and soft woods throughout the day, and constantly changing the blade will be inefficient, so invest in a good combination blade that will work for the majority of your most common operations.
10. Set the correct blade height. Your blade should be high enough so the gullets of the teeth (the spaces between the teeth) are at or just below the top of the wood’s surface. This allows the blade to clear sawdust and introduce fresh air into the cut, while minimizing the amount of exposed blade to your fingers.
Making and finding props for theatre, film, and hobbies

