A Wild Bar for a Wild Party

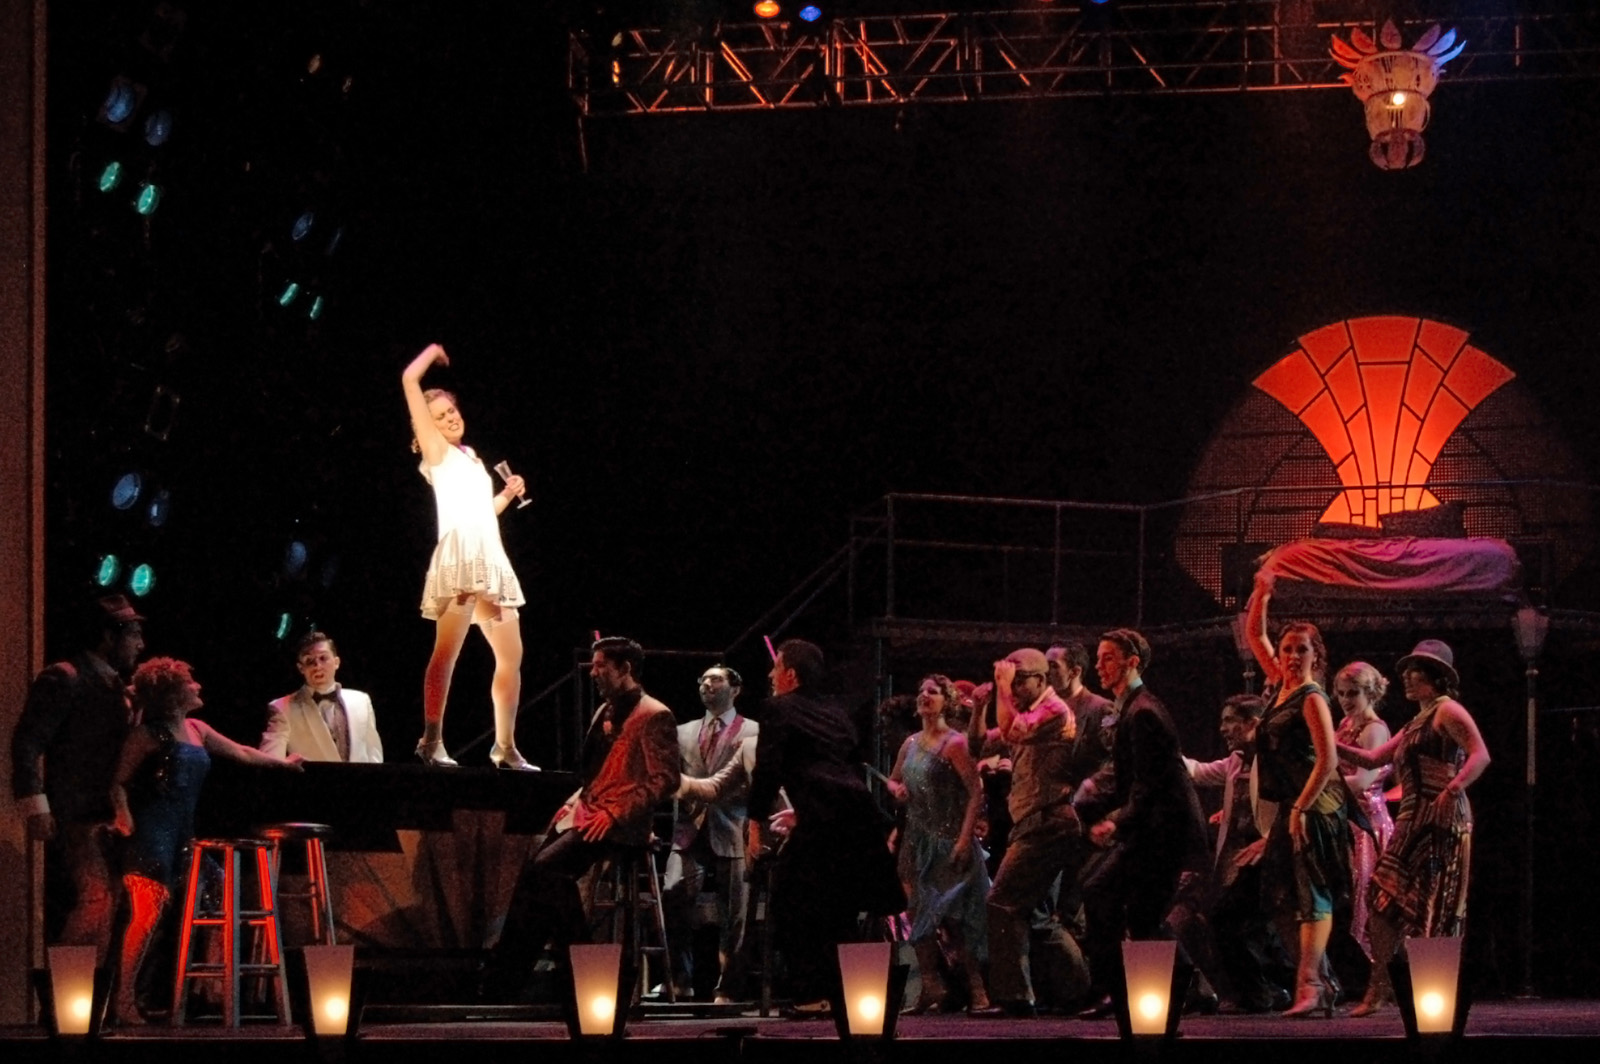
It is a little over a week since Elon University’s Wild Party closed, so I thought I would share some of the props I built while working as the props master on it. First is the sleek Art Deco bar. This production featured a lot of dancing and movement (in fact, the show was more of a dance piece with singing than a traditional musical) and the bar was key in a lot of the dancing. Actors jumped up and down off of it constantly and danced on top of it. Needless to say, it had to be sturdy.

Wild Party
Wild Party

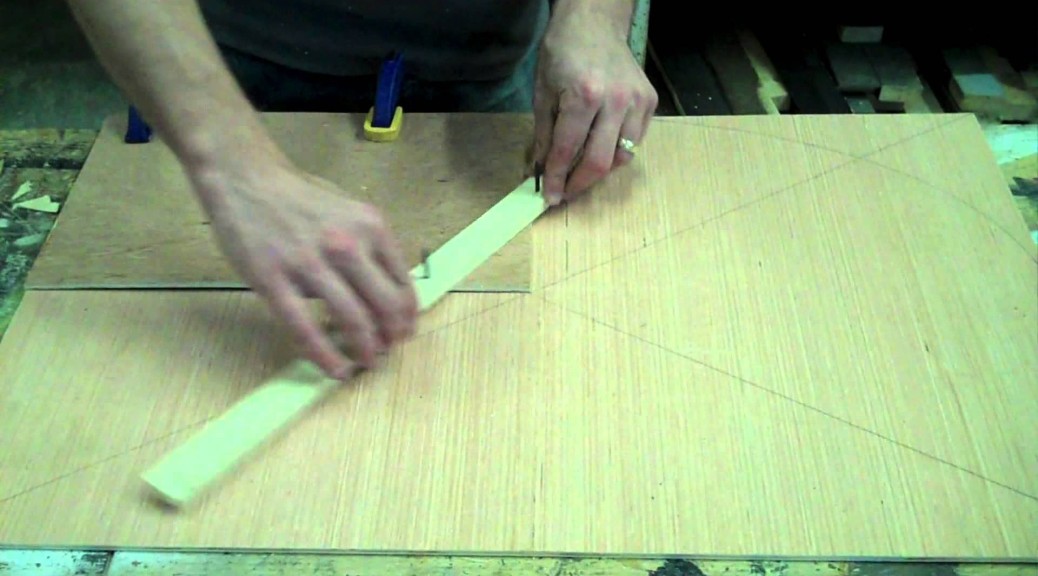
The other hurdle was that I only had a bout a day to build the bar to a point that they could use it in rehearsal; it did not have to be finished, just usable. The bar had a sort of boomerang or banana shape to it. I knew it would take awhile to layout the shape, not to mention all the pieces I would need to cut that followed the shape but were inset or offset by varying amounts. Since the scenic designer, Natalie Taylor Hart, already had the footprint of the bar drafted in CAD, we decided to CNC these pieces and save some time.

CNC the top
CNC the top

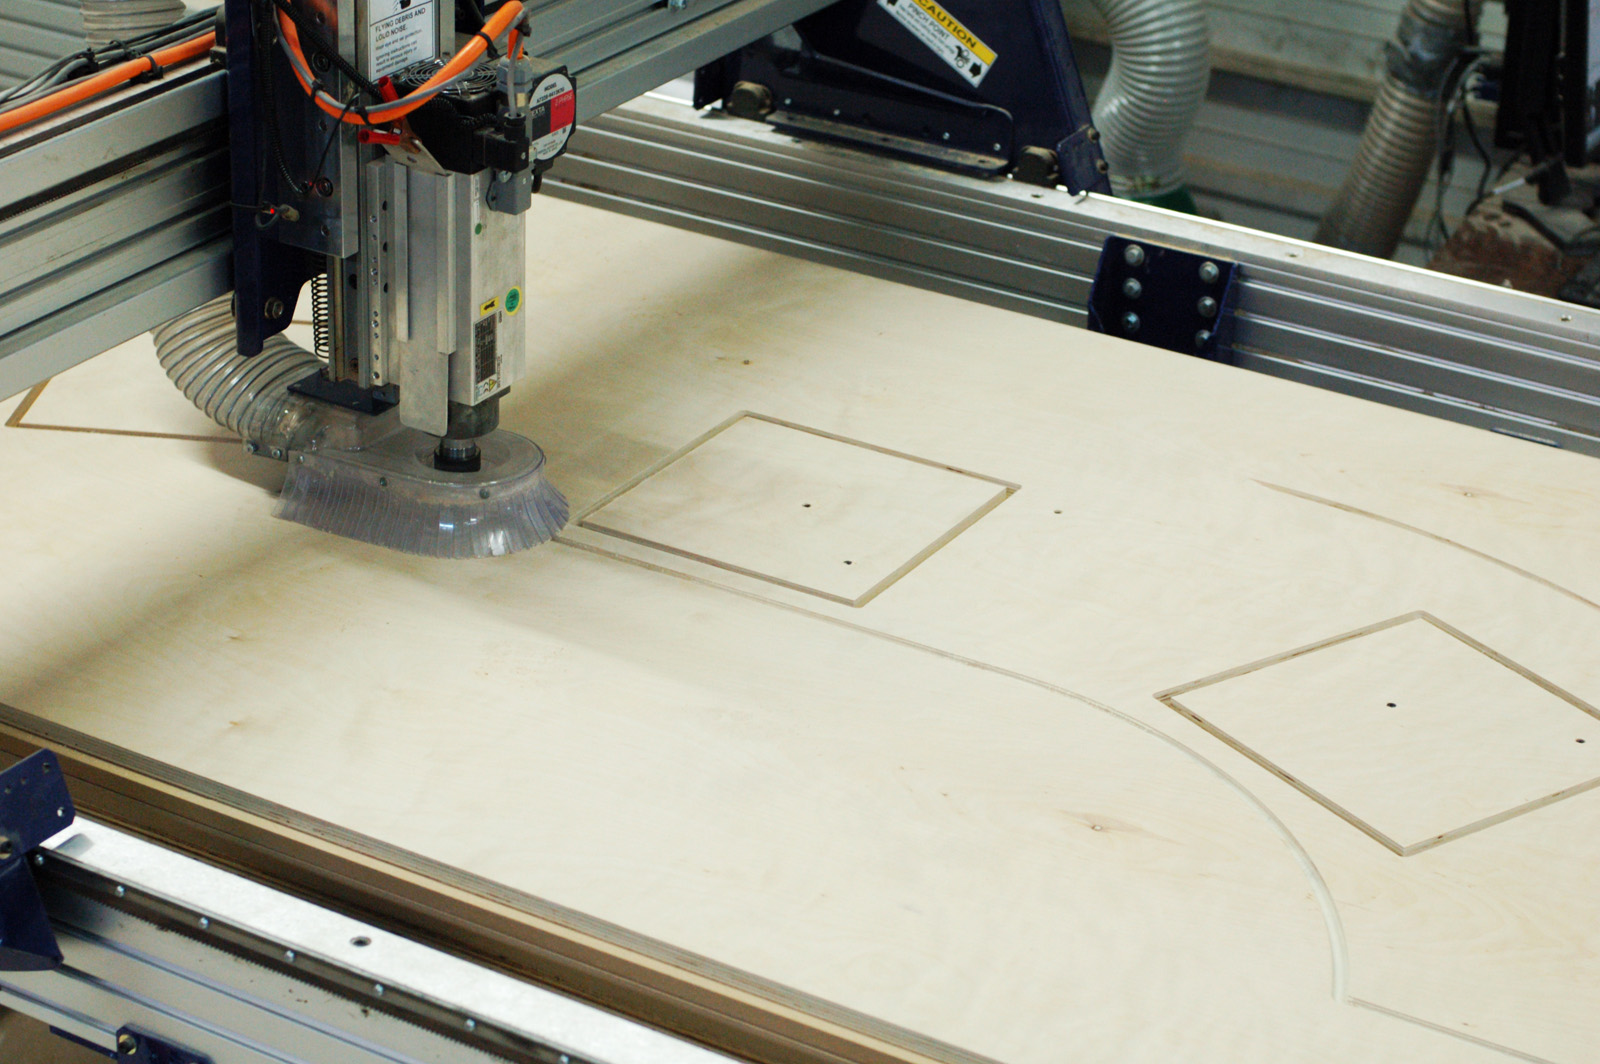
The top was two layers of plywood. We were putting lights in the bar that would shine upward, so the top also had squares to hold three pieces of 3/4″ plexiglass; the squares on the top piece were large enough to fit the plexiglass, while the squares on the bottom piece were a touch smaller to create a lip for the plexiglass to sit on.

Pile of CNC pieces
Pile of CNC pieces

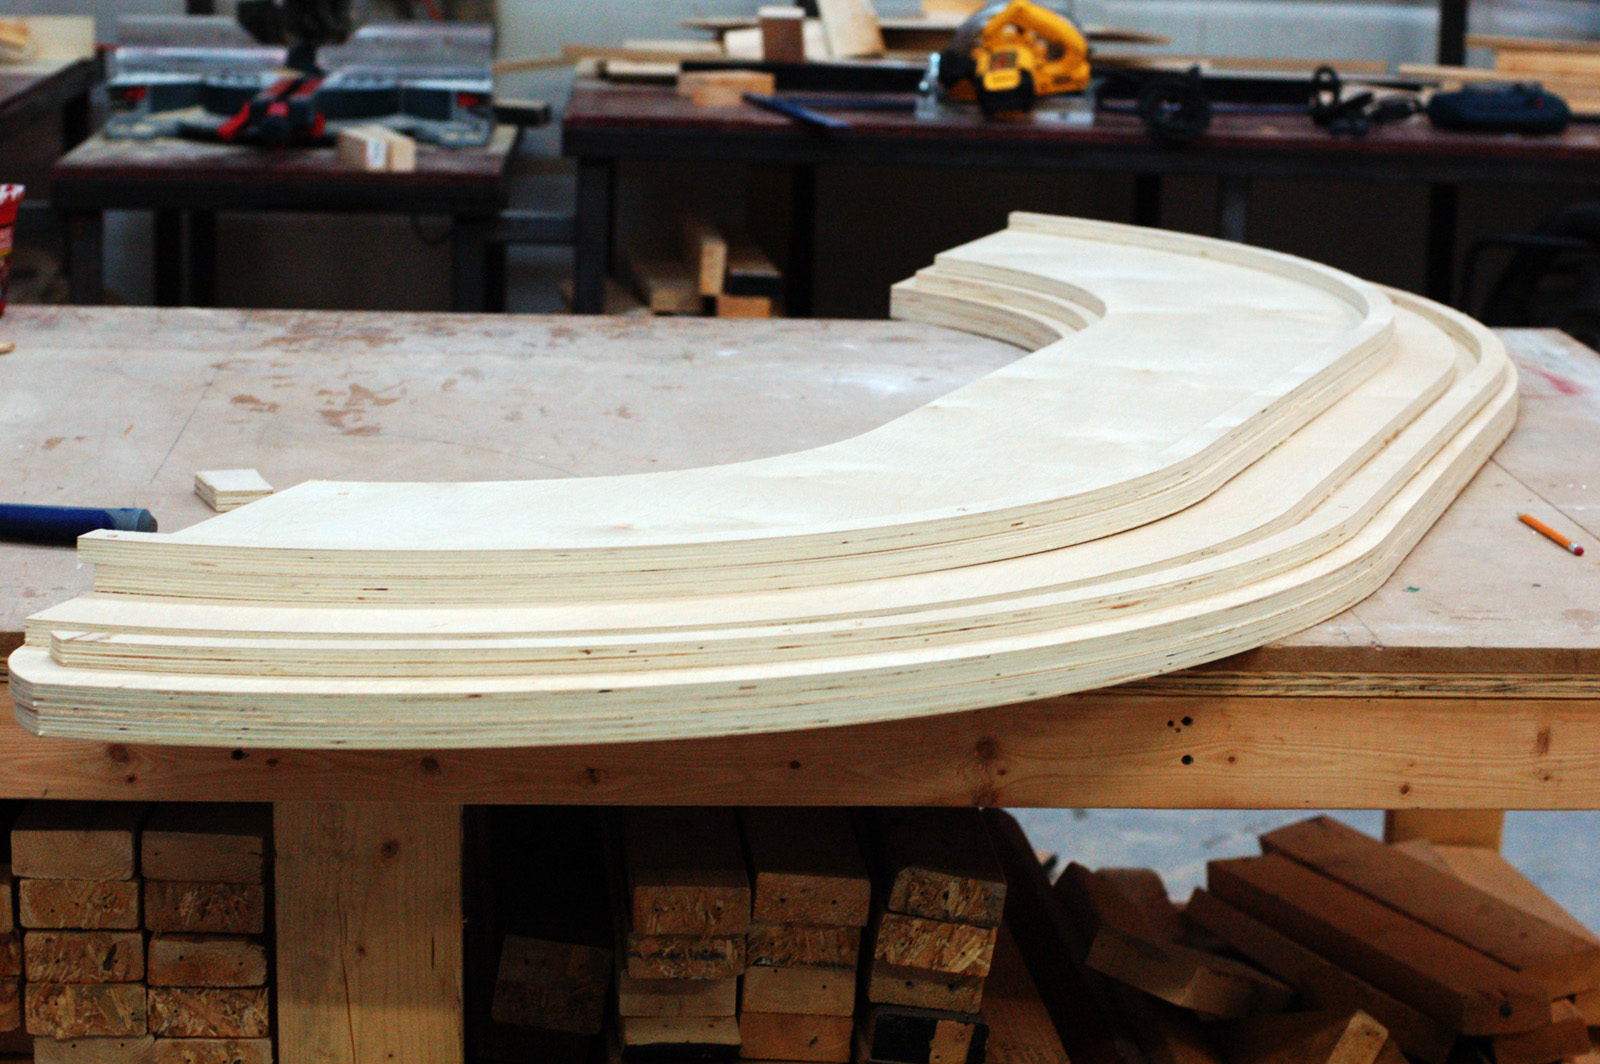
I also cut the footrest, a piece for a shelf in the middle, and some formers to nail the wiggle wood to. This pile of pieces would have taken awhile to draw and cut by hand, but with CAD, Natalie just had to copy the same shape over and over again, insetting the front curve by whatever measurement I gave. With this pile of pieces, I just had to cut a bunch of formers and uprights to connect them all together.

Notches and holes
Notches and holes

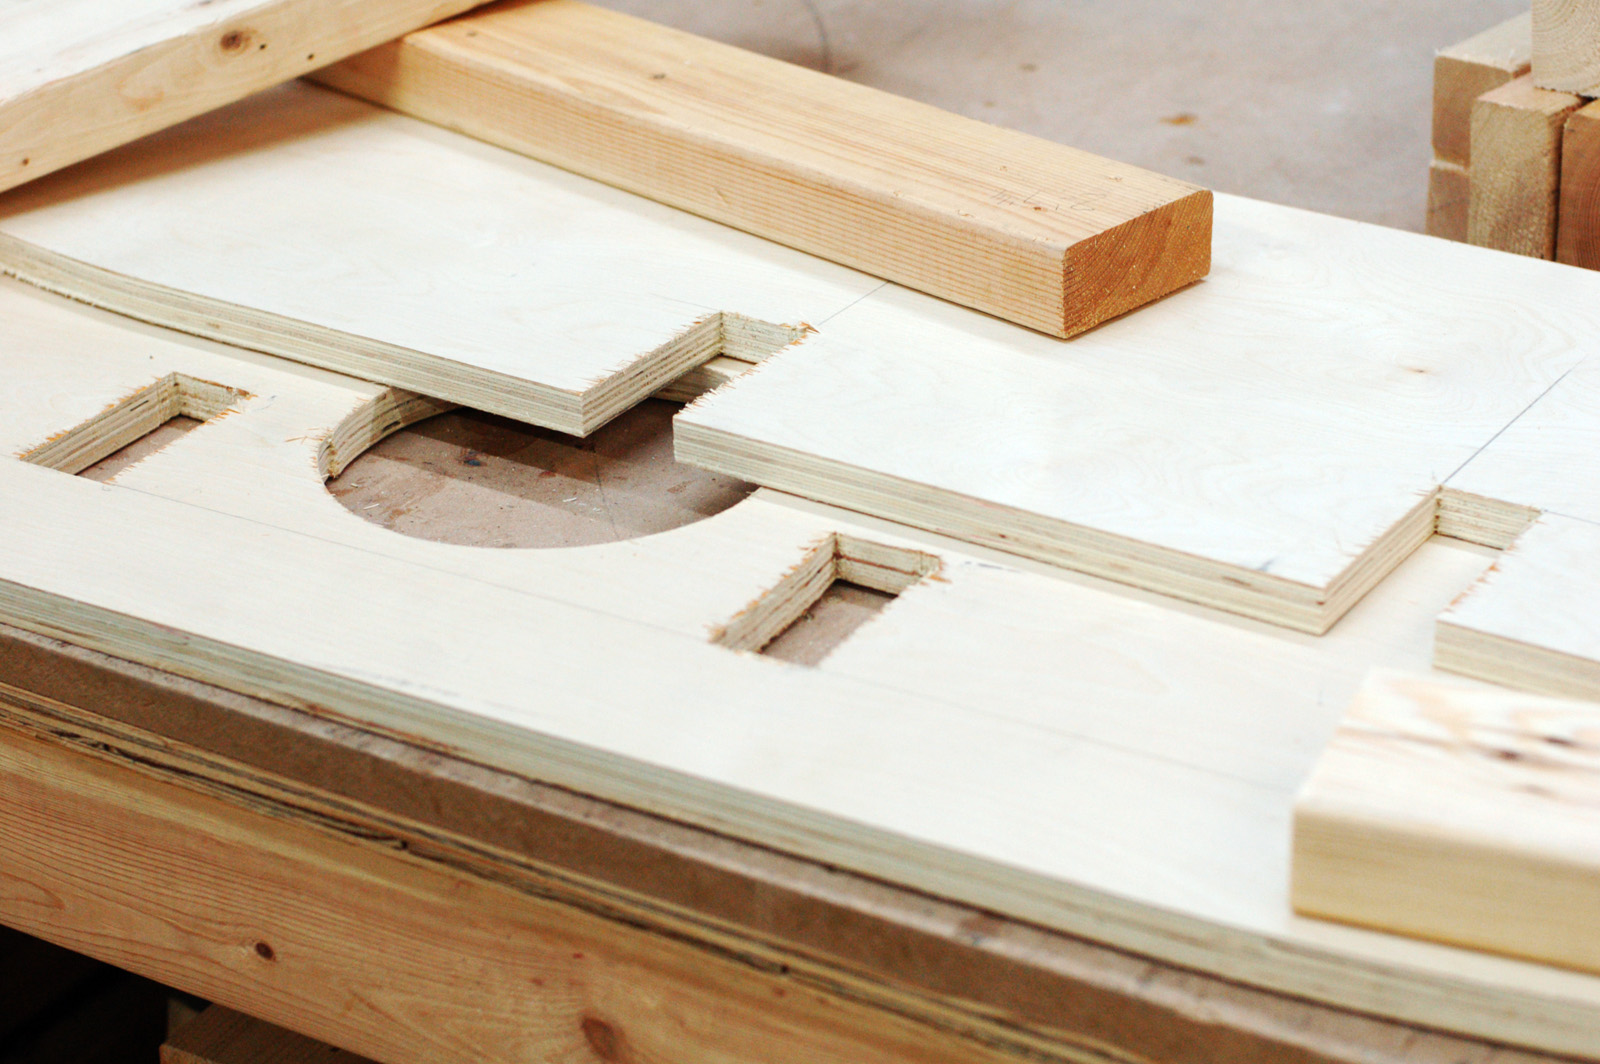
I decided I wanted some supports to run unbroken from the top to the bottom of the bar for strength, which meant I had to cut some notches and holes in the plywood that they could run through. If I had more time to figure the whole thing out ahead of time, I would have drawn these into the CAD. Since the pieces were already cut, I needed to measure and cut them by hand. See, even with fancy fabrication machines, you still need a solid grasp of traditional tools to build things.


Two levels complete
Two levels complete

I built the bar up one level at a time, marking carefully to keep the whole thing square and straight. I positioned the supports so they were nearly above the support below them; they were offset just a bit so I would be able to drive a nail in.

Bar skeleton
Bar skeleton

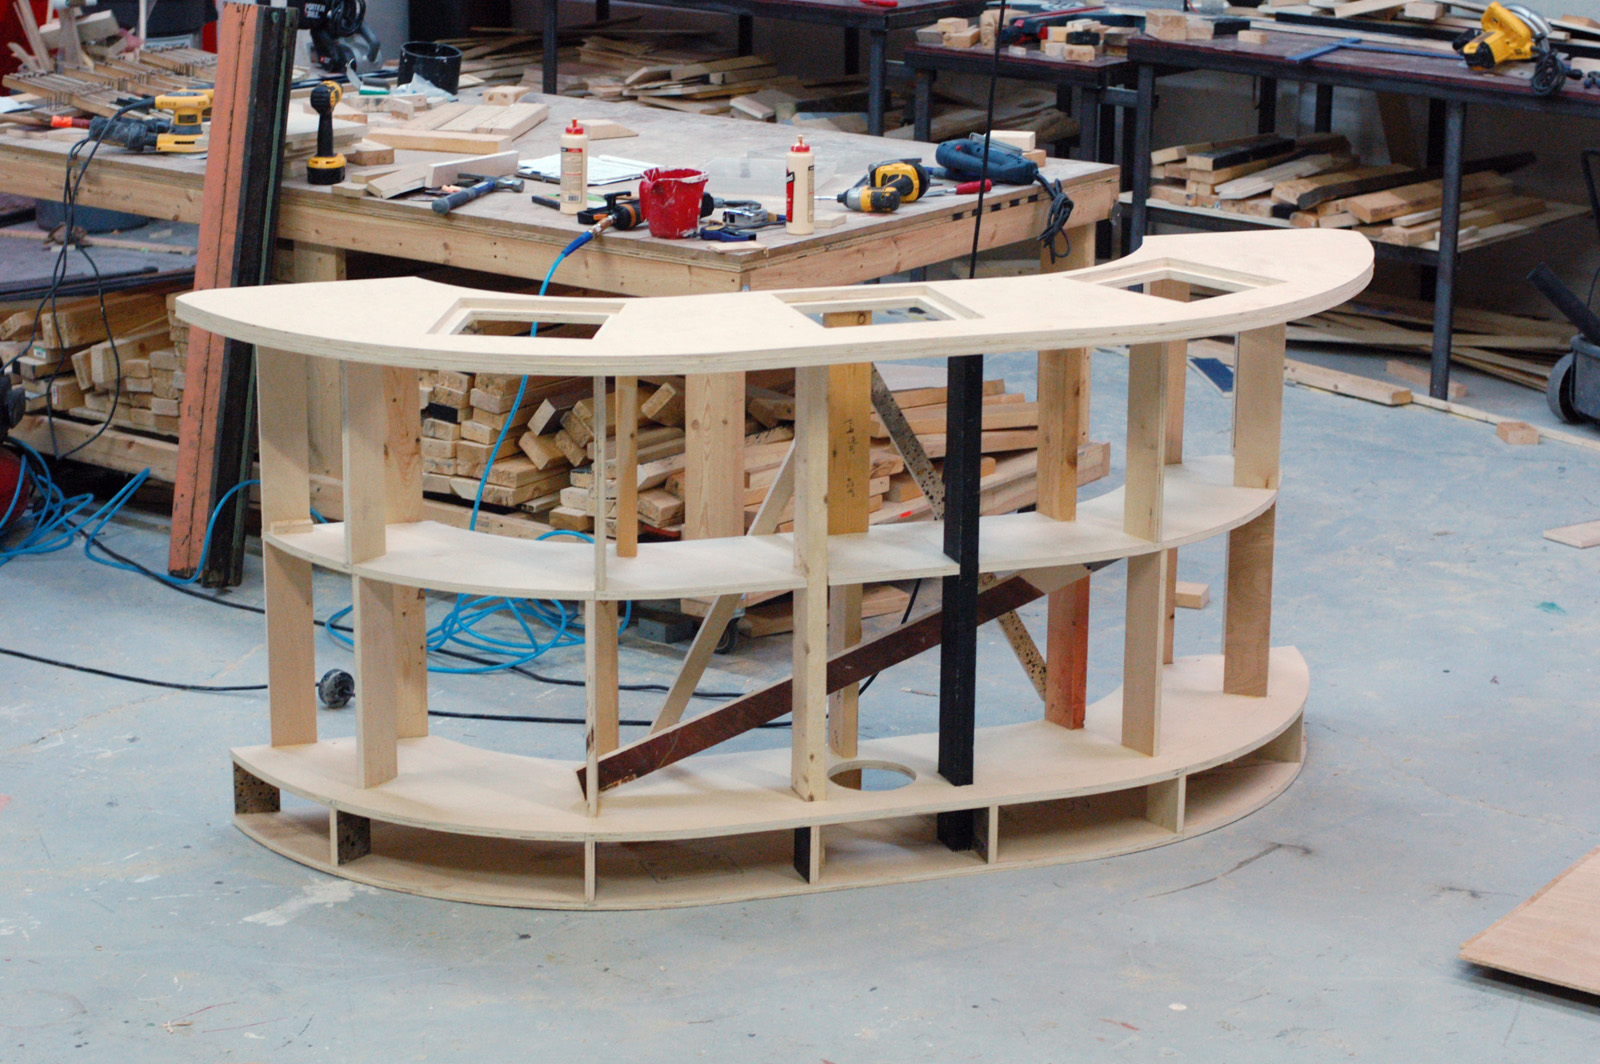
The supports along the front of the bar did double duty as formers, providing a nailing surface for the wiggle wood I would add later. I tried to keep the back as open as possible so it could be used as shelving to store all the props; the set was fairly open and skeletal, so the bar served as a place for a lot of the hand props to appear and disappear. The diagonal braces in the photograph above are just to keep the bar sturdy as they use it in rehearsal. Once the wiggle wood was added, I removed them, because the wiggle wood acted as one large piece of diagonal bracing.

Wiggle Wood
Wiggle Wood

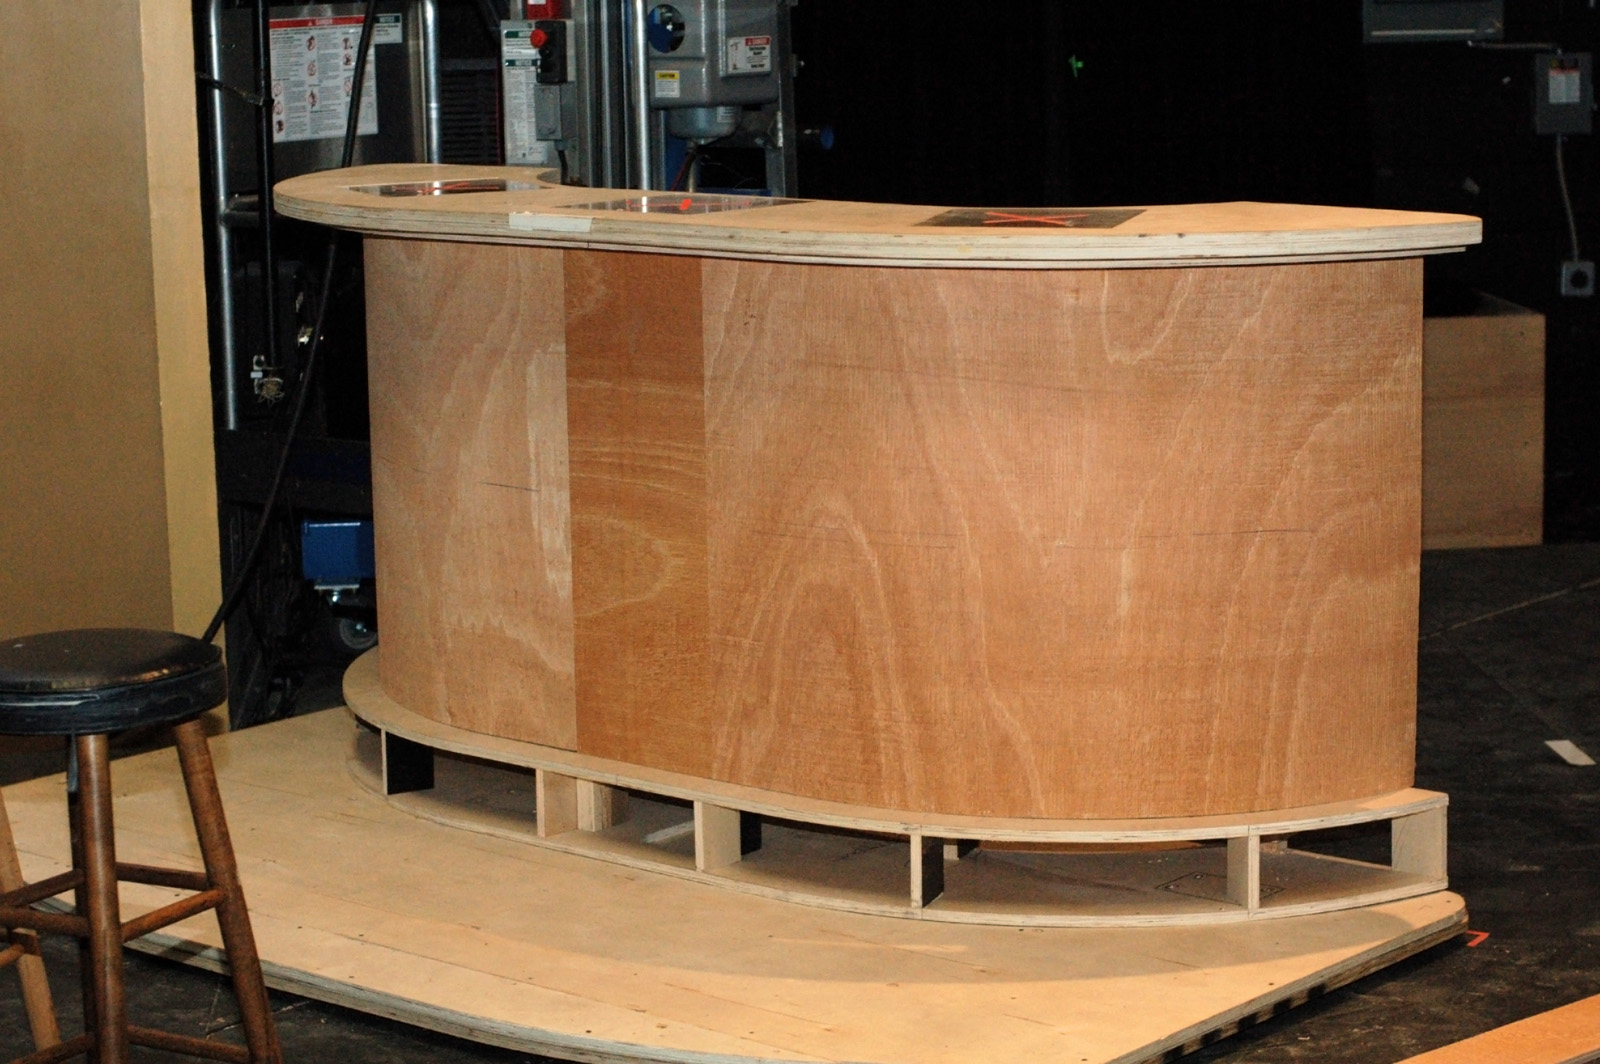
I finished the bar onstage in between rehearsals. The curve was longer than eight feet, so I could not cover it with just one piece of wiggle wood. The center is relatively flat, so I placed a small piece directly in the center; I have found it easier to fill and sand seams between wiggle wood when they are on flat areas. The footrest also got a small strip of wiggle wood after the bar was secured to the wagon underneath it. All the faces got a thin coat of joint compound and a light sanding, and then it was on to painting.

Wild Party Bar
Wild Party Bar

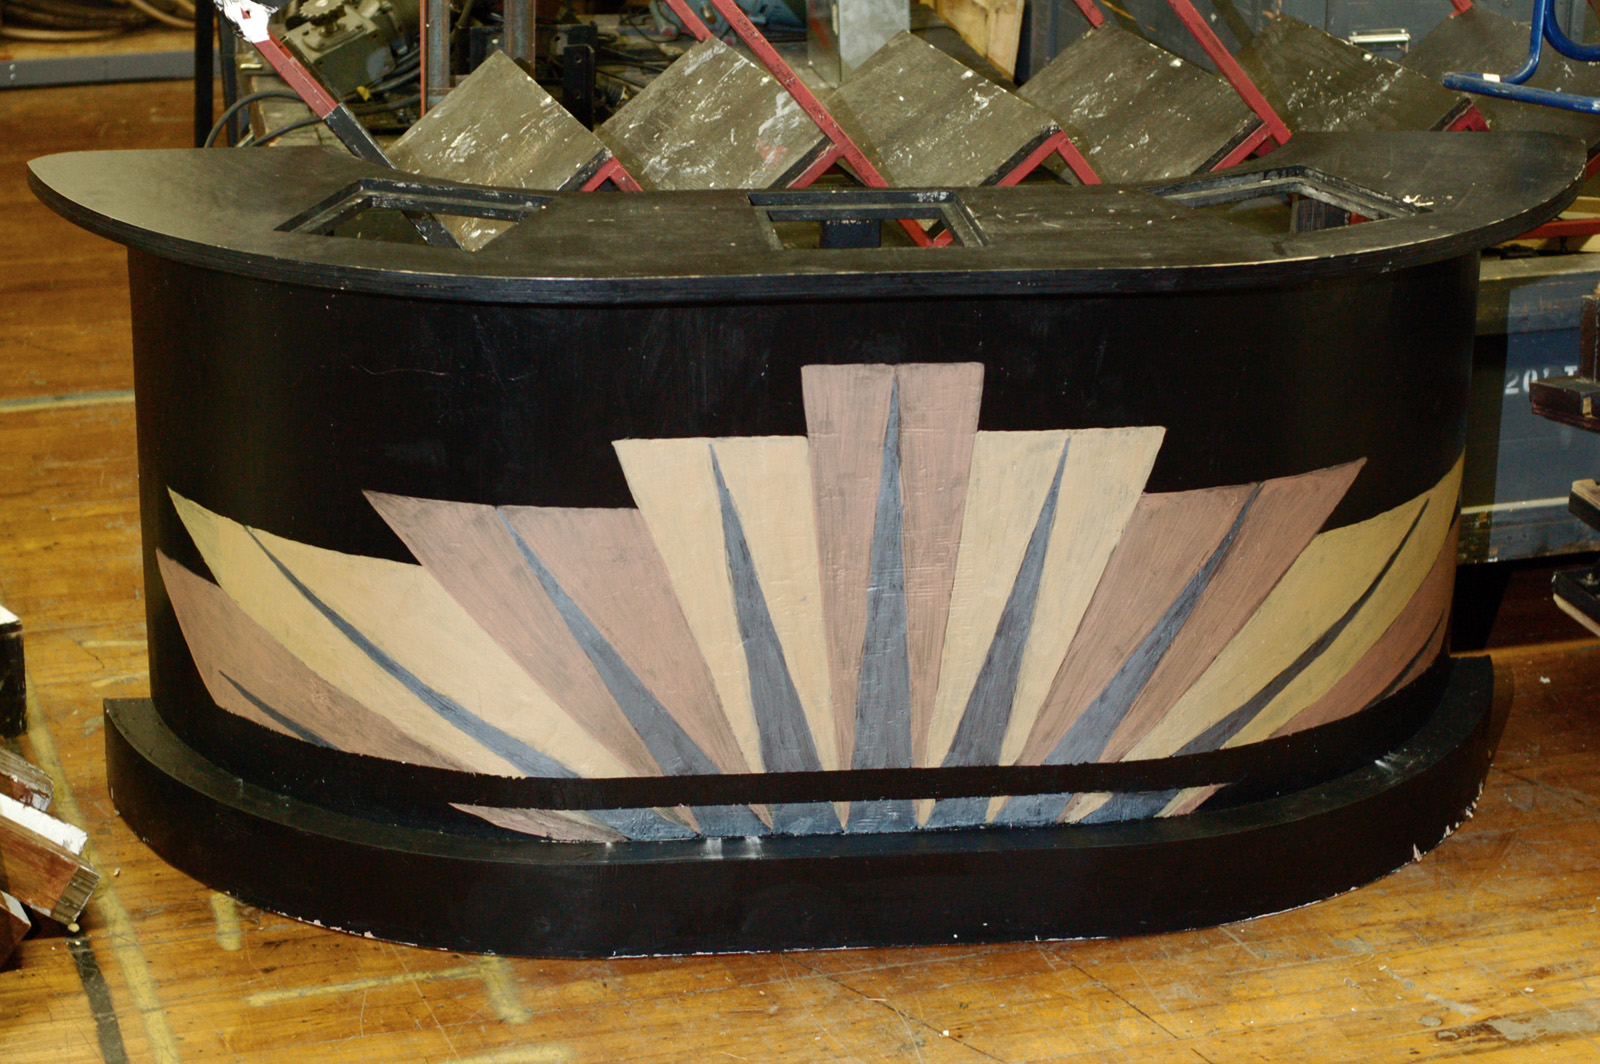
You can see the bar is a bit rough around the edges in the photograph above since I did not have time to take a picture until after strike. The Art Deco design painted on the front was a great touch added by Natalie and her crew. As she also pointed out, despite all the climbing and dancing done on this bar, she never saw it sag or wobble.

A Friday of Links

This photograph of a country store from 1939 has all sorts of amazing things going on in it. I could look at it for hours. The whole website it comes from, Shorpy Historical Photo Archive, is a treasure trove of imagery like this one, and all of them can be viewed at incredibly large sizes so you can spot every little detail.

At the other end of history are Trevor Traynor’s photographs of contemporary New York City newsstands.

This short blog post up at Popular Woodworking taught me some interesting things about how British table saws are different from American ones, particularly in the safety features. I think the fence that stops at the blade is an interesting concept, and would love to try it out.

Have you heard about this? A team of people out in Tennessee are building a full-scale replica of the Millennium Falcon from Star Wars. That’s a 114 foot long spaceship for those who don’t know. What’s great is that if you look back through the blog, you can see that work began on this over six years ago, and now there is some hard-core construction going on nearly every single day. It looks fairly certain that they can pull this whole thing off.

I tweeted this earlier in the week, but if you missed it, NPR had a great story about faux food artisan Sandy Levins, who recreates historical dishes for display at George Washington’s Mount Vernon estate, New York’s Lower East Side Tenement Museum, and many other museums and historical sites.

How to Draw an Ellipse

I have three new videos up on my Prop Building Guidebook companion website. Two are on painting techniques (spattering and sponging), while the third shows a quick method for drawing an ellipse. I’ve attached that below. My book comes out next Tuesday, so that is it on the videos for now. But if you want to request a video for a specific technique, or demonstrating a certain tool, let me know, and I’ll see what I can put together.

The Carpentry of the Musical Show, 1910

The following article was first published in The San Francisco Call, August 28, 1910, page 14. It is excerpted from a larger article called “The Carpentry of the Musical Show”, by Garnet Warren, and describes the process a Broadway show travels from inception to opening night.

The gentleman of theatrical properties has also had pressed into his hands that universal scenario, with rough sketches of furniture by the scenic artist. The stage managers have been conferring, too, with the busy author as to the lists of properties required. Rough instructions are all that are sufficient for most of these.

So away goes the propertyman to his workshop among the dust and cobwebs. It is large and has rough, red bricked walls. Fifteen to eighteen men work here in the busy summer season—fellows in blue shirts and overalls and the clothing of toil. The floors are bare and loaded up with dust, shavings, paint, unfinished carpentry, finished chairs and statues. The practical propertyman would seem able to construct most things. He makes machines for wind effects; he paints the odds and ends of scenery; he builds furniture and electric light fixings and makes rugs and carpets and door knobs and even paper mache statues from his own designs. In the six busy weeks before a production begins, too, his work is of a feverish description. About 3,000 separate pieces are sometimes required. The busy bee would appear to come a disastrous second to the propertyman.

The First Rehearsal of Principals. Photo by Byron.

Editor’s note: Notice how the photograph above shows the use of rehearsal props and costumes.

Excerpted from “The Carpentry of the Musical Show”, by Garnet Warren, first published in The San Francisco Call, August 28, 1910, page 14.

Link-o-Rama

Make Magazine has a great slideshow on “Ten Tips for Drilling Better Holes“. It is a good reminder that even seemingly simple tasks can have a lot of considerations in achieving a good result. While I would not take anything off the list they present, I would add one: be sure the drill bit will not hit your hand as it exits the other side of the material (or if it slips off).

I saw this over at La Bricoleuse and had to share: it’s a Rit Dye color chart. Choose the color you want, and it will tell you which Rit dye or combination of dyes will give you that color. Now, a lot of other factors go into achieving certain colors on particular fabrics, and Rit is not the best dye for all types of fabrics, but it is readily available at most local stores and easy to work with in a pinch, and this chart is a good starting point for many colors.

I just stumbled on a cool blog called the “Creaturiste’s Labatory”. He has a post on oil clay vs water clay in terms of sculpting, though many of the other posts are useful and interesting as well.

This is pretty cool: The official licensed replicas of props from Doctor Who are being manufactured by the same prop maker who builds them for the show.

Finally, here is a very cool video of Tony Swatton forging one of the swords from the series Game of Thrones. He has a number of videos showing the making of other weapons as well. It’s amazing to see the mix of tools and techniques he uses for hand-forging custom weapons at the pace which the entertainment industry requires. Though he mainly does film, TV and theme parks, I’ve heard his name mentioned in theatrical circles as well.

Making and finding props for theatre, film, and hobbies