I did the props for Elon University’s Wild Party back in February, but I haven’t gotten around to posting pictures of a quick gramophone horn I made. The budget was tight and nothing was available to borrow or rent, so I decided to construct my own.
Pattern pieces
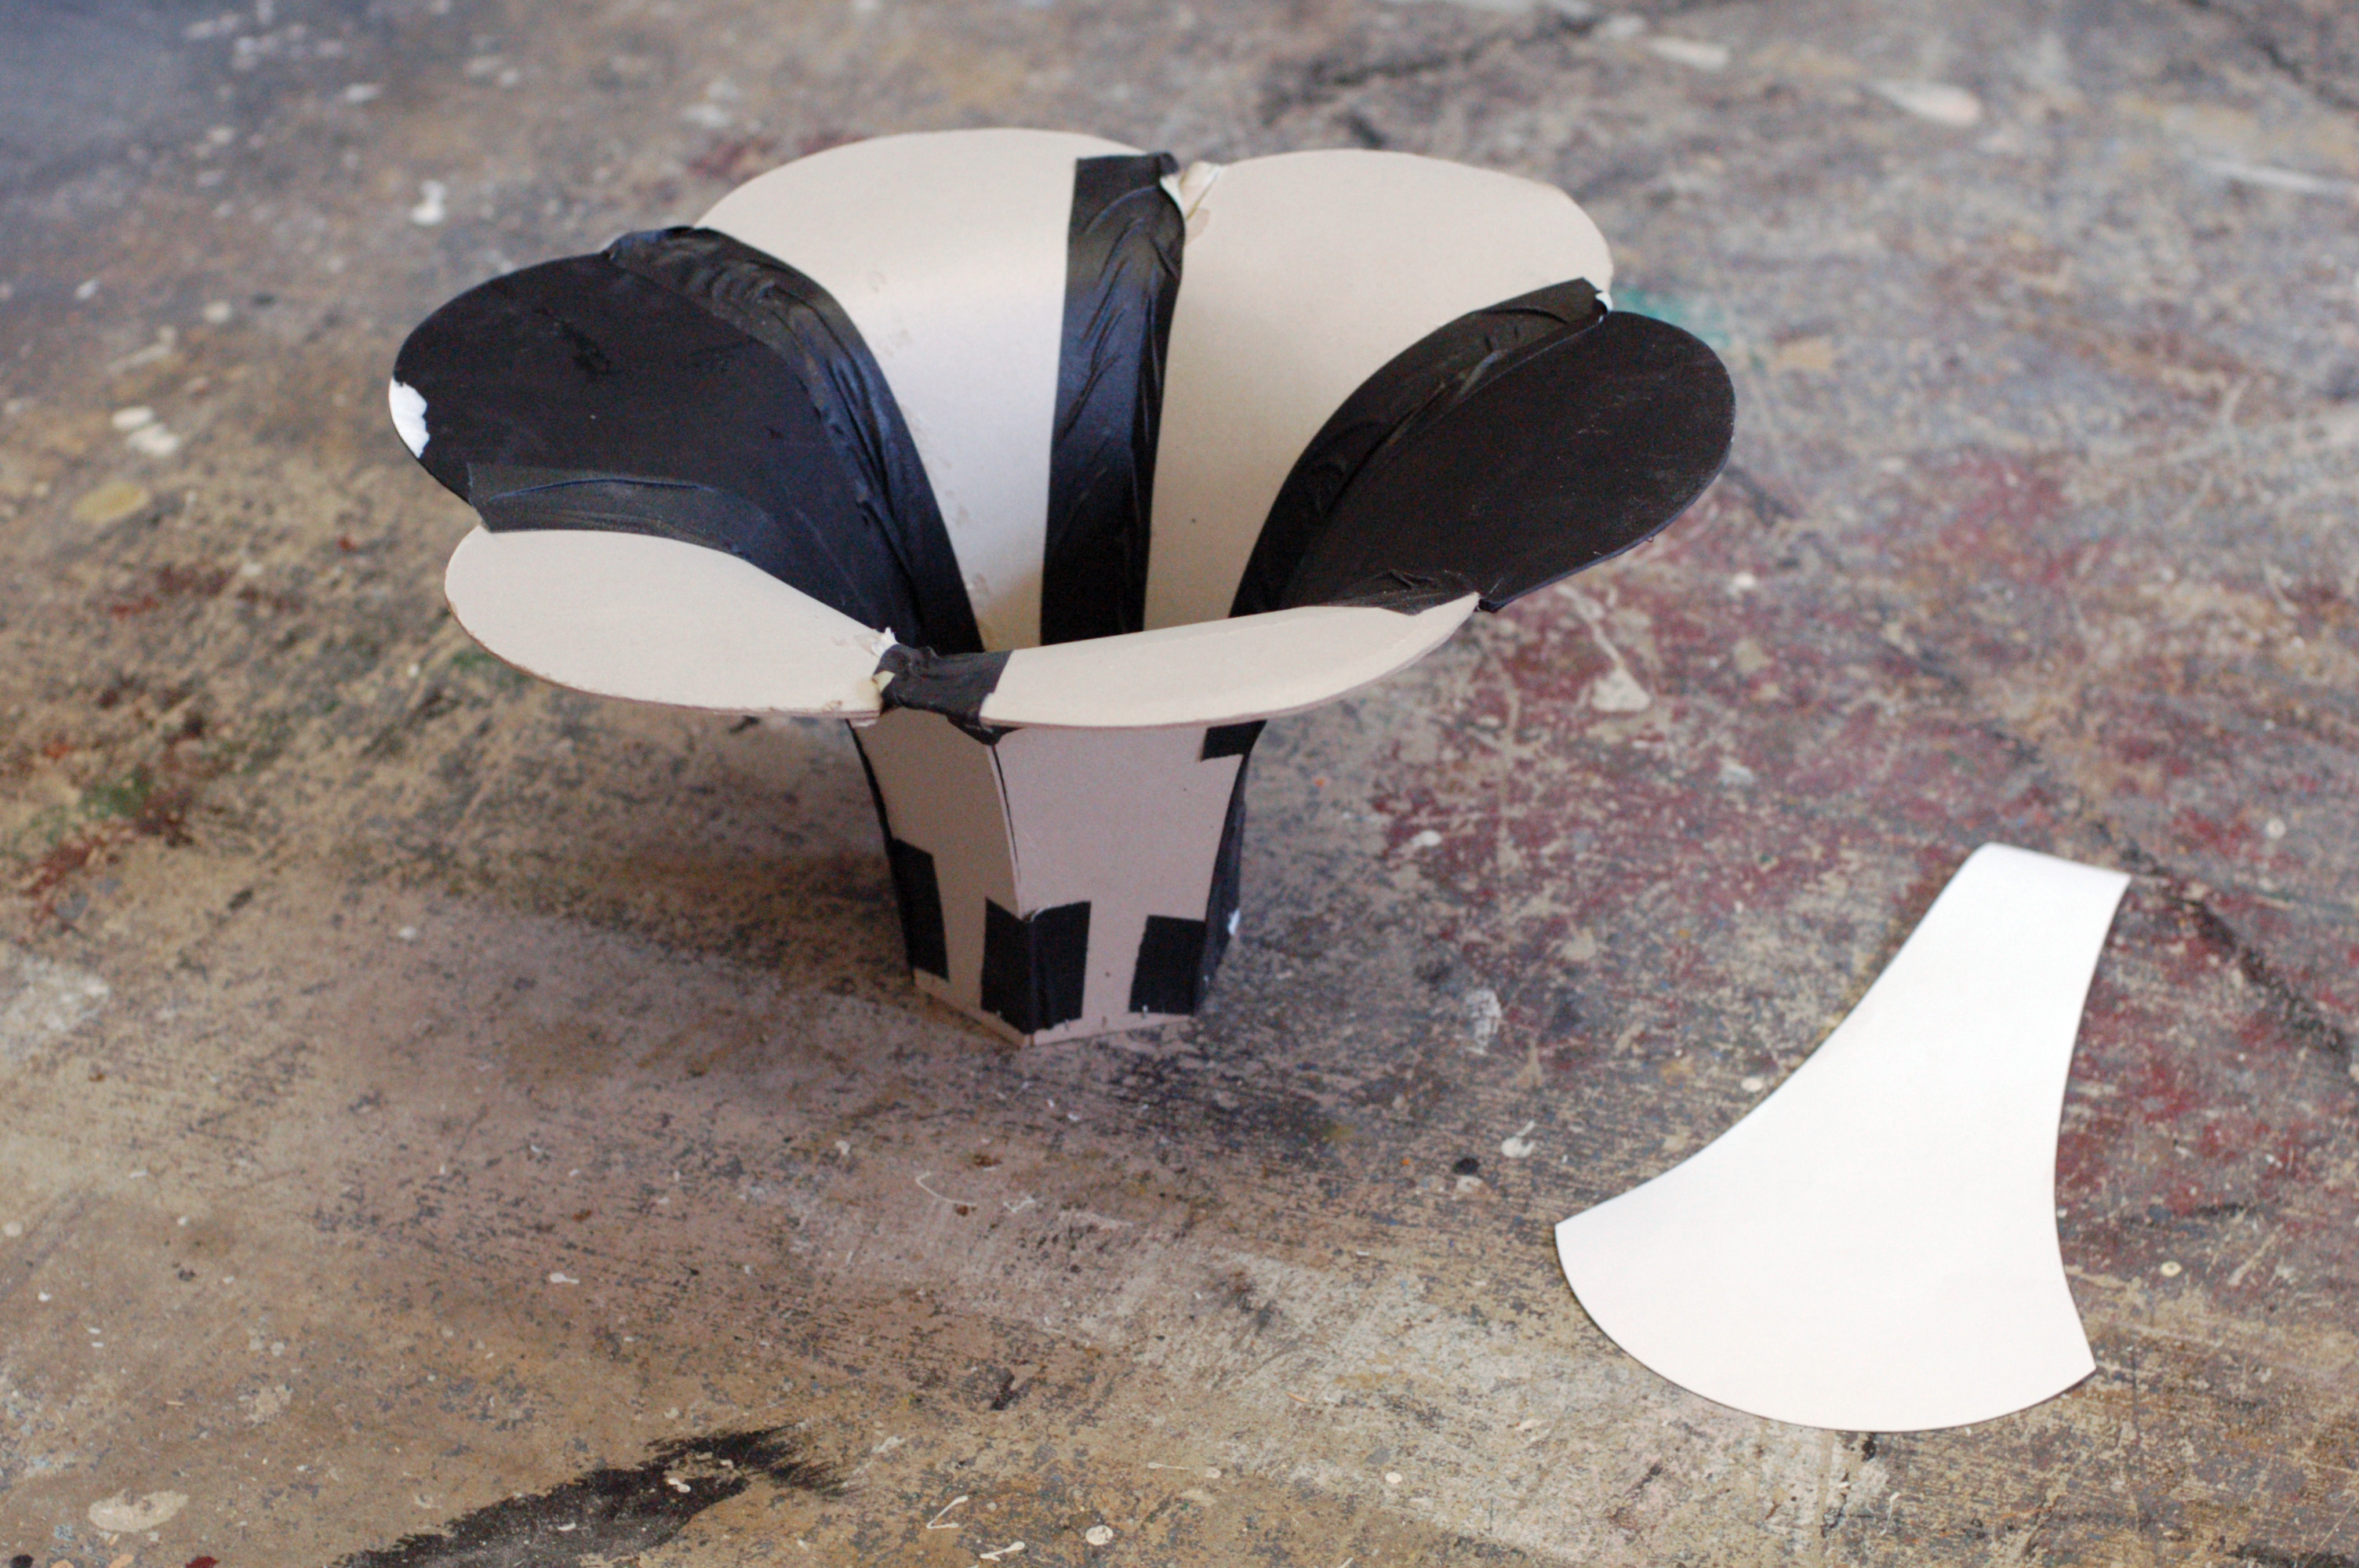
The style of gramophone horn we needed is made up of six “petal” pieces all connected together. Luckily, I found a drafting of the pattern piece needed online. I scaled it up and copied it six times onto some matboard (I used two different colors of matboard because that was all I had in the shop). I attached the bottoms of the pieces to a hexagon of plywood I had cut out.
Extending the back
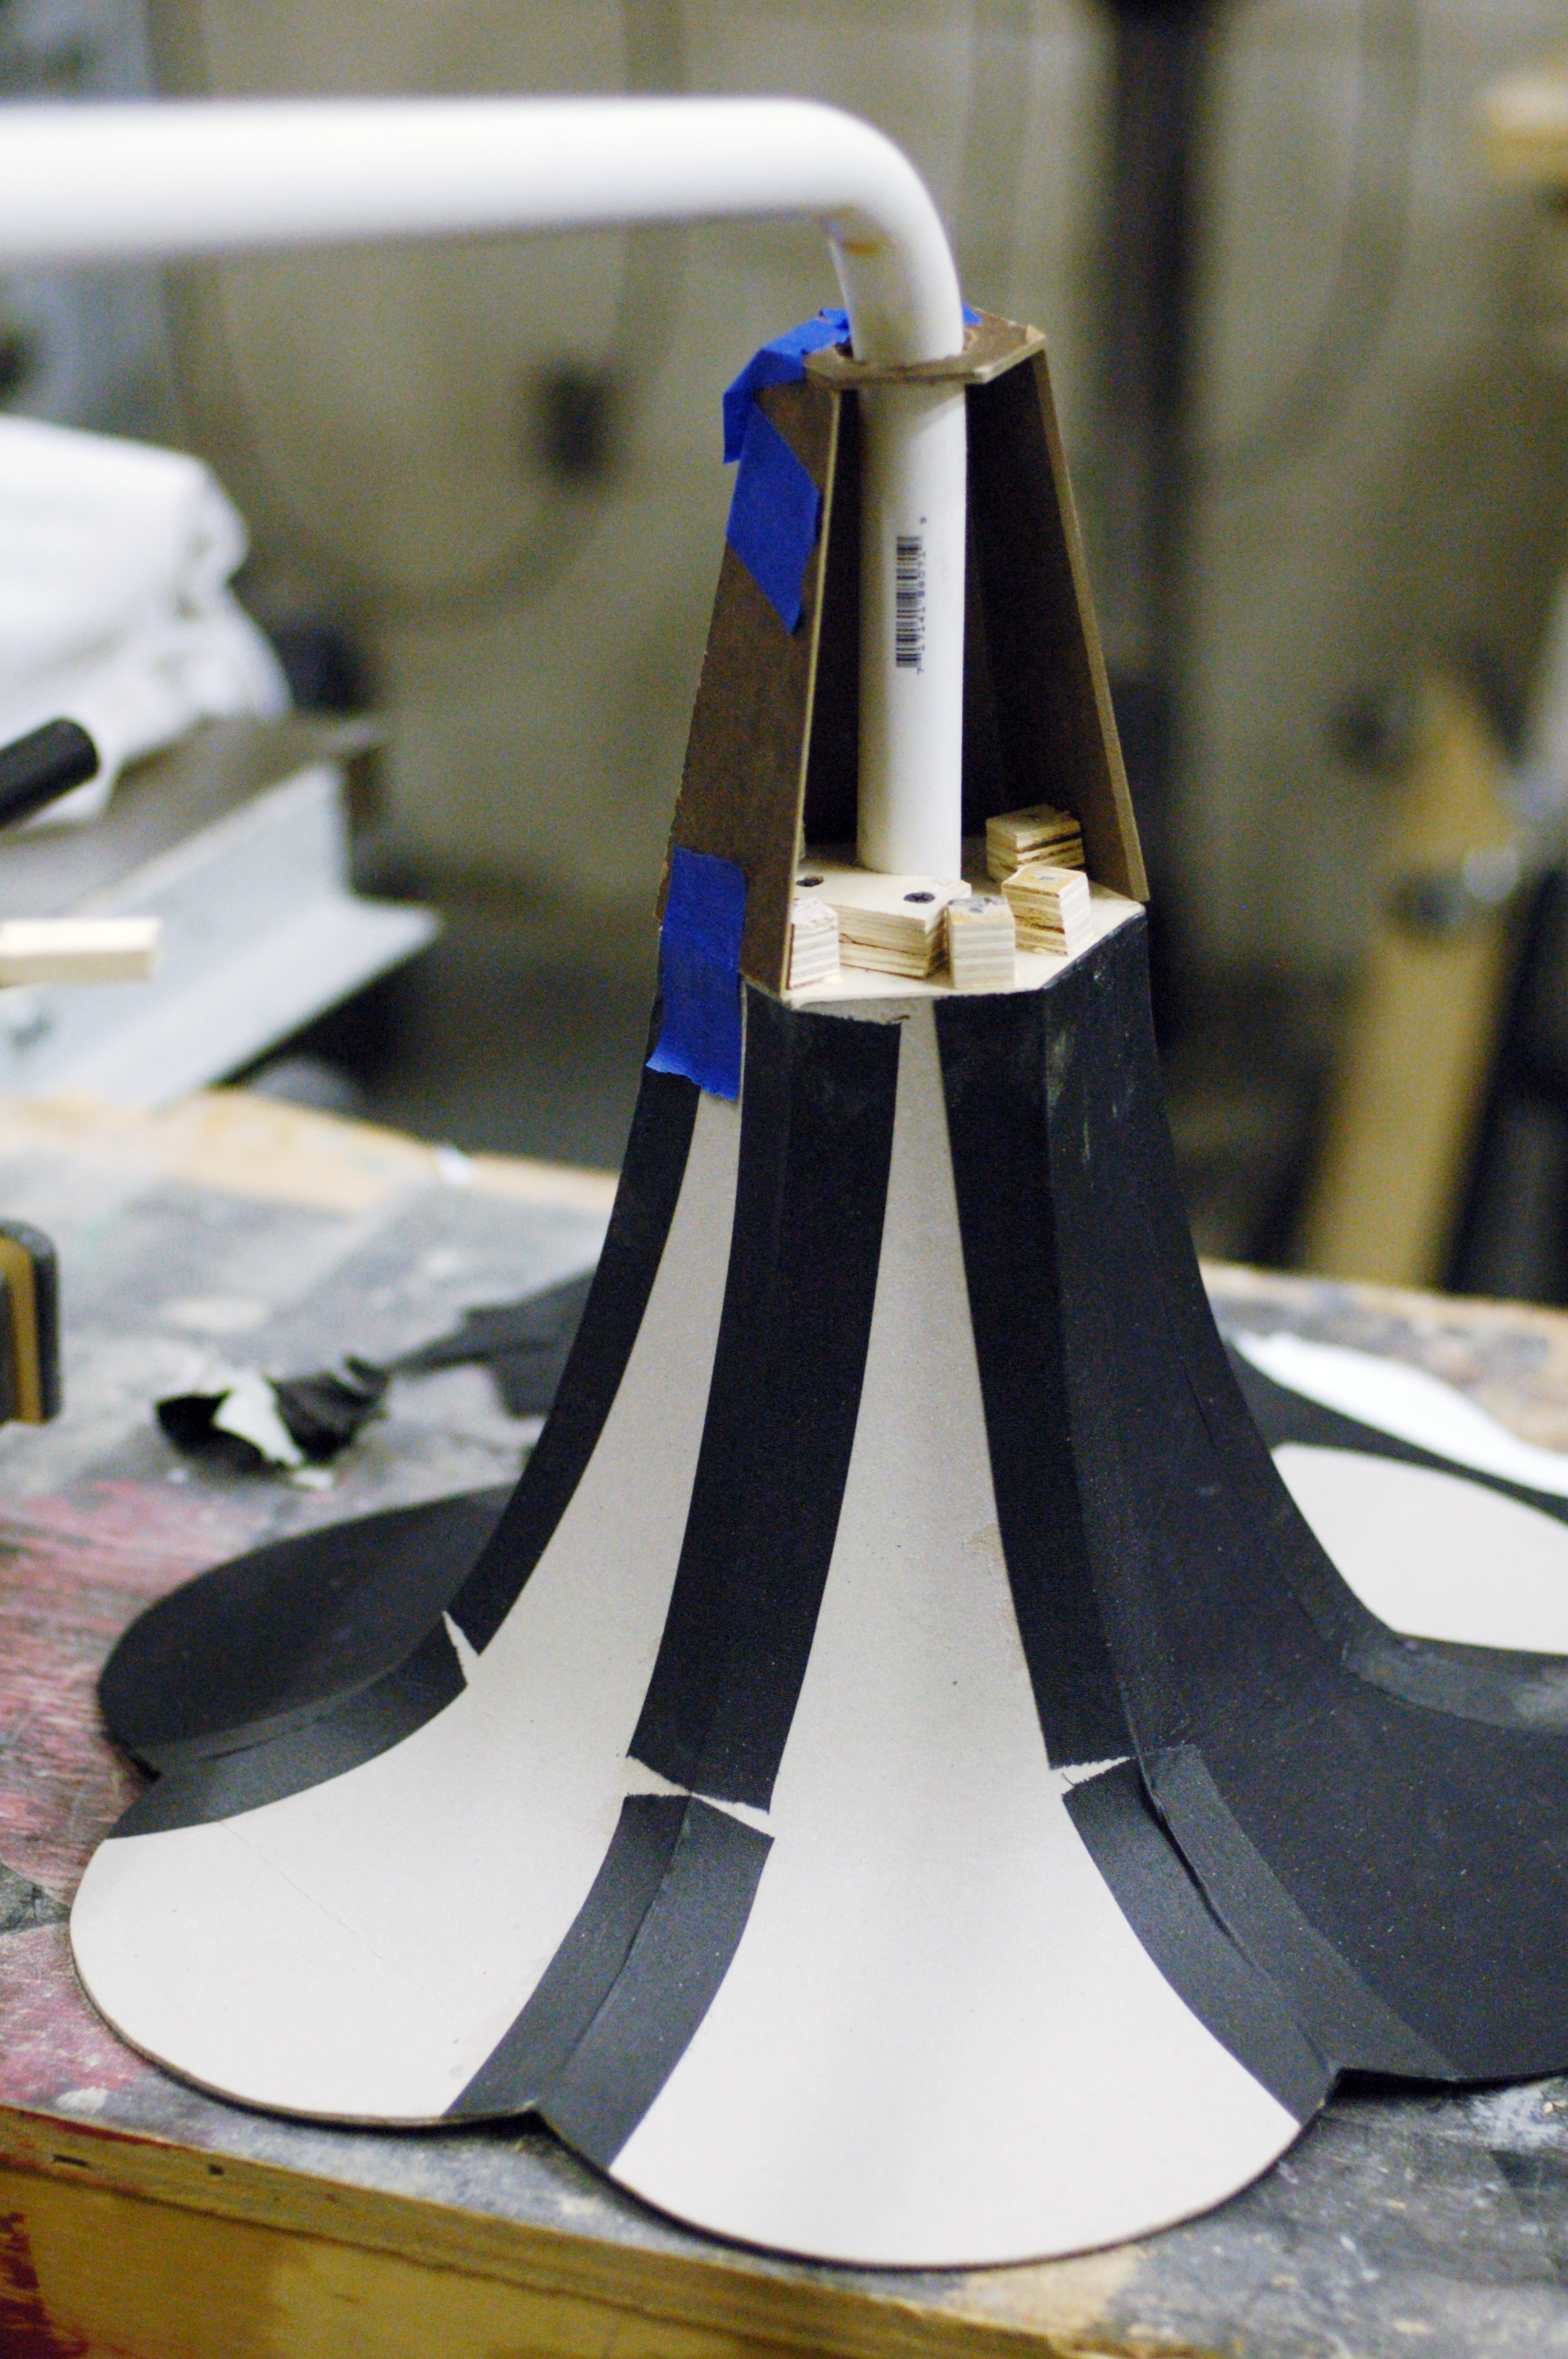
The horn was attached to a length of PVC pipe which I heated up and bent. The back of the horn needed to be longer, so I cut some trapezoids of Masonite to extend the shape back.
Mounting to the table
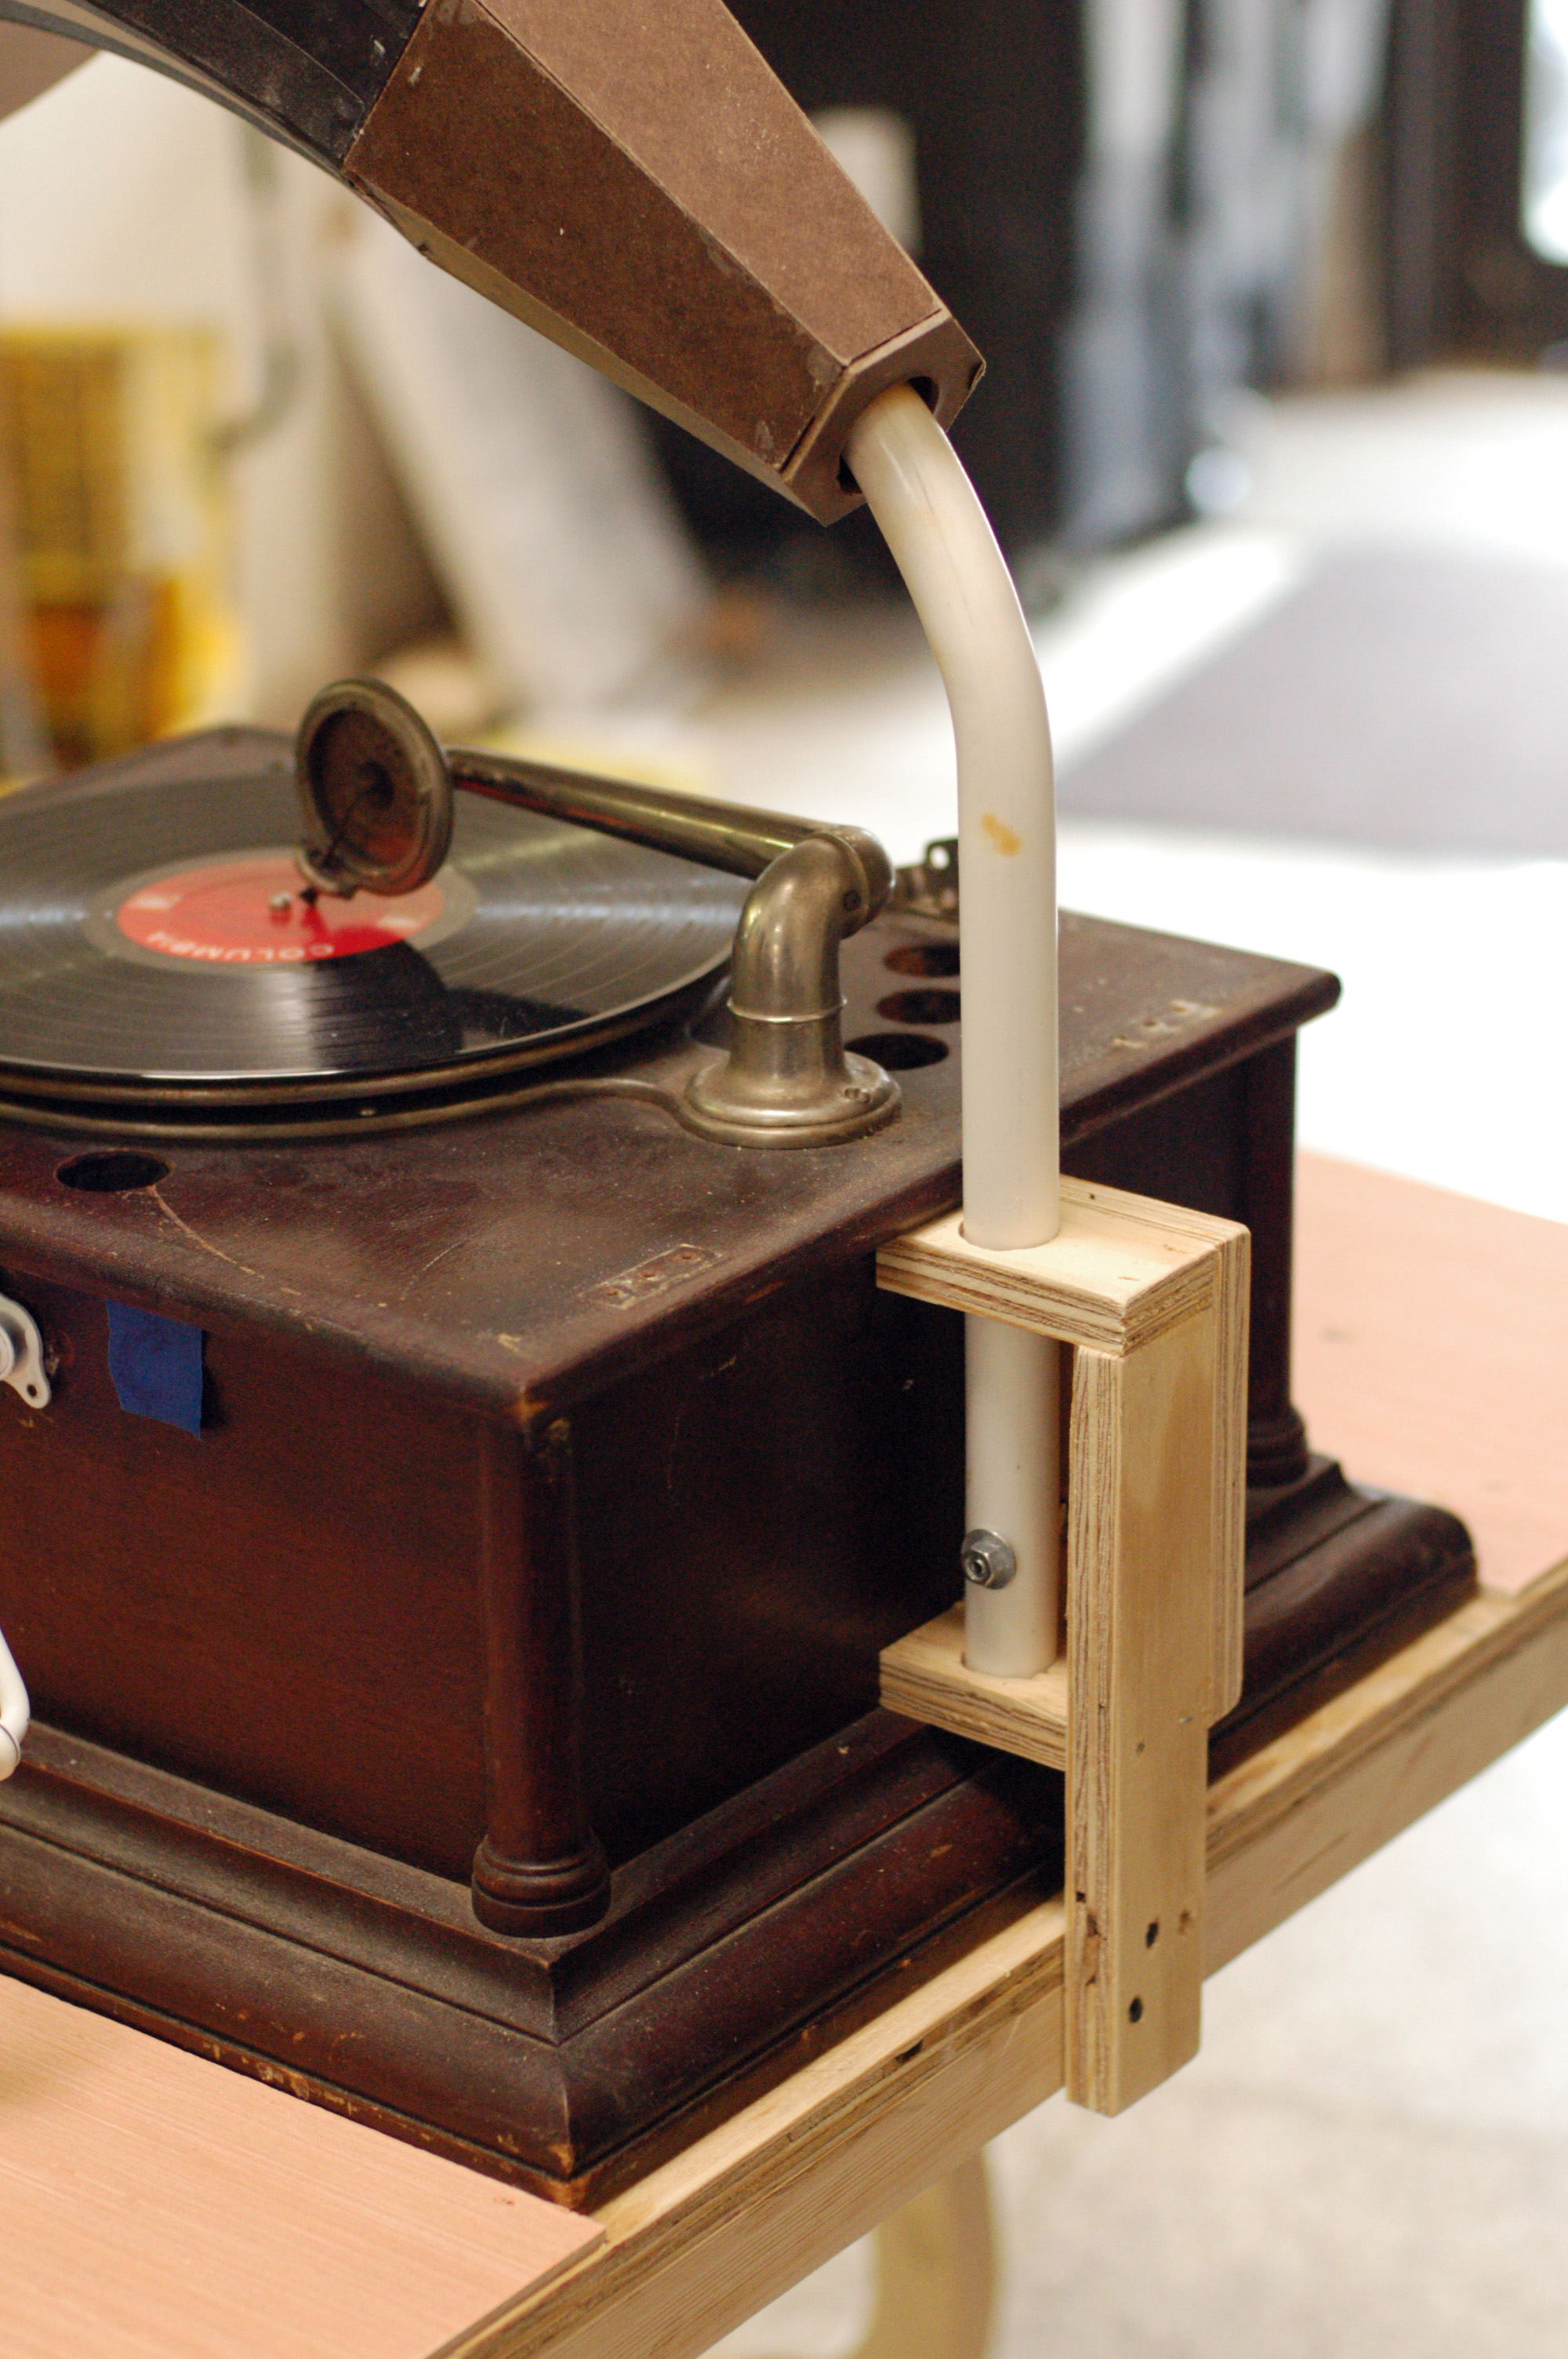
The record player itself was totally not the kind that would have a gramophone horn, so there was nowhere to attach it (a big apology to all you fans of historical accuracy). It was also a rental piece, so it could not be modified. Since the upstage side would never be seen, I attached the horn itself to the table, and built this little plywood bracket to hold the horn so it would look like it was coming out of the record player.
Almost finished
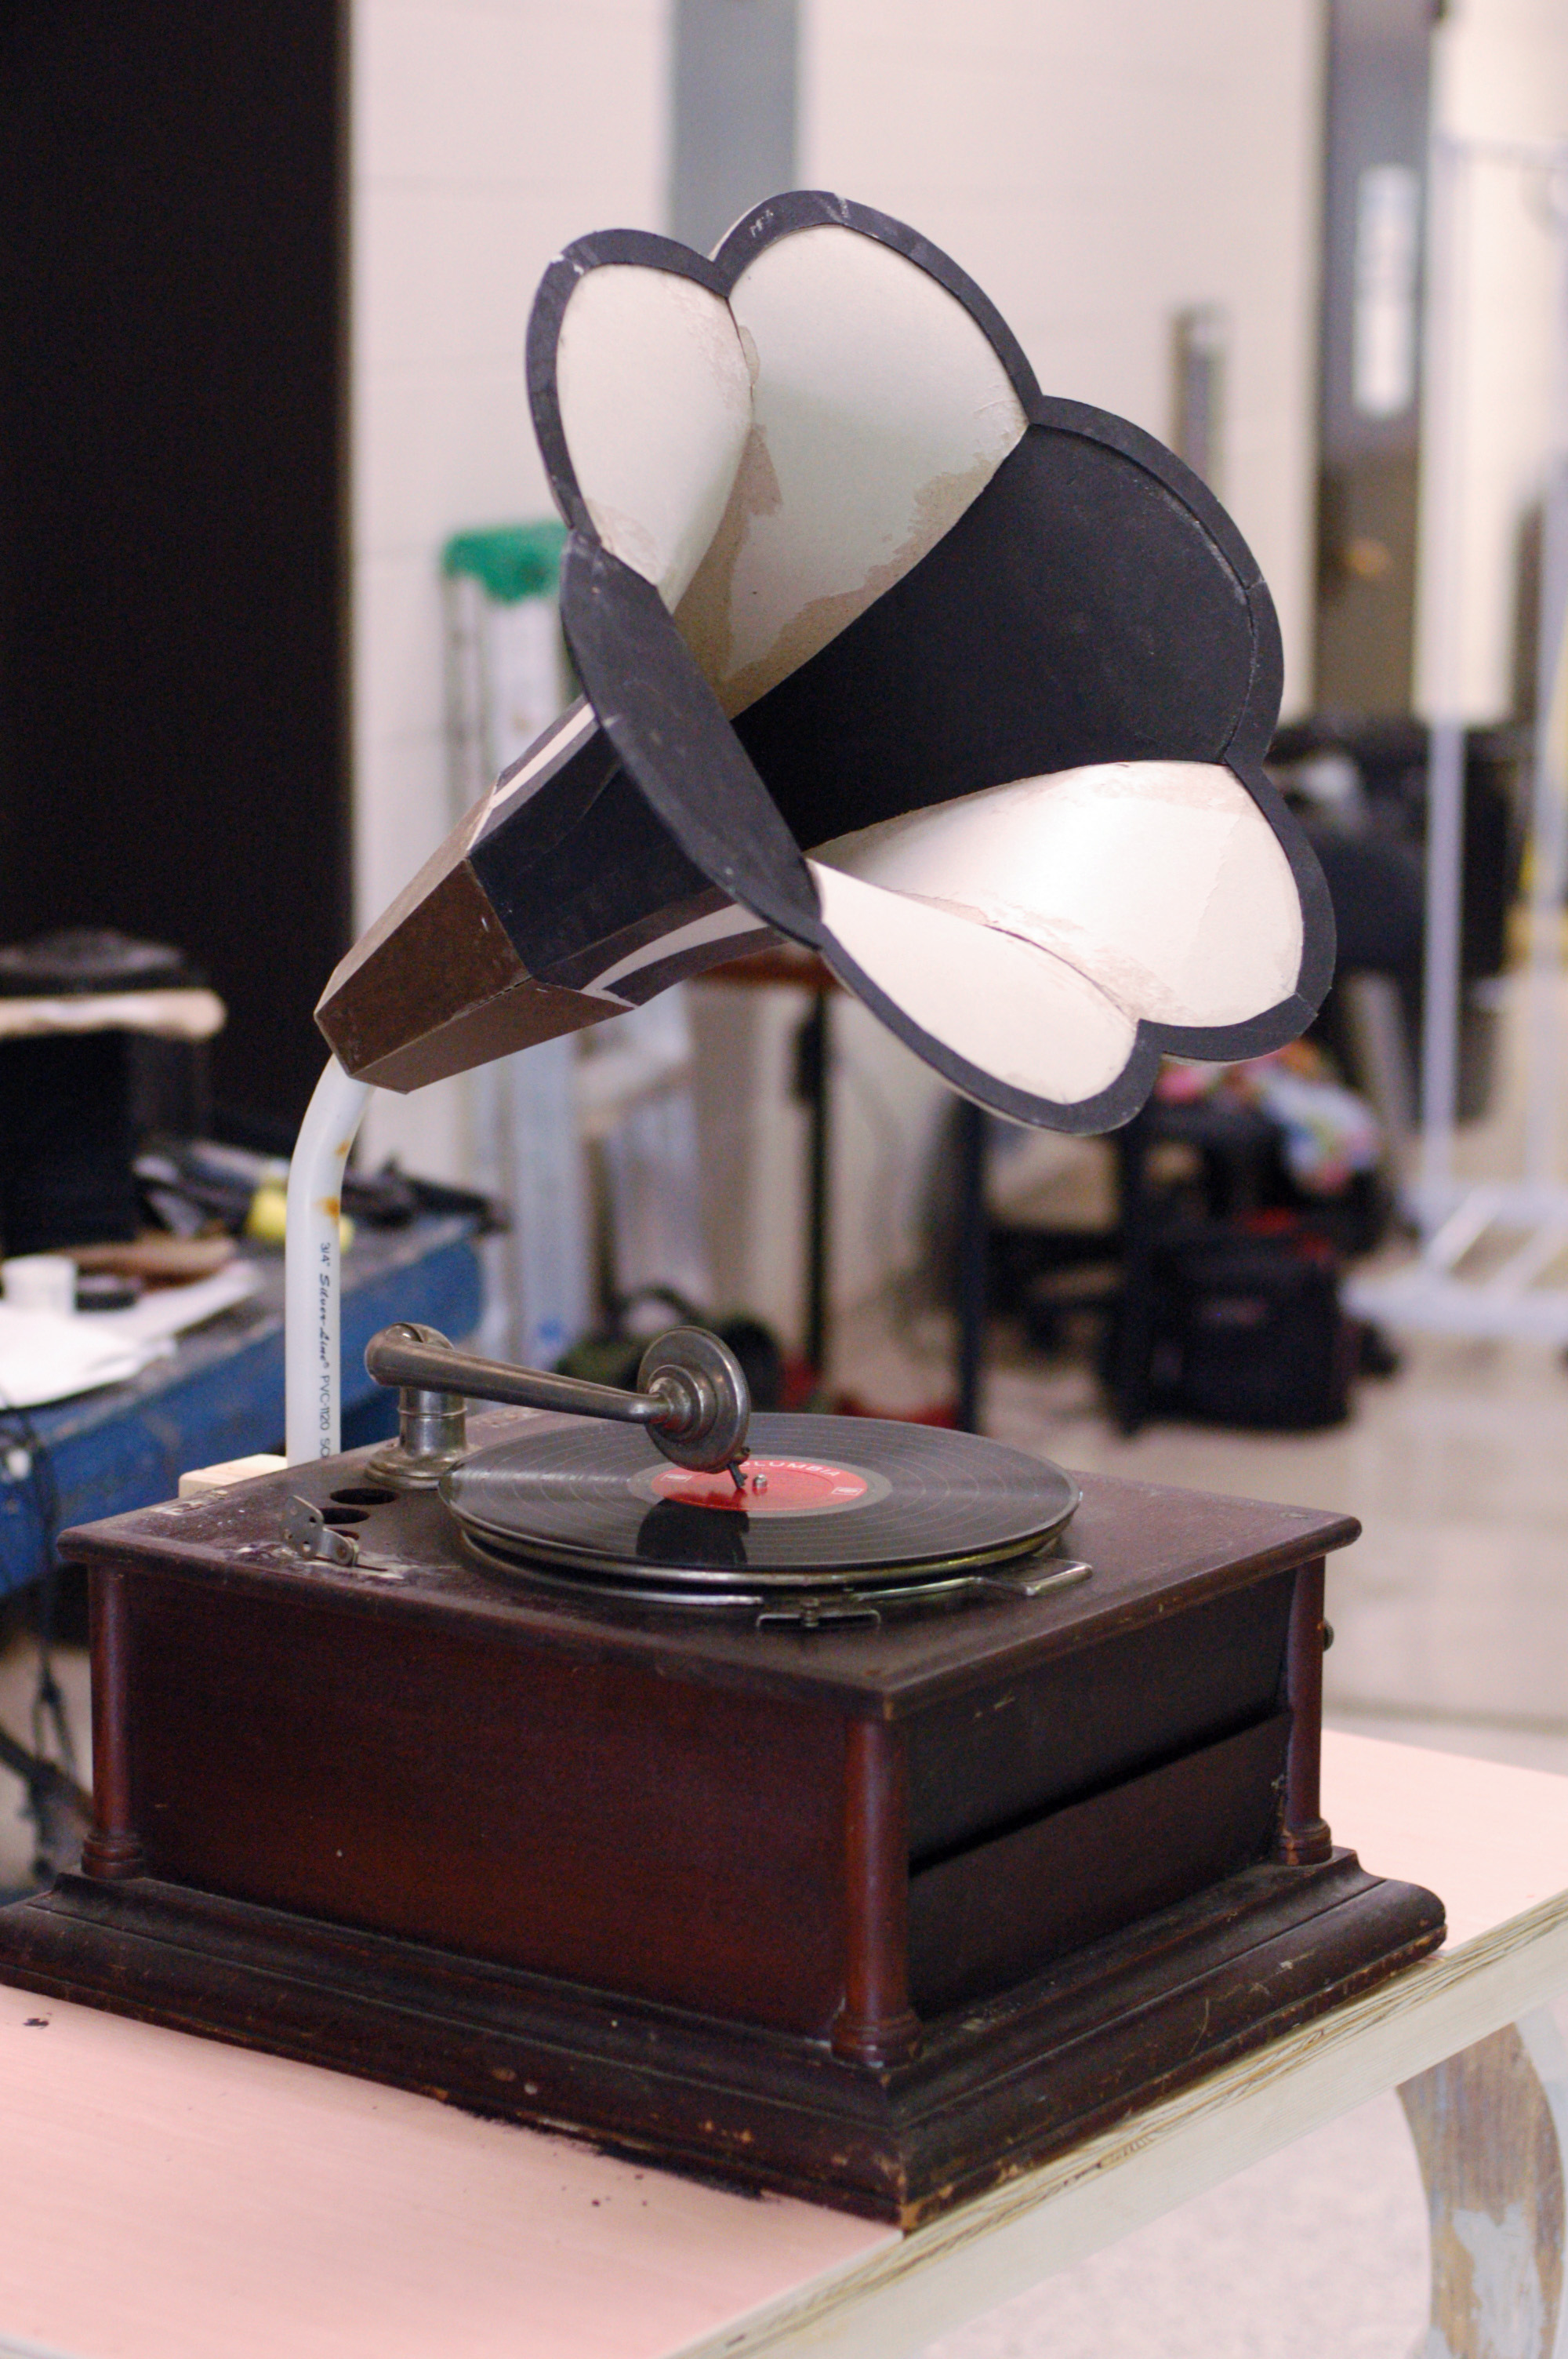
I cut out some matboard “trim” to run along the circumference of the horn to strengthen it and give it a nice clean edge. It was almost ready for paint, but the back of the horn still looked pretty bad.
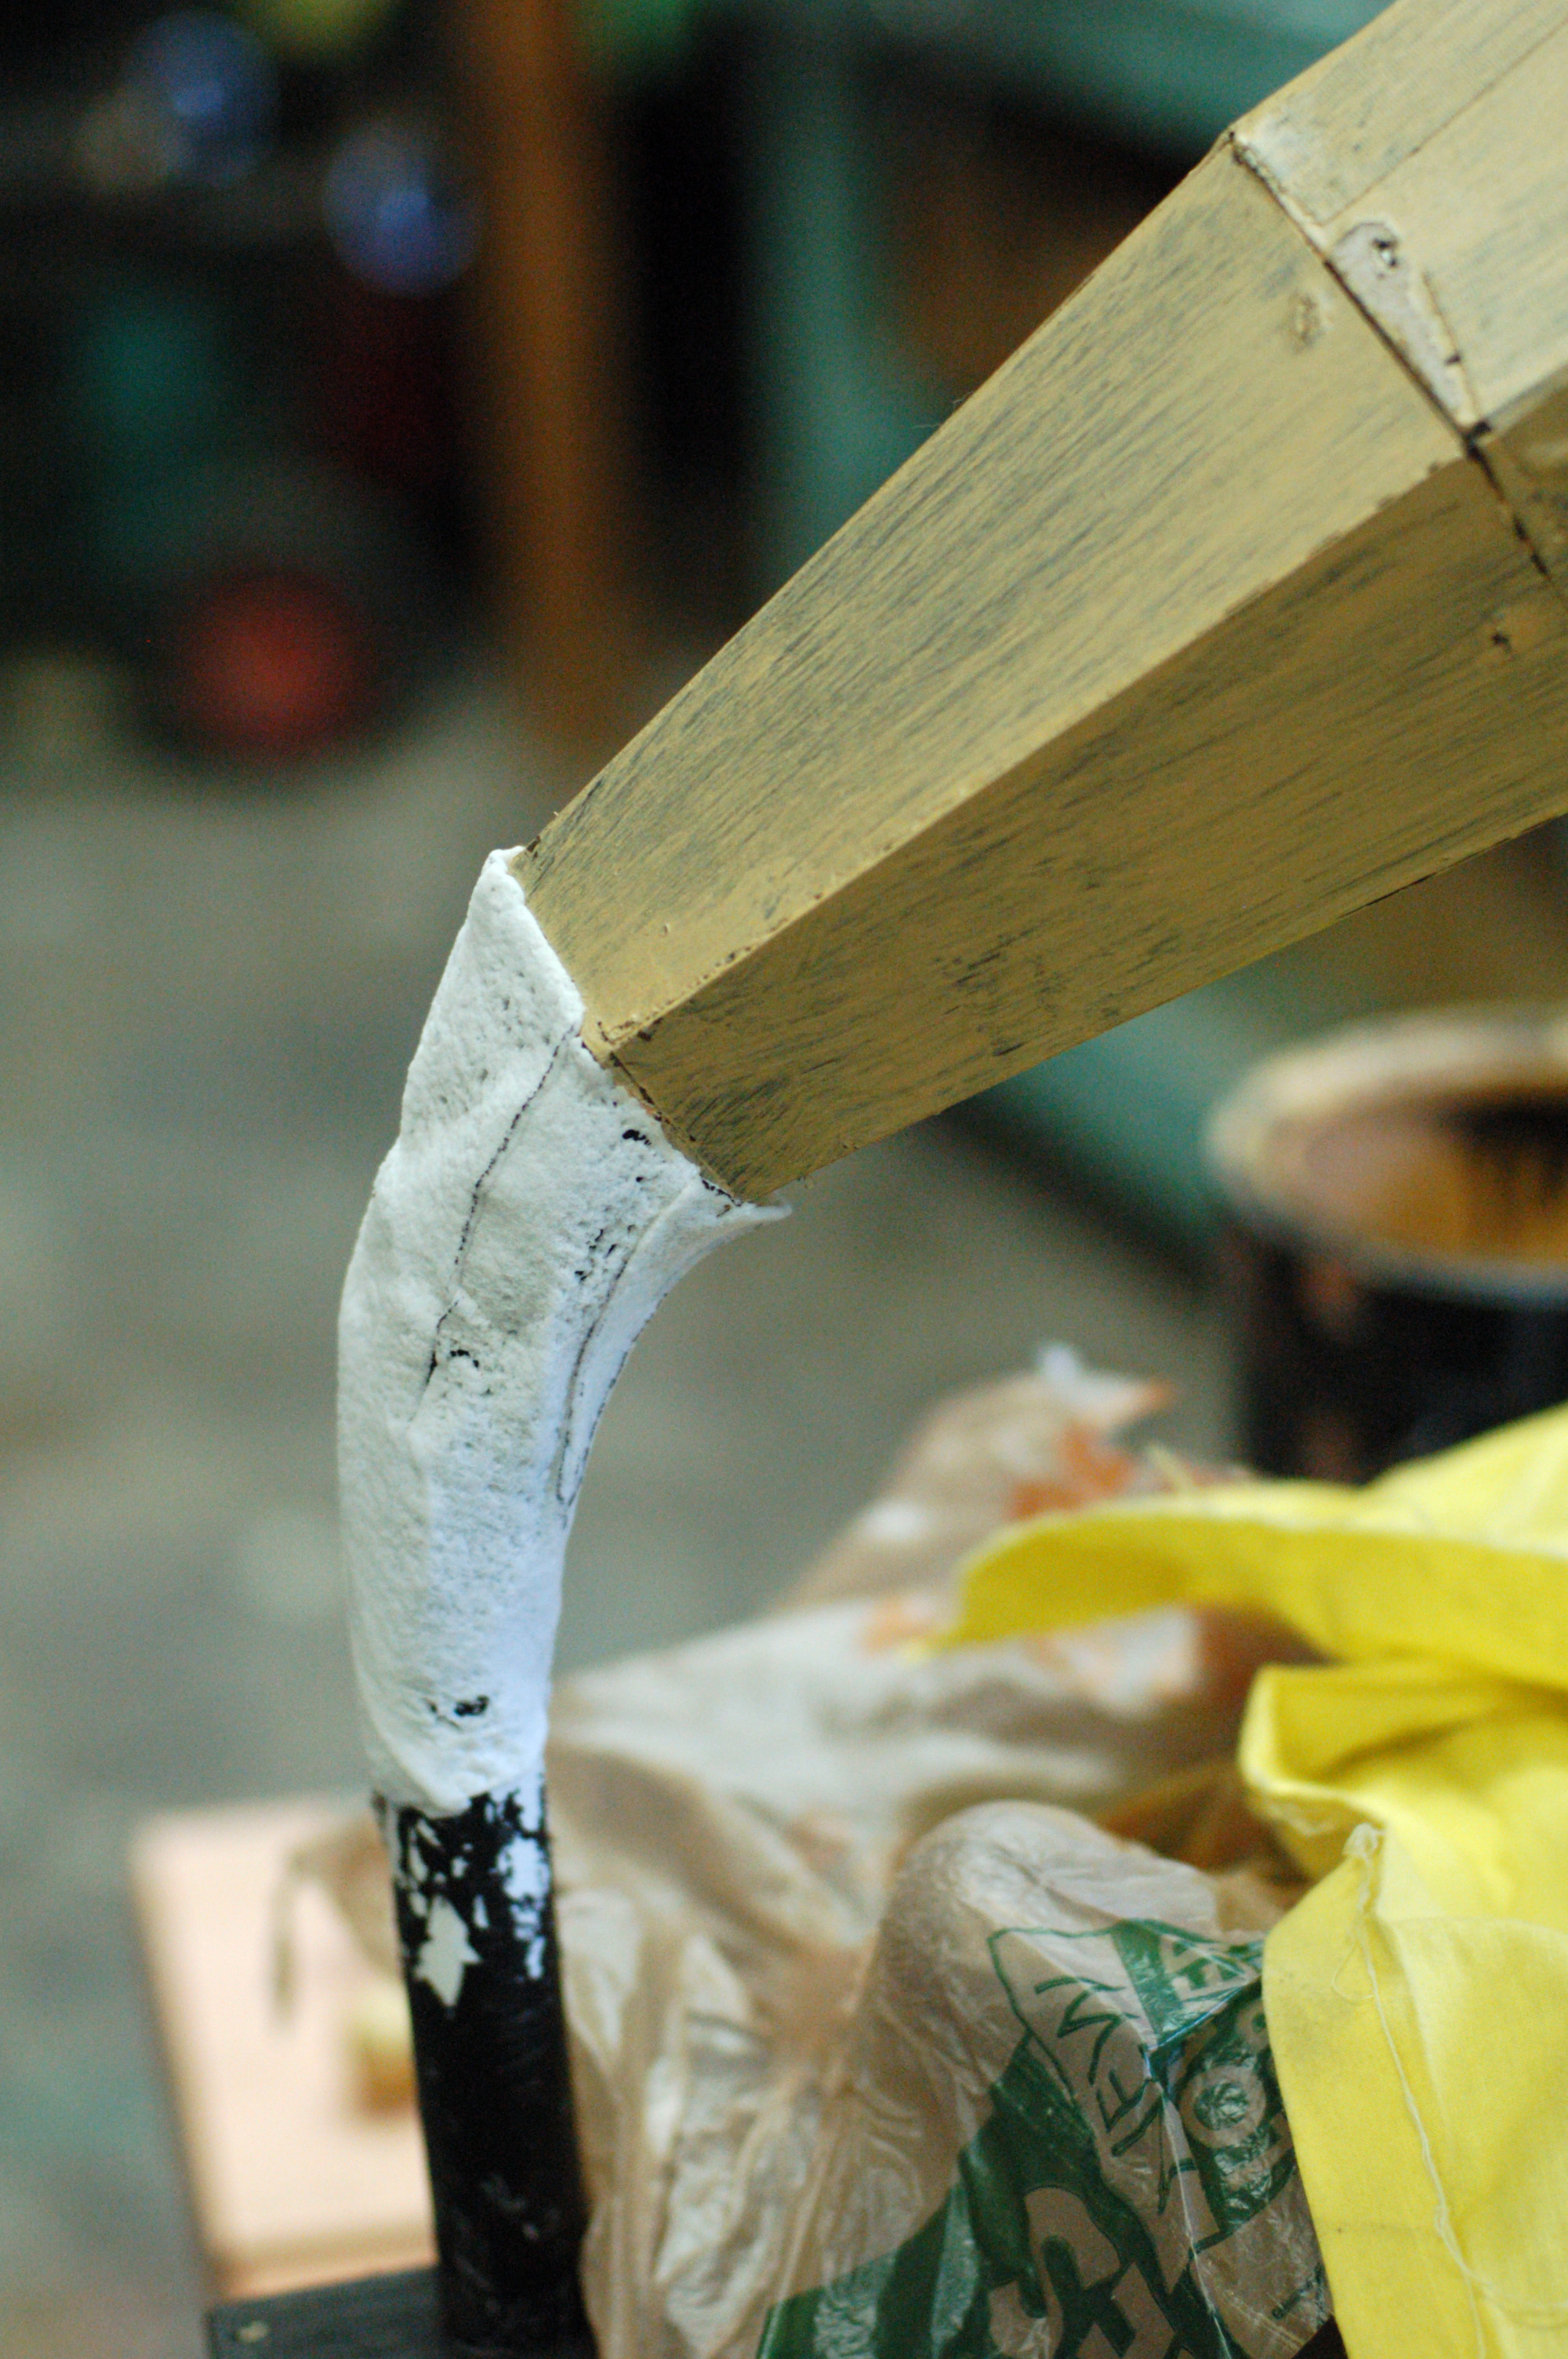
Tapering on a curve
To finish off the shape, I needed a piece that could taper from the horn to the pipe, while curving around the bend in the pipe. The shape was also starting from a hexagon and ending up as a circle. Also, it was only a day or two before opening night. The quickest solution I could think of was to pattern a scrap piece of Wonderflex and wrap it on there. It needed some sanding and filling to make it smoother, but otherwise it worked like a charm.
Wild Party
So there you have it; a down-and-dirty gramophone horn made of paper and plastic.
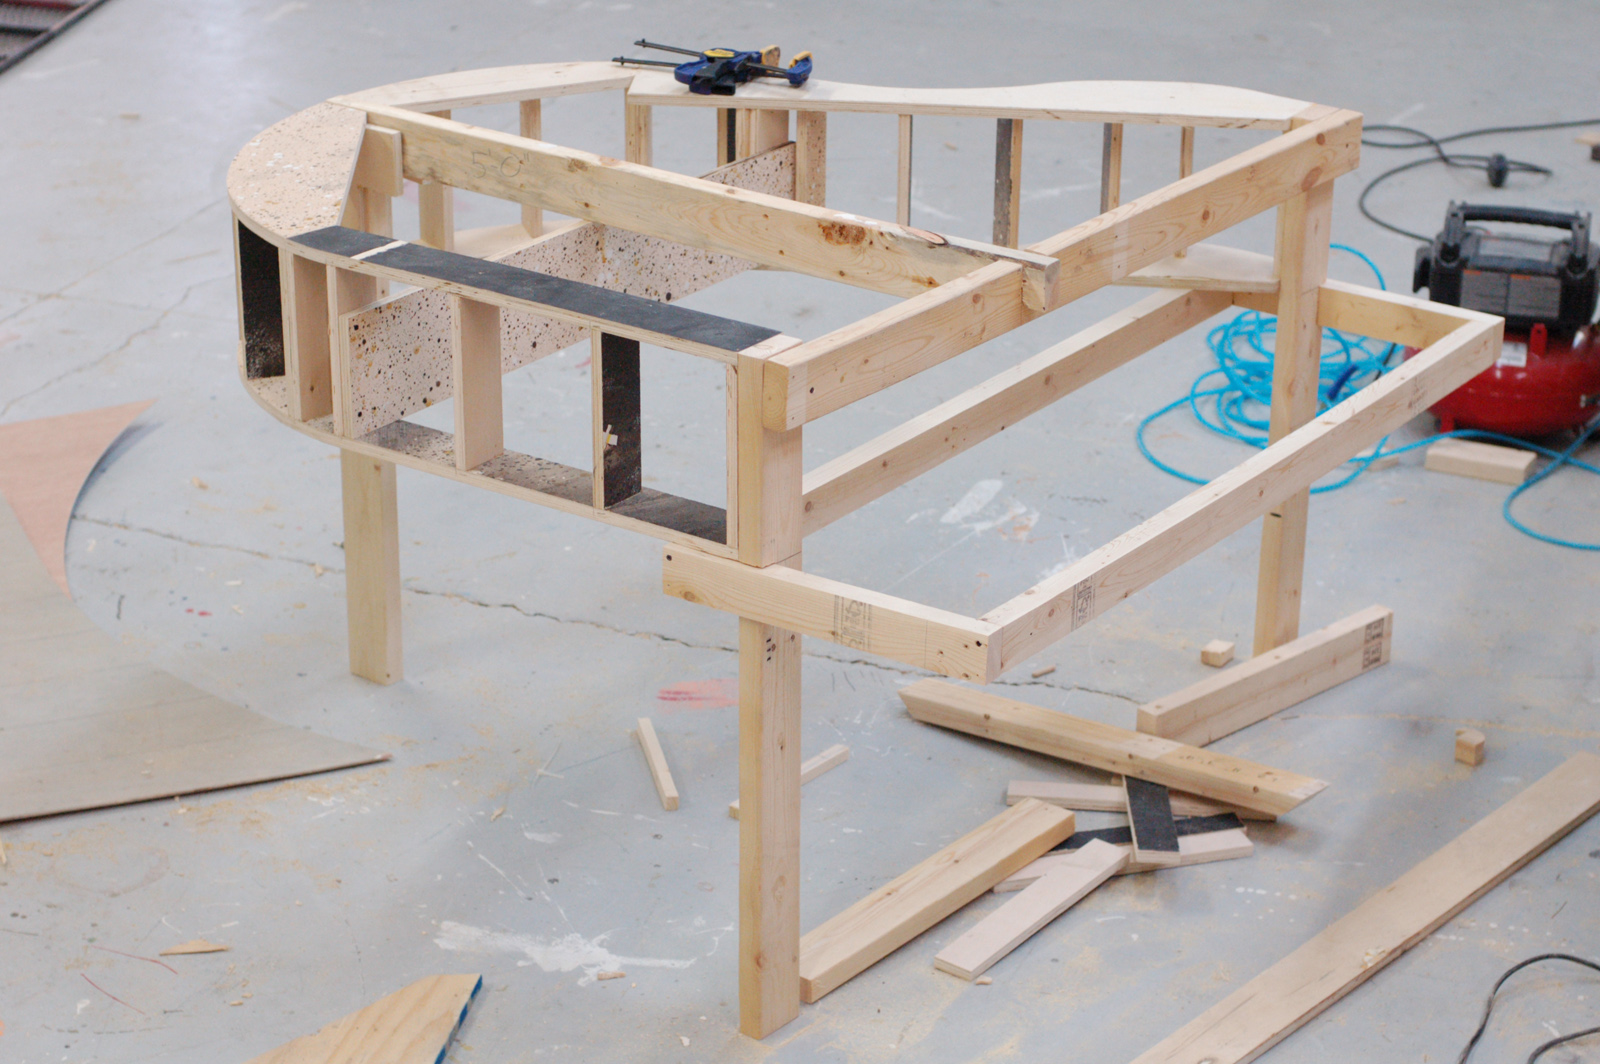
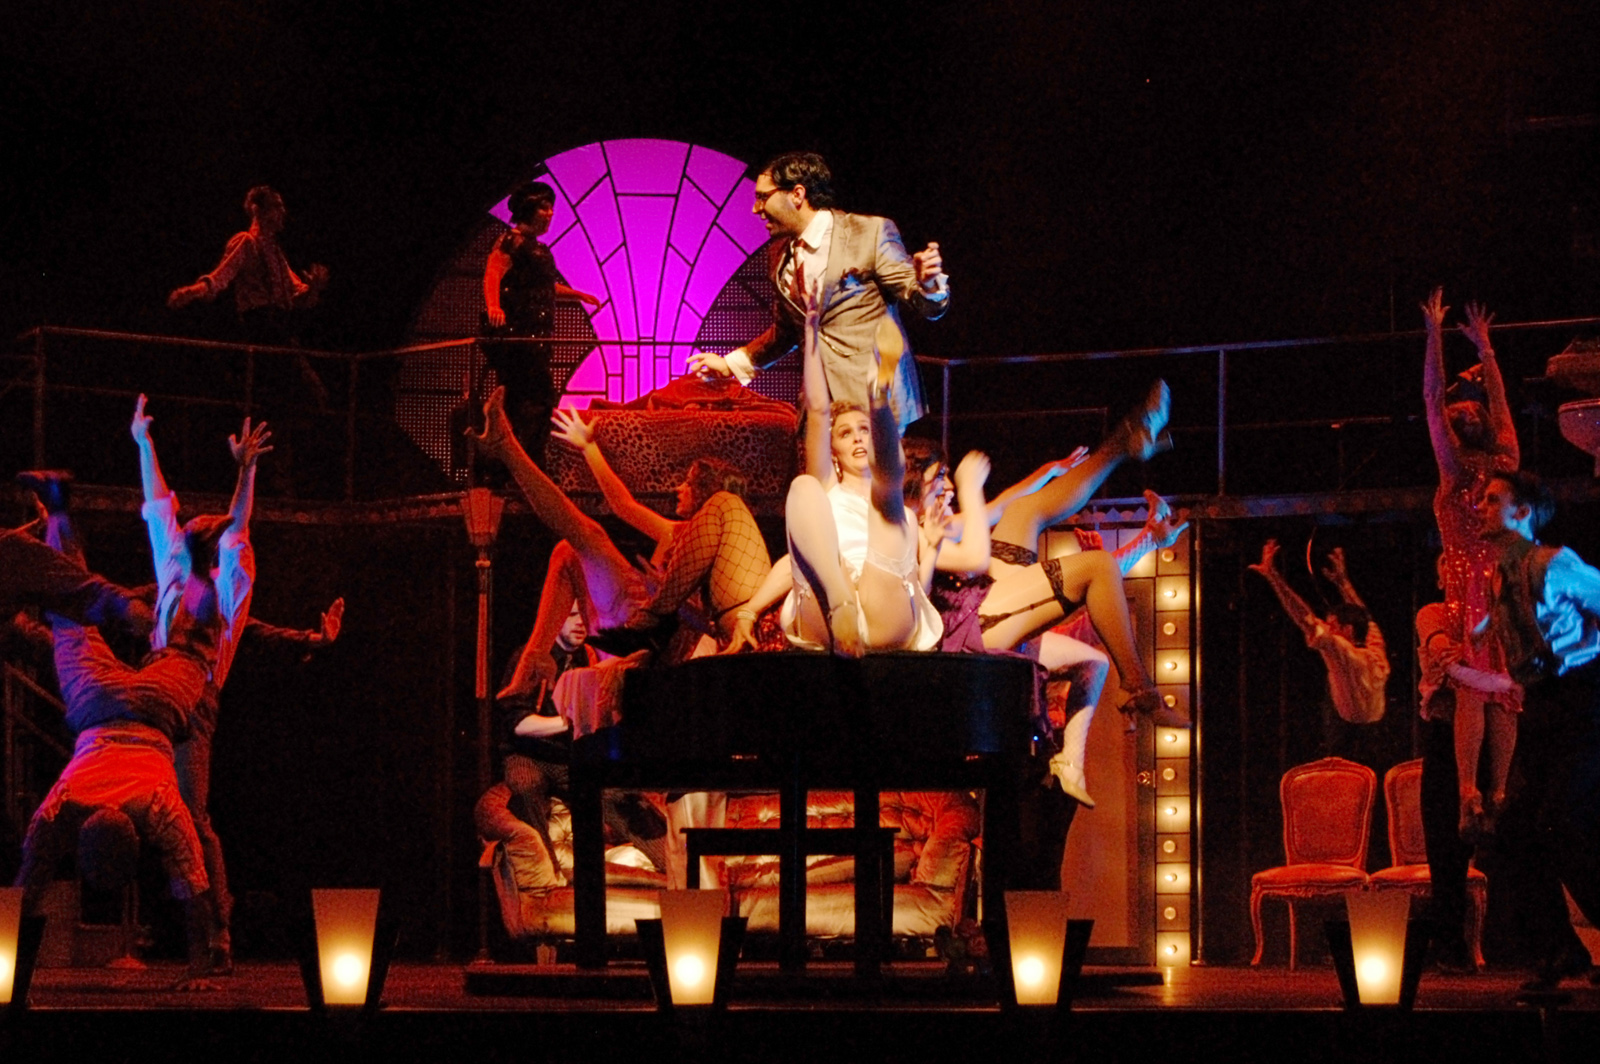
Every musical needs a piano, right? Of course, if you have a piano on stage and people are dancing, you’re going to want the people to dance on the piano as well. Such is the prop master’s life. I had to build a dance-able piano for Elon University’s production of The Wild Party, which closed a few weeks ago.
Appropriated Piano Parts
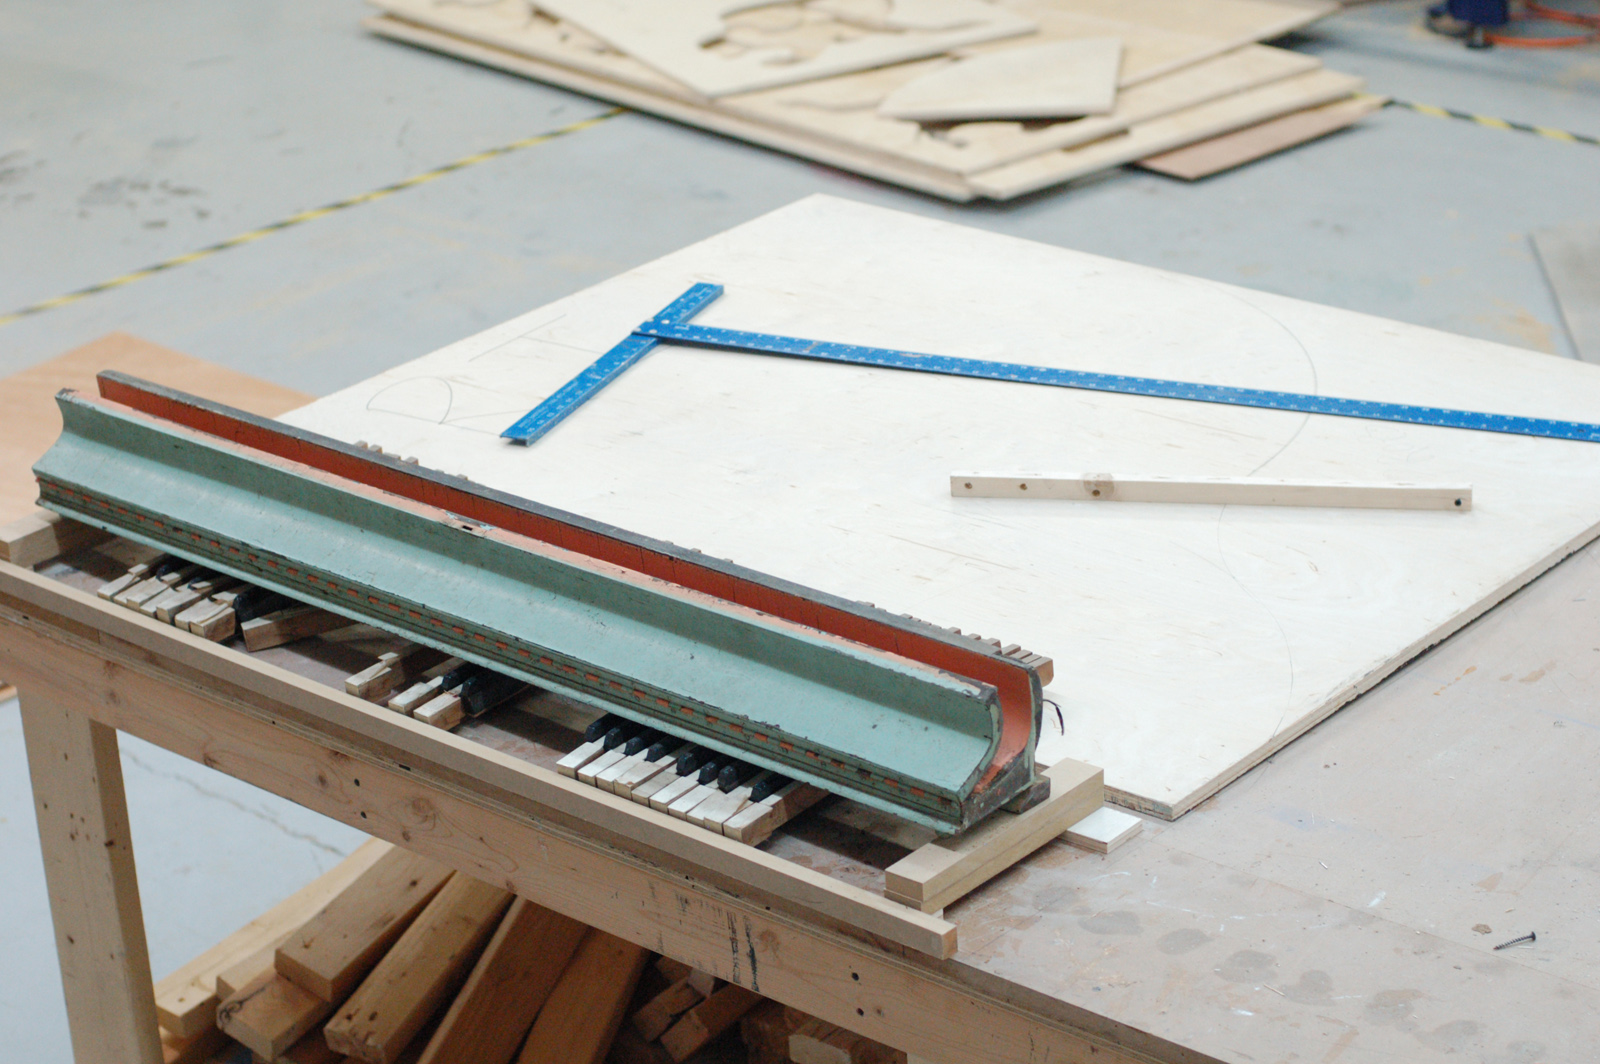
As it turns out, my father has taken apart a piano or two and kept the pieces in his barn. When I was visiting over Christmas, I picked up some of these parts, including the keyboard lid and a partial keyboard. While I probably could have faked the keys, the lid was a real find; it’s two pieces of solid oak cupped along the entire length. This shape would be hard to fake on my own, and it would be nowhere near as sturdy as the piece I found, which could support a person’s weight in the center without bending.
Shape and Structure
It needed to be strong and sturdy, but lightweight enough that it could be quickly turned and moved throughout the musical by the actors. The photograph above shows the beginning stages. I had to make the shape also serve as the structure, because there was not a lot of room to hide cross bracing or reinforcements.
Unpainted Piano
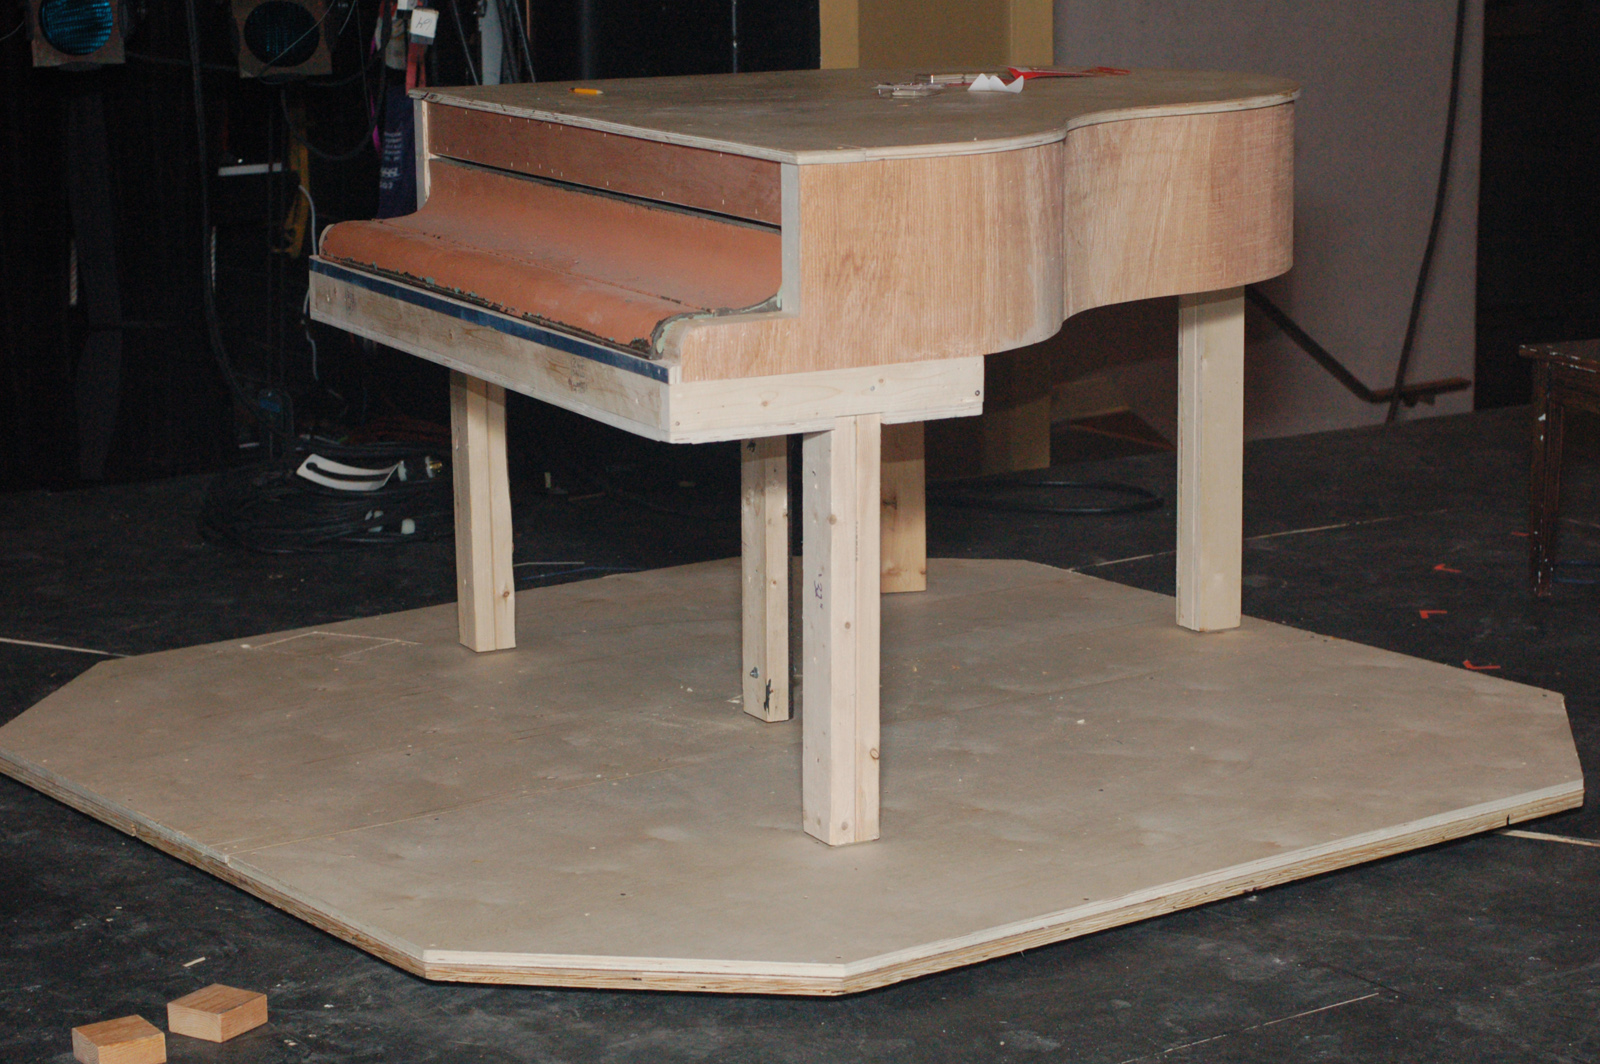
The two-by-four in the center of the piano hides a pipe that leads down into the platform itself. This gave a pivot point to the piano so when the actors spun it around on the wagon, it would rotate on a fixed point.
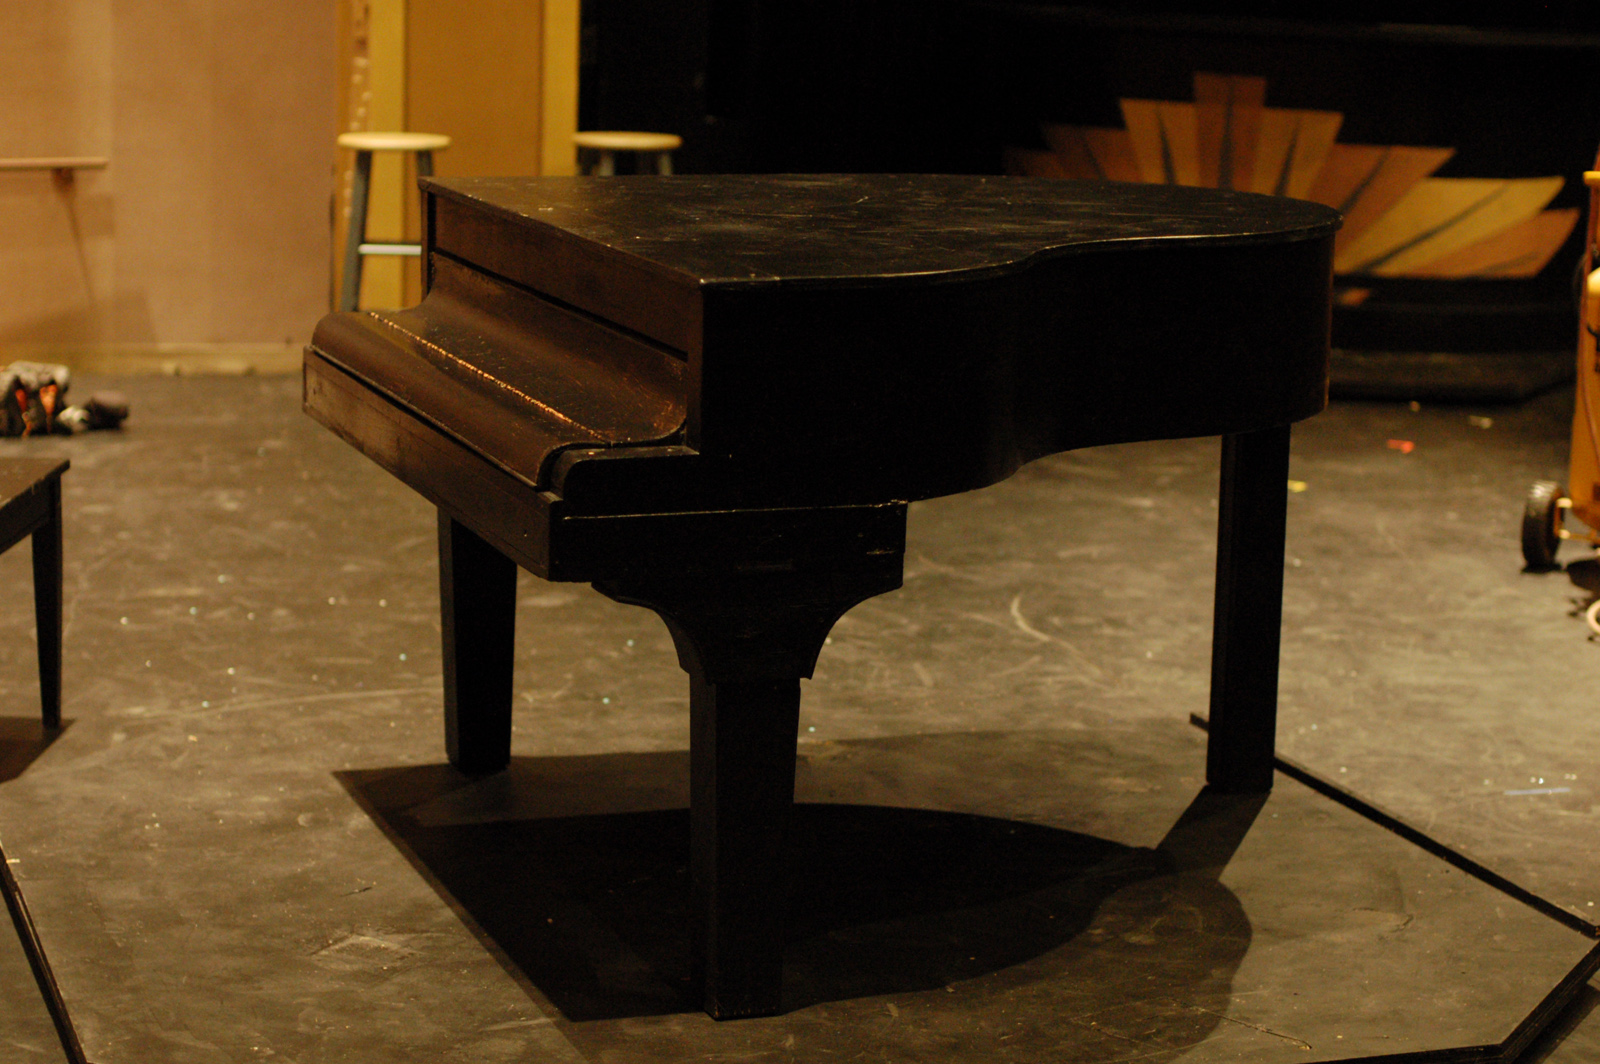
Painted Piano
The piano received a coat of black paint followed by a few coats of Sculptural Arts’ Plastic Varnish Gloss (one of my wife’s favorite products). You can see in the photo above that I added more facing to the front legs to make them appear like more traditional piano legs. On a real piano, these would be cut from solid wood, but on my prop piano, they are pieces of quarter-inch plywood and wiggle wood over top a leg made from two two-by-fours.
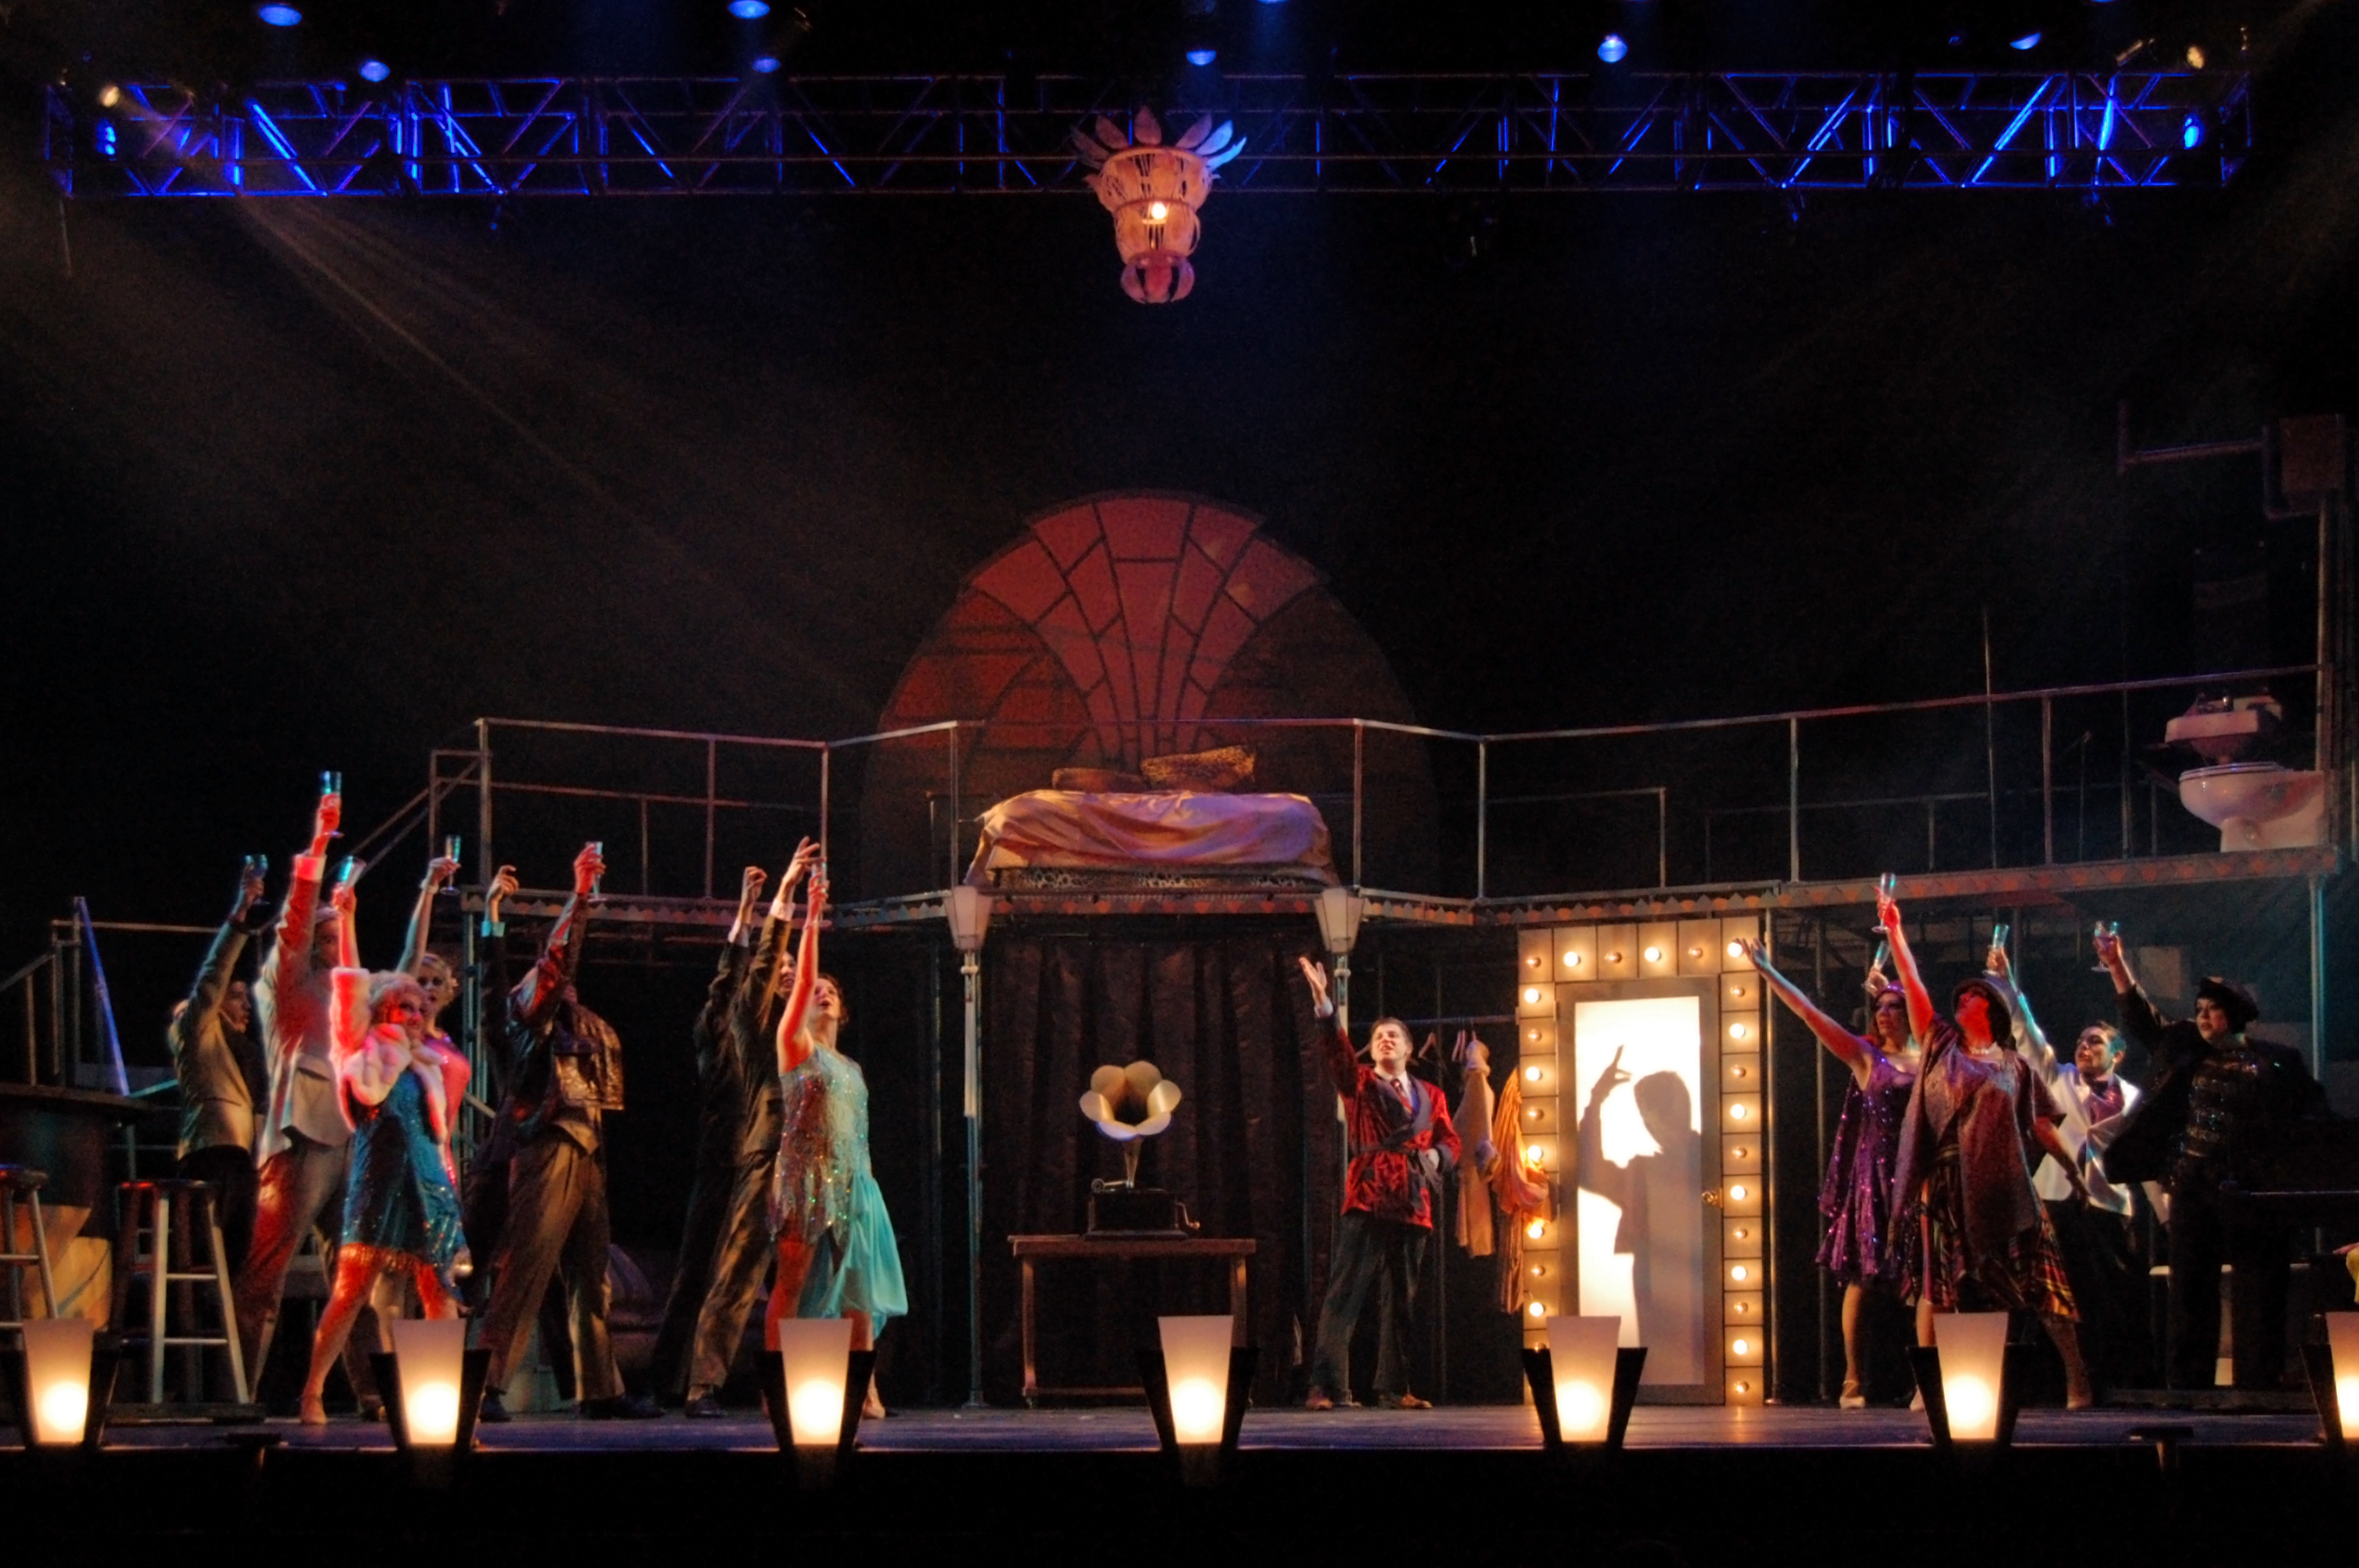
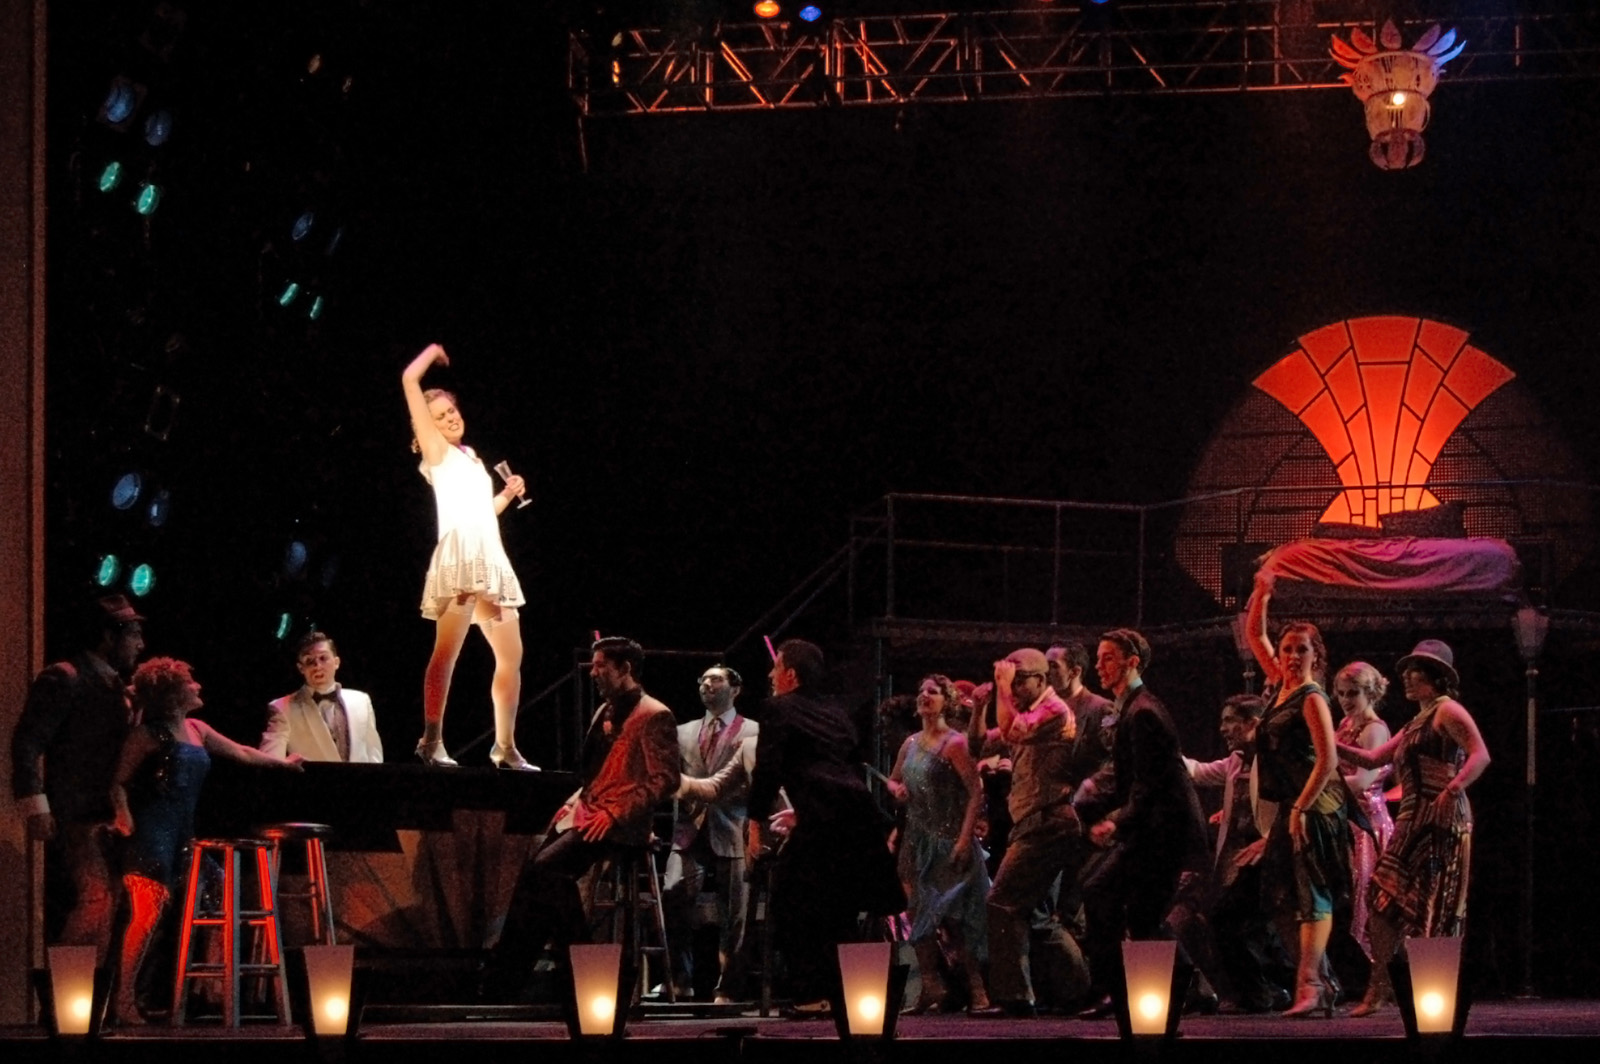
Wild, Wild Party
There are six people dancing on the piano in the photograph above. It featured throughout the musical, with people dancing on top, jumping up and off of it, and generally subjecting it to all sorts of abuse. I’m happy to say it sat there like a rock, never sagging or shaking no matter how hard they tapped or how much shimmy was in their shake.
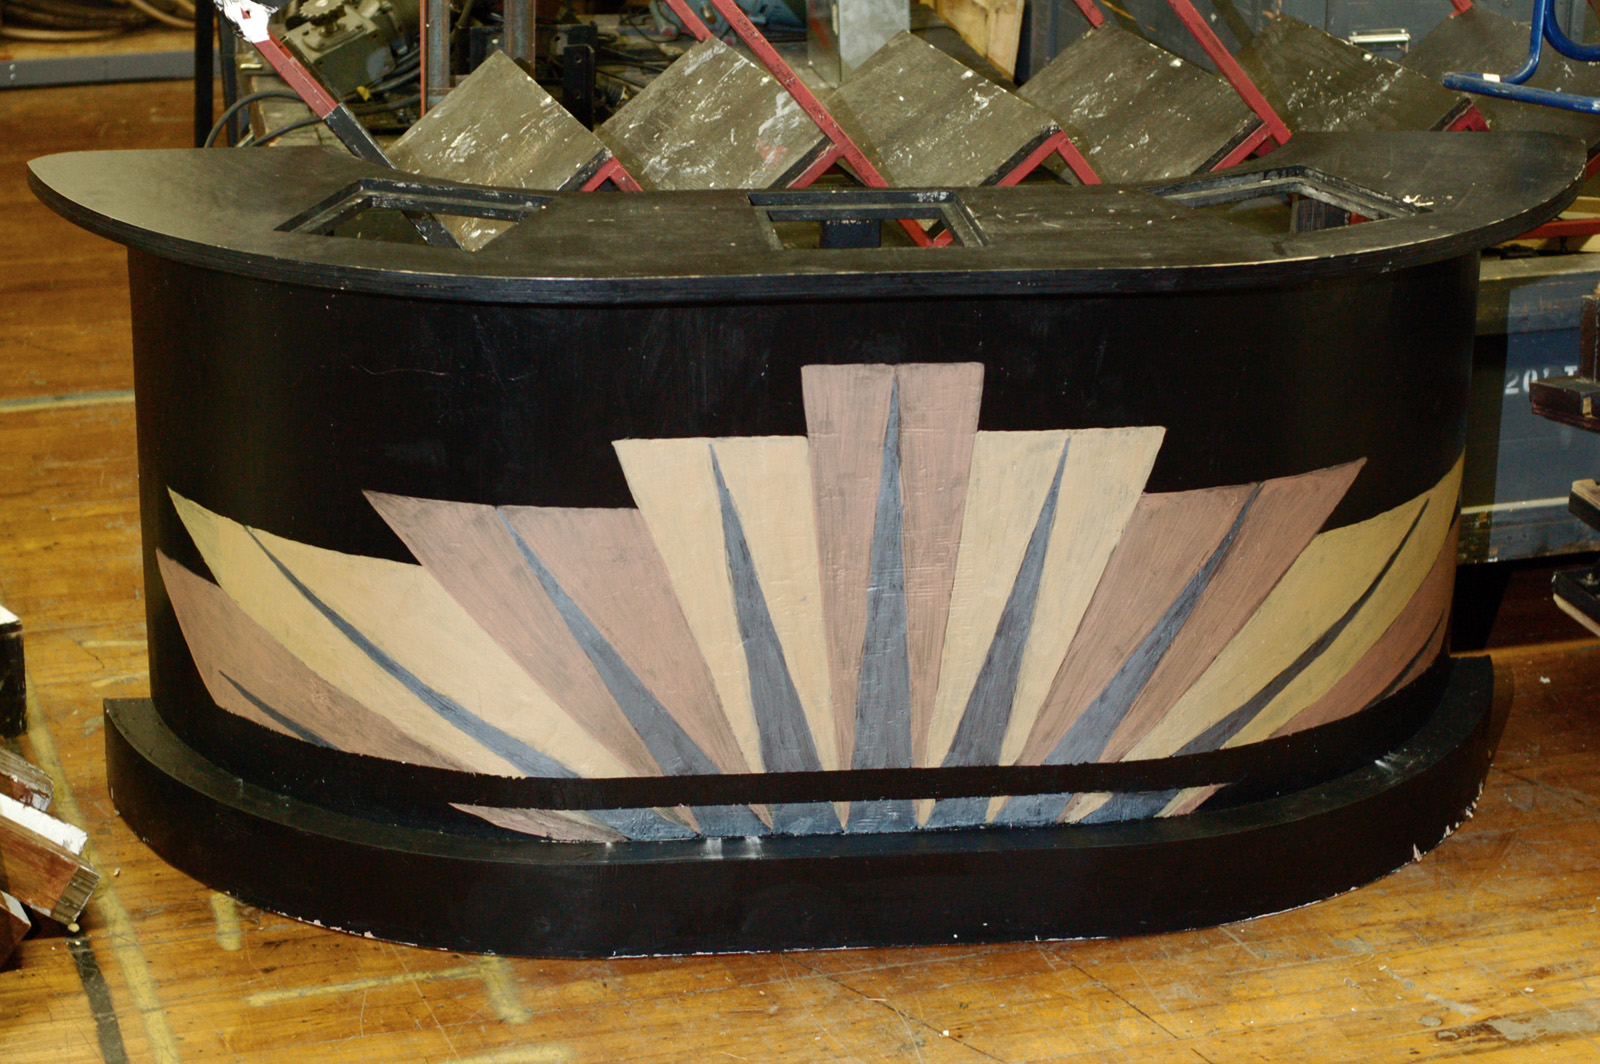
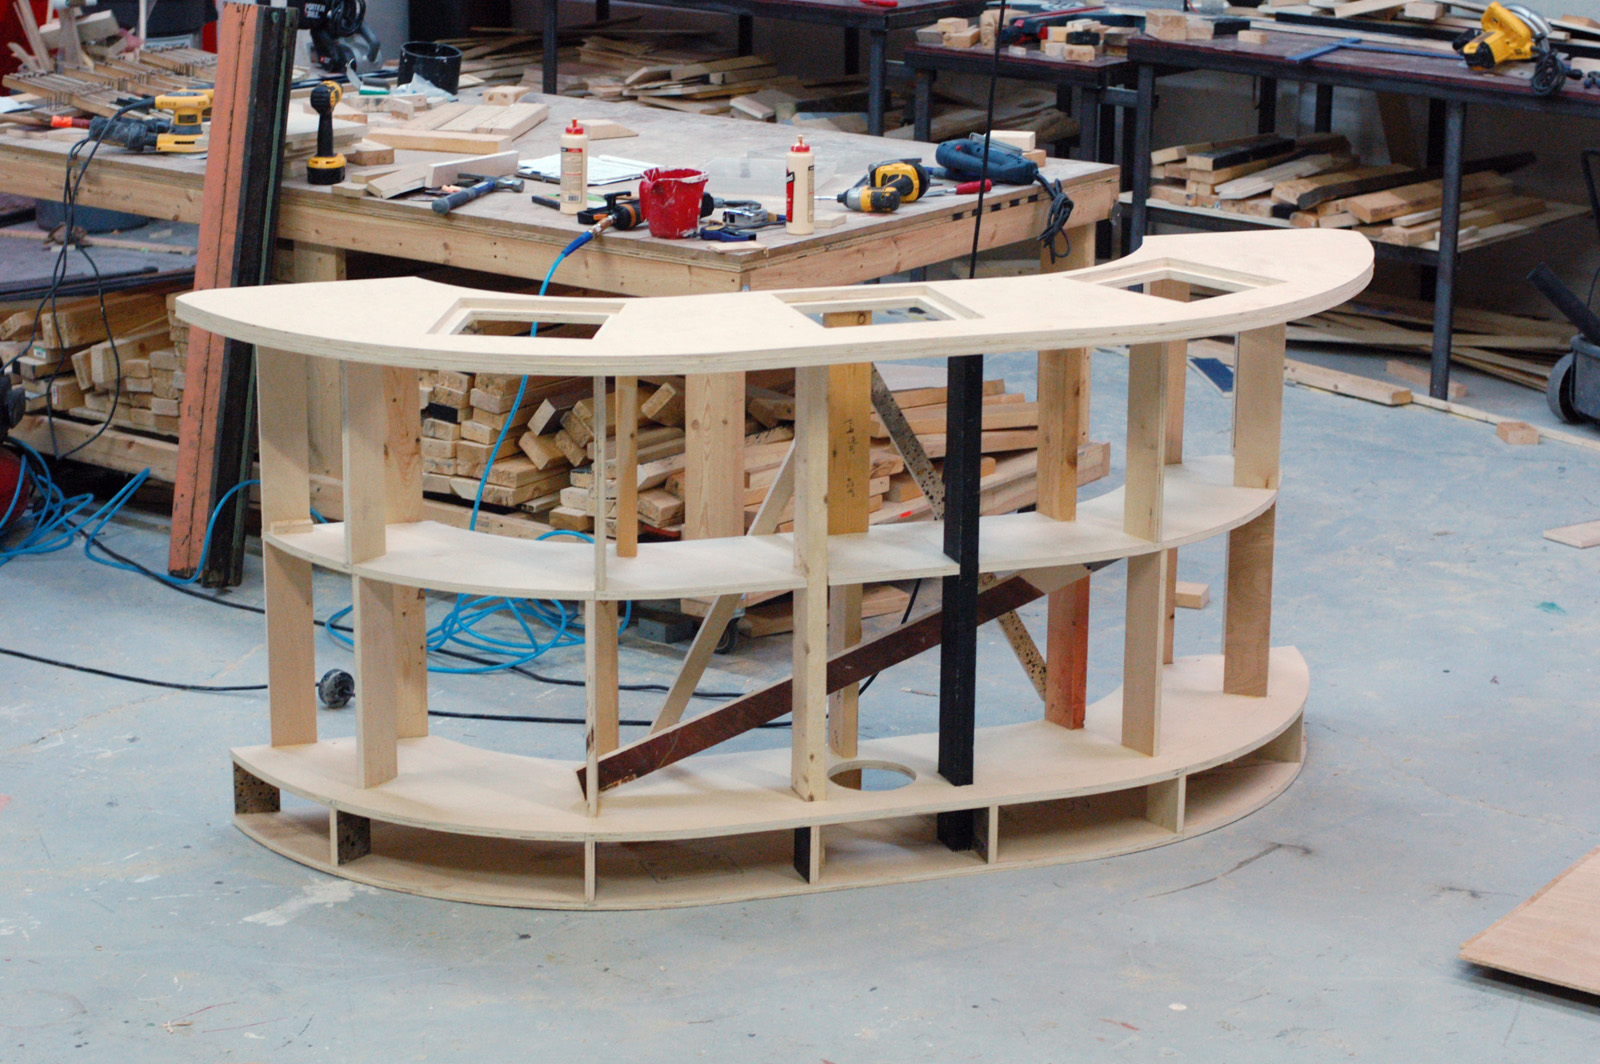
It is a little over a week since Elon University’s Wild Party closed, so I thought I would share some of the props I built while working as the props master on it. First is the sleek Art Deco bar. This production featured a lot of dancing and movement (in fact, the show was more of a dance piece with singing than a traditional musical) and the bar was key in a lot of the dancing. Actors jumped up and down off of it constantly and danced on top of it. Needless to say, it had to be sturdy.
Wild Party
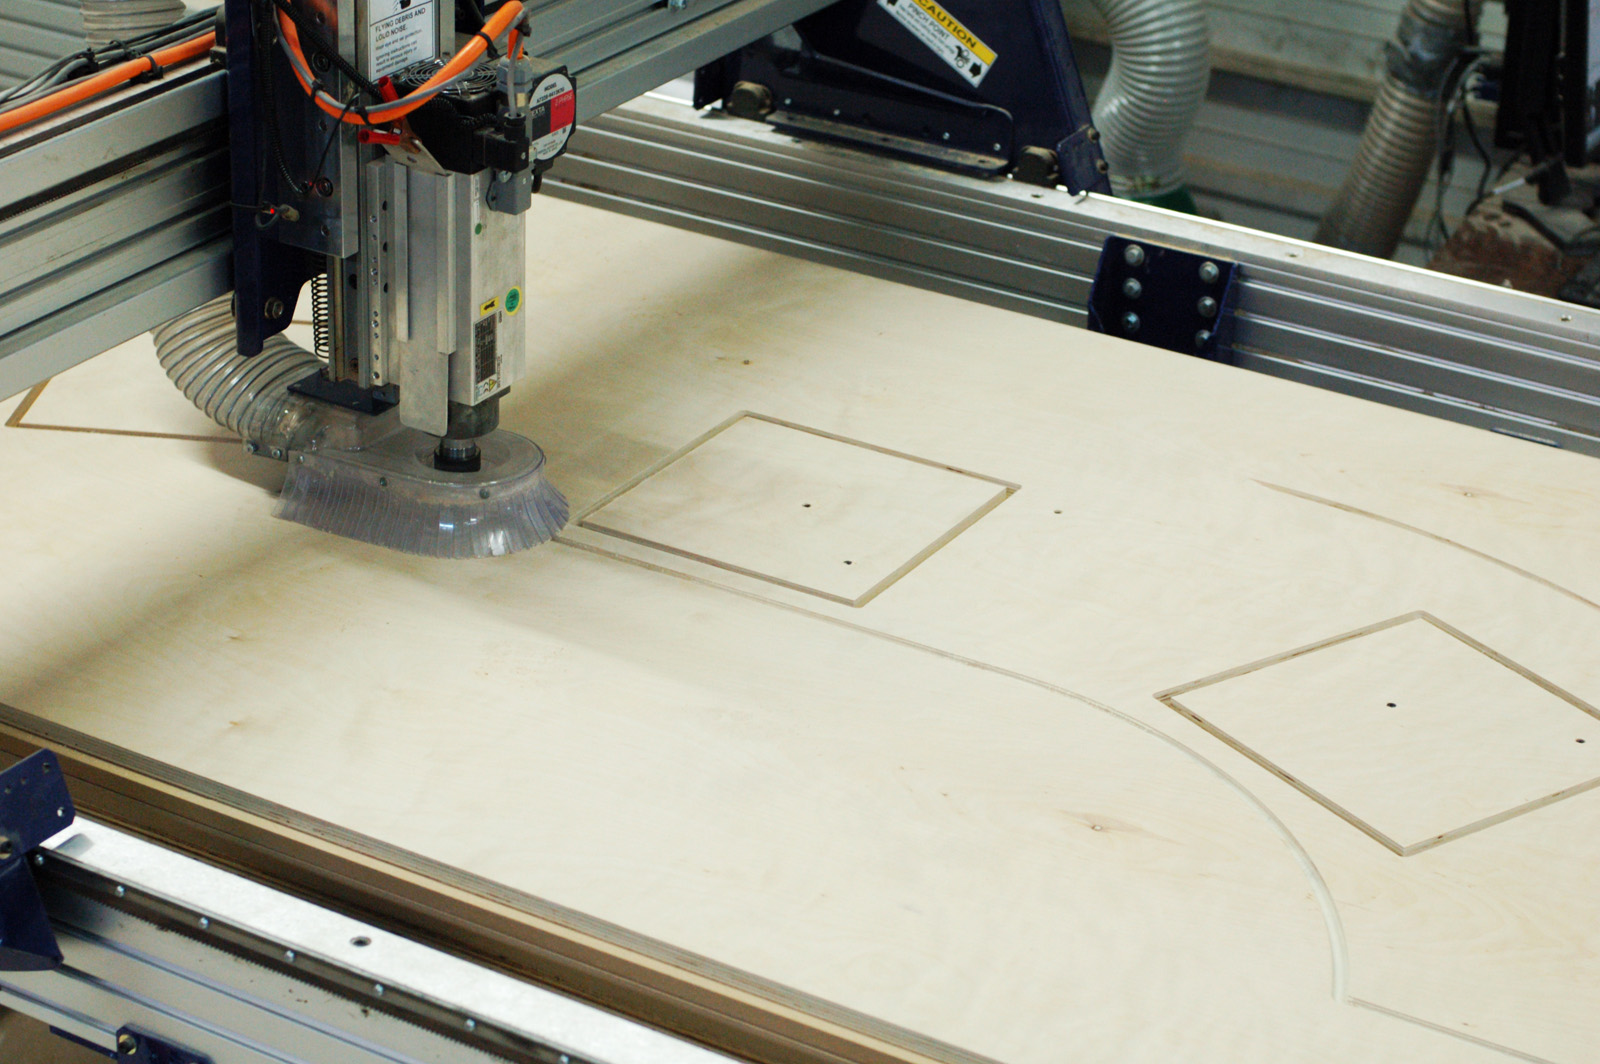
The other hurdle was that I only had a bout a day to build the bar to a point that they could use it in rehearsal; it did not have to be finished, just usable. The bar had a sort of boomerang or banana shape to it. I knew it would take awhile to layout the shape, not to mention all the pieces I would need to cut that followed the shape but were inset or offset by varying amounts. Since the scenic designer, Natalie Taylor Hart, already had the footprint of the bar drafted in CAD, we decided to CNC these pieces and save some time.
CNC the top
The top was two layers of plywood. We were putting lights in the bar that would shine upward, so the top also had squares to hold three pieces of 3/4″ plexiglass; the squares on the top piece were large enough to fit the plexiglass, while the squares on the bottom piece were a touch smaller to create a lip for the plexiglass to sit on.
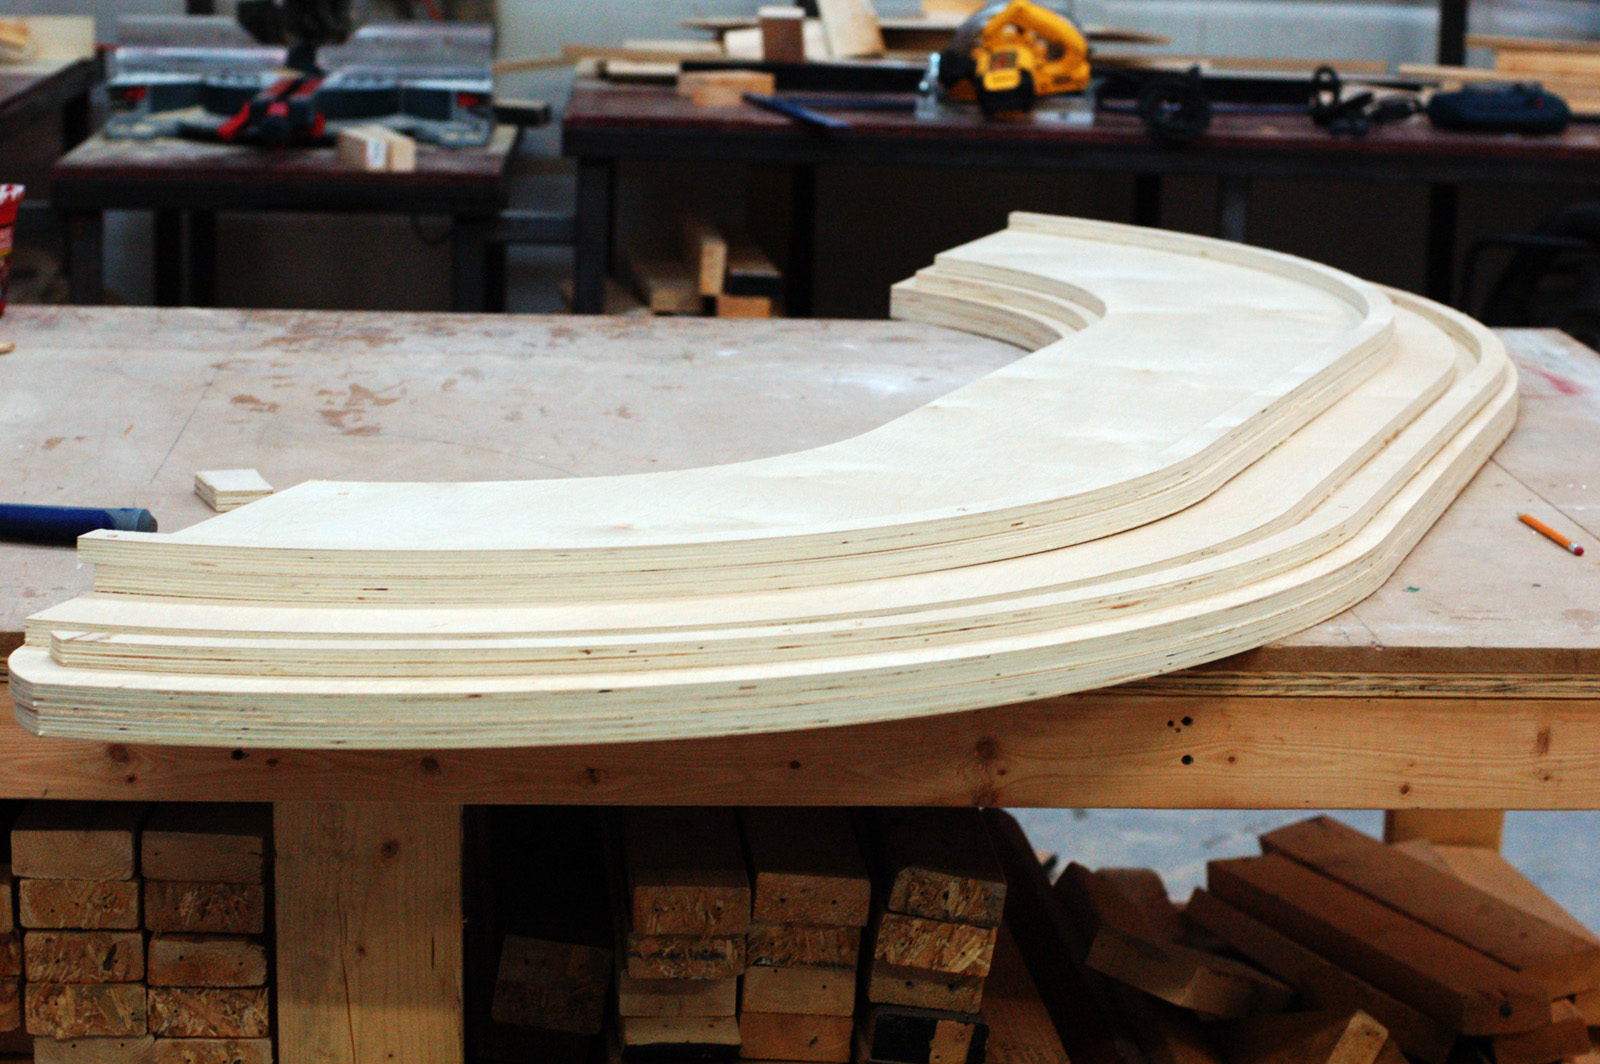
Pile of CNC pieces
I also cut the footrest, a piece for a shelf in the middle, and some formers to nail the wiggle wood to. This pile of pieces would have taken awhile to draw and cut by hand, but with CAD, Natalie just had to copy the same shape over and over again, insetting the front curve by whatever measurement I gave. With this pile of pieces, I just had to cut a bunch of formers and uprights to connect them all together.
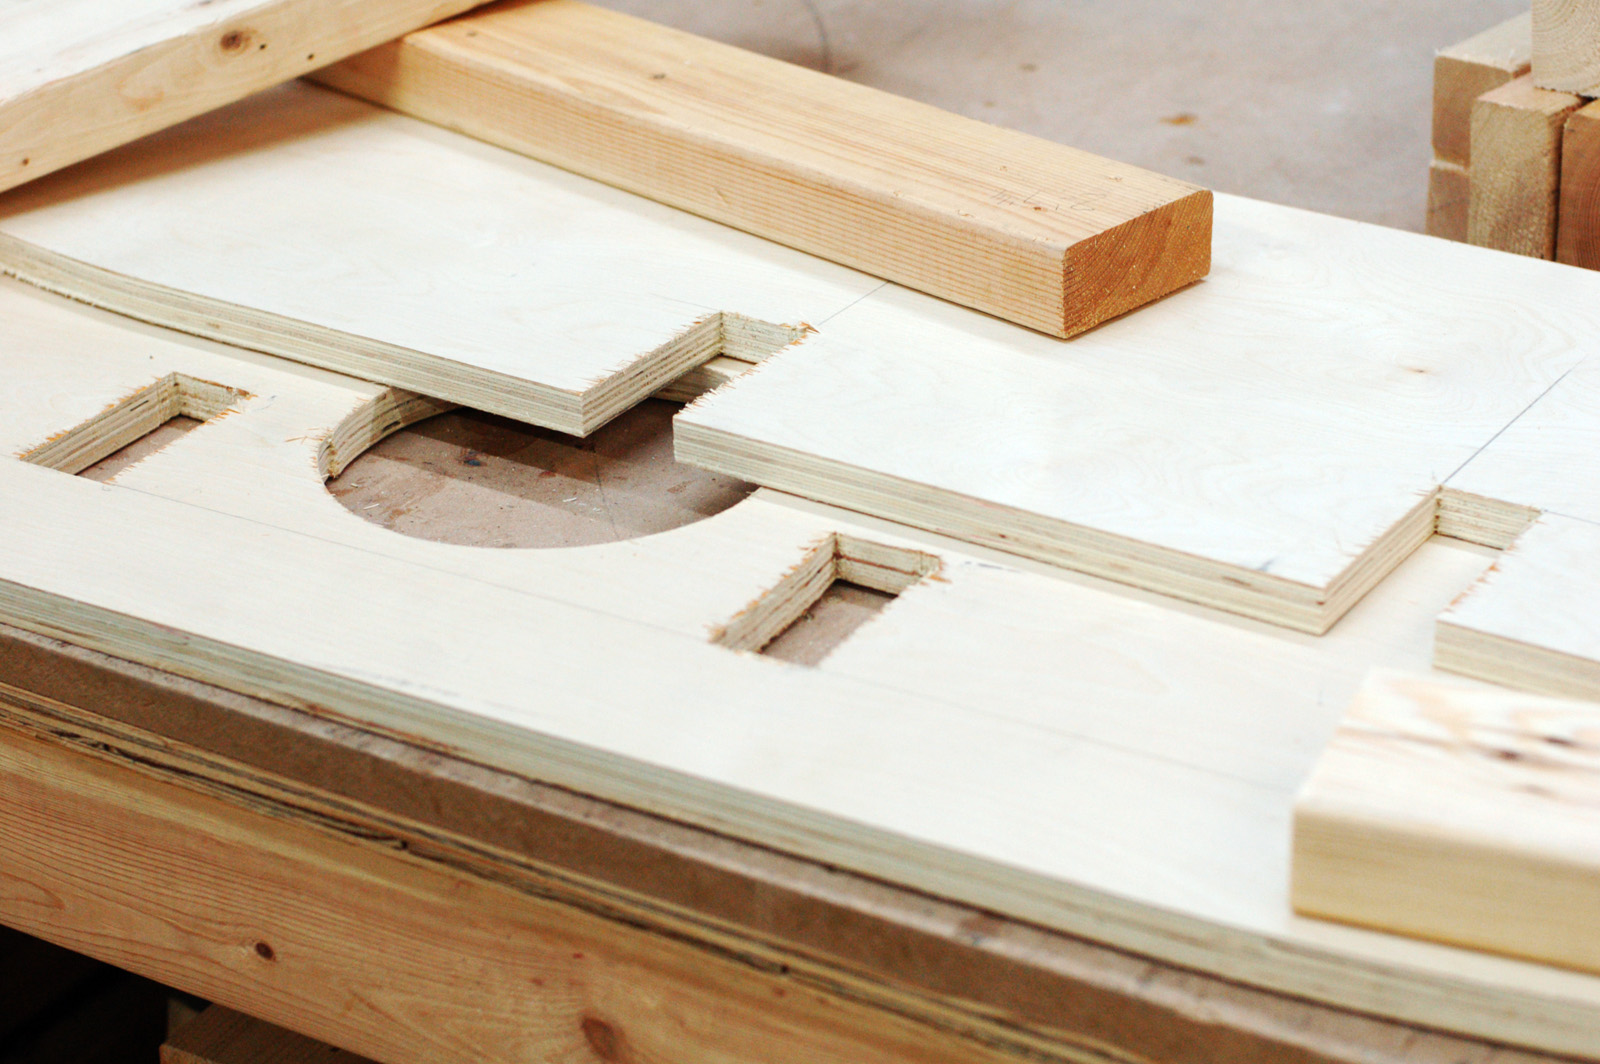
Notches and holes
I decided I wanted some supports to run unbroken from the top to the bottom of the bar for strength, which meant I had to cut some notches and holes in the plywood that they could run through. If I had more time to figure the whole thing out ahead of time, I would have drawn these into the CAD. Since the pieces were already cut, I needed to measure and cut them by hand. See, even with fancy fabrication machines, you still need a solid grasp of traditional tools to build things.
Two levels complete
I built the bar up one level at a time, marking carefully to keep the whole thing square and straight. I positioned the supports so they were nearly above the support below them; they were offset just a bit so I would be able to drive a nail in.
Bar skeleton
The supports along the front of the bar did double duty as formers, providing a nailing surface for the wiggle wood I would add later. I tried to keep the back as open as possible so it could be used as shelving to store all the props; the set was fairly open and skeletal, so the bar served as a place for a lot of the hand props to appear and disappear. The diagonal braces in the photograph above are just to keep the bar sturdy as they use it in rehearsal. Once the wiggle wood was added, I removed them, because the wiggle wood acted as one large piece of diagonal bracing.
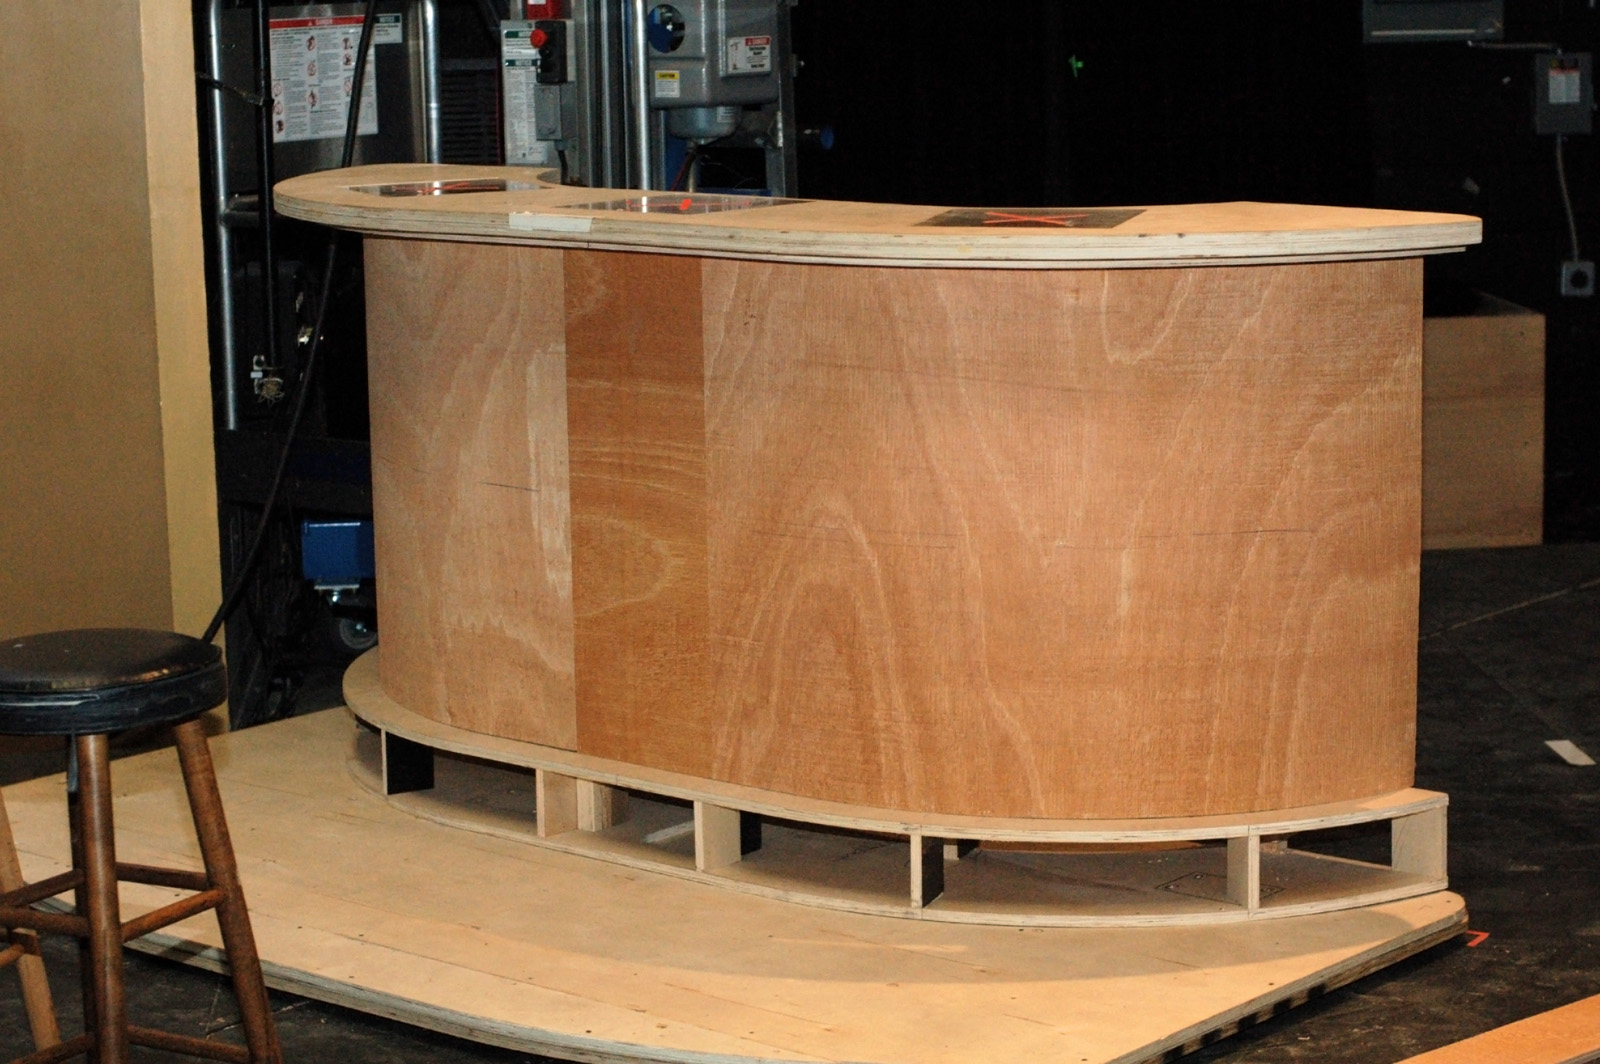
Wiggle Wood
I finished the bar onstage in between rehearsals. The curve was longer than eight feet, so I could not cover it with just one piece of wiggle wood. The center is relatively flat, so I placed a small piece directly in the center; I have found it easier to fill and sand seams between wiggle wood when they are on flat areas. The footrest also got a small strip of wiggle wood after the bar was secured to the wagon underneath it. All the faces got a thin coat of joint compound and a light sanding, and then it was on to painting.
Wild Party Bar
You can see the bar is a bit rough around the edges in the photograph above since I did not have time to take a picture until after strike. The Art Deco design painted on the front was a great touch added by Natalie and her crew. As she also pointed out, despite all the climbing and dancing done on this bar, she never saw it sag or wobble.
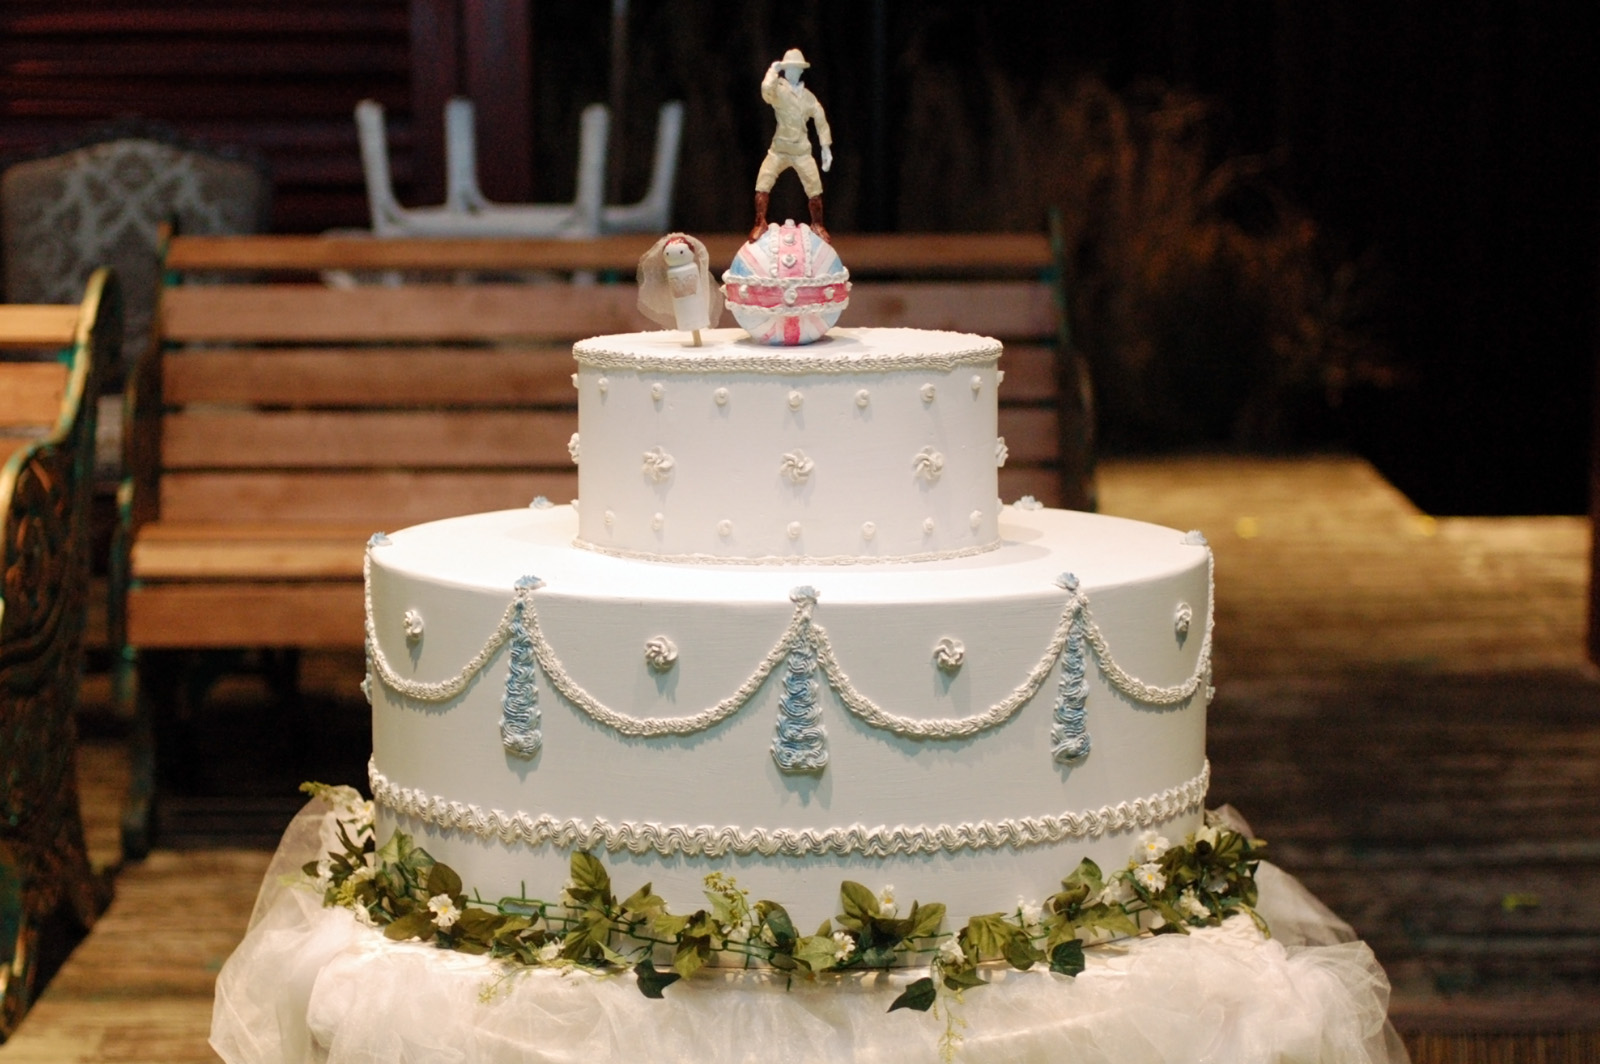
We just closed and struck Cloud 9 here at Elon University. I was the prop master on the show and built a lot of the pieces. One of the fun (and funny) props I constructed was a grand Victorian-era wedding cake. It was meant to be a bit over-the-top, with a grand appearance at the end of Act One when the hastily-arranged wedding occurs. Part of the visual humor came from the cake toppers; the scenic designer (Natalie Taylor Hart) wanted the groom to be a detailed representation of a man striding atop of a Royal Orb, while the bride would be a much smaller and crudely-made figurine stuck in the cake as an afterthought (the play, for those unfamiliar, deals with gender politics in various degrees).
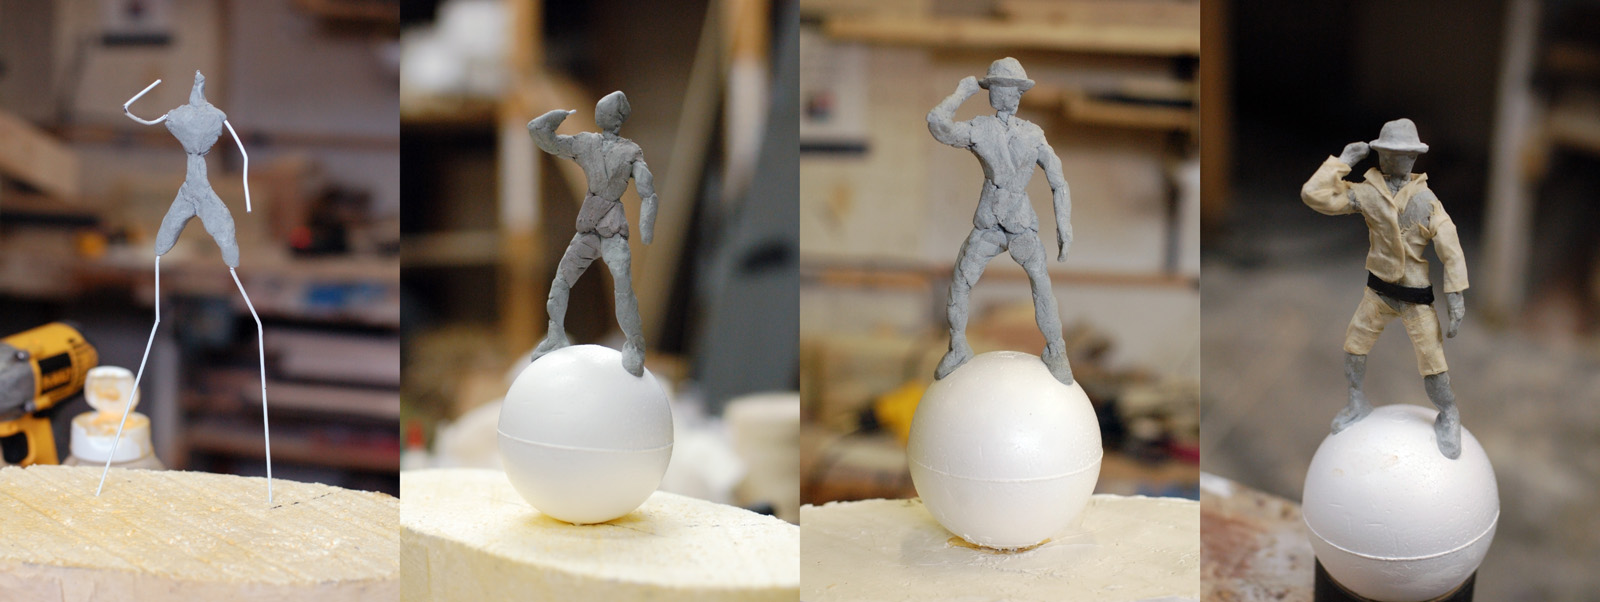
Sculpting the Cake Topper
To make a sculpted figurine of the groom, I started off with bending a wire armature into the pose I wanted. This also let me establish the proportions of the limbs. It wasn’t anything fancy; I cut up a wire hanger and held it in place with plumber’s putty. Plumber’s putty is a type of epoxy putty which is soft and shape-able when you first mix it together, and becomes rock hard after a few minutes. I liked it on this project because I could build up the sculpture bit by bit, allowing the parts to become hard as I worked on other things. I could return to the sculpture later and add more bits without worrying about smooshing the parts I already made. It also did not need to be fired or coated to finish it. The putty I used was left over from another show, so I did not have to spend any more money on a show with a tight budget.
In the last frame of the picture above, you can see I added some clothes. The putty is not very good for getting fine details; you can machine and carve it after it has hardened, but I wanted a quicker way to get some semi-realistic clothing texture on top. I took muslin and soaked it in glue and water, than manipulated it over top until it “draped” like a shirt and pants. After the glue dried, it retained its shape.
A Grand Wedding Cake
The rest of the cake was pretty straightforward. The bottom base is a strip of wiggle wood wrapped around plywood formers, while the top is a solid chunk of white bead foam coated in joint compound. I used painter’s caulk for the icing details. Normally you want to use acrylic caulk rather than silicone caulk, because silicone caulk does not take paint. However, I found some newer stuff which is a mix of acrylic and silicone; the acrylic makes it paint-able, while the silicone keeps it a bit flexible and lets it dry a lot faster. I bought a few decorative cake icing tips, and just attached them to the end of the caulk tube so it would come out all fancy.
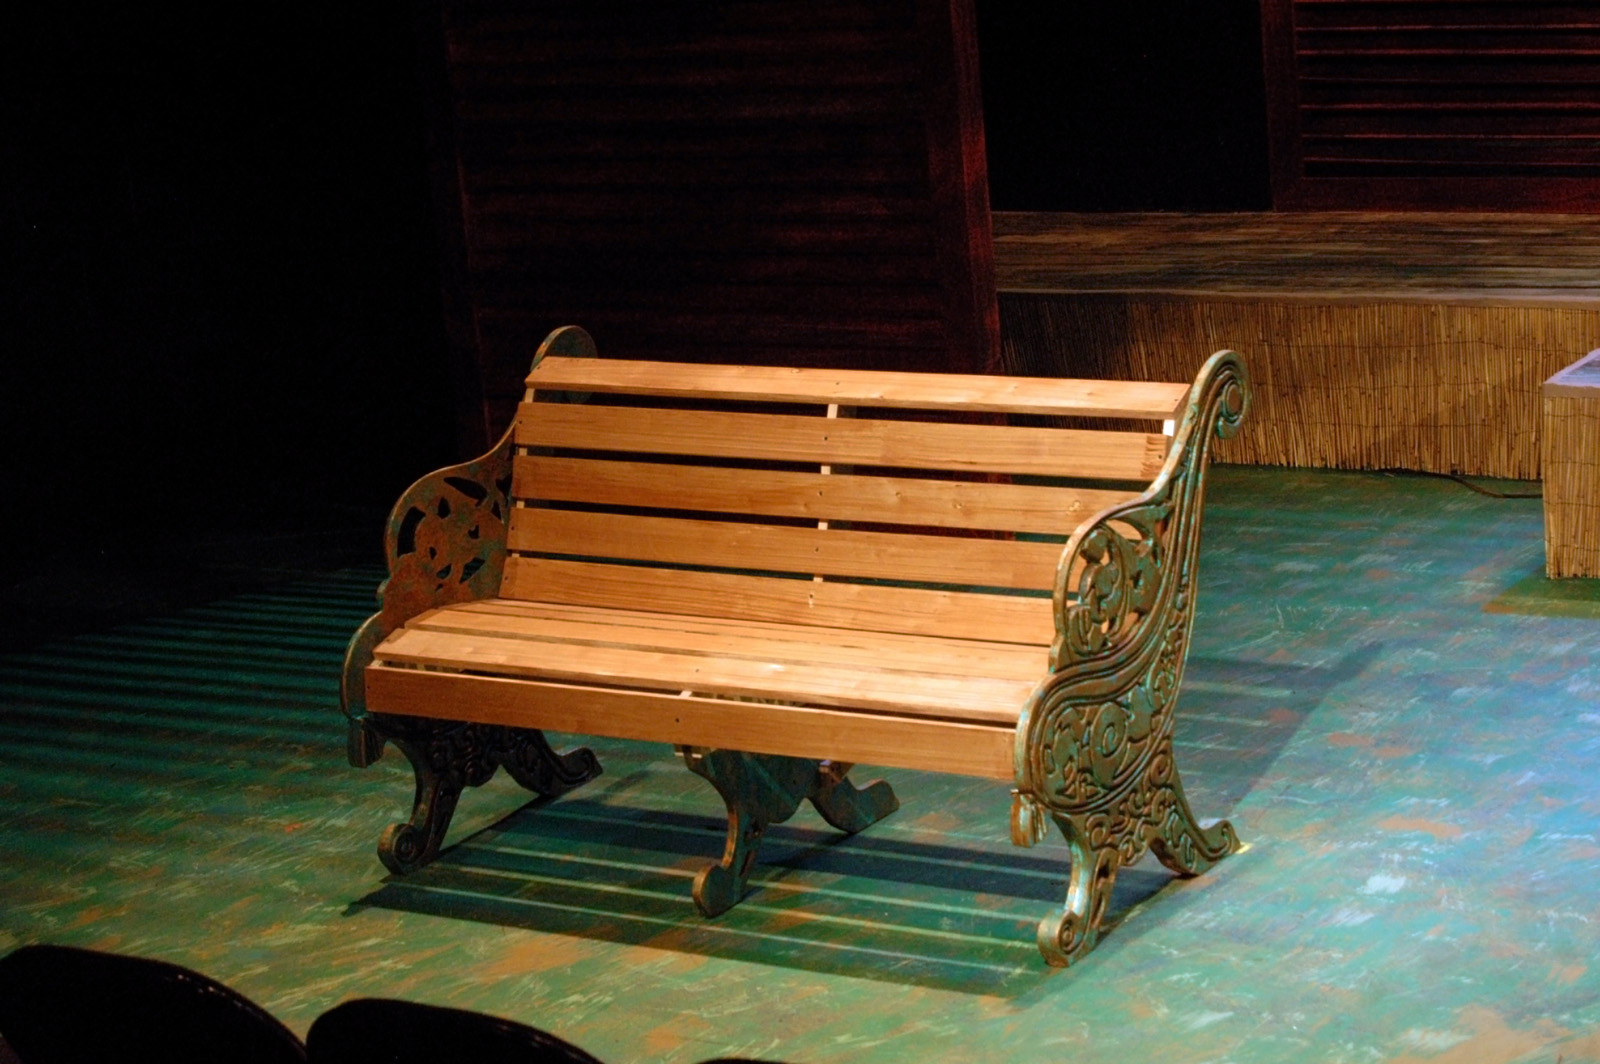
Yes, I built this exact same cast iron park bench seven years ago. I even used the same research image you see in the link. I couldn’t build it the same way, though. The first time around, I used a lot of found pieces and details which I did not possess this time. I also needed to build three matching benches, which warranted a different approach then building a single one. I was building and buying all the props for Elon University’s production of Cloud 9, and the whole second act takes place in an English park; the director was keen on basing it off of Kensington Park. We decided to cut and carve the ends on the scene shop’s CNC router.
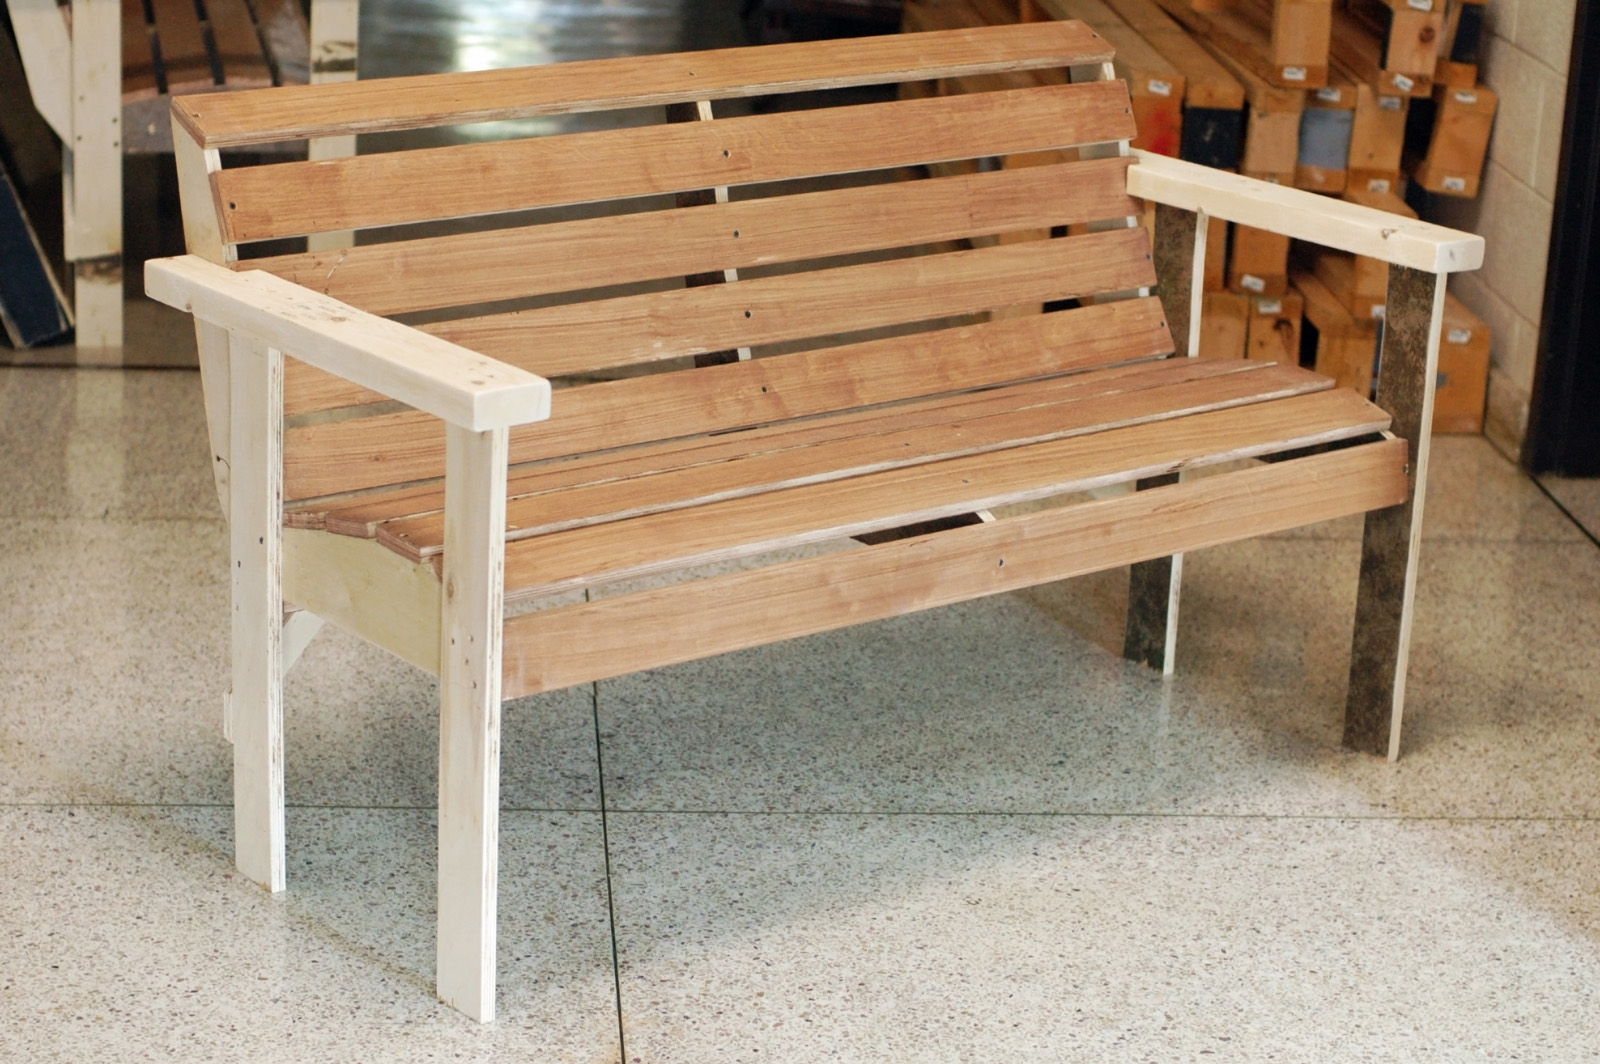
Rehearsal bench
First I built the seats themselves with some stand-in legs and arms. I arranged some slats I had cut into a shape that was comfortable to sit in, than I screwed them together onto supports which kept the whole thing sturdy. The stand-in legs held it all up at the correct height so they could rehearse with the benches while we worked on the real ends. The idea was that when the real ends were ready, we would just unscrew the fake legs and pop on the real ones without having to take apart and reattach all the original slats. This also ensured that the curve and depth of the seat they were using in rehearsal would be exactly the same on the performance benches.
I began by making a line drawing of the bench in Inkscape, an open source vector graphics editor. I drew three layers; the first was a line showing where all the inside “holes” should be cut and the second showing where the outermost profile should be cut. The third layer showed where all the engraving would go. Rather than cutting all the way through the plywood, the router would only cut partway down, and it would use a v-shaped cutting bit (this technique is known as “v-carving”).
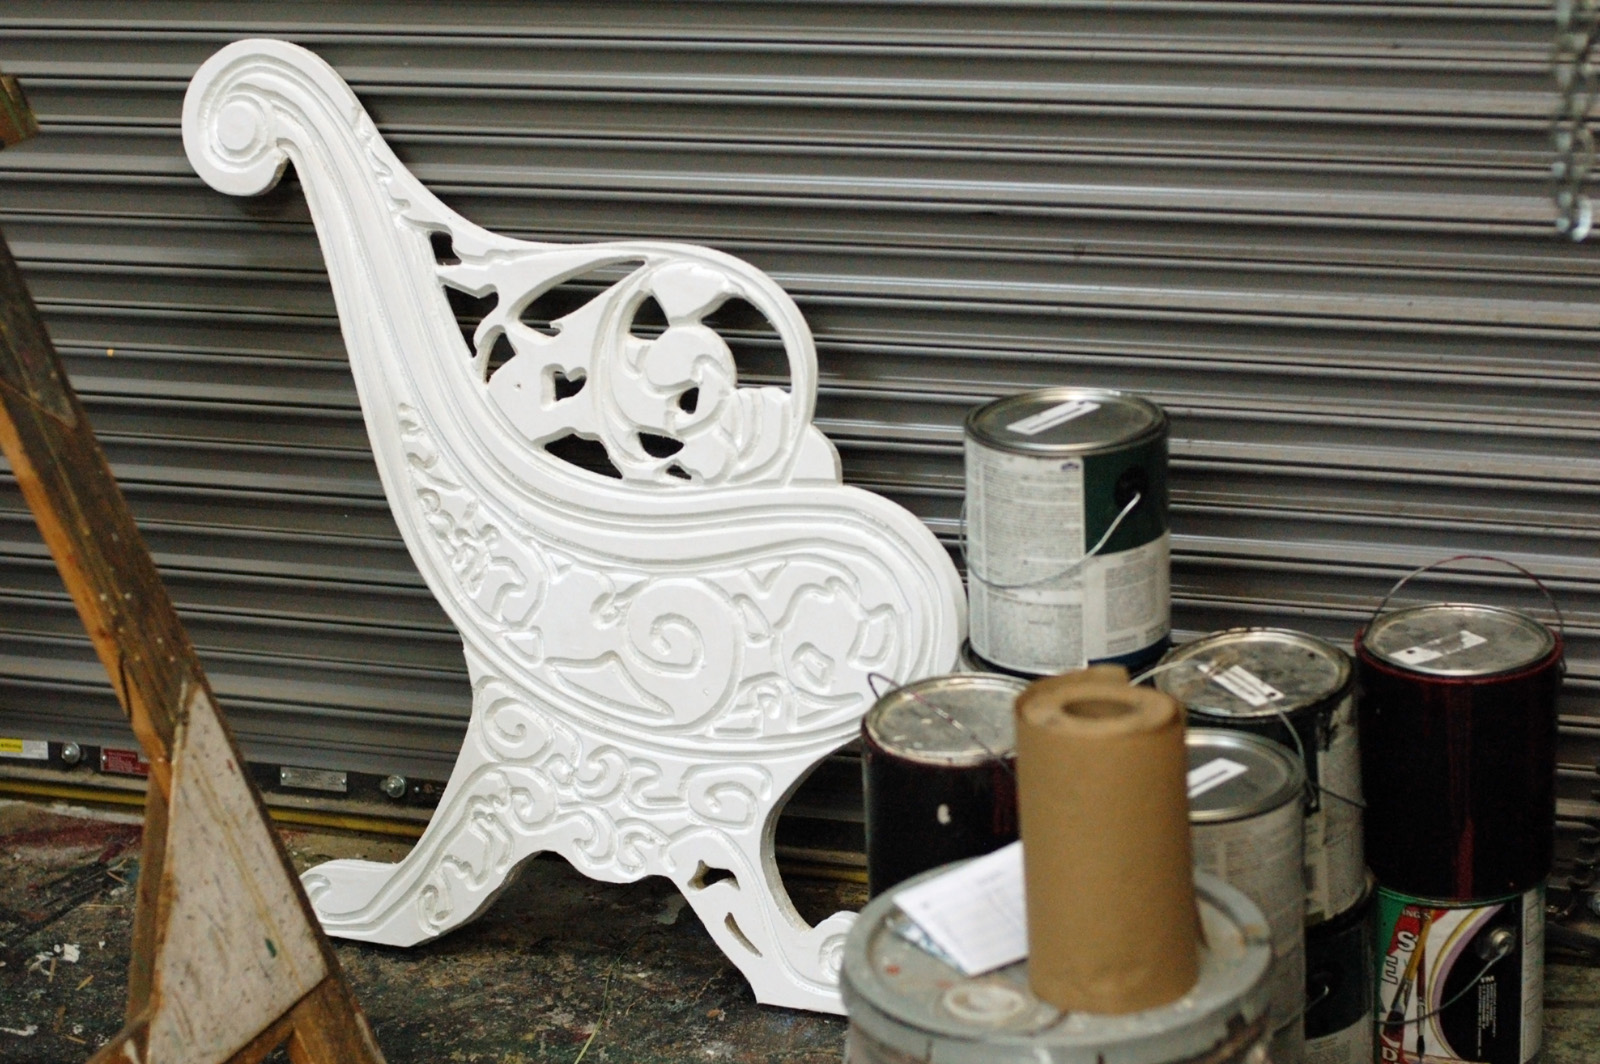
Primed bench end
With the drawings finished, I gave them to the Natalie Hart, the scene designer (also my wife), to import into AutoCAD. I’m sure you can use the Inkscape drawings directly, but I have no experience with CNC file formats, and Natalie has already successfully used her CAD drawings on the CNC machine. The curves I drew in Inkscape turned into a series of many tiny lines in AutoCAD; this meant when they printed, they looked like many tiny lines rather than a single smooth curve. The curves she redrew in AutoCAD printed as smooth curves, however. I’m not sure I will use Inkscape again to draw for a CNC; if I find myself using the CNC a lot in the future, I may just spring for one of the less-expensive CAD drawing programs out there.
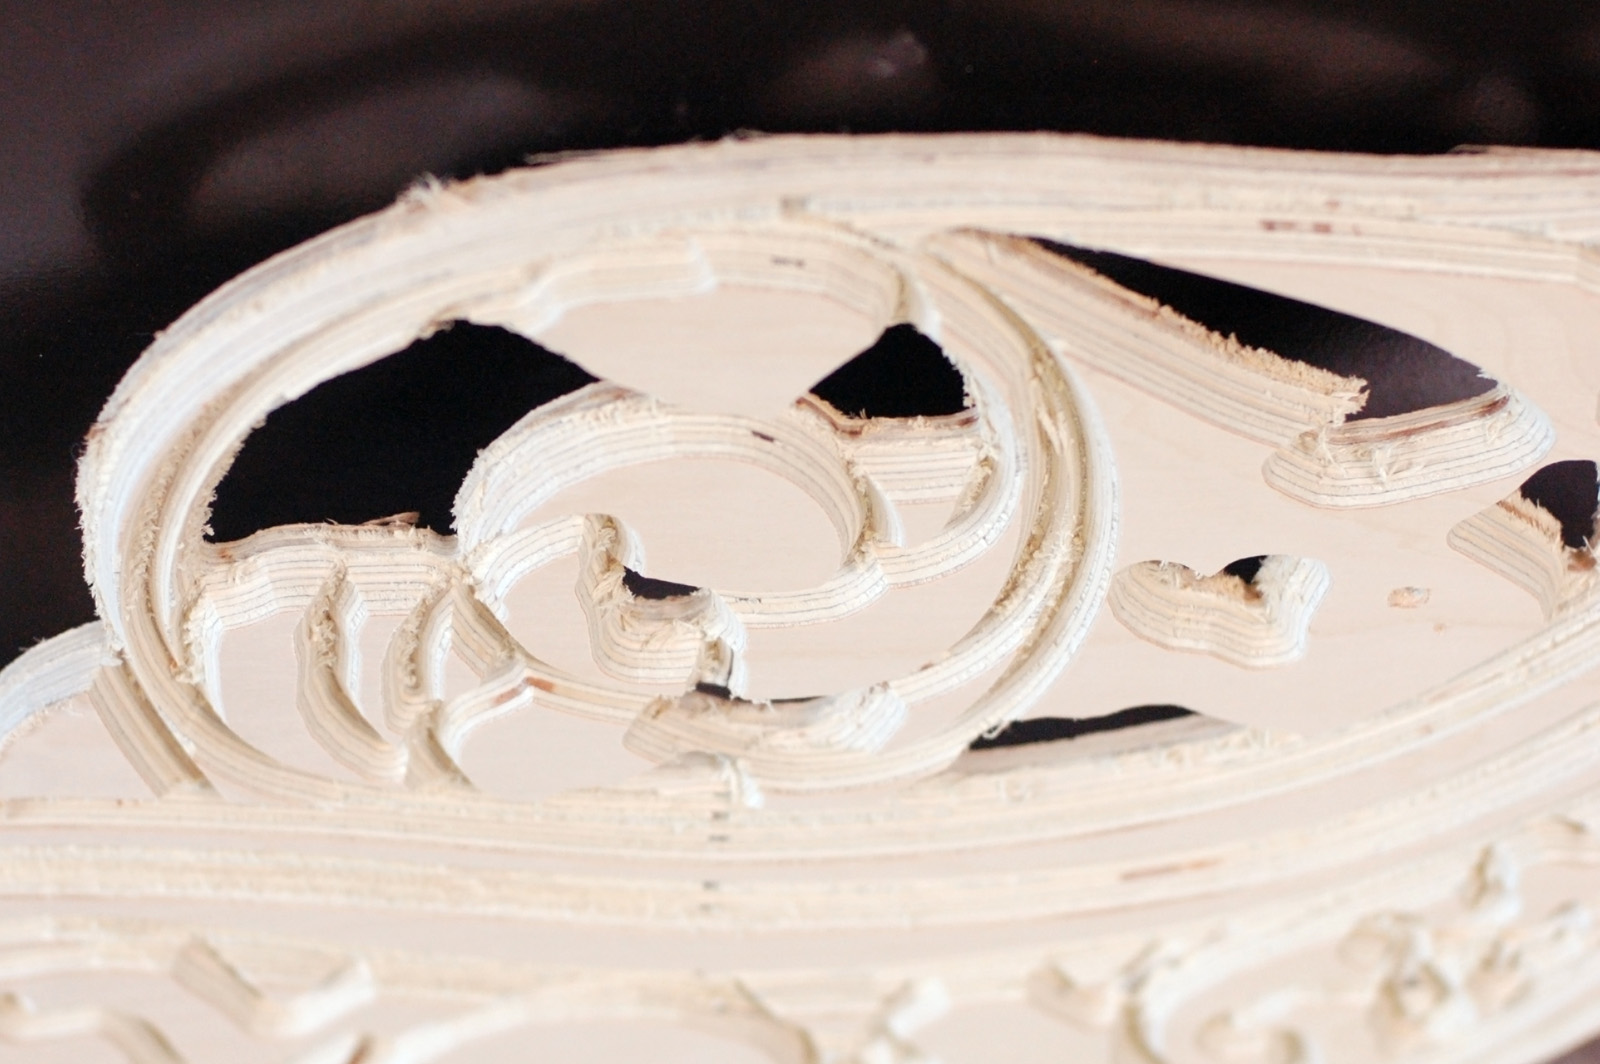
Closeup of CNC V-carving
The final piece of the puzzle was getting the drawings into PartWorks, which is the CNC machine’s software that generates the instructions it uses in cutting. Our production manager/lighting designer Bill Webb happily took that on, since the machine is second-nature to him by now. In about three hours, we had all the pieces we needed for all three benches.
You can see in the photograph above that the CNC left a lot of cleanup work to do. I experimented with a number of abrasive flap and wire wheels to see if there was a quick way to sand the whole thing, but it ended up requiring hitting every nook and cranny with a Dremel tool.
Inside of bench end
We had taken measurements off the rehearsal benches and put them into AutoCAD so the CNC parts would line up exactly with the existing structure. For the inside of the end, we only printed the bottom half and attached it to the outside part. This gave a bit of a lip for the existing bench seat to rest on, while also providing a lot of surface area to screw into from the side. It also helped line up the bench seat to the ends at the correct height.
The faux-verdigris paint treatment was developed by one of the students (good job, Vee Bland!). Natalie and I painted them up, and I quickly assembled them so they would be ready mere minutes before photo call.
Finished bench
Naturally, I would have loved to play around with the software and the drawing to develop a more realistic carving, as well as spend some time learning to run the CNC machine on my own. The time frame on this production was just too intense; 15 days between the first day of rehearsal and opening night, and these benches were but a small part of all the props and furniture I had to build and acquire. Still, it gave me a good idea of how I can integrate CNC fabrication into my prop work when it can come in handy.
Making and finding props for theatre, film, and hobbies