Tag Archives: carve

A Disappearing Turkey

To all of my American readers, I hope you have a Happy Thanksgiving this week! Brian Wolfe from Costume Armour sent me some photographs of a trick turkey they recently created, which seems apropos to the holiday.

For this trick, a waiter needed to walk in with a food cart. He lifts the lid off of a covered tray revealing a delicious roast turkey. He replaces the lid, and the next time the lid is removed, the turkey is gone. Instead, an actor’s head is on the tray, and the actor begins to speak.

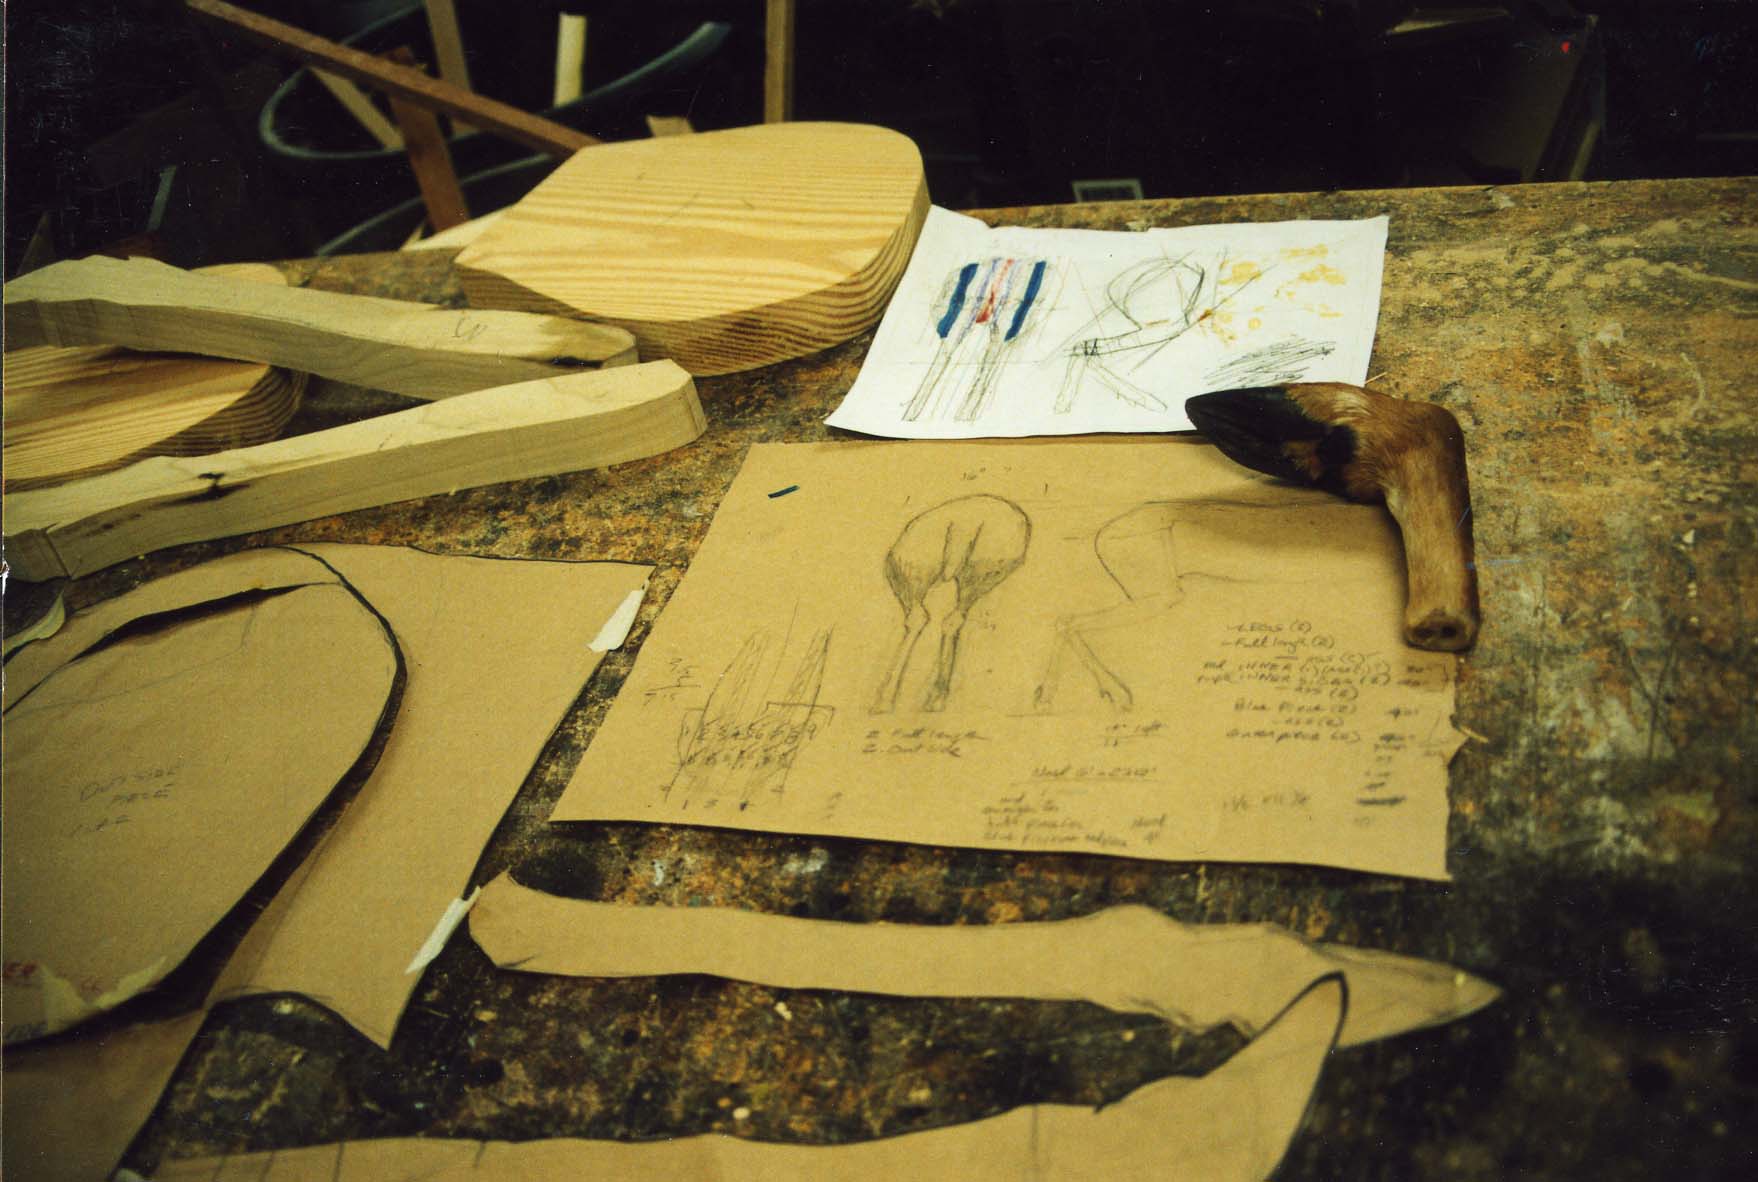
This is the drawing he shared with me:

Drawing for a turkey trick

They needed a giant, oversized turkey with enough room inside to fit a head; it also needed to be light enough that it could be lifted along with the tray (you will see why in a minute). They had a rubber turkey in stock, but it was too small and heavy. So they decided to vacuum form a new one. They carved the turkey in foam, made a two-piece mold, and vacuum formed it in 0.04″ Kydex plastic.

Vacuum formed turkey halves

They cut out the pieces, glued them together, and painted them. Next, they cut a large hole in the bottom:

Hole in the bottom of the turkey

The tray was also vacuum formed, this time in a heavy 0.093″ Kydex plastic with a metallic finish. The bottom was formed over a wooden mold, while the lid used a plaster mold. They also added some artificial lettuce which was bought.

Vacuum formed turkey

A brass drawer pull completed the look to the lid. The small black rectangle next to it in the photograph below is a small toggle switch:

Tray Cover
Tray Cover

When the waiter flips this switch, a small battery-powered electromagnet turns on (shown in the next photograph). The turkey had a small piece of flat steel hidden on top which is grabbed by this magnet. So when the magnet is on and the tray lid is lifted, the turkey travels along with it, hidden from the audience’s view.

Battery and magnet
Battery and magnet

The diagram below illustrates how the whole trick was set up. I’ve seen this same basic principle carried out in a number of different ways, but the combination of the hollow turkey and electromagnet makes this execution especially elegant; you can control whether the turkey or head is visible simply by the flick of a switch. The actor underneath does not have to do anything.

Turkey trick diagram

Hope you enjoyed this! Have a Happy Thanksgiving!

Friday Link-opolis

Hello, internet. It’s been a pretty busy couple of weeks; Crazy for You (which I am prop mastering) begins tech this weekend. It has quite a large number of elements keeping me pretty busy, so I did not have time to write a blog for this past Wednesday. But I do have some fun links I’ve come across that should fill you with proppy goodness.

Anna Warren seems to be even busier than me over at Milwaukee Rep, but she has returned to write a new blog post, and it’s a cool one. She details how she molded and cast fried chicken out of latex and foam, using real fried chicken as the model.

The flip-side of molding and casting real food to make fake food is molding an object to cast it out of an edible material. This brings up many safety concerns, as very few molding materials and mold releases are food-safe. Smooth-on has a wonderfully-illustrated tutorial for casting edible items using a food-safe silicon putty.

I have yet to catch the TV series Face Off, in which special-effects makeup artists compete in time-intensive challenges (like Project Runway for the sci-fi set), but I’ve heard good things about it. Jamie Frevale interviews Rod Maxwell, one of the contestants on the show, about his work and what it was like “performing” that work on television.

Finally, just in time for Halloween, we have this video of a CNC machine which can carve Jack-o’-lanterns:

Friday Link-tacular

It’s Friday once again! I hope everyone was able to finish their taxes!

Last week there was a great newspaper piece on James Blumenfeld, the prop master at the Metropolitan Opera. The operas they put on are among the largest in the country, so it is fascinating to read what it takes to organize and corral all those props.

Here is another great newspaper piece on Torontonian prop maker Chris Warrilow. He runs a prop rental and fabrication shop, but his specialty is custom stage combat swords. The article has some great information about stage weapons.

It must be the year for writing about props people; here is an article on Peter Smeal, the props designer at Children’s Theatre of Charlotte right down here in North Carolina.

You can view the entire “Fundamentals of Machine Tools” (1996) published by the US Army. This is the manual used to train Army members in the use of powered machines for making and repairing things out of metal.

Here is a homemade carving pantograph; you trace your pattern on one end, and the Dremel on the other end carves it into a piece of wood. The commercial kits I’ve seen for this always look so cheap and flimsy.

Finally, if you have the time (about 16 minutes), this video shows the construction of one of Denmark’s most famous chair designs, called “The Chair”. It’s an expert blend of top-of-the-line CNC machines with old-world craftsmanship as the video goes from hundred-year old oaks in the forest to a completed piece of furniture.

Yoruban Sword

I made this decorative Yoruban sword back in 2004, when I was attending Ohio University and had a lot more beard.

Yoruban sword from "The Gods are Not to Blame"

The show was called “The Gods are Not to Blame”, and it is a Yoruban retelling of the Oedipus Rex tale from Ancient Greece (the Yoruba people are one of the largest ethnic groups in Western Africa, with a cultural history of hundreds, if not thousands, of years). My future wife was the set designer on this show, and nearly all the props had to be constructed to be completely authentic; her design involved extensive research into Yoruban artifacts, furniture, and design.

This sword, while appearing like a tradition sword, was built using very modern methods. It’s actually a fairly simple construction, although it has a few hidden tricks. I carved the handle from a piece of poplar, while the blade is taken from a sheet of steel plate. I traced the shape onto the steel and used a plasma cutter to cut it out. I also cut the cross shape out with the plasma.

Pieces of the sword
Pieces of the sword

Now for the hidden fun part. I took a steel rod and sharpened one end to a point. On the end of the tang of the blade, I notched a “V” shape. This is where the sharpened end of the rod went, and I welded the two pieces together; the reason for the sharpening and the notching was to give me a lot of surface area to attach my welds to.

I then had to drill a hole all the way through my carved figurine for the rod to slide into. I needed an extra-long drill bit for this part. I also notched the bottom for the tang to slide into. It was like cutting a mortise for a metal tenon. This step was necessary to keep the handle from spinning around the rod.

I threaded the end of the rod which was sticking out of the top of the figurines head, and tightened a nut down; this is how the handle remained attached to the blade. For one final little touch, I drilled out the top of the head so the nut could fit down inside, and then filled the whole thing over with some Bondo auto-body filler. The nut was now hidden within the top of the handle–with the unfortunate side effect that the handle was now permanently attached. Since this was a decorative sword and not a stage combat weapon (the blade was mild steel, and not to0l-hardened like a weapon’s blade), it would hopefully not need routine maintenance and tightening.

A collection of Yoruban swords

I traced the designs onto the blade from my full-scale drawing and engraved them with a Dremel tool. For my final step, I stained and sealed the handle.

Clean Shaven EricIt was a very hefty sword and a lot of fun to swing around. One day, I wasn’t paying attention while swinging it around, and I accidentally cut all my facial hair off. And that, my friends, is the secret origin of “Clean-Shaven Eric”.

How to make a deer butt

In a previous post, we saw a deer butt which Natalie had built several years ago make a reappearance in a current production of A Lie of the Mind. I asked her to share how she constructed it.

Drawing and deer hoof

She began with research and preparation. Without that, you can easily waste your time building something which is not quite right. She found a taxidermist who agreed to let her come to his shop and show her some techniques. She was able to make a series of detailed drawings to work from; she also scored the back half of a deer hide (as well as the foot pictured above). As you can imagine, with all the deer heads you see mounted in hunting lodges and man caves, there’s bound to be some left over rear parts.

Layup of solid wood pieces

She decided to construct it out of a solid chunk of wood for strength, durability, and realistic weight. With her drawings, she cut the wood into their rough shapes before gluing them up layer by layer.

Cutting away at the wood

Once the form had dried together, she began rounding down all the edges to blend it into a  seamless piece. She also carved in musculature for added realism; since it would be covered with a hide, she exaggerated the lines so they would still show through the thickness of the material.

Completed wooden deer form

With the form completed, she tested it for strength. The legs are fairly skinny, so she added a bit of metal rods in the thinnest areas for reinforcement.

Painting the exposed parts of the deer

Natalie painted the hoofs and mangled parts because they would not be covered by fur. Again, the research and reference materials showed her exactly what it should look like. She had also spoke with the taxidermist about what colors would be showing on the exposed innards.

Attaching the deer hide

She began attaching the hide to the form using Barge. The hide came split down the bottom center so it was a flat piece. That meant it had a seam along the bottom and down each leg, which she had to treat carefully to keep it from becoming too prominent or noticeable.

Completed deer butt
Completed deer butt

With enough practice, you too can produce props as deer as this!