All posts by Eric Hart

How to Draw a Pentagon with a Compass

A pentagon is a five-sided shape where the sides are equal in length. It can be a useful shape in prop making; it can also serve as the basis for a five-sided star. It may be difficult to lay out with standard drafting tools, but with the method below, you can draw one with just a compass and a straight-edge.

Start off with a circle of a size that will perfectly fit your pentagon; that is, each corner of your pentagon will touch the outside of your circle.

Figure 1
Figure 1

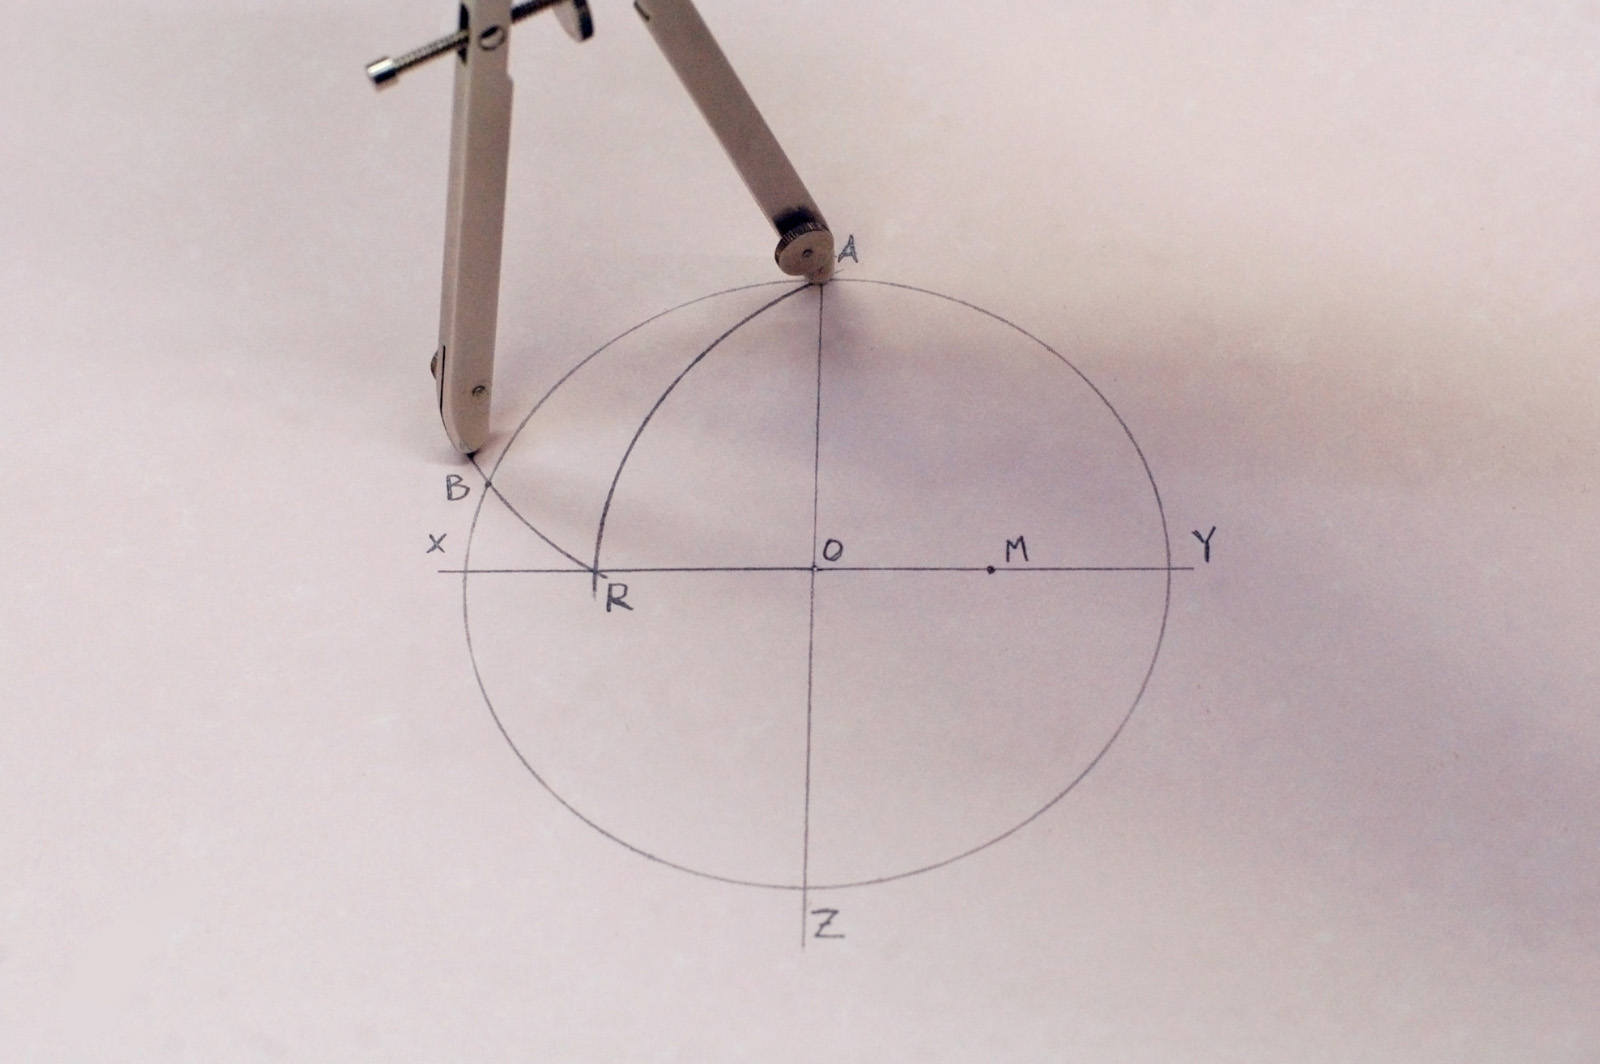
In my circle, I have drawn two perpendicular lines which run through the center point O. Where they cross the circle, I have labeled A, X, Y and Z (A will be the top point of the pentagon, so place it accordingly).

I have bisected line OY to find point M; that is, M is exactly halfway between O and Y.

Figure 2
Figure 2

Put the point of the compass on M and extend it so the pencil touches A. Draw an arc that crosses line XO; we will call this intersection “R”.

Figure 3
Figure 3

Move the point of the compass onto A and extend it so the pencil now touches R. The radius of your compass is now equal to the length of the sides of your pentagram. When you draw an arc from R to your circle, you will find point “B”.

Figure 4
Figure 4

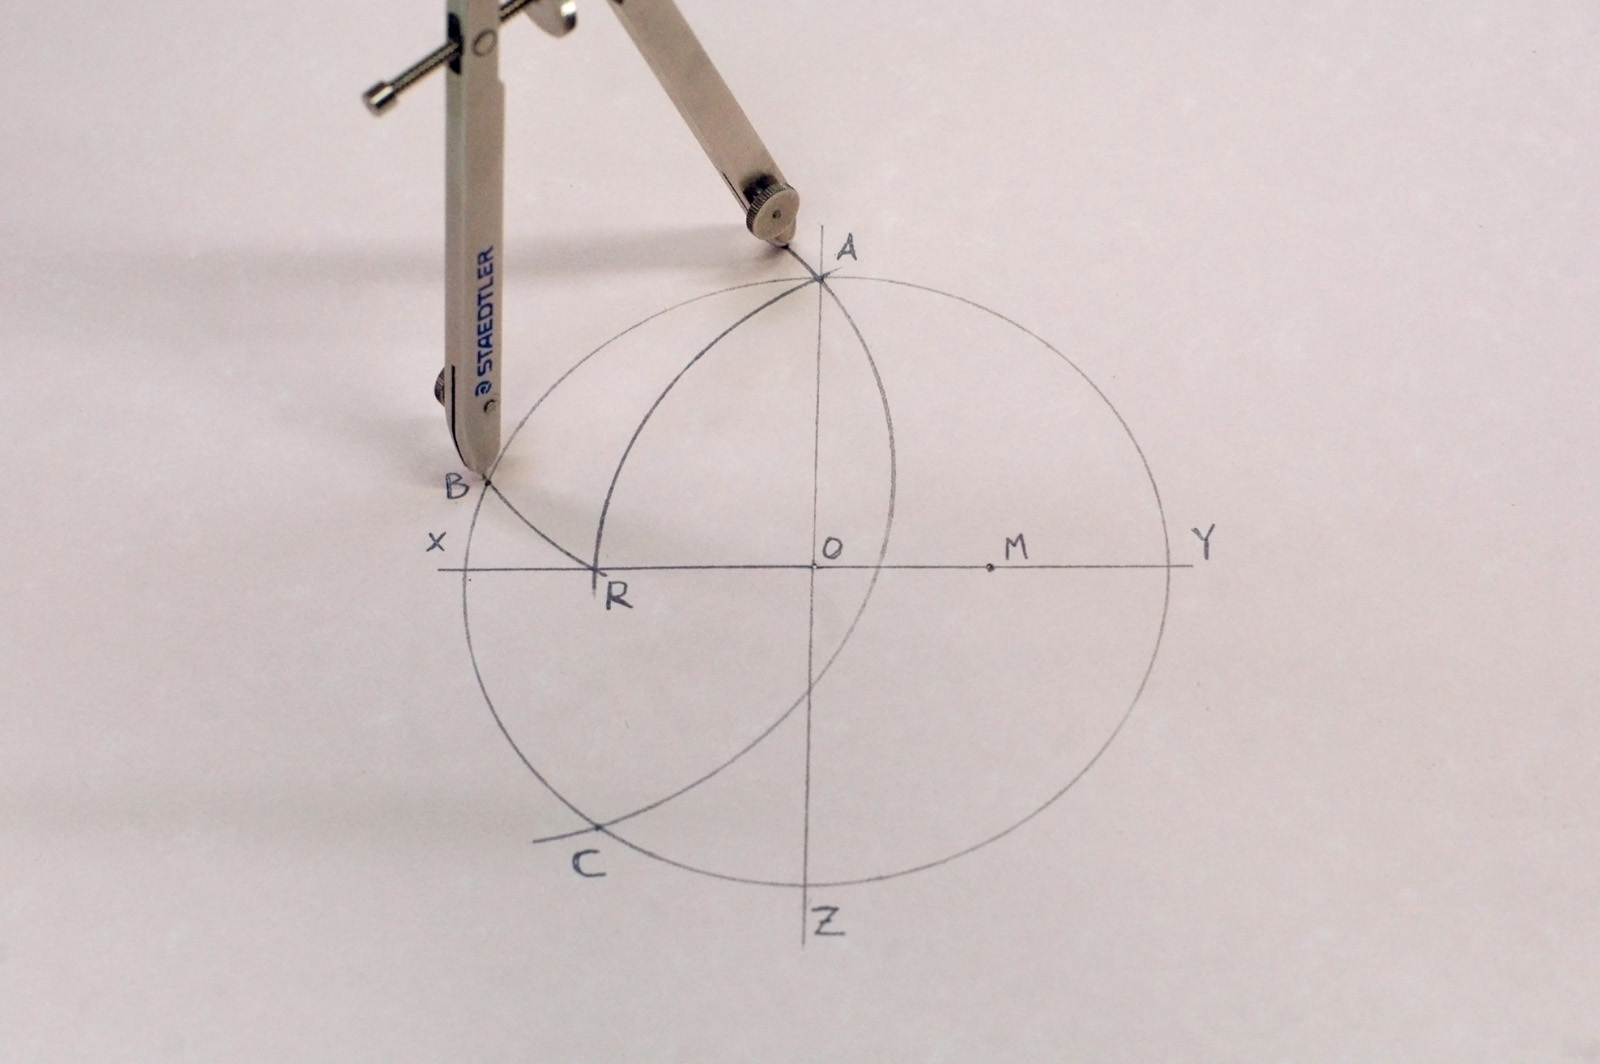
When you move the compass to pivot on B and draw an arc, it will cross the circle at two points: A and a new point “C”.

Figure 5
Figure 5

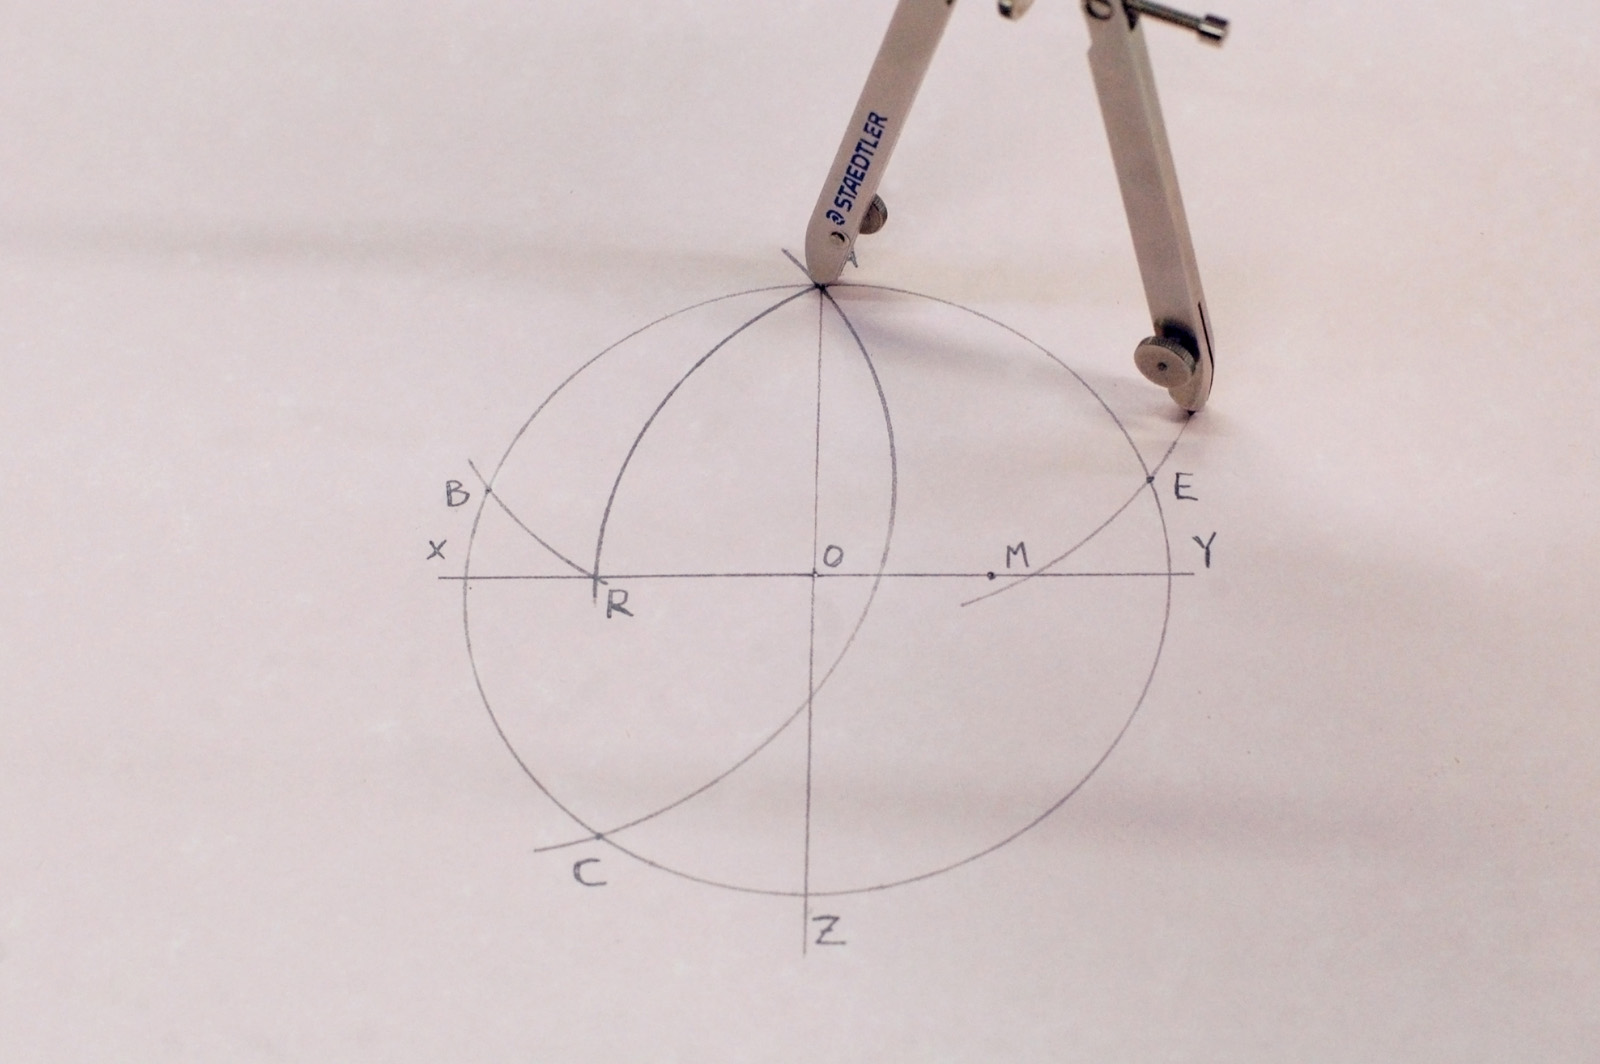
Returning your compass to A, draw an arc that crosses the right side of the circle to find “E”.

Figure 6
Figure 6

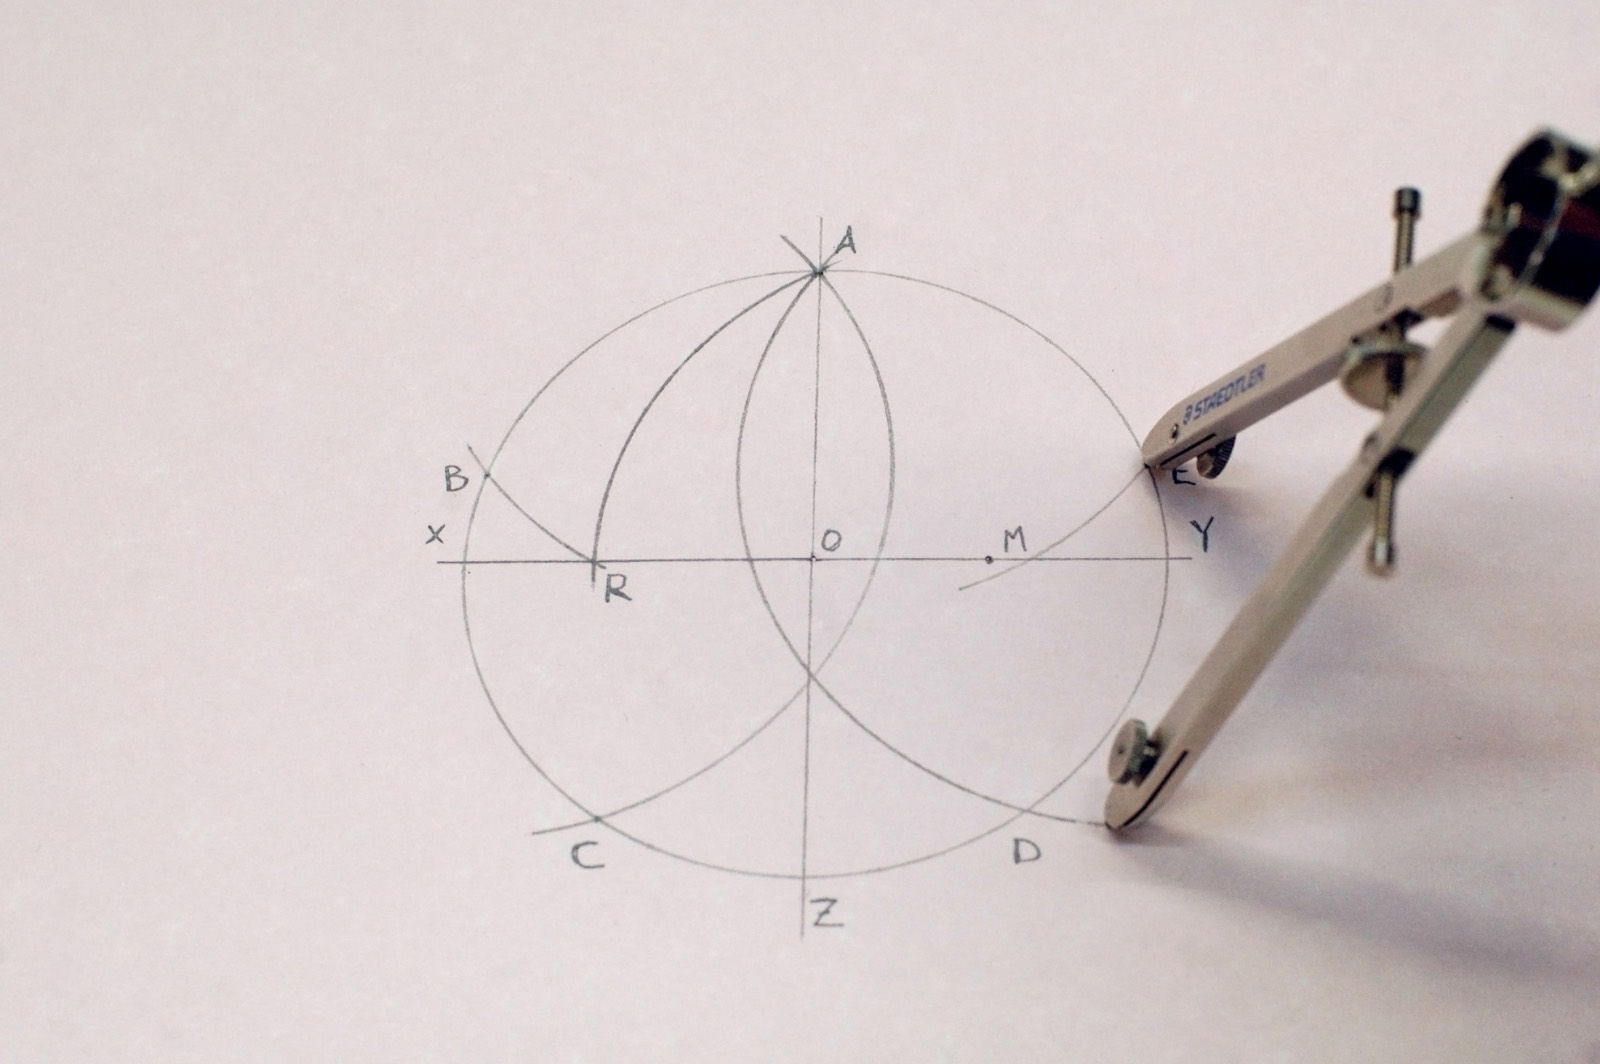
Move the compass to E and draw an arc to find “D”. In the picture above, I drew the arc so it crossed the circle twice, at point D and again at point A. You don’t need to actually do that.

To check that your pentagon has five equal sides, you can put the point of your compass on D. The pencil should touch C.

Figure 7
Figure 7

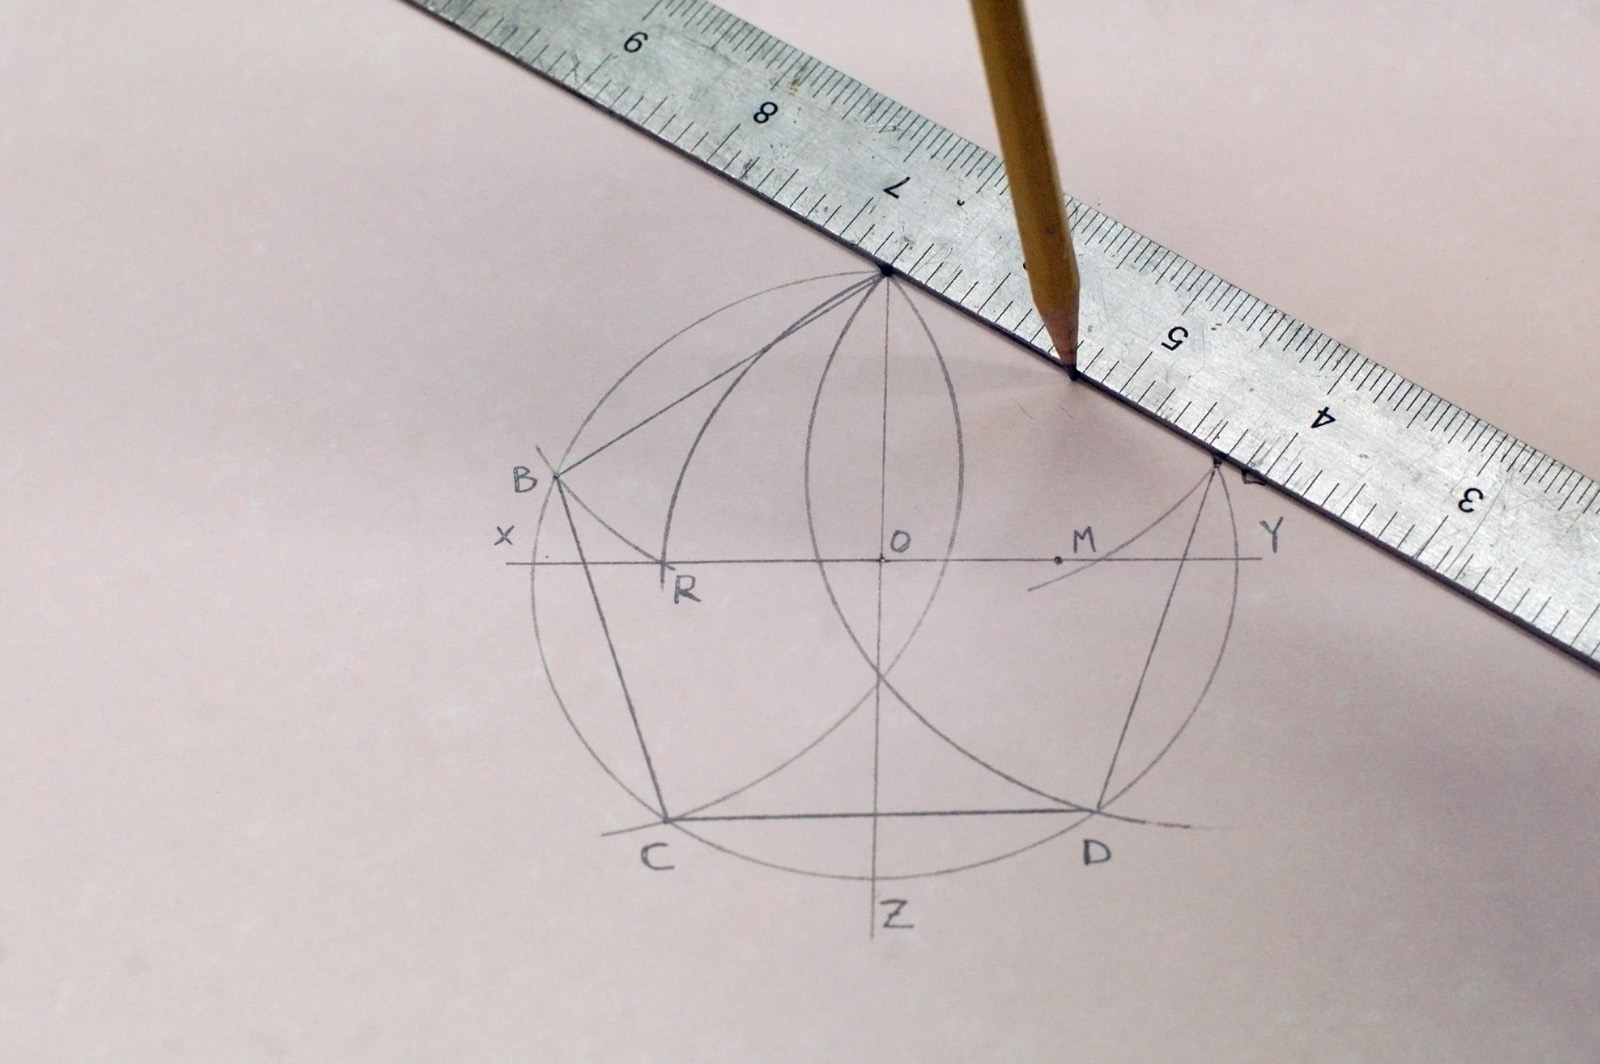
A, B, C, D and E are the corners of your pentagon. All that is left to do is connect them with a straight-edge. Presto! Perfect pentagons!


Prop Building Contest

I just got back from this year’s SETC Conference in Louisville, KY. Focal Press had a nice display for The Prop Building Guidebook: For Theatre, Film, and TV, which will (hopefully) become available at some point today. As you can see from the photograph below, there is another exciting announcement:

Book display at SETC

That’s right, a contest! You can send in a photo or video of  a prop you make and win a pretty cool collection of prizes, including my book, some more Focal Press books, and some prop-making supplies and materials. The contest page has more details on the prizes and how to enter; there are separate categories for students and professionals, as well as a category for group entries, since we often build props in collaboration with others. The contest runs until April 30th, so you have some time to prepare your entry, but don’t wait too long!

In other news, I will be at USITT (March 20-23 in Milwaukee, WI). Stage Directions magazine is hosting a book signing at their booth (#100) on Friday, March 22nd, at 12:30 pm. You will be able to purchase the book there if you do not already have one. You can also check out the latest issue of Stage Directions magazine, which has an article on the Milwaukee Rep props shop by yours truly. A press release about the signing will be going out later today, but I thought I would let everyone know now, since schedules at USITT tend to fill up fast.


Piano for Wild Party

Every musical needs a piano, right? Of course, if you have a piano on stage and people are dancing, you’re going to want the people to dance on the piano as well. Such is the prop master’s life. I had to build a dance-able piano for Elon University’s production of The Wild Party, which closed a few weeks ago.

Appropriated Piano Parts

As it turns out, my father has taken apart a piano or two and kept the pieces in his barn. When I was visiting over Christmas, I picked up some of these parts, including the keyboard lid and a partial keyboard. While I probably could have faked the keys, the lid was a real find; it’s two pieces of solid oak cupped along the entire length. This shape would be hard to fake on my own, and it would be nowhere near as sturdy as the piece I found, which could support a person’s weight in the center without bending.

Shape and Structure
Shape and Structure

It needed to be strong and sturdy, but lightweight enough that it could be quickly turned and moved throughout the musical by the actors. The photograph above shows the beginning stages. I had to make the shape also serve as the structure, because there was not a lot of room to hide cross bracing or reinforcements.

Unpainted Piano
Unpainted Piano

The two-by-four in the center of the piano hides a pipe that leads down into the platform itself. This gave a pivot point to the piano so when the actors spun it around on the wagon, it would rotate on a fixed point.

Painted Piano
Painted Piano

The piano received a coat of black paint followed by a few coats of Sculptural Arts’ Plastic Varnish Gloss (one of my wife’s favorite products). You can see in the photo above that I added more facing to the front legs to make them appear like more traditional piano legs. On a real piano, these would be cut from solid wood, but on my prop piano, they are pieces of quarter-inch plywood and wiggle wood over top a leg made from two two-by-fours.

Wild, Wild Party
Wild, Wild Party

There are six people dancing on the piano in the photograph above. It featured throughout the musical, with people dancing on top, jumping up and off of it, and generally subjecting it to all sorts of abuse. I’m happy to say it sat there like a rock, never sagging or shaking no matter how hard they tapped or how much shimmy was in their shake.


A Papier Mache Chair from 1854

The following comes from “The Illustrated Magazine of Art”, Volume 4, Number 24, page 344, published in 1854. I thought the process they described was interesting. First, it is the first time I’ve heard of using metal molds for papier maché; second, they let each layer dry fully before applying the next (I learned to lay up each layer while the previous is still damp).

The polished French claim the honour of being the original inventors of the papier maché. In Paris the manufacture of the article is carried on very extensively; but far beyond the articles produced there—articles both of utility and ornament—stand those of the Birmingham manufacturers.

The old method of manufacturing papier maché is as follows:

—The paper for use is gray in colour, but similar in texture to ordinary blotting paper. Prior to using it, the paper is well saturated with flour and glue mixed with water, in about equal proportions, and is then laid on the mould of the article intended to be produced. These moulds are of iron, brass, or copper. The mould, coated with the first layer of paper, is then dried for twelve hours. A careful smoothing by a file follows, after which another deposit of paper is made. The processes of drying and smoothing are successively repeated with each additional layer of paper, until the article assumes the required strength and thickness. When the newly-formed article is taken from the mould, the several parts are planed, filed, and trimmed, so as to be quite correct and level. The process of stoving then follows; after which the varnish is laid on, and brought to a smooth, hard, brilliant surface. The article is then coated with several layers of shell-lac varnish, coloured, which, after being hardened, are scraped quite level. The different varnishings and smoothings are carried on for a period varying from twelve to eighteen days, according to the purpose for which the article is required. The exquisite surface is produced by manual polishing with rotten stone and oil; but the finish is obtained by the process of handling alone.

Various alterations and improvements have been made from time to time in the manufacture of papier maché; and sometimes the paper is reduced to pulp, cast to the form required, and then rendered compact and solid.

The specimen which we present is of a chair in papier maché; the grace and elegance of the design deserve especial attention.

Papier Mache Chair
Papier Mache Chair

Papier Mache Chair. The Illustrated Magazine of Art, Vol. 4, No. 24 (1854), p. 344

March Goes in Like a Link

It’s the end of the week, but the beginning of a new month. This is conference month for those of us in technical theatre. First is SETC, happening next week (March 5-9) in Louisville, KY. Shortly after is USITT, taking place March 19-23 in Milwaukee, WI. I will be at both if you wanted a chance to catch up or introduce yourself. At USITT, Stage Directions will be hosting a book signing for my book at their booth on Friday, March 22nd, at 12:30 PM. More info to come. For now, enjoy these links:

My latest magazine article in Stage Directions is now online; I profile the Milwaukee Rep props shop, home of props master Jim Guy. Milwaukee also happens to be the location of this year’s USITT conference. Coincidence?… actually, no, we chose to write about Milwaukee Rep for this issue precisely because of USITT.

The designer of the Dalek from Doctor Who, Ray Cusick, died this past week. The Verge has some videos and a story about him and how the Daleks came to be.

When the Vancouver Playhouse Theatre shut its doors in March 2012, its production facilities and prop storage were abandoned and surrendered to the landlords who owned the building. Jim Buckshon was subleasing part of that building at the time for his company, Renegade Productions, and decided to lease the entire building and save the props. Read the whole story to see how Buckshon took on one of Vancouver’s largest prop collections and kept it intact for future productions.

Weta Workshop — the design/production/creature/FX shop behind films such as The Lord of the Rings, King Kong and Avatar — recently solicited questions for their Mold Shop Supervisor, Michael Wallace.  Mike answers those questions about working in a mold shop, materials and techniques he uses, and his own background.

AJ Catalano is a sci-fi prop maker who has built items for films ranging from The Avengers and The Amazing Spiderman, to The Muppets. Check out this video where he talks about his background and the work he does: