Category Archives: How-to

Guides to building props or using certain techniques and materials

Chairs for Tea

Back in 2007 when I was working at the Santa Fe Opera, we were mounting a new opera called Tea: A Mirror of Soul. It had a heavy Asian influence, with scenes taking place both in Japan and in China. I was given a drawing of a chair, which they needed nine copies of.

drafting of a prop chair

If you study the drawing, you’d notice a few things. First, it’s rather small. Normally, a chair is eighteen inches off the ground; this is only twelve. Second, the back stiles for the circular back are offset from the back legs (if you don’t know what a stile is, check out my “parts of a chair” diagram).  Wooden chairs usually have a single piece of wood running from top to bottom in the back for strength. Where the back meets the seat is the point where a lot of stress is placed on the chair, so relying on the strength of a joint rather than a solid length of wood is inviting trouble. Finally, you may notice that the back has pieces floating in the air. That’s always an engineering challenge.

attaching the back stiles

The seat of the chair was two and a quarter inches thick. I decided to skin the top with a piece of quarter-inch plywood and the bottom with eighth-inch lauan, so the interior frame had to be one and seven-eighths inches thick. That gave me a nice big chunk in the back to attach my back stiles to. I also added some bolts through the joint for extra reinforcement.

Bottom of the chair
Bottom of the chair

The rest of the joints were glued and doweled.

Next came the fun part: the back. We (the props master, master carpenter, and I) needed to figure out a way to make the back pieces appear to be floating. As I mentioned above, I was making nine of these chairs, so the process had to be repeatable as well. The master carpenter was also making a throne with this same cut-out design in it, so he began developing a jig so we could rout the design out of a solid piece of wood. We had discussed using plexiglass in the middle so the pieces would actually look like they were floating, but that would not be strong enough. Instead, we would hide a steel frame inside and have small pieces of steel connecting the pieces. Between the distance of the audience, the sightlines, and the smallness of the gaps, a few pieces of quarter-inch rod steel painted black would be as close to invisible as we could make it.

Dave making a routing jig

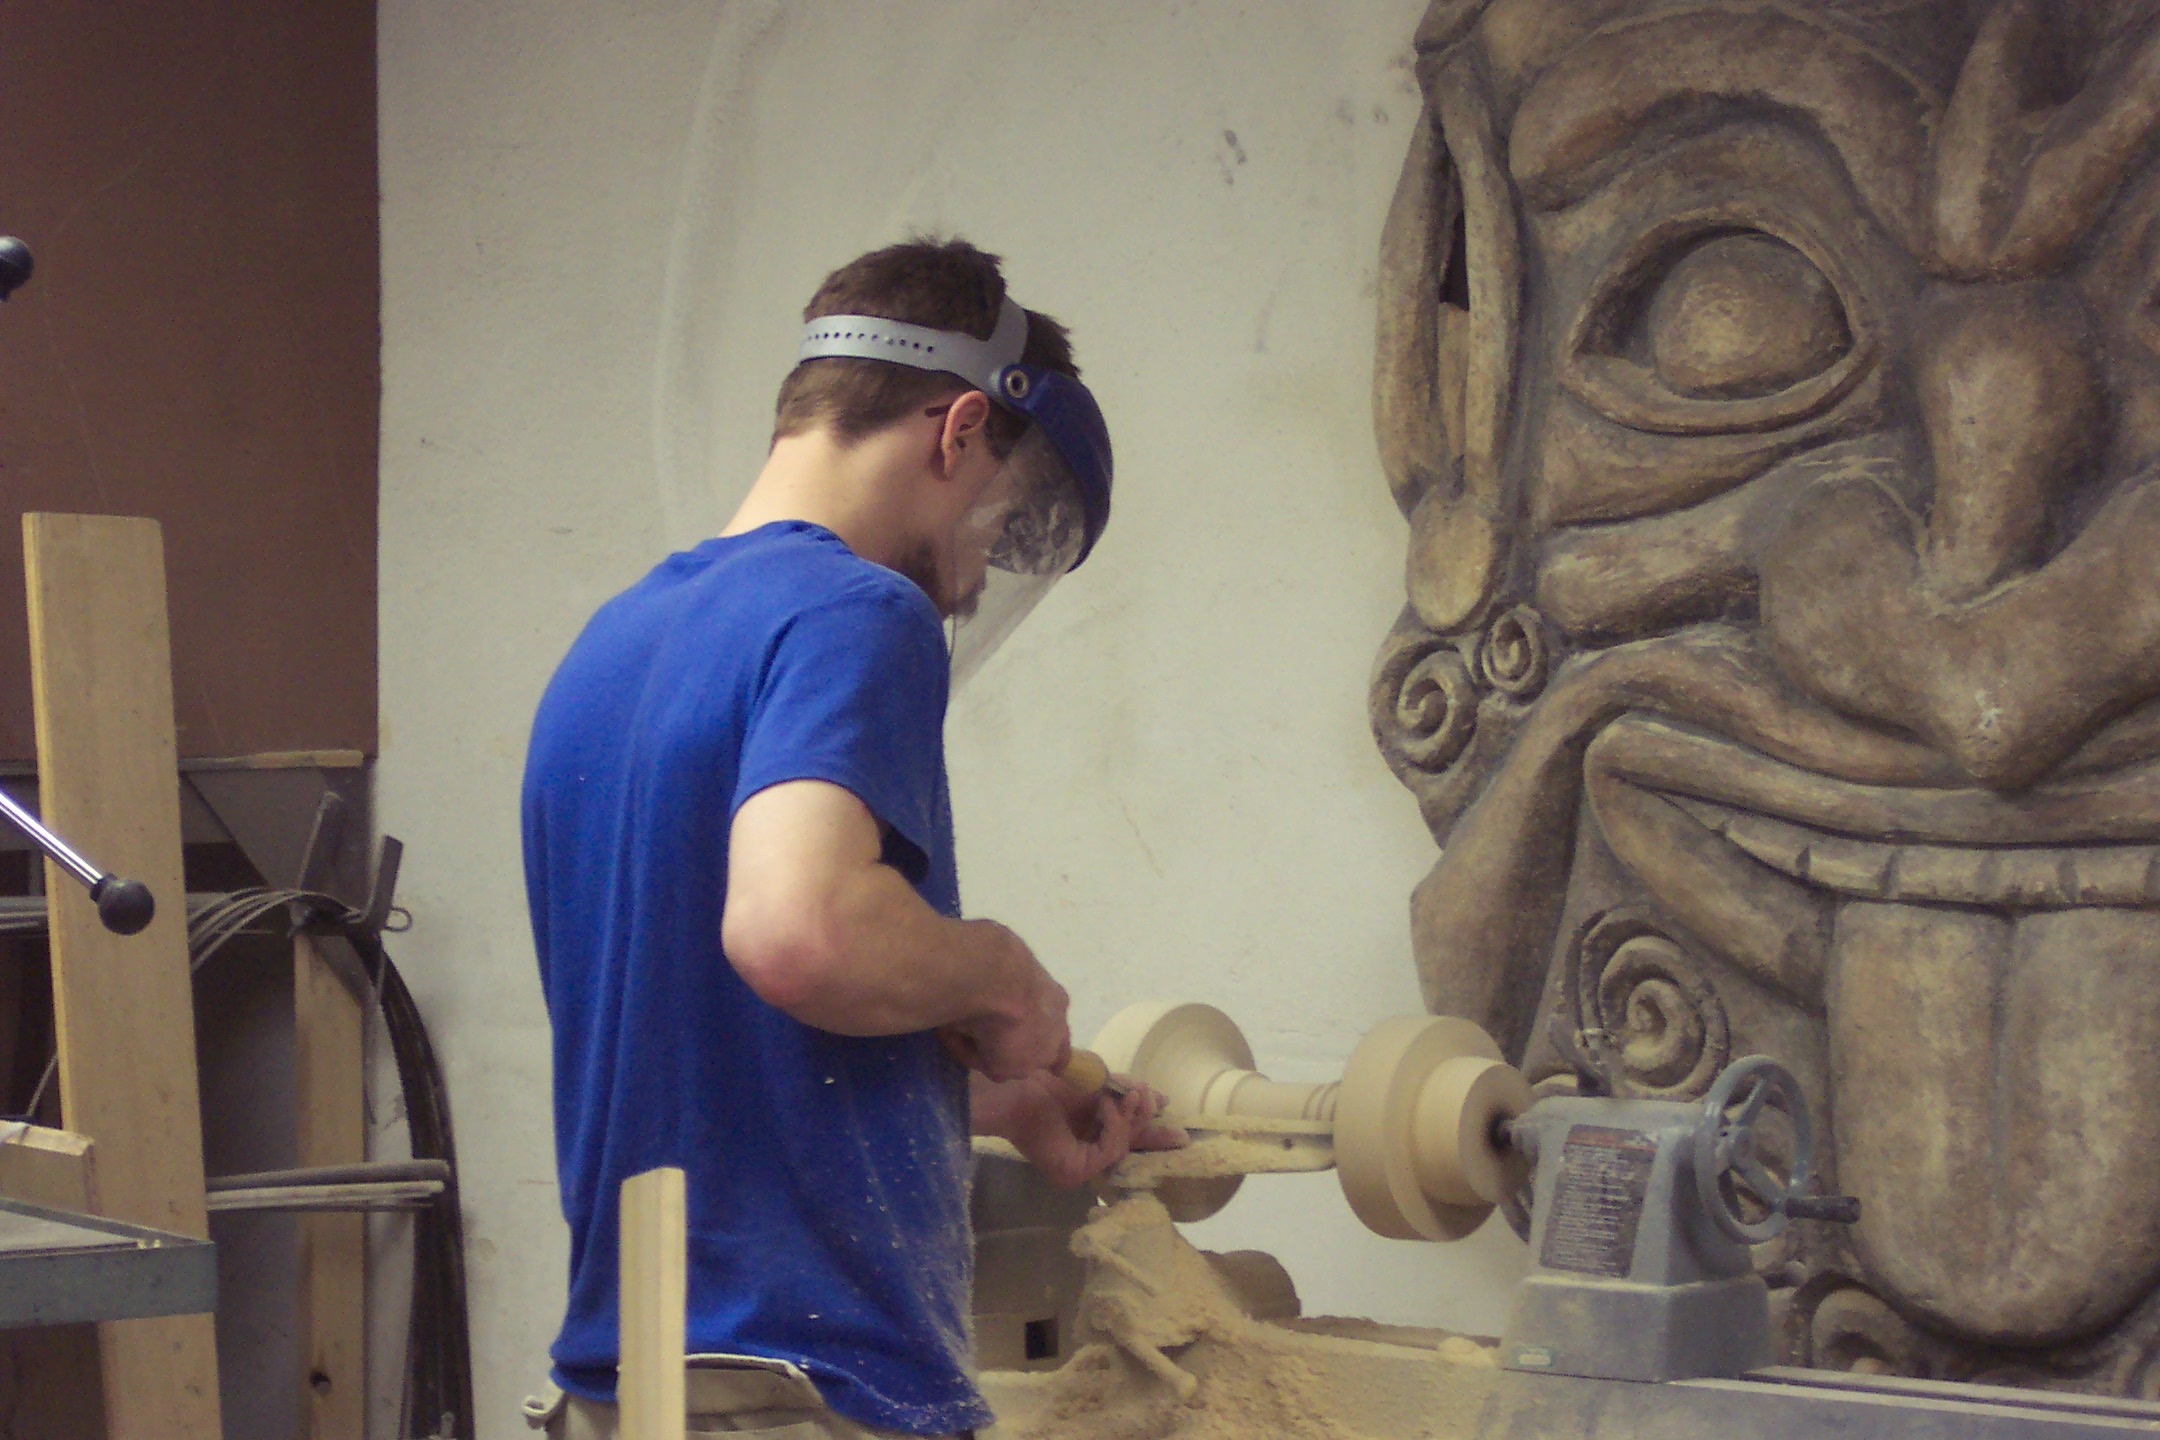
The photograph above shows David Levine, the master carpenter, working out the jig. Note that he’s not actually cutting yet, which is why his dust mask and goggles are off. It was a complicated, multi-piece jig with several steps involved, but the results were beautiful and consistent.

For the back ring, I sandwiched poplar boards on either side of a piece of quarter-inch plywood, with the grain of each side running perpendicularly to the other. In other words, I made a giant Oreo cookie out of poplar, with a creamy plywood center. The interior back pieces were cut out of a solid piece of poplar,  made by gluing several boards together. I put this in the jig and cut my design out.

steel reinforcement in the back

Before I had cut out the back pieces, I had routed the channels in where I would hide the steel rod. The channels were as deep as the diameter of the rod, so once they were in, the whole back could get a coat of Bondo and be sanded smooth, and no one would be the wiser. The steel rod continued sown into the stiles and up into the “horn” at the top so the whole back could be tied together with the same steel structure.

I cut the top horn piece out of a solid chunk of poplar, which I made by laminating two boards with their grains running in different directions.

finished chair for Tea

Looking back, even as I write this article, I see a number of things I would do differently, or at least experiment with to see the results. As with any complicated prop, you learn a lot just by building it, but because you will never build the exact same prop again, it can be hard to assimilate that learning into your overall experience. As it turned out with this prop, I had only finished three of the nine chairs by the time they were cut from the show. It seems the stage was getting too cluttered, and the chairs were one of the more extraneous elements, so away they went.

That meant I got to keep two of the chairs, which let me test just how long my construction would actually hold up. The back on one of them did eventually break away from the seat, though not where I thought it would. I contemplated building more of a steel structure, but worried that the extra weight would either make it too heavy to carry, or even make it more likely to break; picture using a crowbar versus a stick of wood. The crowbar is extremely good at separating two pieces of wood from each other, where a stick of wood is just as likely to break itself before pulling the wood apart. Now look at a chair. The point where the back meets the seat is the focal point of a lever formed by somebody leaning back in the chair. If the stiles were metal (like a crowbar), it might tear the seat apart if you leaned back too hard.

But I digress and ruminate too much. Enjoy the pictures of the chair.

Scenic Dope and Monster Mud

Scenic dope is a general term for a number of materials used for a number of techniques. In the late 19th and early 20th centuries, a ceiling paint known as calcimine was popular. It was essentially whiting mixed with animal glue and a bit of water. Whiting is powdered and washed white chalk, aka calcium carbonate. Set builders used it to prime flats for painting, or a thicker form to adhere muslin to flats. Along the way, it evolved into recipes and formulations which could be used for all sorts of texturing.

If you add linseed oil to whiting, you can make a simple caulk. If you mix whiting with casein (milk protein used as a binder in casein paint) and water (and borax if you want anti-fungal qualities) you can also make a simple joint compound. With the introduction of latex paint (really, acrylic paint, as it contains no actual latex), we now have the modern equivalents for the building blocks of scenic dope.

As it is a material which undergoes frequent experimentation and improvisation, no set recipe exists. A good place to begin your own experimenting is with a gallon of latex paint, 2–5 tubes of painter’s latex caulk, and 1–2 cups of joint compound. The thinner recipes (more paint, less caulk and joint compound) make good coatings for foam, while the thicker recipes (some push the ratio to equal parts paint and joint compound) can hold some heavy texture as it dries, almost to the point of being sculpt-able.

Note that the recipe calls for latex caulk and not silicone caulk. Silicone caulk is more common and easier to find in hardware and home improvement stores, but silicone does not bond with anything, which makes it impossible to mix into a recipe.

For a more flexible recipe, you can mix joint compound with glue (animal, or PVA). This is especially helpful when you are coating surfaces that have a bit of “give”. The harder dope recipes may crack under strain, whereas this one will bend.

You can add any number of additives to your recipe. Water putty and plaster allows it to dry harder but more brittle. Paper pulp really thickens the mix, and it can become almost like a thin clay, which is great for sculpting bark or rough stone on your surfaces. Sand can be added for a, well, sandy surface. Really, if you want a chunky texture, you can add almost anything chunky that you have laying around. In addition to mixing materials like sand into the mix, you can also sprinkle or dust it onto the surface while the dope is still wet. This will give it a coating, or crust, that you may find to your liking.

Theatrical suppliers make any number of products which mimic scenic dope, each with slightly different properties, but formulated to give consistent results. Rosco’s Foamcoat and Sculptural Arts’ Sculpt or Coat are just a few.

Because the recipe consists of latex paint and joint compound, both of which are water soluble, the resulting surface needs to be water-proofed if it will be outside or around moisture.

The properties of dope are similar to the wheatpaste used in papier-mache, and it is frequently used in conjunction with fabric. Strips of fabric are coated with dope and lain over a surface to create textures.

“Monster mud” is a term which began to appear in the late twentieth century to describe a mixture used frequently in the haunted house industry. You mix five gallons of joint compound with one gallon of latex paint. You can then submerge cloth—a large weave like burlap works best, though clothing or other fabric works as well—into the mixture, squeeze the excess mud out, and shape it. You may also spread the mud on straight to add texture. It may take up to several days to dry, but it becomes rock-hard (though not water-proof). It’s a clever way to mimic sculpted fabric, though any kind of flowing surface lends itself to this technique.

Art Deco Footlights

A footlight
A footlight

I recently finished up a number of footlights for a company called Punchdrunk for their upcoming New York production of Sleep No More. Their Boston production used traditional shell-shaped footlights; for this update, the stage had a giant art deco backdrop whose shape would be mirrored in the footlights.

They provided me with a full-scale drawing of the piece with all the angles already figured out. I traced the patterns onto sheets of aluminum. I kept the top edge along the factory edge of the aluminum sheets; with that edge being front and center, I wanted it to be the straightest and cleanest part of the footlight. The first light I cut out using my pair of tin snips. It gave me a clean edge but took forever. I cut the next one out on the bandsaw. It was a lot faster but was harder to keep nice-looking. I ended up using both of the tools to cut, with the bandsaw cutting out the rough shape and making the easy cuts, and the tin snips cleaning up the edges and cutting the trickier parts.

Once cut, the edges needed a lot of sanding and deburring to get them nice and straight and not razor-sharp. I polished them to get them a little shinier as well.

Tracing the template

I was now ready to begin making the bends. I’ve bent sheet metal before using a hammer and some clamps, but I needed a much cleaner and more precise way to make these bends, especially since I was producing sixteen identical footlights. I needed a sheet metal brake. Not having one, I decided to make my own. I looked at a number of tutorials and plans online, and found Dave’s Sheet Metal Bending Brake to be the clearest and most useful description; he’s just a working-class guy trying to build an airplane.

The next two photos show the brake making a fold. First, I had made a mark on a piece of scrap metal and lined it up in the brake to make a bend; this showed me where to line up the marks on the brake in order to place the fold where I needed it to go. Once I was confident with the workings of the brake, it was just a matter of making all 128 folds, one at a time.

Metal in the brake
Metal in the brake
Making the fold
Making the fold

I cut and attached MDF bases to the lights to give them a way to attach to the stage, and for the birdie lights to attach to them as well.

Attaching the bases
Attaching the bases

I then put masking tape along the borders of each panel. This quarter-inch area was to remain metallic while the rest was painted gloss black.

Taping the paintlines

With the masking in place, all that was left to do was a couple of light coats of gloss black spray paint to build up a nice shiny and even surface.

16 footlights
16 footlights

Coffee Table

A few weeks ago, I built myself a new coffee table. It’s not a prop, but I thought I’d show some pictures anyway. We had a set of IKEA shelves in last fall’s production of In the Wake; one of the shelves was just the right size for the top of the coffee table. I gathered the rest of the materials from scraps of lumber that had been sitting around the prop shop for a long time. I kept the design simple; it was almost like a modified trestle table, with a single center stretcher, and the legs had a slight angle to them.

Front view of the table

All the wood I used was pine. While I like the grain pattern of pine, I can’t really stand light-colored wood, so I applied a coat of red mahogany stain to it. One of the things I rarely get to do when making props is put a nice finish to a carpentry project; usually we just slap a coat of polyurethane on and call it done. I decided to go with two coats of shellac. The denatured alcohol means it has some VOCs when you are working with it, but when that is fully evaporated, you are left with just the resin from the lac beetle, giving you a natural finish which is both food-safe and hypoallergenic. You can build up a really nice and hard finish by applying several thin coats with sanding in between. One of the other things that makes it great is that each coat dries in about an hour, as opposed to the 24 hours it takes for a coat of Tung Oil to dry. I applied one coat, sanded it with 220 grit sandpaper, added a second coat, and sanded that with 400 grit paper. The finish protects the stain from coming off the wood and moisture from going into the wood. It leaves the wood slick and smooth without really obscuring its natural appearance (or making it look like a shiny piece of plastic like some horrific finishes you see).

Because I built this in the prop shop, I needed to bring it home when I was all finished. Being in New York City without a car means I had to bring it on the subway.  With that in mind, I had built it so it could be broken down into four pieces which just needed to be screwed together. Basically, I had made my own “flat-pack” furniture. I shrink-wrapped the pieces up and carried it home with ease.

Wrapped up for transport

I even labeled the joints so I knew which way the pieces went when it came time to reassemble it.

Unpacked
Unpacked

Obviously, my cats were very interested in this new arrival. Biscuit especially seemed to approve of it.

Finished coffee table

Chandelier from Romeo and Juliet

As part of the new year, I’m going to be digging through my archives of props I’ve built in previous years. The first one is a chandelier I built for Romeo and Juliet. It was one of my first prop projects in graduate school, and the first prop I built which involved welding.

The first part I made was the body dish. I turned it on the lathe out of poplar. The outside needed to be a specific diameter, as we shall see shortly. I also drilled a hole through the center for the hanging hardware and wires to go through.

Turning the body dish
Body Dish
Body Dish

Next I cut a circle out of 3/4″ plywood to use as a template for the main ring. I made that out of several strips of what we call “wiggle wood”, which is a bendable plywood. I wrapped one layer around the circle, then glued another layer around the first one, with the seams offset so they would hold the circular shape. I added a thinner strip to the top and bottom to mimic molding.

The chandelier in the jig

I left the chandelier in the jig and marked the center of the circle template. I then added a little stand with a smaller circle on top, also centered. I placed the body dish on top of that. This ensured that the body dish was centered within the ring, level, and at the correct height above the ring.

See that metal ring in the above picture? That is why I needed my body dish to be a specific diameter; the ring needs to sleeve on the outside of it. I cut the ring from a section of large pipe that was laying around. On the right side of the picture, you can see some metal brackets bunched together. These will be spread evenly around the wiggle wood ring and hold the cups for the candles. They will then have a metal rod welded to them, with the other end welded to the metal ring on the body dish.

The chandelier after the welding is done

Ta-da! I next ran wires out the bottom of the cups, along the rods, and up through the center. The only thing left to do was glue the electric candles into the cups, which you can only do with a bushy beard.

Gluing the candles in

Actually, what I meant to say was that the only thing left to do was hang a big disco ball from the center, because every chandelier needs a disco ball.

Final Chandelier
Final Chandelier

Notice in the picture that I made more than one chandelier. The template and jig not only allowed me to get all the shapes and spacings correct, it also enabled me to duplicate the same prop without having to remeasure everything.