Tag Archives: build

A Grand Wedding Cake for Cloud 9

We just closed and struck Cloud 9 here at Elon University. I was the prop master on the show and built a lot of the pieces. One of the fun (and funny) props I constructed was a grand Victorian-era wedding cake. It was meant to be a bit over-the-top, with a grand appearance at the end of Act One when the hastily-arranged wedding occurs. Part of the visual humor came from the cake toppers; the scenic designer (Natalie Taylor Hart) wanted the groom to be a detailed representation of a man striding atop of a Royal Orb, while the bride would be a much smaller and crudely-made figurine stuck in the cake as an afterthought (the play, for those unfamiliar, deals with gender politics in various degrees).

Sculpting the Cake Topper

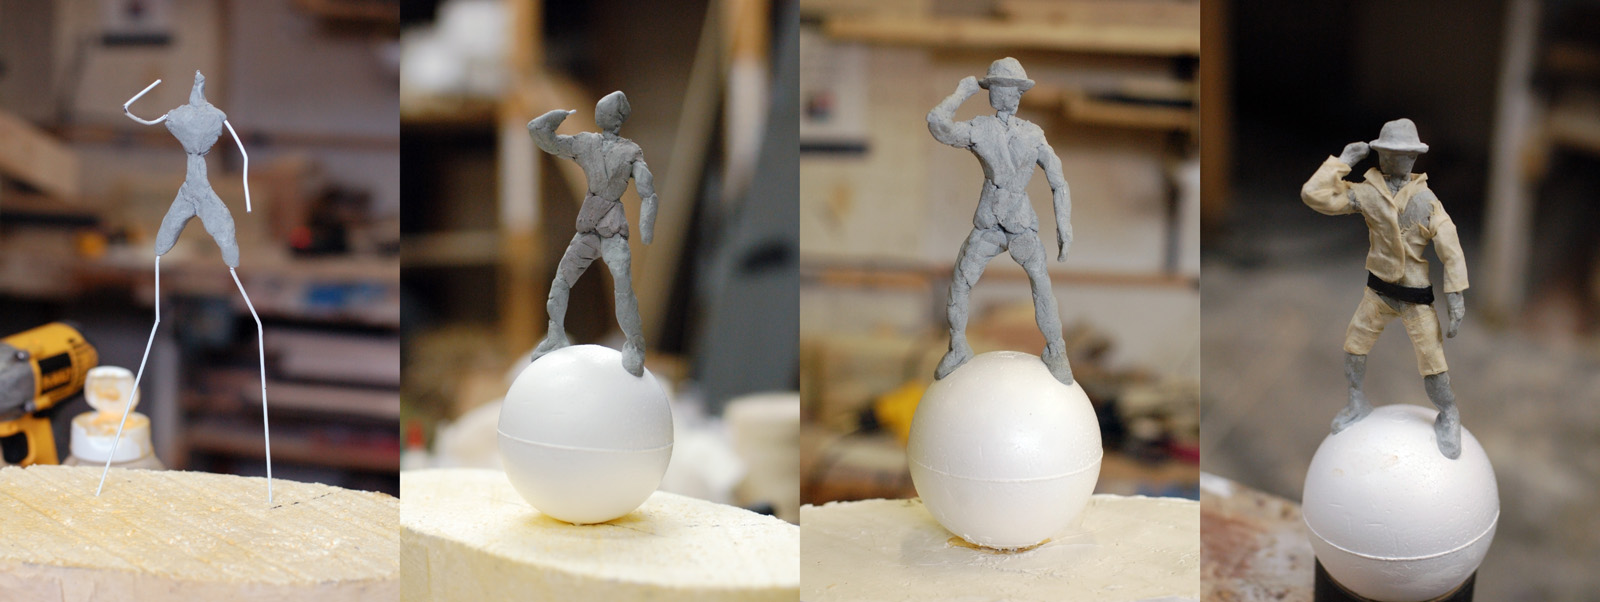
To make a sculpted figurine of the groom, I started off with bending a wire armature into the pose I wanted. This also let me establish the proportions of the limbs. It wasn’t anything fancy; I cut up a wire hanger and held it in place with plumber’s putty. Plumber’s putty is a type of epoxy putty which is soft and shape-able when you first mix it together, and becomes rock hard after a few minutes. I liked it on this project because I could build up the sculpture bit by bit, allowing the parts to become hard as I worked on other things. I could return to the sculpture later and add more bits without worrying about smooshing the parts I already made. It also did not need to be fired or coated to finish it. The putty I used was left over from another show, so I did not have to spend any more money on a show with a tight budget.

In the last frame of the picture above, you can see I added some clothes. The putty is not very good for getting fine details; you can machine and carve it after it has hardened, but I wanted a quicker way to get some semi-realistic clothing texture on top. I took muslin and soaked it in glue and water, than manipulated it over top until it “draped” like a shirt and pants. After the glue dried, it retained its shape.

A Grand Wedding Cake

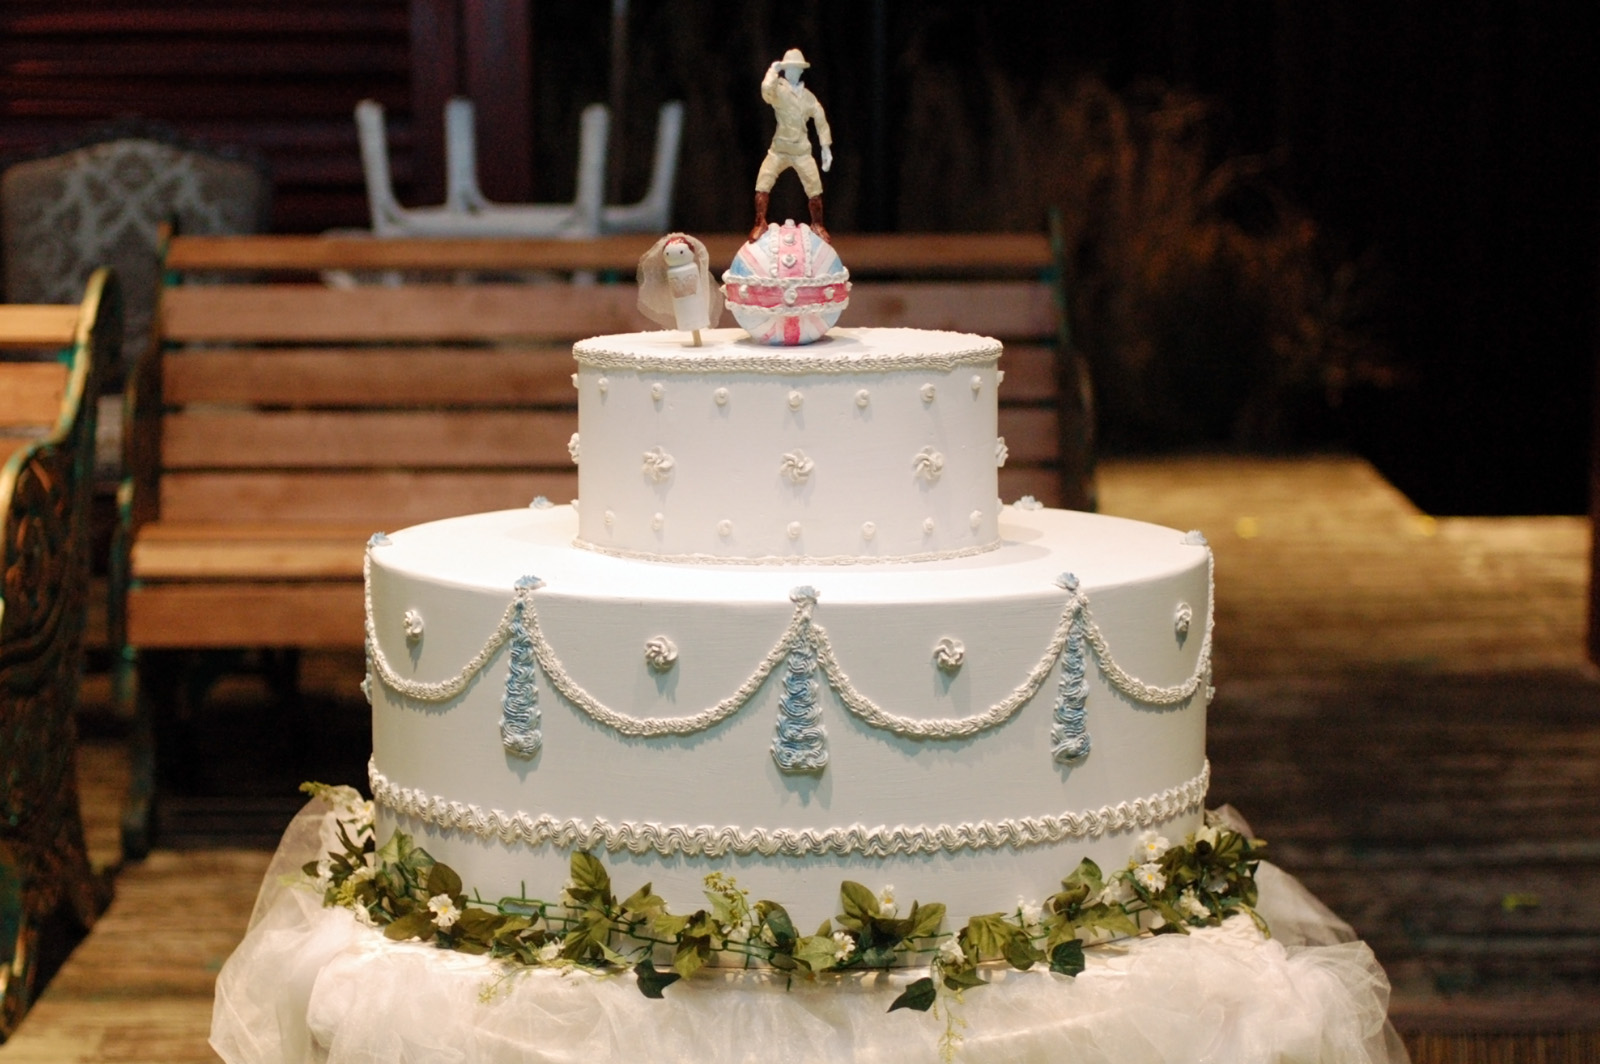
The rest of the cake was pretty straightforward. The bottom base is a strip of wiggle wood wrapped around plywood formers, while the top is a solid chunk of white bead foam coated in joint compound. I used painter’s caulk for the icing details. Normally you want to use acrylic caulk rather than silicone caulk, because silicone caulk does not take paint. However, I found some newer stuff which is a mix of acrylic and silicone; the acrylic makes it paint-able, while the silicone keeps it a bit flexible and lets it dry a lot faster. I bought a few decorative cake icing tips, and just attached them to the end of the caulk tube so it would come out all fancy.

Player Piano for Crazy for You

Another project I worked on for Crazy for You at Elon University was a player piano. The piano sits against the wall of the saloon for a number of scenes. It has a couple of gags; when we first see it, a cowboy is playing a song on it, then gets up and walks away as the piano continues to play. Later, another cowboy fires a gun which hits the piano and causes it to start playing on its own again until it is kicked.

We began by looking for a real piano which we could take apart and modify. After a few weeks of unsuccessful searching, I decided I would just build one. After all, it needed to be a custom size to fit into the set, so transporting and modifying a real piano might be just as labor-intensive. The exterior of a piano is not really that complicated; it’s mostly a giant box with various levels of molding and details. The tricky part was getting it to play on its own.

Detail of the piano keyboard

One of the perks of working at a university is that you have a lot of crew members backstage who can operate tricks by hand. I knew the player piano could be worked manually from behind, so I just needed to figure out how to make that work. I cut out a set of piano keys from 3/4″ MDF and drilled a hole through each one. I ran a piece of metal rod through all the holes; I added a washer between each piece of MDF as a spacer. You can just make out the washers in the photograph above, catching a glint of light. This method allowed the MDF “keys” to pivot around the rod. I set the “keyboard” in the piano and added  blocks underneath to limit their movement to that which a piano has. You will notice the holes were drilled offset from the center. The extra length in the back gave the back extra weight; when you let go of a key in the front, gravity would pull the back down, returning the key to its natural position. This simple mechanism would allow someone in front to play the keyboard normally, and someone in the back could make the piano appear to play on its own by pushing the keys up.

A view from the back

In the view from the back, you can hopefully get a better sense of what is going on. The keys can be accessed from behind; pushing them up causes the keys in front to move down, as if the piano is playing itself. When you let go of the keys in behind, they return to their normal position. The piano was pushed up against the wall, and a hole was cut in the flat, allowing a crew member to reach in and “play” the piano without being seen by the audience. The music itself was played live by the orchestra.

The finished, unpainted piano

The photograph above shows the piano immediately before it is painted. I managed to build the entire thing with scrap material, amazingly enough. The scene shop at Elon has a CNC machine, and it produces some wacky off-cuts. The scene shop usually doesn’t have time to trim the edges to make them square and usable again, but I do, so it gives me some nice large pieces of quality plywood and lauan.

The saloon in Crazy for You

The piano was painted to match a lot of the other woodwork used in the saloon scene. I cut some black keys out of black foam core and hot glued them on top of the white keys; they basically moved along with the white keys as they were played, but were not playable on their own. With the keys painted white and the piano painted with dark wood tones, it gave enough contrast that even the balcony seats could witness that the piano was playing on its own. All in all, it was a pretty fun prop for having been built in little over a day.

Six Foot Tall Microscope

I just finished building a six foot tall microscope which resulted in some nice photographs. I guess at six feet tall, it’s not really “micro” any more; it should just be called a “scope”.

Base structure
Structure of the interior of the base

A company with a microscope as its logo wanted a giant microscope to bring to trade shows. They wanted the silhouette of the prop to match their logo (which was simply a drawing of the side view) but with some details added to make it look more like a real microscope. One of the challenges was in designing a prop that looked like a real microscope but still resembled the outline of their logo when looked at from the side.

Continue reading Six Foot Tall Microscope

The Making of the Props for The Making of a King

I recently finished my first major gig down here in North Carolina. I was building props for the productions of Henry IV and Henry V at PlayMakers Repertory Company in Chapel Hill. It was a lot of fun, and also an interesting change of pace to return to a job where I am building all day without any managerial duties.

base of a chaise lounge

The base for this chaise lounge was fairly straightforward. I began by building a nice sturdy frame out of oak. The design evolved later to a piece which was completely covered in moulding. The oak ended up being completely obscured by all the moulding. Ah, well.

CNC routed headboard design

The king’s headboard had a fairly intricate cut-out design, so the props shop sent a piece of 3/4″ plywood to the scene shop to be CNC routed.

Completed headboard
Completed headboard

When I got the CNC’d piece back, I cleaned it up and attached some other layers, moulding, posts and finials to make the full headboard.

Trestle table base
Trestle table base

Above is a nice trestle table base I built for the tavern scene. The feet and the pieces on top of the legs are made of solid wood; I had to laminate a few pieces together to get those thicknesses. The legs themselves are actually boxed out, with a two-by-four hidden inside for strength. The wedged tenons on the sides of the legs are just fake pieces glued on the outside.

Finished table
Finished table

The table top had already been built for the rehearsal piece, so I just had to attach it. The scene shop also added some metal diagonal braces, which were needed to keep the table from collapsing under horizontal forces.

Papier-mache tub
Papier-mache tub

Finally, the props shop was building a hammered copper bath tub out of some good old-fashioned papier-mâché. I jumped on this project in the middle, adding a few layers to what was already started and attaching the large Ethafoam rod along the top. The initial layers were done with an ordinary flour and water paste. The next few layers were done with strips of paper and a product called “Aqua Form” to make it harder and more water-proof. Aqua Form markets itself as a nontoxic water-based polymer which replaces resins for use in laminates; it worked great with the paper, but it also claims it can be used in lieu of resin for fiberglass. I certainly look forward to learning more about it.

Making a Cast Iron Park Bench

First, I wanted to mention that I have redone and updated my online portfolio; it was in desperate need of an overhaul, especially now that I am freelancing again. I went with a free site at CarbonMade.com, because the thought of designing and coding yet another portfolio site was making me tired just thinking about it. I’ve seen some other prop makers who use that site to show their work, and so far, it seems to be working well. Let me know what you think!

Now then, let’s take a look at a bench I made back in 2006 at the Santa Fe Opera. I basically had to build the whole thing from scratch in less than a week, so it’s a bit rough.

Research image
Research image

They wanted a cast iron park bench. The only real requirements were the size, so I had to find my own research image. I showed the above photograph to Randy Lutz, the prop master, and he agreed it was a good bench to duplicate.

Basic layout of sides

I drew a full-scale layout of the side on a piece of paper and spray-glued it to a sheet of plywood. You’ll notice the decorative parts do not match the photograph exactly. What I decided to do was pull some decorative resin castings and carved wood pieces from stock—the opera has quite a good collection of these. I then arranged them to match the research as closely as possible. I traced them and cut away the extra plywood. You’ll see in a bit when I start gluing them on, it’ll all make sense.

Adding the back and seat

I cut out and added some support runners on the insides of the two ends and began to attach the slats which would make up the back and the seat. It needed some extra support, so I ran a rod along the bottom; you can see it in the next photograph.

Adding applied details

Now I began attaching the decorative resin bits. I also used some Ethafoam rod cut in half to make some curved half-round molding. I found a strip of upholstery fringe which added more texture.

Closeup of details
Closeup of details

Here’s a closeup showing some of the resin bits and Ethafoam, as well as some rosettes and even bits of yarn. If you look really close, you can even make out a bit of hot glue design work; though it’s practically invisible here, once the paint goes on, it will add just that extra little bit of texture that will make the whole thing seem like a single piece of cast iron from the audience.

Paint job
Paint job

The paint job is what really helped marry all the different materials together and bring the whole thing to life. The painter of this bench worked as one of the other props carpenters for the beginning of the summer, so none of us knew how good he was at scenic art until he did this bench.

Completed bench
Completed bench

So here it is, ready to go on stage. I even added some round bolt heads running down the middle so it looked like the slats were bolted to the legs. Overall, it was a fun piece for the short time frame I had to build it in.