San-nin Kichisa Kuruwa no Hatsu-gai 1860 by Toyokuni III
Kabuki is a traditional form of theatre in Japan which began around four hundred years ago. It is a highly stylized form of theatre, and its use of props is very formalized and full of tradition. I thought it would be interesting to take a look at how they use and make props in Kabuki. I don’t speak or read Japanese, so while I took care to double and triple-check all the terminology, someone more knowledgeable than I may still find mistakes. Still, I hope you’ll find what follows to be a good overview of props in Kabuki theatre.
Terminology
The word for props is å°é“å…·, or kodÅgu. Kabuki distinguishes between different categories of props just like those of us in English-speaking countries. If you need a refresher, check out my article on the different categories of props, as well as an illustration of these categories. Hand props are called æŒã¡é“å…·, or mochidÅgu. MochidÅgu include accessories, swords and other weapons, fans and armor (or yoroi); basically, everything which is portable. Set props, such as furniture, set dressing and other items left on stage for the duration of the performance, are known as dedÅgu. Large props are named 大é“å…·, or ÅdÅgu. In the US, we would consider ÅdÅgu to be scenery; indeed, the Japanese treat it as a separate department as well, with different technicians involved, so we will not spend any more time on it here.
Props which are used up at each performance (consumables and food) are called kiemono. Props which are broken and destroyed each performance are kowaremono. Vehicles and portable shrines are known as norimono. Rigged and trick props are called shikake, or shikake mono. A great example of a shikake mono is a branding iron with a button-activated electric filament which ignites a match head to produce a puff of smoke. Red paint on the iron also serves to leave a red mark on the actor being branded (McNicol 33). Kabuki also considers several other items to fall under the realm of props, such as animal costumes (nuigurumi), footgear (hakimono) and headgear. Unlike in the US, snow, snowflakes and artificial blossoms (tsuri eda) are responsibility of ÅdÅgu, rather than the prop makers (Scott 155).
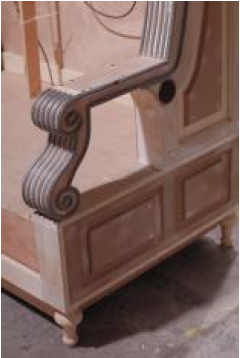
Every once in a while you come across some curved or otherwise intricate detail on a prop you wish to recreate that seems far too intense and labor-intensive to undertake by hand. Take, for instance, the curved ridges running along the front of the arm in the picture below (the parts in grey).
Ethafoam on a decorative arm
Rather than spending two weeks carving these out by hand, I made them out of Ethafoam. Ethafoam is a actually a trademark of DOW Chemical for their spongy, cushiony polyethylene foam used for packaging and wrapping pipes. It’s great for theatre because it also comes in rods, which can be cut in half to make flexible half-round molding.
Ethafoam Rod
Now, this is not an article about the wonders of Ethafoam, but rather the idea of using soft and flexible materials to simulate hard and rigid objects. Ethafoam is just one of the many materials used in theatre for such purposes. You can see another example in the photograph below.
Closeup of cast iron bench
You can also see yarn used at the very bottom. This was a replica of a cast iron bench I made for the Santa Fe Opera a few years back. The research called for a very ornate and detailed-looking bench, and the short time-frame I had to build it meant I had to use a lot of found objects and unconventional materials to pull off the look.
painted cast iron bench
On closer inspection, you can see more materials, such as fabric fringe were used. Once it was artfully painted, the illusion was pretty convincing, especially under stage lighting and seen from a distance. The painting of soft materials like Ethafoam or fabric can be one of the trickiest parts of this process. Either they soak up all the paint or the paint simply will not stick to it. You usually need to coat it with something first, though that can be tricky as well; because the material is flexible, you need to use a coating which also remains flexible, otherwise it may chip and flake away. Brushing on watered-down PVA glue or a coating of something like Jaxsan is usually sufficient.
When you look through older texts dealing with props, you can find numerous examples of using industrial felt, upholstery trim, or any number of other fabrics and soft materials to mimic solid decorations. If you ask prop artisans about it, you will get some mixed responses. Some love the versatility it gives them, especially on a budget. Others abhor it as an amateurish “proppy-prop” trick. In my own opinion, I try to avoid it if I am making a prop that gets handled by an actor. Nothing looks sillier than when an actor picks up a supposedly marble vase only to have the decorative ridges squish under his hands. It also threatens to break the actor out of character even if it is not noticeable by the audience. If, on the other hand, you need to add ornamentation on set dressing or on the parts of a prop that are unlikely to be touched during the performance, than it’s a great trick to use, especially when you are on a tight budget or tight deadline.
If you are a prop artisan, and you find yourself freelancing (or wishing to freelance), you may wonder how to make money, or more appropriately, how much to charge for your work. In my experience, it has been most helpful to calculate the costs of the project as accurately as possible beforehand, including a set rate you charge for your own labor. My favorite tool for this is the computer spreadsheet, whether it’s through Microsoft Office, OpenOffice, or Google Docs (or whatever Macs use).
Materials
The first, and easiest, cost to estimate is the materials you will use. I include every single bit and piece, even if I already have the materials in stock; if I use what I already have, I will still want to replenish my supply. I literally check the website of where I want to order my material, or visit the store, and use those prices to make my calculation. Make sure you include every single piece of material, no matter how minor you think it is. I was recently estimating a chandelier for a Broadway show. I knew I would need electrical cords to run from the light bulbs to the plug, but I figured it would only be a couple of bucks. Luckily, I decided to play it safe and actually estimate it for real. It turned out I would need nearly 700 feet of cord, which came out to $350. That’s not the kind of cost you want to miss in your estimate. Count up all the screws, nuts, bolts and washers. Don’t forget about taxes and delivery charges. The idea here is that you want to present your client with a realistic estimate of what the project will cost. If the project actually comes under budget, that’s great; people love hearing that they will pay less than they thought. If you don’t want to tell them you saved money, that’s great too, because you can pocket the difference. What you want to avoid is a project that costs more than what you are getting paid for. You don’t want to beg the client for another $350 because you forgot to figure in the electrical cord; that is desperate, and the client is in no way obligated to pay you it, because it was part of the original bid and it’s just your own dumb mistake in overlooking it. You can pretty much count on having to eat any costs you neglect to include in your original bid.
If the client changes something about the project, that’s a different story. Feel free to charge extra for changes.
After you add everything up, you want to make sure and add a contingency. Though you may be absolutely sure you have considered every possible material expense, there is sure to be something extra that you need, or the price of something may inexplicably rise between the time you check it out and the time you actually purchase it. For whatever reason, I like to take the total cost of the materials and add 20% to it. This is usually enough to cover the unforeseen costs.
In the commercial world, especially when it is a business rather than a single person making a prop, it is common to also charge a mark-up on materials. If the prop you are building includes a light bulb, you don’t just charge for the cost of the light bulb, you charge them for the light bulb plus a bit of profit. In other words, it is like you are a store that is making money by reselling the light bulb. This is not to be confused with the contingency cost, which should always be factored in. Adding a markup to your materials is entirely up to you; as for myself, if I am doing a job for a non-profit theatre, or a friend, or any sort of client that I already have a relationship with, I do not add a markup. I’m telling you about it just so you are aware that such a thing exists and is utilized by prop-making companies.
Labor
The second half of your equation is figuring out how much time you need to work on the project. This can be very difficult to estimate, as most of us are very bad at predicting how long a task will take. Again, your biggest ally is breaking down the tasks as much as possible to their most basic components and estimating the time those will take. Â While estimating the time it takes to “build a fake dead goat” can lead to wildly inaccurate guesses, predicting how long it will take to “tighten four bolts” is far simpler.
Just like materials, you want to add a contingency to your labor. It is much more likely you will be off in your predictions with labor than materials, as the cost of materials can be researched online or by calling stores. I always err on the side of pessimism when it comes to how long a task will take. Â Though I am not necessarily thinking about absolute worst-case scenarios (if all the power goes out and my tools break, and my car breaks down on the way to the store, and a volcano starts erupting while my wife goes into labor), you do want to consider that not everything goes according to plan. Think back to the last project you undertook, and remember how it took you twenty minutes just to get your workbench cleaned off before you can begin.
Turnaround Time
When you finally figure out how many labor hours it will take you to finish your project, that doesn’t mean you know how long it will take. If you calculate it will take 23 hours to work on the job, that does not mean it will be done tomorrow. First, you have to figure that you do not have every single hour of the day to dedicate to the task. Maybe you have a full-time job, or family obligations. Even if you are single and otherwise unemployed, you still need to leave time for meal breaks and sleep. Further, you need to calculate the time it will take for paint and glue to dry, or other chemicals to cure. If you need to order parts or materials, you need to factor in the time it will take to ship them.
When a project becomes particularly complex, or if you still don’t know how to calculate the time it will take to complete a prop, you may wish to learn about Gantt Charts.
An example Gantt Chart
I’ve never used them for single-person projects, but you may find them handy. Essentially, you break a project into every possible task. If you are building a table, you want to list buying the wood, drawing the table, developing the cut list, measuring the pieces out, cutting all the pieces, gluing the top together, gluing the apron together, attaching the apron to the top, attaching the legs to the table, sanding the table, staining the wood, and sealing the table. Obviously this is a highly-simplified example, but the point is that you need to break apart your project into various tasks and subtasks until it cannot be broken apart any more.
With a Gantt chart, you then put the tasks into order. Some tasks need to wait for other tasks to be completed before they are begun. Others can be started in the middle of other tasks. The Gantt chart sets up the overall timeline of the project, showing which tasks are dependent on others as well as which tasks can be completed independently.
Single-person projects tend to be much more linear, and simpler projects rarely need such analytical breakdown, but the important lesson to take from this is that you want to do as much planning and thought beforehand to ensure you are not promising a complete prop without adequate time to pull it off.
Charging for your labor
I did not mean to get ahead of myself talking about the time it takes to complete a project, but I want to make sure I touch on how much to charge for your labor. Generally, you charge for the time you actually work on a project, as opposed to the time you are waiting for materials to be shipped or for paint to dry. First, let me say something very important:
Your labor as a skilled artisan is very valuable and you should never ever ever ever feel guilty charging for it.
In my experience, labor is well over half the cost of any project. In many cases, it can be the largest cost on a project. This makes sense. If you could get a custom prop that perfectly fulfills all the needs of a client from Wal Mart, than they would have gone to Wal Mart. If, however, they want someone’s face carved into a chair that fits within a specific area of a stage, and is strong enough to support a tap dancer, you should charge them accordingly.
At this point, it seems simple. You’ve already figured out how much time you need to work on the project. You just need to take your hourly rate, multiply it by however many hours you need to work, and that’s the cost of the labor.
But what do you charge for your labor? That’s the rub.
Unfortunately, I can’t even give you an answer. It varies widely with where you are, how skilled you are, what the project is, and even who you are. Obviously you can charge more to a Broadway show in New York City than you can to a children’s theatre in North Carolina. It is incumbent upon yourself to research your circumstances as much as possible. Ask other artisans how much they charge. Find companies in your area that offer similar services and find out how much they pay their artisans. As a freelancer, I’ve worked at a number of theatres, operas, and display companies across the company, so that gives me a baseline idea of what I can make as an artisan.
Mike Lawler conducted a survey of technical theatre earnings in 2006. It’s very informal and fairly incomplete, but it’s the most inclusive survey we have in this area. If we are to assume full-time employment for props people (40 hours a week for 50 weeks a year), the median hourly rate is $10-17.50. Â Obviously, a freelancer can never hope to work full-time, so these numbers serve more as a “you should never charge less than this, ever.” Unfortunately, the best way to determine how much to charge for your work is to see how much work you get each year for several years, figure out how much your living expenses are each year, then charge enough to keep up with your expenses. Obviously, you cannot set your rates based on hindsight; you pretty much have to wing it. Again, I’d like to reiterate that your best bet is to find out how much similar artisans in your area are charging. Your second option is to throw a price out and see if it sticks; if not, you can always lower it if you can afford it.
At this point, I want to mention that you do not need the same rate for every project. I have one rate I charge for “friends”, one for non-profit theatres whose work I find exciting or who have projects I really want to do, and one for commercial people. It’s not for purely selfish reasons; there are actual differences between working for someone you already have a relationship with versus working for someone new where there is a learning curve in the communications.
How much is too much? I’ve seen people who can charge up to $45 an hour for non-union theater work. You have to imagine that film and corporate work can command even higher prices. In my experience, whenever you feel you are charging too much, there is someone out there charging even more.
Putting it Together
At this point, you have your materials cost and your labor cost, as well as contingencies for each one. In addition, you have the turnaround time for how long it will take you to complete your project. If you added a markup to your materials, be sure to include that as well.
If you wish to operate as a business, rather than just as a person making props, you should think about adding a profit margin. In other words, take the total cost of your materials (with markup) and labor (both with contingencies), and multiply it by some profit margin. You may wish to get one and a half times what it costs to complete the project, though it is not unheard of to charge four times what it will actually cost.
Now that you’ve come this far, do not forget to include the cost of moving the prop from your shop to the theatre (or wherever it is going). It would really suck to come up with a sudden $85 charge for UPS to deliver your prop.
As an example, I was recently bidding out a project. I added up the price of all the materials. I used the best materials in order to minimize my own labor time, so it was fairly pricey. I included a contingency for all my materials. I calculated how long it would take me to complete all the tasks. I made sure I was being very pessimistic. I factored in my contingency. I added a markup to all my materials. I decided I would add a profit margin to the whole project. They asked how much more it would cost to get it completed by an earlier time. I called the various vendors to see if I could rush ship the materials and how much more that would cost. I recalculated my labor to include “overtime” and “over night” labor in order to get the project done. In short, it ended up sounding like an extremely expensive endeavor on their part.
At the end of the day, they went with a professional scene shop. Not  because they were cheaper; in fact, I was cheaper. But my price was close enough to theirs, and they were already building the rest of the scenery, so the producers decided to pay a higher price with the assumption there would be greater consistency in the final product.
In other words, even when I felt I was being my most expensive, the client still went with a shop that was even more expensive.
Keep that in mind when you think you’re skilled labor isn’t worth that much.
Careers in Technical Theater, by Mike Lawler, occupies a somewhat unique position in a bookshelf filled with theatre books. Rather than describe how to do the various jobs one can have backstage, it describes what those jobs are. Perhaps more importantly, it illustrates how one pursues those jobs and what one can expect with those jobs, both in terms of duty and in terms of lifestyle and compensation.
Before I focus on the chapter in props, I’d like to point out the value of the rest of the book. It is very helpful to know what all the other people in the theatre are doing, as you’ll likely deal with most of them at least once in your career. If you don’t know the difference between a stage manager and a production manager, you’ll likely waste your time asking questions of the wrong person. Likewise, for those just starting out in their careers, it can be useful to be introduced to the range of jobs that are possible backstage. Perhaps you’re more suited to be a scenic artist than a props person, but if your school didn’t have a good scenic arts program, you may have been unaware that they are a regular position in many theaters.
The chapter on props spends the bulk of its time in an interview with Jim Guy, props director of the Milwaukee Rep (and currently the President of S*P*A*M). In a way, Guy runs the idealized prop shop, and other theatres will have an adapted or stripped-down version of that shop. In that respect, it’s a good example of what one can expect in a career in props, if one is looking for full-time employment. It doesn’t touch much on a freelance career in props. This type of working career is probably more common in larger urban areas which can support several theatres, though it all depends on how far one is willing to travel. A certain number of artisans have a ” journeyman” type of career, where they travel the country spending a few months or a whole season at various companies. This happens because a lot of theatres close down over the summer, while another large group only operates during the summer. Neither can afford a full-time staff for the full year, but an artisan can make a full-time salary by always moving where the work is until a full-time position opens up somewhere.
This book was published in 2007, making it one of the more up-to-date guides to careers in technical theater. Though we had a slight case of the “major-global-economic-meltdown”s, we’ve recovered a bit since then. Theatre careers are somewhat recession-proof, in that jobs are scarce and pay is meager even in the best of times.
The information on pay is compelling, but woefully incomplete; it’s not the fault of Mr. Lawler, rather it’s that only 35 props people responded to his survey. Adding just Broadway and off-Broadway people, who are not represented here, can quickly double the entire survey. We also have no information from opera, touring shows, or the academic world, all of which are major employers of props people. Finally, we have no indication of whether any of the respondents are in unions or not. I would also like to mention that props people, particularly artisans, have an easier time freelancing and doing side gigs in other fields besides theatre. Building props for film, television, events, or retail displays uses nearly the same skills as building props for theatre, and many props artisans take advantage of this.
That being said, the information that Lawler does provide is highly useful, giving at least an indication of what an average salary for a props person is in the United States. Overall, the book does a good job of what it sets out to do, which is providing a realistic, utilitarian and concise introduction to actually working in technical theatre.
Last year, I presented a paper called Devising a Mental Process for Approaching a Prop. In it, I theorized about a method to discover which properties a prop required in order to better determine how to construct it. In this article, I will delve into how to get the shape you need.
When thinking about the construction of a prop, you can consider two things: the shape and the surface treatment. These are not mutually exclusive. Certain materials influence certain surface treatments, through physical or even chemical reactions, or through varying levels of translucency which reveal some of the material beneath. For now, let us focus solely on the shape.
Making a three-dimensional object can be done in a number of ways. You can add material together to create your shape. You can subtract material to reveal your shape. You can also bend (or twist or stretch or somehow manipulate) your material into a new shape. Carpentry can be considered an additive process. You glue or nail or screw pieces of wood together to create a piece of furniture. Carving comes to mind when you think of a subtractive process. You remove smaller pieces from a larger chunk of foam or another material until it becomes the shape you want. Many processes are actually a combination of these two processes. Returning to our carpentry example, before you can add your various pieces together, you need to subtract material from the individual pieces to make them the correct width and length and give them the grooves and tenons and dovetails necessary for joinery.
A fourth way to create shapes is through the hardening of liquids (or semi-liquids or pastes) into a solid. This can be through drying, such as joint compound, Sculpt or Coat, or clay et al; through a chemical reaction, such as resin or other mold-making and casting compounds; or by heating and cooling, such as metal, wax or Friendly plastic.
The prop-maker can use these four meta-techniques to replicate nearly anything. Besides choosing the technique, one must choose the material. There are several categories of raw materials one can choose from. Wood (lumber, plywood, MDF, chip-board), metal (steel, aluminum, brass, tin), plastic (styrene, PVC, ABS, acrylic, Plexiglas, Stryrofoam, beaded foam), textiles (fabric, buckram, carbon fiber), ceramic (clay, plastiline). There are of course, several other categories and far too many materials to name, but you’ll find yourself returning to many of the same ones for prop-making. As I mentioned above, many materials can be shaped by more than one of the four categories I’ve described.
In addition to raw materials, you can use any number of found objects and parts. Model-makers use the term “kit-bashing”, which means taking pieces from commercially-available models, such as the tires from a car or the fuel yank from a jet, to use in a scratch-built model as a way to save time in creating complex shapes. For the prop-maker, the world is their kit to bash.
This is not meant to be an exhaustive list, nor is it meant to be a series to be memorized. As I hinted above, the boundaries between the meta-techniques become nebulous when you get into specifics. Rather, it is intended as a guide to consider when you are figuring out what materials and techniques to build your prop out of. For example, building a table with a straight and flat top and straight legs is far easier to make by adding together straight and flat pieces of wood. Making a hard shell, like armor, is easier by bending a sheet of a material like Wonderflex, which can hold its new shape when cooled.
Making and finding props for theatre, film, and hobbies